- Risks of allowing apps through Windows Defender Firewall
- How to allow apps through firewall on Windows 10
- Allow apps through firewall on Windows 10
- Windows Firewall: блокировка доступа в Интернет, исходящего и входящего трафика
- Создание правила брандмауэра Windows
- Adjust Windows 10 Firewall Rules & Settings
- Allow Program through Firewall
- Advanced Firewall Settings
Risks of allowing apps through Windows Defender Firewall
There are two ways to allow an app through Windows Defender Firewall. Both of them are risky:
Add an app to the list of allowed apps (less risky).
Open a port (more risky).
When you open a port in Windows Defender Firewall you allow traffic into or out of your device, as though you drilled a hole in the firewall. This makes your device less secure and might create opportunities for hackers or malware to use one of those openings to get to your files or use your device to spread malware to other devices.
Generally, it’s safer to add an app to the list of allowed apps than to open a port. A port stays open until you close it, but an allowed app opens the «hole» only when needed.
To help reduce your security risk:
Only allow an app or open a port when you really need to, and follow the steps to remove apps from the list of allowed apps or close ports that you no longer need.
Never allow an app that you don’t recognize to communicate through the firewall.
Select the Start menu, type Allow an app through Windows Firewall, and select it from the list of results.
Select Change settings. You might be asked for an administrator password or to confirm your choice.
To add an app, select the check box next to the app, or select Allow another app and enter the path for the app.
To remove an app, clear the check box next to the app, and then select OK.
Select the Start menu, type Windows Defender Firewall, and select it from the list of results.
Select Advanced settings on the side navigation menu. You might be asked for an administrator password or to confirm your choice.
Select Inbound Rules.
To open a port, select New Rule and complete the instructions.
To close a port, select the rule you want to disable, and then under Actions, select Disable Rule.
How to allow apps through firewall on Windows 10
Sometimes the firewall will block trusted apps from accessing the internet, but on Windows 10 is super easy to change the settings to manually allow apps through the firewall — Here’s how to perform the task.

Windows 10 comes with several security features to keep your device and data protected against unauthorized access, malware, and other attacks, including a powerful built-in firewall, known as Windows Defender Firewall.
Although the Windows Defender Firewall does a pretty good job managing which applications and features are allowed to connect through the network, sometimes you may need to allow or deny an apps manually.
In this guide, you’ll learn the steps to allow or deny apps access through the firewall on Windows 10.
Allow apps through firewall on Windows 10
To allow an app through the Windows 10 firewall, use these steps:
Open Windows Security.
Click on Firewall & network protection.
Click the Allow an app through firewall link.
 Windows Defender Security Center firewall settings
Click the Change settings button.
Check the app or feature you want to allow through the firewall on Windows 10.
 Allow apps through firewall on WIndows 10
Check on which type of networks an app can access the network:
- Private — Allows the app access to the network at home or work.
- Public — Allows the app access to the network at a public place, such as on a coffee shop.
Click the OK button.
Once you complete the steps, the app will now access the network freely.
If you want to block an app through the firewall, you can follow the same instructions, but on step No. 5, make sure to clear the check mark for the app or feature you want to deny access to the network.
This guide focuses to configure the Windows 10 firewall, but in the case that you have another security solution, make sure to check your vendor support website for specific instructions.
We may earn commission for purchases using our links to help keep offering the free content. Privacy policy info.
All content on this site is provided with no warranties, express or implied. Use any information at your own risk. Always backup of your device and files before making any changes. Privacy policy info.
Windows Firewall: блокировка доступа в Интернет, исходящего и входящего трафика
В статье мы рассмотрим, как заблокировать входящий или исходящий Интернет трафик любому приложению с помощью Windows Firewall . Современную жизнь трудно представить без соединения с интернетом. Все мобильные телефоны, планшеты, компьютера и ноутбуки постоянно взаимодействуют между собой в рамках локальной сети или получают, и отправляют информацию в Интернет. Как бы мы не зависли от сети, в определенных случаях необходимо заблокировать доступ в Интернет некоторым приложениям .
Для чего это может понадобится? Блокировка входящего трафика позволяет отключить не нужные обновления ПО, назойливую рекламу или экономить трафик. Блокировка исходящего – может предотвратить распространение конфиденциальной информации. Возможно вы захотите ограничить вашего ребенка от просмотра нежелательного контента или чрезмерного проведения времени за онлайн играми. В статье мы рассмотрим, как заблокировать входящий или исходящий трафик любому приложению с помощью Windows Firewall. Это наиболее простой и одновременно гибкий способ блокировки доступа.
Мы рассмотрим работу фаервола в Windows 10, однако эта инструкция будет работать и для пользователей Windows 8 или 7.
Создание правила брандмауэра Windows
Для начала необходимо запустить расширенный интерфейс межсетевого экрана. Для этого перейдите в панель управления, выберите режим отображения крупные значки и кликните «Брандмауэр Windows» . Панель управления можно вызвать, кликнув правой кнопкой мышки по кнопке Пуск и выбрав нужный пункт меню, или нажать Пуск и затем ввести Панель управления . В окне брандмауэра нужно кликнуть на Дополнительные параметры .
Расширенный интерфейс брандмауэра содержит множество настроек. Вносите все изменения максимально внимательно, в точности следуя этой инструкции. Не правильная настройка приведет к множеству проблем в работе компьютера.
В левой навигационной панели выберите «Правила для исходящего подключения» . Система отобразит все созданные ранее правила, не удивляйтесь, что список заполнен десятками различных записей, созданных Windows.
В правой панели кликните на «Создать правило» .
По умолчанию предлагается создать правило для программы, подтвердите выбор нажав кнопку Далее .
На следующем шаге необходимо указать путь к исполняемому файлу программы для блокировки. На примере браузера Opera мы проверим блокировку подключения к интернету. Вы можете как внести полный путь к exe файлу вручную, так и воспользоваться кнопкой Обзор .
В последнем случае система автоматически заменит часть пути файла на переменную окружения. В нашем случае файл находится по адресу C:\Program Files\Opera\45.0.0.255225846\opera.exe , но брандмауэр автоматически заменяет путь на %ProgramFiles%\Opera\45.0.0.255225846\opera.exe .
Важно : По ряду причин переменные окружения могут неправильно определяться системой. Если вы столкнулись с тем, что созданное правило блокировки не работает – отредактируйте правило, вставив полный путь к файлу в поле ввод вручную.
Тоже важно : В большинстве случаев достаточно заблокировать исполняемый файл программы, для ограничения доступа к интернету. Но этот подход может не сработать для онлайн игр. К примеру, если вы хотите заблокировать возможность подключения к игровым серверам Minecraft, блокировать нужно приложение Java (исполняемый файл Javaw.exe). Так как игра подключается к сети Интернет через Java.
Подтвердите выбор файла нажав кнопку Далее .
На следующем шаге подтвердите выбор «Блокировать подключение» нажав кнопку Далее .
Adjust Windows 10 Firewall Rules & Settings
Configure to block outbound connections, create public and private networks
In Windows 10, the Windows Firewall hasn’t changed very much since Vista. Overall, it’s pretty much the same. Inbound connections to programs are blocked unless they are on the allowed list. Outbound connections are not blocked if they do not match a rule. You also have a Public and Private network profile for the firewall and can control exactly which program can communicate on the private network as opposed to the Internet.
In this article, I’ll go through the various options and settings for the Windows 10 firewall and talk about how you can adjust them to suit your needs. Even though outbound connections are not blocked by default, you can configure your own firewall rules in Windows 10 to block outbound connections. This can be useful if you want to block a specific program from being able to communicate with the Internet, even if the program gets installed without your consent.
To get started, let’s talk about how to bring up the firewall settings in Windows 10. You can either open the Control Panel and open the firewall from there or you can click on Start and type in the word firewall.
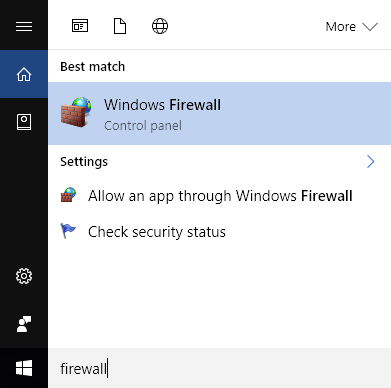
This will bring up the Windows Firewall dialog where you can control all of the various settings for the firewall.
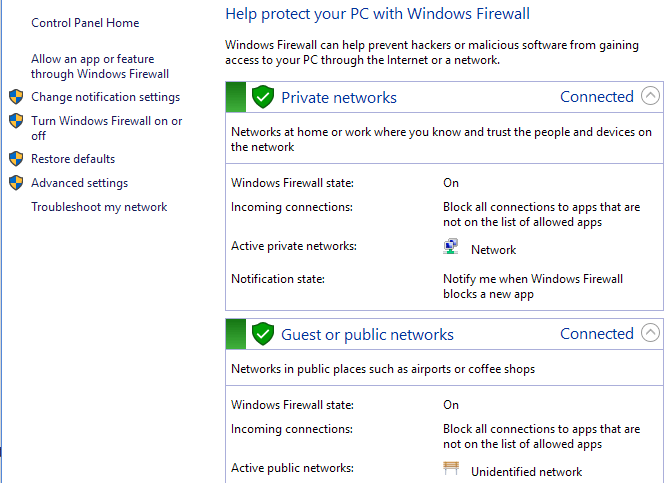
On the right hand side, it splits the view into Private networks and Guest or public networks. Your home wireless network should show up under Private networks, but if it doesn’t, then you will probably have to manually tell it that the network is a Home network and not a Public network.
Allow Program through Firewall
The main reason most people will ever mess with the firewall is to allow a program to work through the firewall. Normally, this is automatically done by the program itself, but in some cases, you have to do it manually. You can do this by clicking on Allow an app or feature through Windows Firewall.
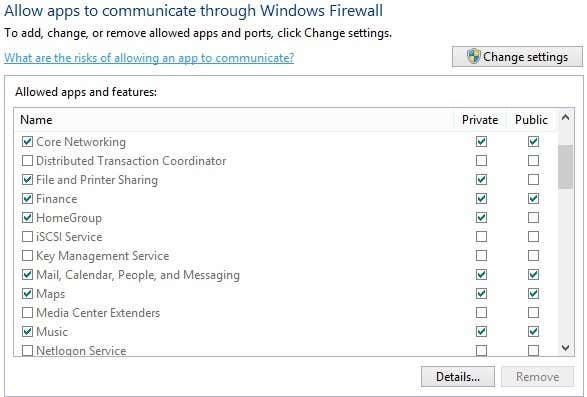
As you can see, for each program or feature of Windows, you can choose to allow incoming connections on the private and public networks separately. This separation is handy for things like File and Printer Sharing and HomeGroups since we don’t want someone from public WiFi to be able to connect to a network share or a local HomeGroup. To allow an app, simply find it in the list and then check the box for which type of network you want to allow incoming connections on.
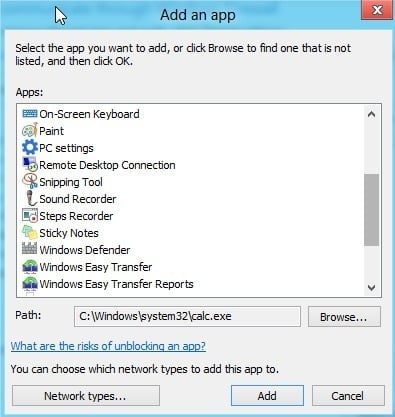
If the app is not listed, you can click on the Allow another app button and pick from a list or click the Browse button to find your program specifically. If the button is greyed out, click on Change settings first.
If you go back to the Firewall home dialog, there is another link on the left-hand pane called Turn Windows Firewall On or Off. If you click on that, you’ll get a set of options like shown below:
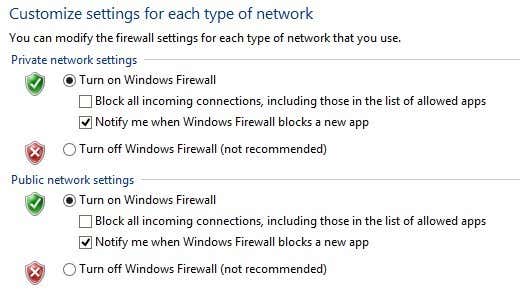
You can turn off the firewall in Windows 10 entirely, but that will allow everything through the firewall. You can also block all incoming connections to your computer, even for allowed apps, which is useful in certain situations. For example, if you are in a public setting like a hotel or airport and you want to be extra safe while connected to the network. You can still browse the Internet using a web browser, but no program will be able to create an incoming connection from another computer on the local network or from a server on the Internet.
Advanced Firewall Settings
The real fun, though, is if you want to mess around with the advanced firewall settings. This is obviously not for the faint of heart, but it’s also not a big deal because you can click the Restore Defaults link and set everything back to the way it was when you first installed Windows 10. To get to the advanced settings, click the Advanced settings link in the left-hand pane on the firewall main dialog. This will bring up the Windows Firewall with Advanced Security window:
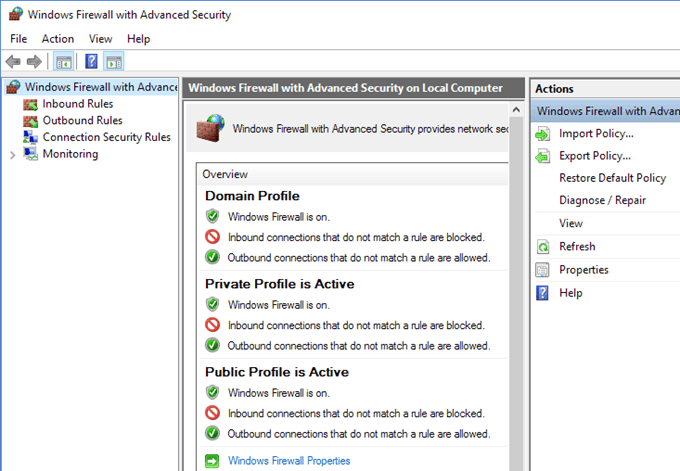
On the main screen, it gives you a quick overview of your firewall settings for the domain, private networks, and public networks. If your computer is not joined to a domain, you don’t have to worry about that profile. You can quickly see how inbound and outbound connections are managed by the firewall. By default, all outbound connections are allowed. If you want to block an outbound connection, click on Outbound Rules in the left-hand column.
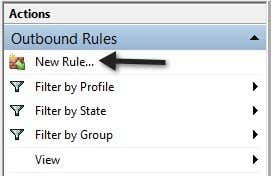
Go ahead and click on New Rule and then you’ll get a dialog asking what type of rule.
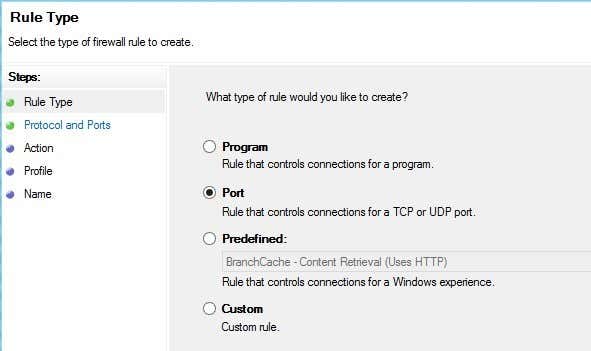
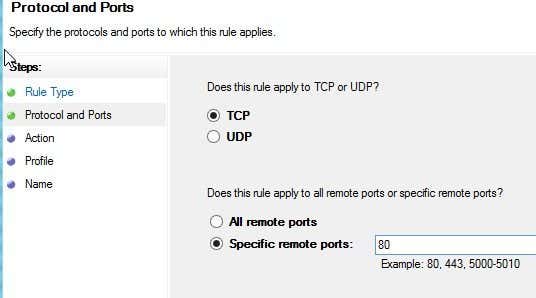
I chose port because I want to block all outgoing connections on port 80, the HTTP port used by every web browser. In theory, this should block all Internet access in IE, Edge, Chrome and other browsers. Click Next, select TCP and type in the port number.
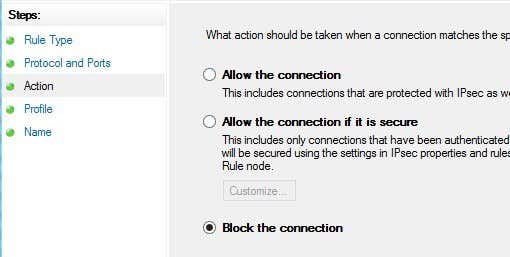
Click Next and choose the action you want to perform, in my case, Block the connection.
Finally, choose which profiles you want the rule to apply too. It’s probably a good idea to just pick all the profiles.

Now just give it a name and that’s it! When I open Chrome to visit any webpage, I get the following error message:
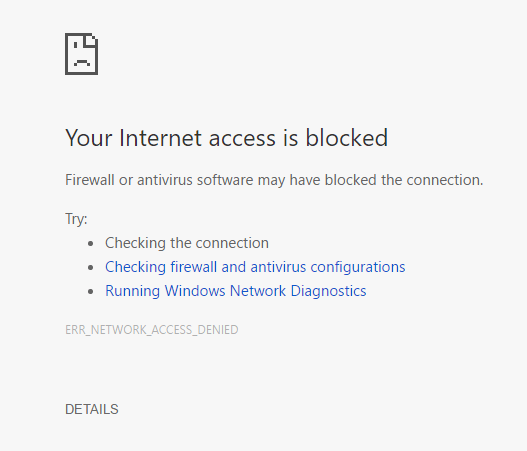
Sweet! So I just created a new outbound connection rule in Windows 10 firewall that blocks port 80 and therefore prevents anyone from browsing the Internet! You can create your own custom firewall rules in Windows 10 following the steps I showed above. Overall, that’s pretty much all there is to the firewall. You can do more advanced stuff, but I wanted to give a decent overview that even non-technical people can try to follow.
If you have any questions about configuring the firewall in Windows 10, post a comment here and we’ll try to help. Enjoy!
Founder of Online Tech Tips and managing editor. He began blogging in 2007 and quit his job in 2010 to blog full-time. He has over 15 years of industry experience in IT and holds several technical certifications. Read Aseem’s Full Bio


