- FTP Firewall Support
- Overview
- Compatibility
- Setup
- Windows Server 2012 or Windows Server 2012 R2
- Windows 8 or Windows 8.1
- Windows Server 2008 R2
- Windows 7
- Windows Server 2008 or Windows Vista
- How To
- How to configure the global firewall settings for the FTP service
- Configuration
- Attributes
- Child Elements
- Configuration Sample
- Sample Code
- Configuring FTP Firewall Settings in IIS 7
- Compatibility
- Introduction
- Prerequisites
- Use the FTP Site Wizard to Create an FTP Site With Anonymous Authentication
- Summary
- Step 1: Configure the Passive Port Range for the FTP Service
- Notes
- Step 2: Configure the external IPv4 Address for a Specific FTP Site
- Summary
- (Optional) Step 3: Configure Windows Firewall Settings
- Using Windows Firewall with non-secure FTP traffic
- Using Windows Firewall with secure FTP over SSL (FTPS) traffic
- More Information about Working with Firewalls
FTP Firewall Support
Overview
The element is used to configure the port range that the FTP service will use for data channel activity when you use the FTP PASV command to negotiate passive connections, which contains IP address and port of the server.
When passive connections are negotiated using the FTP PASV command, the FTP server sends a response which contains IP address and port of the server. By specifying the lowDataChannelPort and highDataChannelPort attributes, you can direct FTP clients to communicate with your firewall, which should route the client traffic to your FTP server.
The valid range for TCP/IP ports is 1025 through 65535. (Ports from 1 through 1024 are reserved for use by system services.) You can enter a special port range of «0-0» to configure the FTP server to use the Windows TCP/IP ephemeral port range. In early versions of Windows, the TCP/IP ephemeral port range was set to use ports 1025 through 5000. Starting with Windows Vista and Windows Server 2008, the TCP/IP ephemeral port range has been changed to 49152 through 65535. For more information about the ephemeral port range, see the following article in the Microsoft Knowledge Base:
You can use the to configure the per-site external IP address for your firewall; this allows you to route the firewall traffic for each site through a different firewall.
Compatibility
| Version | Notes |
|---|---|
| IIS 10.0 | The element was not modified in IIS 10.0. |
| IIS 8.5 | The element was not modified in IIS 8.5. |
| IIS 8.0 | The element was not modified in IIS 8.0. |
| IIS 7.5 | The element of the element ships as a feature of IIS 7.5. |
| IIS 7.0 | The element of the element was introduced in FTP 7.0, which was a separate download for IIS 7.0. |
| IIS 6.0 | The element replaces the IIS 6.0 MSFTPSVC/PassivePortRange metabase property. |
The FTP 7.0 and FTP 7.5 services shipped out-of-band for IIS 7.0, which required downloading and installing the modules from the following URL:
With Windows 7 and Windows Server 2008 R2, the FTP 7.5 service ships as a feature for IIS 7.5, so downloading the FTP service is no longer necessary.
Setup
To support FTP publishing for your Web server, you must install the FTP service. To do so, use the following steps.
Windows Server 2012 or Windows Server 2012 R2
On the taskbar, click Server Manager.
In Server Manager, click the Manage menu, and then click Add Roles and Features.
In the Add Roles and Features wizard, click Next. Select the installation type and click Next. Select the destination server and click Next.
On the Server Roles page, expand Web Server (IIS), and then select FTP Server.
To support ASP.Membership authentication or IIS Manager authentication for the FTP service, you will need to select FTP Extensibility, in addition to FTP Service.  .
.
Click Next, and then on the Select features page, click Next again.
On the Confirm installation selections page, click Install.
On the Results page, click Close.
Windows 8 or Windows 8.1
On the Start screen, move the pointer all the way to the lower left corner, right-click the Start button, and then click Control Panel.
In Control Panel, click Programs and Features, and then click Turn Windows features on or off.
Expand Internet Information Services, and then select FTP Server.
To support ASP.Membership authentication or IIS Manager authentication for the FTP service, you will also need to select FTP Extensibility. 
Click OK.
Click Close.
Windows Server 2008 R2
On the taskbar, click Start, point to Administrative Tools, and then click Server Manager.
In the Server Manager hierarchy pane, expand Roles, and then click Web Server (IIS).
In the Web Server (IIS) pane, scroll to the Role Services section, and then click Add Role Services.
On the Select Role Services page of the Add Role Services Wizard, expand FTP Server.
Select FTP Service.
To support ASP.Membership authentication or IIS Manager authentication for the FTP service, you will also need to select FTP Extensibility. 
Click Next.
On the Confirm Installation Selections page, click Install.
On the Results page, click Close.
Windows 7
On the taskbar, click Start, and then click Control Panel.
In Control Panel, click Programs and Features, and then click Turn Windows Features on or off.
Expand Internet Information Services, and then FTP Server.
Select FTP Service.
To support ASP.Membership authentication or IIS Manager authentication for the FTP service, you will also need to select FTP Extensibility. 
Click OK.
Windows Server 2008 or Windows Vista
Download the installation package from the following URL:
Follow the instructions in the following walkthrough to install the FTP service:
How To
How to configure the global firewall settings for the FTP service
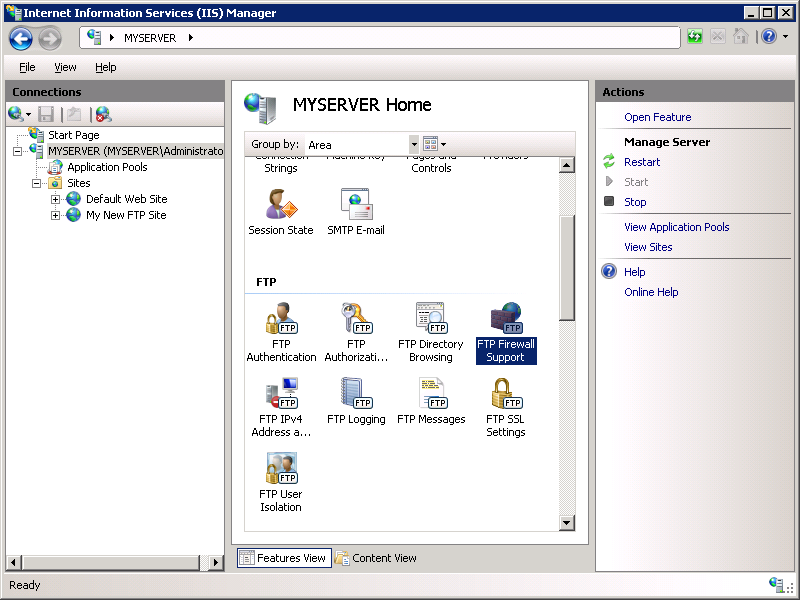
Open Internet Information Services (IIS) Manager:
If you are using Windows Server 2012 or Windows Server 2012 R2:
- On the taskbar, click Server Manager, click Tools, and then click Internet Information Services (IIS) Manager.
If you are using Windows 8 or Windows 8.1:
- Hold down the Windows key, press the letter X, and then click Control Panel.
- Click Administrative Tools, and then double-click Internet Information Services (IIS) Manager.
If you are using Windows Server 2008 or Windows Server 2008 R2:
- On the taskbar, click Start, point to Administrative Tools, and then click Internet Information Services (IIS) Manager.
If you are using Windows Vista or Windows 7:
- On the taskbar, click Start, and then click Control Panel.
- Double-click Administrative Tools, and then double-click Internet Information Services (IIS) Manager.
In the Connections pane, click the server name.
In the Home pane, double-click the FTP Firewall Support feature.
In the Data Channel Port Range box, use one of the following options to enter a port range for passive data channel connections:
- Use [low port]-[high port] for a port range, where each port must be between 1025 and 65535. For example, 5000-6000.
- Use «0-0» to configure the FTP server to use the Windows TCP/IP ephemeral port range.


In the External IP Address of Firewall box, type the IPv4 address of the Internet-facing network adapter of your firewall.
In the Actions pane, click Apply.
For additional information about how to configure the firewall settings for the FTP service, see the following topic on the Microsoft IIS.net Web site:
Configuration
The element is configured at the global level in ApplicationHost.config.
Attributes
| Attribute | Description |
|---|---|
| lowDataChannelPort | Optional int attribute. |
Specifies the lowest port for data channel activity for passive data connections.
The default value is 0 .
Specifies the lowest port for data channel activity for passive data connections.
The default value is 0 .
Child Elements
Configuration Sample
The following sample illustrates several configuration settings in the global element for a server. More specifically, the settings in this example demonstrate how to:
Enable FTP credential caching and specify a time-out of 10 minutes (600 seconds.)
Configure the low port as 5000 and the high port as 6000 for data channel communications.
Enable logging and specify that log files will be kept per-site, and that log files will be rotated daily by UTC time.
Specify a custom FTP provider and specify a custom parameter for that provider.
Specify global IP restrictions that allow FTP access from local host and deny access to the 169.254.0.0 to 169.254.255.255 block of IP addresses.
Configure request filtering with the following options:
- Block FTP access to the _vti_bin virtual directory, which is used with the FrontPage Server Extensions.
- Block several file types that are associated with executables.
- Specify 100MB as the maximum file size.
Add a global authorization rule that allows access for the administrators group.
Specify that domain name syntax can be used for FTP virtual host names.
Sample Code
The following examples configure the FTP service to use the port range of 5000 to 6000 for data channel activity when passive connections are used.
Configuring FTP Firewall Settings in IIS 7
Compatibility
| Version | Notes |
|---|---|
| IIS 7.5 | The FTP 7.5 service ships as a feature for IIS 7.5 in Windows 7 and Windows Server 2008 R2. |
| IIS 7.0 | The FTP 7.0 and FTP 7.5 services were shipped out-of-band for IIS 7.0, which required downloading and installing the service from the following URL: https://www.iis.net/download/FTP. |
Introduction
Microsoft has created a new FTP service that has been completely rewritten for Windows ServerВ® 2008. This FTP service incorporates many new features that enable web authors to publish content better than before, and offers web administrators more security and deployment options.
This document walks you through configuring the firewall settings for the new FTP server.
Prerequisites
The following items are required to be installed to complete the procedures in this article:
IIS 7 must be installed on your Windows 2008 Server, and Internet Information Services (IIS) Manager must be installed.
The new FTP service. You can download and install the FTP service from the https://www.iis.net/ web site using one of the following links:
You must create a root folder for FTP publishing:
Create a folder at %SystemDrive%\inetpub\ftproot
Set the permissions to allow anonymous access:
Open a command prompt.
Type the following command:
Close the command prompt.
Important Notes:
The settings listed in this walkthrough specify %SystemDrive%\inetpub\ftproot as the path to your FTP site. You are not required to use this path; however, if you change the location for your site you will have to change the site-related paths that are used throughout this walkthrough.
Once you have configured your firewall settings for the FTP service, you must configure your firewall software or hardware to allow connections through the firewall to your FTP server.
- If you are using the built-in Windows Firewall, see the (Optional) Step 3: Configure Windows Firewall Settings section of this walkthrough.
- If you are using a different firewall, please consult the documentation that was provided with your firewall software or hardware.
Use the FTP Site Wizard to Create an FTP Site With Anonymous Authentication
In this section you, create a new FTP site that can be opened for Read-only access by anonymous users. To do so, use the following steps:
Go to IIS 7 Manager. In the Connections pane, click the Sites node in the tree.
Right-click the Sites node in the tree and click Add FTP Site, or click Add FTP Site in the Actions pane.

When the Add FTP Site wizard appears:
Enter «My New FTP Site» in the FTP site name box, then navigate to the %SystemDrive%\inetpub\ftproot folder that you created in the Prerequisites section.
If you choose to type in the path to your content folder, you can use environment variables in your paths.
Click Next.

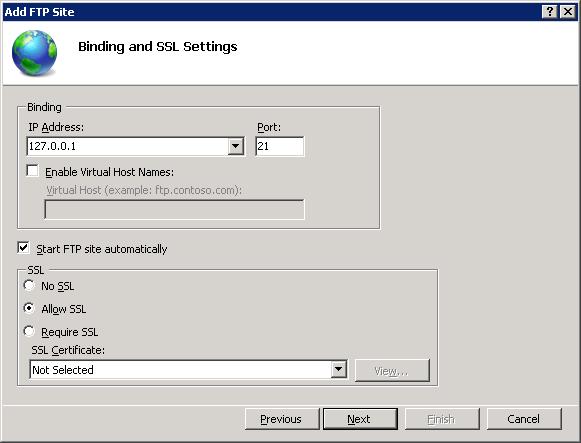
On the next page of the wizard:
Choose an IP address for your FTP site from the IP Address drop-down, or choose to accept the default selection of «All Unassigned.» Because you will be accessing this FTP site remotely, you want to make sure that you do not restrict access to the local server and enter the local loopback IP address for your computer by typing «127.0.0.1» in the IP Address box.
You would normally enter the TCP/IP port for the FTP site in the Port box. For this walk-through, you will choose to accept the default port of 21.
For this walkthrough, you do not use a host name, so make sure that the Virtual Host box is blank.
Make sure that the Certificates drop-down is set to «Not Selected» and that the Allow SSL option is selected.
Click Next.
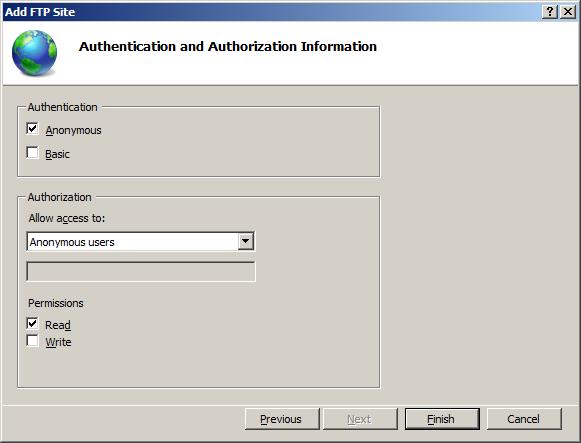
On the next page of the wizard:
Select Anonymous for the Authentication settings.
For the Authorization settings, choose «Anonymous users» from the Allow access to drop-down. Select Read for the Permissions option.
Click Finish.
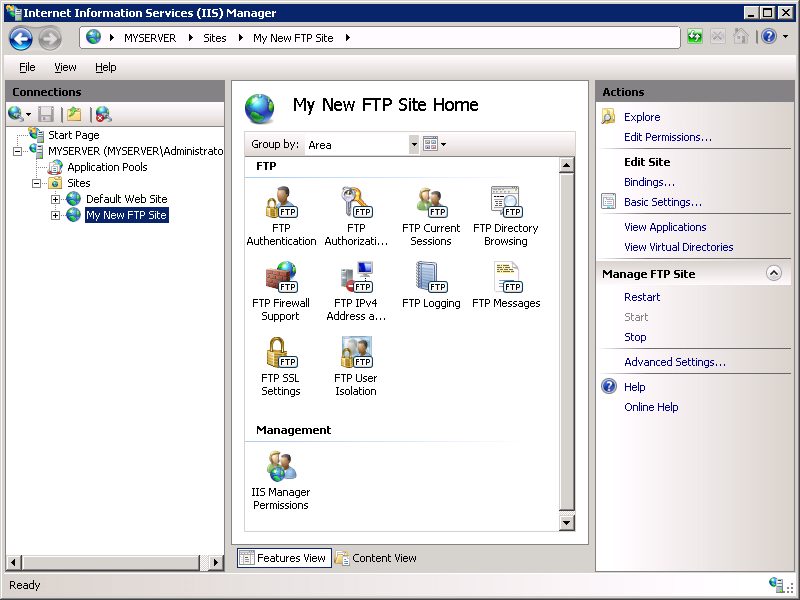
Go to IIS 7 Manager. Click the node for the FTP site that you created. The icons for all of the FTP features display.
Summary
To recap the items that you completed in this step:
- You created a new FTP site named «My New FTP Site», with the site’s content root at %SystemDrive%\inetpub\ftproot .
- You bound the FTP site to the local loopback address for your computer on port 21, choosing not to use Secure Sockets Layer (SSL) for the FTP site.
- You created a default rule for the FTP site to allow anonymous users «Read» access to the files.
Step 1: Configure the Passive Port Range for the FTP Service
In this section, you configure the server-level port range for passive connections to the FTP service. Use the following steps:
Go to IIS 7 Manager. In the Connections pane, click the server-level node in the tree.
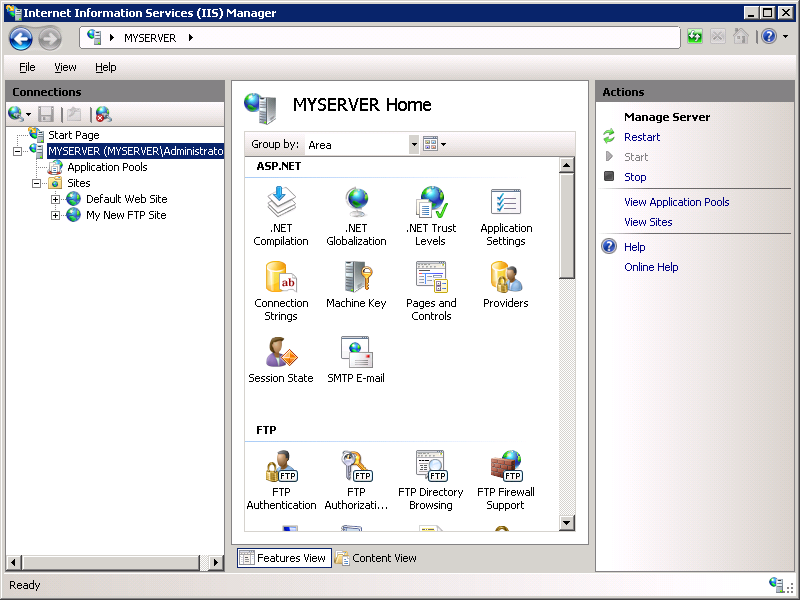
Double-click the FTP Firewall Support icon in the list of features.
Enter a range of values for the Data Channel Port Range.

Once you have entered the port range for your FTP service, click Apply in the Actions pane to save your configuration settings.
Notes
The valid range for ports is 1024 through 65535. (Ports from 1 through 1023 are reserved for use by system services.)
You can enter a special port range of «0-0» to configure the FTP server to use the Windows TCP/IP dynamic port range.
For additional information, please see the following Microsoft Knowledge Base articles:
This port range will need to be added to the allowed settings for your firewall server.
Step 2: Configure the external IPv4 Address for a Specific FTP Site
In this section, you configure the external IPv4 address for the specific FTP site that you created earlier. Use the following steps:
Go to IIS 7 Manager. In the Connections pane, click the FTP site that you created earlier in the tree, Double-click the FTP Firewall Support icon in the list of features.

Enter the IPv4 address of the external-facing address of your firewall server for the External IP Address of Firewall setting.
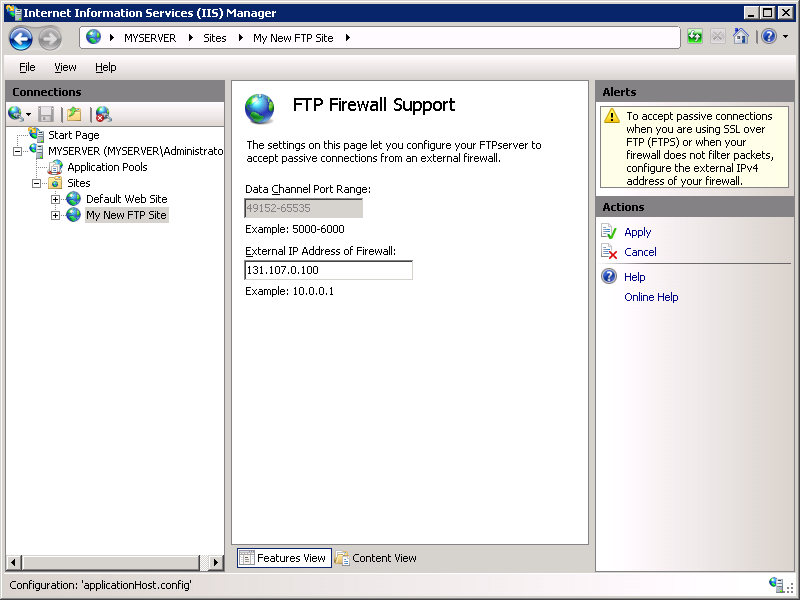
Once you have entered the external IPv4 address for your firewall server, click Apply in the Actions pane to save your configuration settings.
Summary
To recap the items that you completed in this step:
- You configured the passive port range for your FTP service.
- You configured the external IPv4 address for a specific FTP site.
(Optional) Step 3: Configure Windows Firewall Settings
Windows Server 2008 contains a built-in firewall service to help secure your server from network threats. If you choose to use the built-in Windows Firewall, you will need to configure your settings so that FTP traffic can pass through the firewall.
There are a few different configurations to consider when using the FTP service with the Windows Firewall — whether you will use active or passive FTP connections, and whether you will use unencrypted FTP or use FTP over SSL (FTPS). Each of these configurations are described below.
You will need to make sure that you follow the steps in this section walkthrough while logged in as an administrator. This can be accomplished by one of the following methods:
- Logging in to your server using the actual account named «Administrator».
- Logging on using an account with administrator privileges and opening a command-prompt by right-clicking the Command Prompt menu item that is located in the Accessories menu for Windows programs and selecting «Run as administrator».
One of the above steps is required because the User Account Control (UAC) security component in the Windows Vista and Windows Server 2008 operating systems prevents administrator access to your firewall settings. For more information about UAC, please see the following documentation:
While Windows Firewall can be configured using the Windows Firewall applet in the Windows Control Panel, that utility does not have the required features to enable all of the features for FTP. The Windows Firewall with Advanced Security utility that is located under Administrative Tools in the Windows Control Panel has all of the required features to enable the FTP features, but in the interests of simplicity this walkthrough will describe how to use the command-line Netsh.exe utility to configure the Windows Firewall.
Using Windows Firewall with non-secure FTP traffic
To configure Windows Firewall to allow non-secure FTP traffic, use the following steps:
Open a command prompt: click Start, then All Programs, then Accessories, then Command Prompt.
To open port 21 on the firewall, type the following syntax then hit enter:
To enable stateful FTP filtering that will dynamically open ports for data connections, type the following syntax then hit enter:
Important Notes:
- Active FTP connections would not necessarily covered by the above rules; an outbound connection from port 20 would also need to be enabled on server. In addition, the FTP client machine would need to have its own firewall exceptions setup for inbound traffic.
- FTP over SSL (FTPS) will not be covered by these rules; the SSL negotiation will most likely fail because the Windows Firewall filter for stateful FTP inspection will not be able to parse encrypted data. (Some 3rd-party firewall filters recognize the beginning of SSL negotiation, e.g. AUTH SSL or AUTH TLS commands, and return an error to prevent SSL negotiation from starting.)
Using Windows Firewall with secure FTP over SSL (FTPS) traffic
The stateful FTP packet inspection in Windows Firewall will most likely prevent SSL from working because Windows Firewall filter for stateful FTP inspection will not be able to parse the encrypted traffic that would establish the data connection. Because of this behavior, you will need to configure your Windows Firewall settings for FTP differently if you intend to use FTP over SSL (FTPS). The easiest way to configure Windows Firewall to allow FTPS traffic is to list the FTP service on the inbound exception list. The full service name is the «Microsoft FTP Service», and the short service name is «ftpsvc». (The FTP service is hosted in a generic service process host (Svchost.exe) so it is not possible to put it on the exception list though a program exception.)
To configure Windows Firewall to allow secure FTP over SSL (FTPS) traffic, use the following steps:
Open a command prompt: click Start, then All Programs, then Accessories, then Command Prompt.
To configure the firewall to allow the FTP service to listen on all ports that it opens, type the following syntax then hit enter:
To disable stateful FTP filtering so that Windows Firewall will not block FTP traffic, type the following syntax then hit enter:
More Information about Working with Firewalls
It is often challenging to create firewall rules for FTP server to work correctly, and the root cause for this challenge lies in the FTP protocol architecture. Each FTP client requires two connections to be maintained between client and server:
- FTP commands are transferred over a primary connection called the Control Channel, which is typically the well-known FTP port 21.
- FTP data transfers, such as directory listings or file upload/download, require a secondary connection called Data Channel.
Opening port 21 in a firewall is an easy task, but this means that an FTP client will only be able to send commands, not transfer data. This means that the client will be able to use the Control Channel to successfully authenticate and create or delete directories, but the client will not be able to see directory listings or be able to upload/download files. This is because data connections for FTP server are not allowed to pass through the firewall until the Data Channel has been allowed through the firewall.
This may appear confusing to an FTP client, because the client will seem to be able to successfully log in to the server, but the connection may appear to timeout or stop responding when attempting to retrieve a directory listing from the server.
The challenges of working with FTP and firewalls doesn’t end with the requirement of a secondary data connection; to complicate things even more, there are actually two different ways on how to establish data connection:
- Active Data Connections: In an active data connection, an FTP client sets up a port for data channel listening and the server initiates a connection to the port; this is typically from the server’s port 20. Active data connections used to be the default way of connecting to FTP server; however, active data connections are no longer recommended because they do not work well in Internet scenarios.
- Passive Data Connections: In a passive data connection, an FTP server sets up a port for data channel listening and the client initiates a connection to the port. Passive connections work much better in Internet scenarios and recommended by RFC 1579 (Firewall-Friendly FTP).
Some FTP clients require explicit action to enable passive connections, and some clients don’t even support passive connections. (One such example is command-line Ftp.exe utility that ships with Windows.) To add to the confusion, some clients attempt to intelligently alternate between the two modes when network errors happen, but unfortunately this does not always work.
Some firewalls try to remedy problems with data connections with built-in filters that scan FTP traffic and dynamically allow data connections through the firewall. These firewall filters are able to detect what ports are going to be used for data transfers and temporarily open them on firewall so that clients can open data connections. (Some firewalls may enable filtering FTP traffic by default, but it is not always the case.) This type of filtering is known as a type of Stateful Packet Inspection (SPI) or Stateful Inspection, meaning that the firewall is capable of intelligently determine the type of traffic and dynamically choose how to respond. Many firewalls now employ these features, including the built-in Windows Firewall.


