- How to configure static IP address on Alpine Linux
- Configuring Static IP address on Alpine server
- IPv4 static address configuration for Alpine Linux version 3.13.xx
- Linux Router with VPN on a Raspberry Pi
- Contents
- Rationale
- Installation
- Modem in full bridge mode
- Network
- /etc/hostname
- /etc/hosts
- /etc/network/interfaces
- DHCP from ISP
- Basic IPtables firewall with routing
- /etc/sysctl.d/local.conf
- /etc/conf.d/dhcpd
- /etc/dhcp/dhcpd.conf
- Synchronizing the clock
- Busybox /etc/conf.d/ntpd
- Chrony /etc/chrony.conf
- OpenNTPD /etc/ntpd.conf
- /etc/ntpd.conf
- tlsdate
- timezone
- Saving Time
- Unbound DNS forwarder with dnscrypt
- Unbound
- /etc/unbound/unbound.conf
- Additional DNS level filtering
- /etc/unbound/unbound.conf
- Script to prepare/sort domains for Unbound
- DNSCrypt
- /etc/dnscrypt-proxy/dnscrypt-proxy.toml
- Add policy route for dnscrypt over VPN
- /etc/network/fwmark_rules
- Random number generation
- Haveged
- rng-tools with bcm2708-rng
- Pre Alpine Linux 3.8 (which includes rngd 5)
- Post Alpine Linux 3.8 (which includes rngd 6)
- WiFi 802.1x EAP and FreeRadius
- VPN Tunnel on specific subnet
- /etc/modules
- /etc/iproute2/rt_tables
- /etc/network/interfaces
- /etc/sysctl.d/local.conf
- /etc/network/fwmark_rules
- /etc/ppp/ip-up
- /etc/ppp/ip-down
- /etc/openvpn/route-up-fwmark.sh
- /etc/openvpn/route-pre-down-fwmark.sh
- Advanced IPtables rules that allow us to route into our two routing tables
- OpenVPN Routing
- Creating a LAN only Subnet
- /etc/iproute2/rt_tables
- /etc/network/interfaces
- /etc/network/route_LAN
- /etc/ppp/ip-up
- /etc/openvpn/route-up-fwmark.sh
- /etc/ntpd.conf
- Blocking bogons
- Installing ipset
- Adding our allowed networks
- Restricting our LAN subnet with iptables, and blocking the bogons
- Other Tips
- Diagnosing firewall problems
- netcat, netcat6
- tcpdump
- lbu cache
- lbu encryption /etc/lbu/lbu.conf
- Backup apkprov
- Harden SSH
- Generate a SSH key
- /etc/ssh/sshd_config
- /etc/conf.d/sshd
How to configure static IP address on Alpine Linux
A t home or in a cloud environment, IP addresses are assigned dynamically by the DHCP server. Setting a static IP address on your Alpine Linux server is required for various reasons. For instance, Alpine Linux is configured as a DHCP server or KVM server to host multiple VMs. Static IP address makes it easy to work with port forwarding, firewalling, and HTTPS server too. This quick tutorial will explain how to set up a static IP address on Alpine Linux.
| Tutorial details | |
|---|---|
| Difficulty level | Easy |
| Root privileges | Yes |
| Requirements | Alpine Linux |
| Est. reading time | 2 minutes |
Configuring Static IP address on Alpine server
We define DHCP or static configuration in /etc/network/interfaces file. The first entry must be a loopback (lo0) interface. For example, we can use the cat command:
cat /etc/network/interfaces
My Ethernet device name is eth0. See how to find out or display available network interfaces on Linux using the ifconfig command or ip command # ifconfig -a
# ip link show
IPv4 static address configuration for Alpine Linux version 3.13.xx
Let us set static IP address to 192.168.2.16 with 255.255.255.0 (/24) subnet. The default gateway set to 192.168.2.254 and Alpine Linux hostname set to nixcraft-x140e:
We can add multiple IP address as follows for eth0:
Источник
Linux Router with VPN on a Raspberry Pi
Contents
Rationale
This guide demonstrates how to set up a Linux router with a VPN tunnel. You will need a second ethernet adapter. If you are using a Raspberry Pi, then you can use something like this Apple USB Ethernet Adapter as it contains a ASIX AX88772 which has good Linux support.
You may choose to also buy a Real Time clock. If you don’t have an RTC, the time is lost when your Pi is shut down. When it is rebooted, the time will be set back to Thursday, 1 January 1970. As this is earlier than the creation time of your VPN certificates OpenVPN will refuse to start, which may mean you cannot do DNS lookups over VPN.
For wireless, a separate access point was purchased (Ubiquiti UniFi AP) because it contains a Atheros AR9287 which is supported by ath9k.
I chose a Raspberry Pi because it’s inexpensive. I was not concerned with getting high PPS (Packets Per Second). You could choose to use an old x86/amd64 system instead. If I had better internet I’d probably go with an offering from Soekris such as the net6501 as it would have a much lower power consumption than a generic x86_64 desktop processor.
If you want to route speeds above 100 Mbit/s you’ll want to make use of hardware encryption like AES-NI. The Soekris offerings have the option of an additional hardware encryption module (vpn1411). Another option is to use a Mini ITX motherboard, with a managed switch. I chose the Ubiquiti ES-16-150W.
If you wish to use IPv6 you should consider looking at Linux Router with VPN on a Raspberry Pi (IPv6) as the implementation does differ slightly from this tutorial.
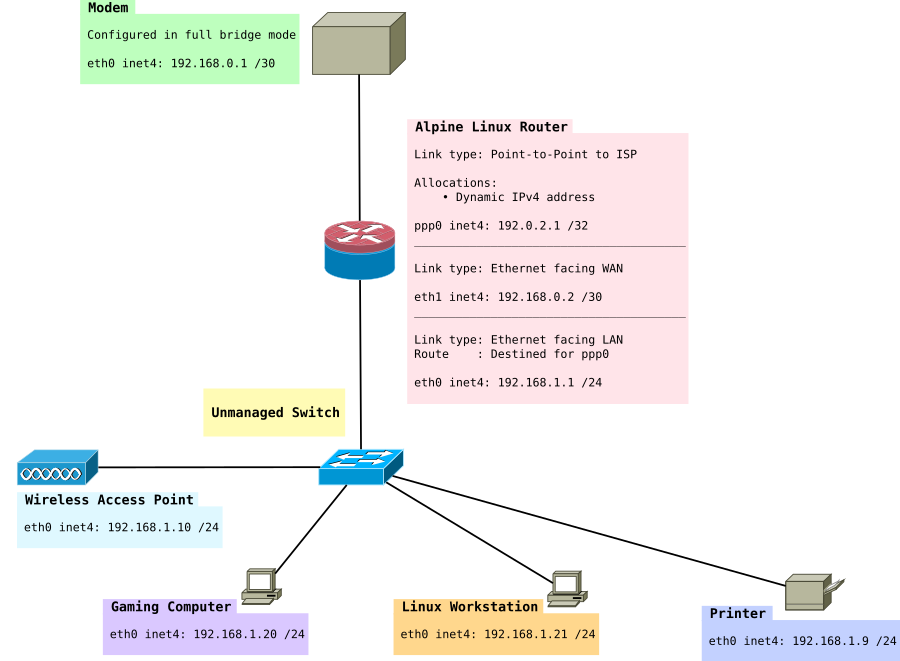
The network in this tutorial looks like this:
Installation
This guide assumes you’re using Alpine Linux from a micro SD card in ramdisk mode. It assumes you’ve read the basics of how to use Alpine local backup. The Raspberry Pi article contains information on how to install Alpine Linux on a Raspberry Pi.
Modem in full bridge mode
This particular page uses an example where you have a modem that uses PPPoE. You will need to modify the parts which do not apply to you.
In this example, I have a modem which has been configured in full bridge mode. PPP sessions are initiated on the router.
The modem I am using is a Cisco 877 Integrated Services Router. It has no web interface and is controlled over SSH. More information can be found Configuring a Cisco 877 in full bridge mode.
Network
/etc/hostname
Set this to your hostname eg:
/etc/hosts
Set your host and hostname
/etc/network/interfaces
Configure your network interfaces. Change «yourISP» to the file name of the file in /etc/ppp/peers/yourISP
Next you need to configure your router to be able to dial a PPP connection with the modem.
If your ISP uses PPP you may need to configure it. See PPP.
You will want to make sure you set your WAN interface, in this example we used eth1.
Alternatively, it’s quite common for ISPs to use IPoE. IPoE is much simpler and runs DHCP only on the external interface. It should look something like:
DHCP from ISP
Above we set DHCP and we set a static IP. This is so we can still forward packets through to the modem to be able to access the web interface or SSH.
We do still need DHCP to get an IP address from our ISP though. I like to use dhcpcd instead of udhcp (the default in Alpine Linux), because it allows for Prefix Delegation, which is used in IPv6 networks.
My /etc/dhcpcd.conf looks like this:
Basic IPtables firewall with routing
This demonstrates how to set up basic routing with a permissive outgoing firewall. Incoming packets are blocked. The rest is commented in the rule set.
First install iptables:
apk add iptables ip6tables
I’d also highly suggest reading these resources if you are new to iptables:
/etc/sysctl.d/local.conf
Note IPv6 is disabled here if you want that see the other tutorial Linux Router with VPN on a Raspberry Pi (IPv6). You may also wish to look at ip-sysctl.txt to read about the other keys.
/etc/conf.d/dhcpd
Specify the configuration file location, interface to run on, and that you want DHCPD to run in IPv4 mode.
/etc/dhcp/dhcpd.conf
Configure your DHCP configuration server. For my DHCP server I’m going to have three subnets. Each has a specific purpose. You may choose to have any number of subnets as shown below. The broadcast-address will be different if you used VLANs. However, in this case VLANs are not used.
Make sure to add this to the default run level once configured:
rc-update add dhcpd default
Synchronizing the clock
You can choose to use BusyBox’s ntpd or you can choose a more fully fledged option like OpenNTPD or Chrony
Busybox /etc/conf.d/ntpd
Allow clients to synchronize their clocks with the router.
Make sure to add this to the default run level once configured:
rc-update add ntpd default
or if you prefer, to synchronize with multiple servers.
Chrony /etc/chrony.conf
OpenNTPD /etc/ntpd.conf
apk add openntpd
Add to default run level.
rc-update add openntpd default
/etc/ntpd.conf
tlsdate
The time can also be extracted from a https handshake. If the certificate is self-signed you will need to use skip-verification:
apk add tlsdate
tlsdate -V —skip-verification -p 80 -H example.com
timezone
You might also want to set a timezone, see Setting the timezone.
Saving Time
There are two ways to do this. If you didn’t buy an RTC, see Saving time with Software Clock. If you did, like the PiFace Real Time Clock, see Saving time with Hardware Clock
Unbound DNS forwarder with dnscrypt
We want to be able to do lookups using dnscrypt without installing DNSCrypt on every client on the network. DNSCrypt can use it’s own protocol or DNS over HTTPS.
The router will also run a DNS forwarder and request unknown domains over DNSCrypt for our clients. Borrowed from the ArchLinux wiki article on dnscrypt-proxy.
Unbound
apk add unbound
/etc/unbound/unbound.conf
Additional DNS level filtering
This script takes in a list of domains and produces a filter file. We are directing all lookups to «0.0.0.1» which is an invalid IP and should fail immediately, unlike localhost.
/etc/unbound/unbound.conf
In your main unbound configuration, add
Script to prepare/sort domains for Unbound
DNSCrypt
You can test that you’re not getting DNS leaks by using dnsleak.com or this one from GRC. Providers like CloudFlare and Google (1.1.1.1, 8.8.8.8) use anycast which should be pointing to a server located to where your VPN exits.
/etc/dnscrypt-proxy/dnscrypt-proxy.toml
Using the sample dnscrypt config is fine. You’ll need to make these changes:
Add policy route for dnscrypt over VPN
Add a policy based route based on the uid of the dnscrypt user. On Alpine Linux dnscrypt-proxy runs as a specific user so check /etc/passwd
In this example, the dnscrypt user has the uid 103.

/etc/network/fwmark_rules
rc-update add unbound default
rc-update add dnscrypt-proxy default
Random number generation
There are two ways to assist with random number generation Entropy and randomness. This can be particularly useful if you’re generating your own Diffie-Hellman nonce file, used in the FreeRadius EAP-TLS configuration section, or any process such as generating certificates or public private keys.
Haveged
Haveged is a great way to improve random number generation speed. It uses the unpredictable random number generator based upon an adaptation of the HAVEGE algorithm.
apk add haveged
Start haveged service:
service haveged start
Add service to boot
rc-update add haveged default
Start rngd service:
service haveged start
Add service to boot:
rc-update add haveged default
rng-tools with bcm2708-rng
Pre Alpine Linux 3.8 (which includes rngd 5)
All Raspberry Pis come with the bcm2708-rng random number generator on board. If you are doing this project on a Raspberry Pi then you may choose to use that.
Add the kernel module to /etc/modules:
echo «bcm2708-rng» > /etc/modules
apk add rng-tools
Set the random device (/dev/random) and rng device (/dev/hwrng) in /etc/conf.d/rngd
RNGD_OPTS=»—no-drng=1 —no-tpm=1 -o /dev/random -r /dev/hwrng»
Post Alpine Linux 3.8 (which includes rngd 6)
With AlpineLinux 3.8 you don’t have to insert the module as it is built in the kernel.
Additionally, the syntax has changed for rngd so for /etc/conf.d/rngd you’ll need
RNGD_OPTS=»-x1 -o /dev/random -r /dev/hwrng»
Start rngd service:
service rngd start
Add service to boot:
rc-update add rngd default
You can test it with:
cat /dev/hwrng | rngtest -c 1000
You should see something like:
It’s possible you might have a some failures. That’s okay, two runs I did previously had a failure each.
WiFi 802.1x EAP and FreeRadius
A more secure way than using pre-shared keys (WPA2) is to use EAP-TLS and use separate certificates for each device. See FreeRadius EAP-TLS configuration
VPN Tunnel on specific subnet
As mentioned earlier in this article, it might be useful to have a VPN subnet and a non-VPN subnet. Typically, gaming consoles or computers might want low-latency connections. For this exercise we use fwmark.
We expand the network to look like this:
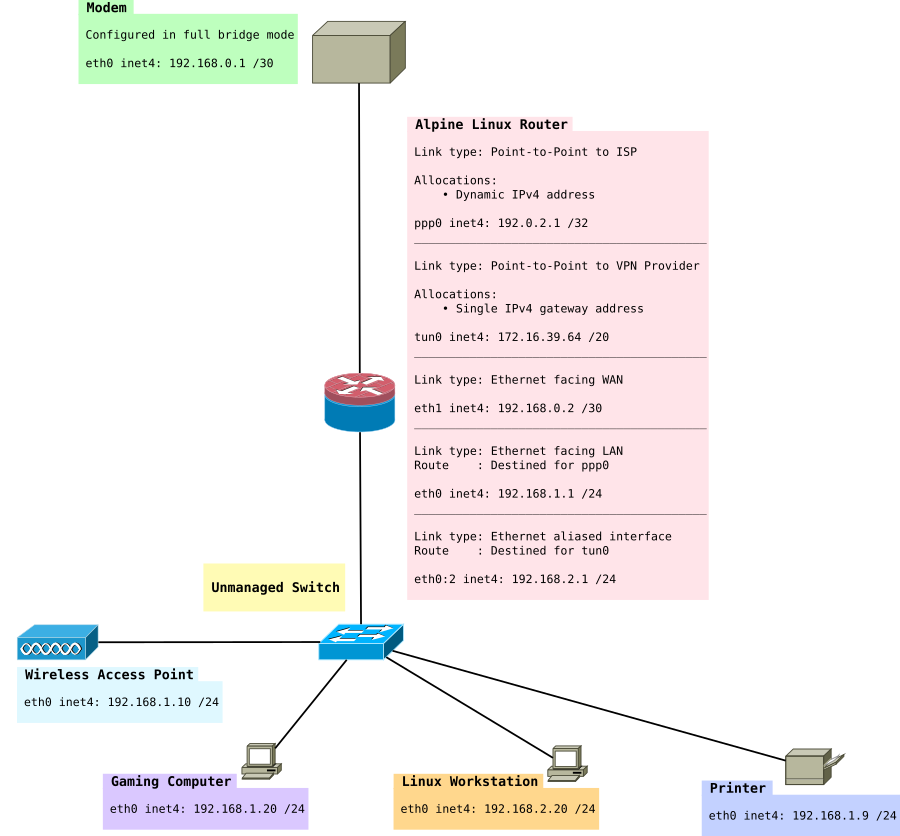
Install the necessary packages:
apk add openvpn iproute2 iputils
/etc/modules
You’ll want to add the tun module
/etc/iproute2/rt_tables
Add the two routing tables to the bottom of rt_tables. It should look something like this:
/etc/network/interfaces
Next, add the virtual interface (really just a IP address to eth0) eth0:2, just under eth0 will do.
/etc/sysctl.d/local.conf
If you want to use fwmark rules you need to change this setting. It causes the router to still do source validation.
fwmark won’t work if you have this set to 1.
/etc/network/fwmark_rules
In this file, we want to put the fwmark rules and set the correct priorities.
/etc/ppp/ip-up
Next, we want to create the routes that should be run when PPP comes online. There are special hooks we can use in ip-up and ip-down to refer to the IP address, ppp man file — Scripts You can also read about them in your man file if you have ppp-doc installed.
/etc/ppp/ip-down
/etc/openvpn/route-up-fwmark.sh
OpenVPN needs similar routing scripts and it also has it’s own special hooks that allow you to specify particular values. A full list is here OpenVPN man file — Environmental Variables
/etc/openvpn/route-pre-down-fwmark.sh
What I found was when starting and stopping the OpenVPN service if you used:
service openvpn stop
The rules in route-pre-down-fwmark.sh were not executed.
seemed to work correctly.
Advanced IPtables rules that allow us to route into our two routing tables
This is an expansion of the previous set of rules. It sets up NAT masquerading for the 192.168.2.0 to go through the VPN using marked packets.
I used these guides to write complete this:
You may want to delete certain rules here that do not apply to you, e.g. the FreeRadius rules. That is covered later in this article.
OpenVPN Routing
Usually when you connect with OpenVPN, the remote VPN server will push routes down to your system. We don’t want this as we still want to be able to access the internet without the VPN. We have also created our own routes that we want to use earlier in this guide.
You’ll need to add this to the bottom of your OpenVPN configuration file:
My VPNs are arranged like this in /etc/openvpn:
OpenVPN configuration file for that server:
OpenVPN certs for that server:
So I use this helpful script to automate the process of changing between servers:
That way I can simply change between servers by running:
and then restart openvpn. I am also reminded to put the port forward through on the VPN control panel so my BitTorrent client is connectable:
service openvpn restart
Finally add openvpn to the default run level
rc-update add openvpn default
Creating a LAN only Subnet
In this section, we’ll be creating a LAN only subnet. This subnet will be 192.168.3.0/24. The idea of this subnet is nodes in it cannot have their packets forwarded to the Internet, however they can be accessed via the other LAN subnets 192.168.1.0/24 and 192.168.2.0/24. This approach doesn’t use VLANs although that would be recommended if you had a managed switch. The idea of this subnet is for things like WiFi access points, IP Phones which contact a local Asterisk server and of course printers.
At the end of this section we will have something like:
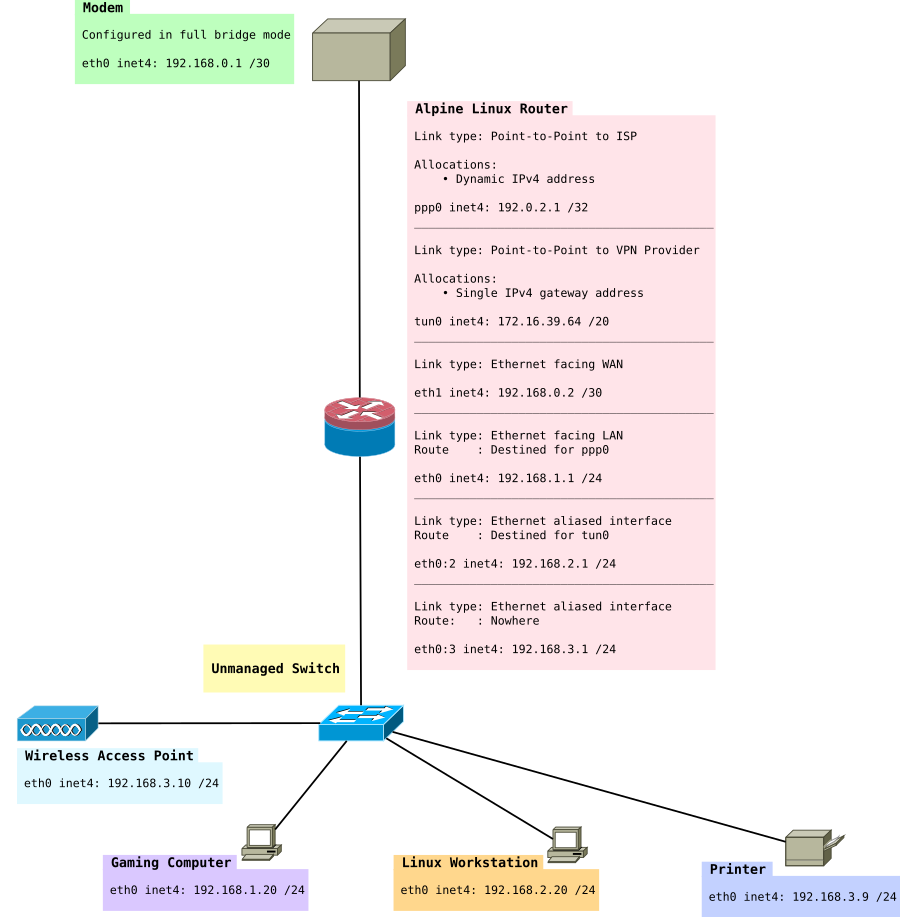
/etc/iproute2/rt_tables
First we’ll add a third routing table:
/etc/network/interfaces
Add a an extra virtual interface (really just a IP address to eth0).
/etc/network/route_LAN
This file will have our route added to it
/etc/ppp/ip-up
Append a route from the LAN subnet to the ISP table
/etc/openvpn/route-up-fwmark.sh
Append a route from the LAN subnet to the VPN table
/etc/ntpd.conf
Add a listen address for ntp (OpenNTPD).
You should now have:
Devices needing the correct time will need to use this NTP server because they will not be able to get it from the Internet.
Blocking bogons
Our LAN now has 4 subnets in total that are possible:
- 192.168.0.0/30 (connection between modem and router)
- 192.168.1.0/24 (ISP table, directly routed out WAN)
- 192.168.2.0/24 (VPN table, routed out VPN)
- 192.168.3.0/24 (Null routed subnet for LAN only hosts)
- 172.16.32.0/20 (VPN provider’s network, so we can access things on the VPN’s network).
Everything else should be rejected. No packets should ever be forwarded on 192.168.5.2 or 10.0.0.5 for example.
Installing ipset
Add it to start up:
rc-update add ipset default
Now we need to load the lists of addresses into ipset Securing Your Server using IPset and Dynamic Blocklists mentions a script which was particularly useful. This script could be run on a cron job if you wanted to regularly update it and for the full bogon list you should as they change when that address space has been allocated.
For the purpose of this we will be using just the bogon-bn-nonagg.txt list.
This is unlikely to change as it’s the IPV4 Reserved IP addresses space. The script:
Now you should see the list loaded into memory when you do:
We want to save it so our router can refer to it next time it starts up. To do that:
Adding our allowed networks
ipset create allowed-nets-ipv4 hash:net,iface family inet
Then you can add each of your allowed networks:
For IPv6, if you’ve got any Unique local address ranges you may choose to add them:
ipset create allowed-nets-ipv6 hash:net,iface family inet6
Finally, save the sets with this command so they can be loaded at the next boot:
Restricting our LAN subnet with iptables, and blocking the bogons
Finally, we can apply our iptables rules, to filter both 192.168.3.0/24 and make sure that subnets like 192.168.5.0/24 are not forwarded or accessible by our router. You will need to review these rules, and remove the ones that do not apply to you.
Don’t forget to change your RADIUS rules if you moved your WiFi APs into the 192.168.3.0/24 subnet. You’ll also need to edit /etc/raddb/clients.conf
I used a new table here called «raw». This table is more primitive than the filter table. It cannot have FORWARD rules or INPUT rules. Therefore you will still need a FORWARD rule in your filter table to block bogons originating from your LAN.
The only kind of rules we may use here are PREROUTING and OUTPUT. The OUTPUT rules will only filter traffic originating from our router’s local processes, such as if we ran the ping command to a bogon range on the router’s command prompt.
Traffic passes over the raw table, before connecting marking as indicated by this packet flow map: Netfilter packet flow graph this means we don’t have to strip the mark off the bogon range in the mangle table anymore.
Other Tips
Diagnosing firewall problems
netcat, netcat6
Netcat can be useful for testing if a port is open or closed or filtered.
apk add netcat-openbsd
After installing netcat, we can use it like this:
Say we wanted to test for IPv6, UDP, Port 547 we would do this on the router:
and then this on the client to connect to it:
nc -u -v -6 2001:0db8:1234:0001::1 547
tcpdump
tcpdump can also be useful for dumping the contents of packets coming in on an interface:
apk add tcpdump
Then we can run it. This example captures all DNS traffic originating from 192.168.2.20.
tcpdump -i eth0 udp and src 192.168.2.20 and port 53
You can write the file out with the -w option, and view it in Wireshark locally on your computer. You can increase the verbosity with the -v option. Using -vv will be even more verbose. -vvv will show even more.
lbu cache
Configure lbu cache so that you don’t need to download packages when you restart your router eg Local APK cache
This is particularly important as some of the images do not contain ppp-pppoe. This might mean you’re unable to get an internet connection to download the other packages on boot.
lbu encryption /etc/lbu/lbu.conf
In /etc/lbu/lbu.conf you might want to enable encryption to protect your VPN keys.
Remember to set a root password, by default Alpine Linux’s root account is passwordless.
Backup apkprov
It’s a good idea to back up your apk provision file. You can pull it from your router to your local workstation with:
scp -r root@192.168.2.1:/media/mmcblk0p1/ .apkovl.tar.gz.aes-256-cbc ./
And decrypt it with:
openssl enc -d -aes-256-cbc -in .apkovl.tar.gz.aes-256-cbc -out .apkovl.tar.gz
It can be encrypted with:
openssl aes-256-cbc -salt -in .apkovl.tar.gz -out .apkovl.tar.gz.aes-256-cbc
Harden SSH
Generate a SSH key
ssh-keygen -t rsa -b 4096
You will want to put the contents of id_rsa.pub in /etc/ssh/authorized_keys
You can put multiple public keys on multiple lines if more than one person has access to the router.
/etc/ssh/sshd_config
A couple of good options to set in here can be:
While this isn’t usually a good idea, a router doesn’t need more than one user.
The most important options:
/etc/conf.d/sshd
You will want to add
This instructs OpenRC to make sure the network is up before starting SSH.
Finally add sshd to the default run level
rc-update add sshd default
Additionally you may want to look at Secure Secure Shell and tighten OpenSSH’s cryptography options.
Источник


