- Install Alpine on VirtualBox
- Contents
- Preparation
- Install Virtual Box on host
- Download Alpine
- Setting up virtual PC
- Install Alpine on the virtual computer
- Install drivers for Virtual Box
- Alpine Install: from a disc to a virtualbox machine single only
- Contents
- Terminology
- Requirements
- Preparing the medium to install
- Preparing the virtual machine to install
- Booting the Alpine ISO disc
- Normal setup/install process
- Login as root
- Running setup alpine script
- Finishing the installation
- Alpine Install: from a iso to a virtualbox machine with external disc
- Contents
- Terminology
- Requirements
- Preparing the medium origin to install
- Preparing the medium target to install
- Preparing the virtual machine to install
- Booting the Alpine ISO disc
- Normal setup/install process
- Login as root
- Running setup alpine script
- Finishing the installation
Install Alpine on VirtualBox
This guide describes a standard install of Alpine within a Virtual Box VM. (virtual machine)
Oracle VM VirtualBox runs one or more virtual x86 or x64 guests on a host computer.
This enables you to install and test Alpine on your main computer almost as you would any other program.
Contents
Preparation
Install Virtual Box on host
First you’ll need to download and install Virtual Box on your host computer. Either from the official homepage (for Windows, OS X or Solaris) or from your distribution’s repository (for Linux).
Virtual Box consists of two components:
- VirtualBox platform package
- Oracle VM VirtualBox Extension Pack
Install both and start VirtualBox to check for proper operation. If you have problems, consult the VirtualBox user manual or one of the support sites for Virtual Box.
Download Alpine
Download the Virtual Alpine ISO, which is optimized for virtual systems, from the Alpine Download section. Save it in a location where you can find it easily.
Setting up virtual PC
Start Virtual Box. You will see a mostly empty window with a couple symbols in the upper left corner. The leftmost icon is a multi pointed star. If you hover your mouse over it, the tooltip will say “New”.
Click on the multi pointed star to create a new machine. A window will pop up, asking you some questions about the virtual (guest) computer you want to create.
- Name: Choose anything you like. e.g. “Alpine”.
- Type: Linux
- Version: Other Linux, either 64 bit or 32 bit. Choose 64 bit if you downloaded the x86_64 Alpine-ISO, or 32 bit if you downloaded the x86 Alpine-ISO.
- Use the default values for the other questions, simply click “next” or “create” until the dialogue finishes.
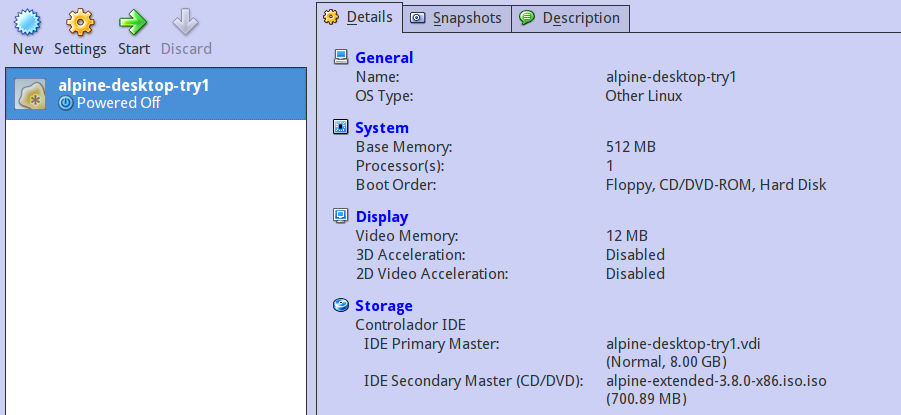
You will see a new entry in Virtual Box, called Alpine (or the name you chose during step 1 in the dialogue above). Click on it for more information about your guest.
One of the entries should read Mass storage, and offer an IDE controller with a primary master (the virtual hard disc) and a secondary master (the virtual optical drive).
Click on the secondary master. A context menu will pop up. Select the entry “choose image” and open the Alpine ISO you downloaded earlier.
Once that is done, click on the green start arrow on the menu bar.
Install Alpine on the virtual computer
Follow the steps described in the Installation Handbook, just as if you were installing Alpine on a real PC.
Install drivers for Virtual Box
Once you successfully reboot into the Alpine VM, there are two steps left:
These two steps install all drivers that other programs might request, and activate several comfort functions.
Источник
Alpine Install: from a disc to a virtualbox machine single only
Overall description: Installing Alpine from an official disc image to a VirtualBox machine.
This document guides you through installing Alpine on a VirtualBox VM — this is ideal if you only want to try out Alpine. For other ways to install (including dual-boot) see Alpine_newbie_install_manual.
Contents
Terminology
- Host machine: the machine you’re running VirtualBox on. It will «host» the target virtual machine.
- Guest machine: your target machine where Alpine will be installed, executed by the VirtualBox software on the host machine.
- Reserved RAM: the amount of host machine RAM that will be needed for exclusive use by the guest machine. The host machine cannot use this RAM while the guest machine is running.
- Virtual disc: the emulated storage medium attached to the guest machine. Usually it is a file (or several files) which VirtualBox presents as a disk to the guest OS (Alpine).
Requirements
On the host machine:
- Qemu or VirtualBox using package manager! Do not promote Oracle’s policy of overversiones without security patches
- At least 1GB of RAM, 2GB or more if you don’t want lockups while running something in addition to the virtual machine software
- The curl or wget programs to download the image to boot in the virtual software
On the guest machine:
- Minimum 512Mb RAM, but 1Gb or more is recommended if you’re going to use a graphical interface. That obviouly must be in sync with the host machine.
Preparing the medium to install
Download the source medium to install and put into your home; there’s more hardware medium sources to download, like the s390x and ppc64le, but because VirtualBox handles only x86 and x64 hardware, we will list those here
The name of the source medium to install will be in the following format: http://dl-cdn.alpinelinux.org/alpine/v /releases//alpine-standard- .0-.iso where ARCH and VERSION can be one of the following, for VirtualBox virtual machines:
Typically, the version most commonly used in a virtual box is the x86. The hardware is cheaper and operation does not consume a lot of memory. The iso download URL format is:
Graphical download: Just point the web browser to that URL and the download will start. A file with .iso extension type, with a name like «alpine-standard-3.10.0-x86.iso» (if i386/686); will be downloaded into the directory specified in your browser configuration.
Command line method: just open a terminal and execute: wget -c -t8 —no-check-certificate http://dl-cdn.alpinelinux.org/alpine/v /releases//alpine-standard- .0-.iso , for example:
- For «x86» and «3.10» the command will be:
wget -c -t8 —no-check-certificate http://dl-cdn.alpinelinux.org/alpine/v3.10/releases/x86/alpine-standard-3.10.0-x86.iso
You must be mindful of the directory you run the command from, as that is where the file will be saved.
Preparing the virtual machine to install
Start the VirtualBox software program.
Booting the Alpine ISO disc
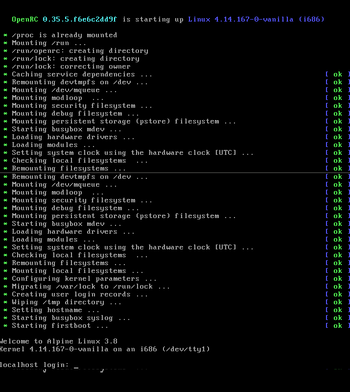
When the machine starts, you must be sure to choose the Optical drive (commonly named CD/DVD ROM drive), so the disc/iso will boot. After a while, a command line shell will show you:
Normal setup/install process
After boot up, you will see a command line shell of a complete ready to use Alpine
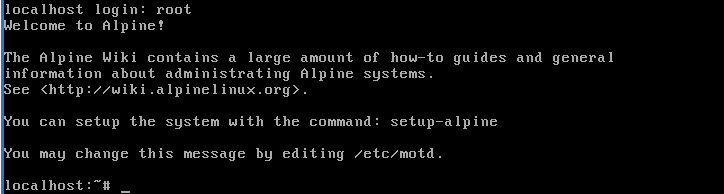
Login as root
Log in as root and press enter. No password will be asked for if you’re running from the boot image.
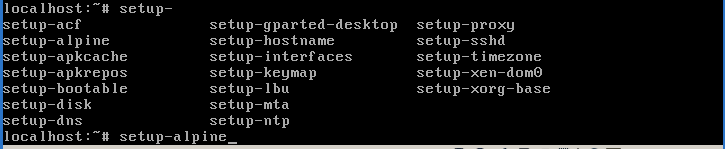
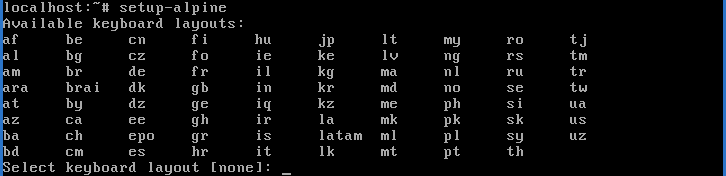
Running setup alpine script
Run the setup-alpine script as shown in the image:
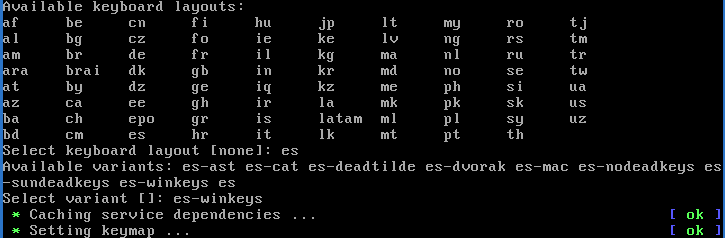
Select keyboard layout
Choose your keyboard layout. If you don’t know your keyboard layout, choose us. Typically, for a Latin American environment, es is enough. For Russian (and maybe Cyrilic) ru is sufficient.
Select keyboard variant
Choose your keyboard variant. If you don’t know your keyboard variant, choose the default from the list. For example, the typical Latin American keymap is es-winkeys.
Enter system hostname
Host name, which will be the name of your computer. using localhost is enough and recommended for testing purposes because permits apply mostly to how-tos and tutorials on the wiki pages.

Initialize network cards
Choose your network card. Typically, you can just go with the default (press enter), a second question will ask about any other configuration. Type «no» then press enter to bypass the step to property set up after installation finished property.

IMPORTANT NOTE: mostly in x86 and x64 ISO images we can let configurations for later, cos at the most modern the network card, the lest supported or still not well tested. Just type done and press enter. If you configured the wired interface, another question will be asked, use dhcp? Most people will use DHCP, so press enter again. If you have Internet connection from ISP, most settings are just DHCP, so all will be configured automatically.
Initialize network DNS
The DNS will be automatically detected, if not, you will be asked ask for the server addresses. Type «» (empty string) for domain, then press enter. Later you can change it to 8.8.8.8 (or the DNS server address of your choice) as shown in the picture. Press enter to go to the next question:

Changing the root password
Next a root password must be defined. You’ll need to type it twice for confirmation as the picture shows. If it’s too short you will get a warning, but your password will still work. Just retype it and go.
Note: when you type, NO chars will be shown.

Which timezone to choose?
Select a timezone, just press enter to use UTC when perform a single installation.

Proxy chooser
Then setup script will ask for proxy chooser.. just type none and then press enter

Enter mirror number
Then setup script will ask for repository mirror chooser.. just type done and then press enter, this will be configure many times later during usage of the system. Almost any tutorial of newbie pages will explain detailed so lest bypass using «done».

Which ssh server?
Installing an SSH server enables you to manage your machine remotely. OpenSSH is what the big distros use. Dropbear is a tiny SSH replacement. Recommended to type openssh and then press enter, because you able to connect using command line from Unix-like systems also is the offline available in all alpine installer images. 
Which NTP client to run?
This is for time sync. Press enter to use the image offline. It can be changed after installation.

Setup Disk
This will setup the destination usage of the files
Witch disk choose to use?
To choose the disk destination .. commonly sda are the hard disk cos sdb the USB boot or CD/DVD image

How would be used?
Then choose type of installation .. those are described at Setup modes section at Alpine setup scripts wiki page. «sys» mode is the familiar install to disk well knowed for usage as main OS to computers.

After all a confirmation question will raised, type «y» if everything are ok and the setup will proceed to erase, format and copy the files to the destination disk choose!
Finishing the installation
After setup ends, a «reboot» will be offered. Type «reboot» and press enter and your newly installed virtual machine will be booted. Don’t forget to remove the boot medium.

You cannot see a graphical window system? No problem. With Alpine, GUIs are made the right way. So if you need a desktop, you can install a desktop follow this link: Alpine newbie apk packages or go directly to Alpine newbie desktops
For other ways to install, see the Alpine_newbie_install_manual
Источник
Alpine Install: from a iso to a virtualbox machine with external disc
Overall description: Alpine Installation from a official disc/iso downloaded to a real hard disk by the usage of VirtualBox machine as the real machine, where will be single OS only.
This document will guide you to install Alpine into a real hard disk device but through the VirtualBox virtual machine acting as real machine, use if want to install to a real hard disk device externally but no way to boot it so can use in VirtualBox virtual machine . For others ways to install see at the Alpine_newbie_install_manual
Contents
Terminology
- Host machine: will be your real machine with installed operating system that have installed the VirtualBox software and «will host» the target operating system, in that case Alpine.
- Guest machine: will be your target machine where Alpine will be installed, emulated by the host operating system using the VirtualBox software installed in the real machine.
- Reserved RAM: will be the amount of RAM that will be need to share exclusively to the virtual machine created by the VirtualBox software in the host machine, stolen from the real RAM.
- External disc: will be the storage medium device attached as target for the emulated machine or «guest machine», where the Alpine will be installed.
Requirements
- In the host machine we need installed the virtualbox program from VirtualBox software
- In the host machine we need at least 1Gb of RAM, recommended 2Gb of RAM installed
- The guest machine need 512Mb RAM, but recommended 1Gb reserved if desktop software will be installed
- In the host machine we need installed wget or a web browser to download install medium
Preparing the medium origin to install
Download the source medium to install and put into your home, there’s more hardware medium sources to download, like the s390x and ppc64le, but due VirtualBox only emulates x86, x64 and arm hardware only, will list those here.
So using 3.10 version and i386 flavor the available links to download will be: http://dl-cdn.alpinelinux.org/alpine/v3.10/releases/x86/alpine-standard-3.10.0-x86.iso
Graphical download: Just point the web browser to that url and the download of the iso file will start. A file with .iso extension type, with name like «alpine-standard-3.10.0-x86_64.iso» will be downloaded commonly into the Download directory of your home documents filesystem.
Command line method: in unix-like terminal execute: wget -c -t8 —no-check-certificate http://dl-cdn.alpinelinux.org/alpine/v3.10/releases/x86/alpine-standard-3.10.0-x86.iso , and where you run the command, in that place/dir will be downloaded the file.
Preparing the medium target to install
Please take care of your attached devices.. for best care results only use those involved in the process, so only put the disc (that can be a USB flash, MMC card or external drive) attached, and remove all others that will no to be use. We will assume only one internal disc (that obviously cannot be removed) and one external disk attached.
The external disc will be detected and the operating system will create a new device representation, such like /dev/sdb commonly. In Linux systems you can detect the recently attached disk with following command:
/bin/dmesg | tail -n 50| grep ‘Attached SCSI’ | cut -d’ ‘ -f4
This will output [sde] for our example installation. Caution due that previously command only will work if you recently attached the new external disk where the system will be installed.
Later with the detection of the disk, create the representation for the VirtualBox virtual machine, the detection will be put in /dev/ parameter.. so if the disk was detect as [sde] you must use it without «[«/»]» sings, the command for creating the virtual disk will be:
VBoxManage internalcommands createrawvmdk -rawdisk /dev/sde -filename $HOME/rawdisk-sdb.vmdk

Preparing the virtual machine to install
Start the VirtualBox software program.
Booting the Alpine ISO disc
When the machine start, you must be sure to choose the Optical drive (commonly named CD/DVD Rom drive), so the disc/iso will boot and after a while a command line shell will show you:
Normal setup/install process
After boot up, you will see a command line shell of a complete ready to use Alpine
Login as root
Log in as root and press enter. No password will be asked for if you’re running from the boot image.
Running setup alpine script
Run the setup-alpine script as shown in the image:
Select keyboard layout
Choose your keyboard layout. If you don’t know your keyboard layout, choose us. Typically, for a Latin American environment, es is enough. For Russian (and maybe Cyrilic) ru is sufficient.
Select keyboard variant
Choose your keyboard variant. If you don’t know your keyboard variant, choose the default from the list. For example, the typical Latin American keymap is es-winkeys.
Enter system hostname
Host name, which will be the name of your computer. using localhost is enough and recommended for testing purposes because permits apply mostly to how-tos and tutorials on the wiki pages.
Initialize network cards
Choose your network card. Typically, you can just go with the default (press enter), a second question will ask about any other configuration. Type «no» then press enter to bypass the step to property set up after installation finished property.
IMPORTANT NOTE: mostly in x86 and x64 ISO images we can let configurations for later, cos at the most modern the network card, the lest supported or still not well tested. Just type done and press enter. If you configured the wired interface, another question will be asked, use dhcp? Most people will use DHCP, so press enter again. If you have Internet connection from ISP, most settings are just DHCP, so all will be configured automatically.
Initialize network DNS
The DNS will be automatically detected, if not, you will be asked ask for the server addresses. Type «» (empty string) for domain, then press enter. Later you can change it to 8.8.8.8 (or the DNS server address of your choice) as shown in the picture. Press enter to go to the next question:
Changing the root password
Next a root password must be defined. You’ll need to type it twice for confirmation as the picture shows. If it’s too short you will get a warning, but your password will still work. Just retype it and go.
Note: when you type, NO chars will be shown.
Which timezone to choose?
Select a timezone, just press enter to use UTC when perform a single installation.
Proxy chooser
Then setup script will ask for proxy chooser.. just type none and then press enter
Enter mirror number
Then setup script will ask for repository mirror chooser.. just type done and then press enter, this will be configure many times later during usage of the system. Almost any tutorial of newbie pages will explain detailed so lest bypass using «done».
Which ssh server?
Installing an SSH server enables you to manage your machine remotely. OpenSSH is what the big distros use. Dropbear is a tiny SSH replacement. Recommended to type openssh and then press enter, because you able to connect using command line from Unix-like systems also is the offline available in all alpine installer images.
Which NTP client to run?
This is for time sync. Press enter to use the image offline. It can be changed after installation.
Setup Disk
This will setup the destination usage of the files
Witch disk choose to use?
To choose the disk destination .. commonly sda are the hard disk cos sdb the USB boot or CD/DVD image
How would be used?
Then choose type of installation .. those are described at Setup modes section at Alpine setup scripts wiki page. «sys» mode is the familiar install to disk well knowed for usage as main OS to computers.
After all a confirmation question will raised, type «y» if everything are ok and the setup will proceed to erase, format and copy the files to the destination disk choose!
Finishing the installation
After al the scripts setup ends, a «reboot» will be offered, just type «reboot» and press enter, remobe the boot media and new installed system will be booted.
If you try to start that installation maybe you cannot see a graphical window system? take easy and get calm down.. in Alpine all are made by the right way.. so if user need a desktop.. user can install a desktop follow the next: Alpine newbie apk packages or bypass and go directly to Alpine newbie desktops
For others ways to install see at the Alpine_newbie_install_manual
Источник


