- How to install Git on AWS EC2 Amazon Linux 2
- Steps to install Git on Amazon Ec2 Linux
- 1. Connect to Ec2 Instance
- 2. Run system update
- 3. Install git in Amazon EC2 instance
- 4. Check Git Version
- 5. Let’s Setup a local repository for Git
- Amazon EC2 Deployment: Complete CI/CD Pipeline using GitHub Actions and AWS CodeDeploy
- Table of Contents
- 1. The CI/CD Pipeline Stack
- 2. The Requirements
- 3. Create IAM Role and Service Role for AWS CodeDeploy
- Instance Role
- Service Role
- 4. Create and Launch EC2 instance
- 5. Install Packages in EC2 Server through SSH
- 6. Configure AWS CodeDeploy Service
- Create an Application
- Create the Deployment Group
- 7. Configure CodeDeploy AppSpec file
- 8. Setting up GitHub Actions workflow pipeline
- Continuous Integration
- Continuous Deployment
- 9. Running the Complete Pipeline
- Summary
How to install Git on AWS EC2 Amazon Linux 2
We can easily download Git from almost all Linux distributions using the integrated package manager. Here we will see how to install GIT on Amazon Linux running on AWS Ec2 Instance.
Git is a freely available open-source system for distributed versioning. It is fast, scalable, and system version control (logging of adjustments) of files. As we know in the programming world while writing hundreds of codes there are always frequent changes happened. And these changes can be monitored and reversed with the help of GIT; further files can be made available to others via “repositories” or changes can be obtained from others.
If required, adjustments from publicly accessible repositories (repos) can be imported into a “working copy” or you can make your own adjustments available to others. This gives a programmer better control over each version of the file’s, complete history and track of changes done. This is all without any central server. It is an open-source, hence Git is also often used as a development platform, including for the Linux kernel.
Steps to install Git on Amazon Ec2 Linux
1. Connect to Ec2 Instance
There are two easy ways to connect Ec2 Instance running Linux one is using the Web Console and the other via SSH from your local system’s command prompt or terminal.
For Web Terminal
Just select your Instance and click on the Connect button given in the Top menu.
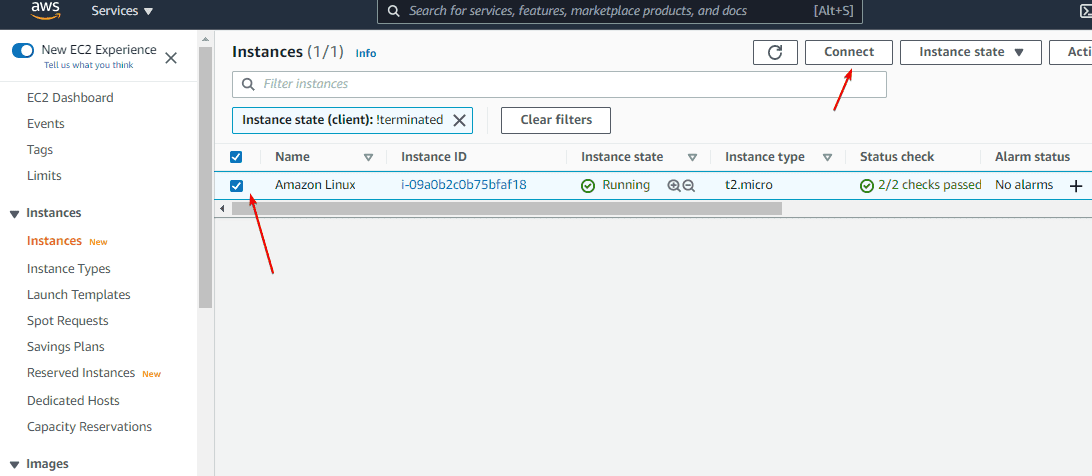
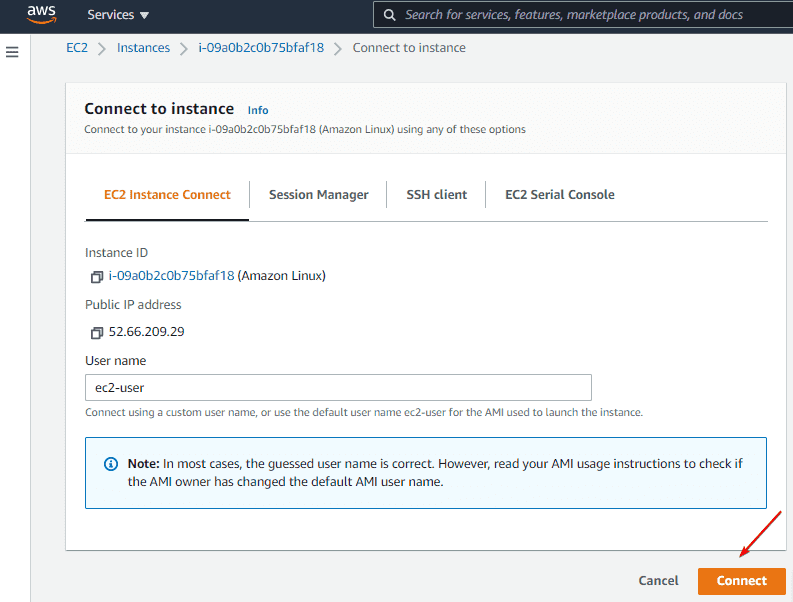
After that again click on the Connect button.
Those who like to use a local PC system’s terminal or SSH client they can see our tutorial- How to SSH AWS ec2 Linux Instances remotely
2. Run system update
Before installing Git, let’s run the system update command on Amazon Ec2 Linux, this will update the existing packages and also refresh the system’s repository cache.
3. Install git in Amazon EC2 instance
We don’t need to add any third-party repository to get the Git on our Amazon Linux 2, simply use the default YUM package manager and you will have it on your cloud VM via the amzn2-core system repo. Here is the command to follow:
4. Check Git Version
Once the installation is completed let’s check the Git version available on our system.
5. Let’s Setup a local repository for Git
Create a directory
Get into the created directory
Now, initialize git local repository
You can see the content
To have the git status, the command is:
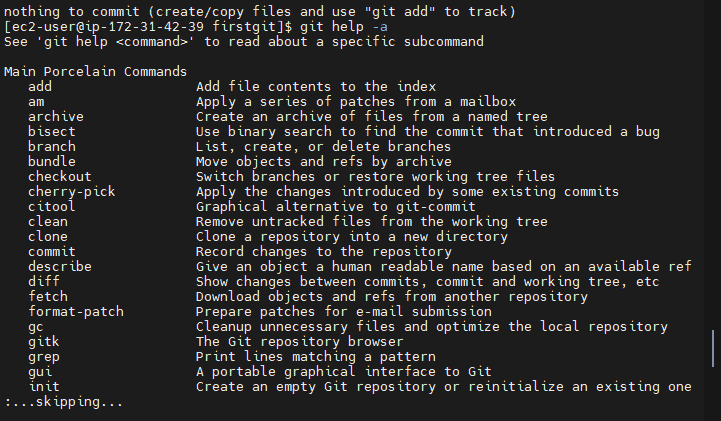
To list all git commands and sub-commands
Get help for some particular command
For more information refer to the Git documentation.
Источник
Amazon EC2 Deployment: Complete CI/CD Pipeline using GitHub Actions and AWS CodeDeploy

Let’s build a complete CI/CD workflow using GitHub Actions, AWS CodeDeploy and Amazon EC2.
In the previous post, we have discussed the Complete CI/CD Pipeline of Serverless Deployment (AWS Lambda + FastAPI) using GitHub Actions. From that, we know CI/CD Pipeline is incredibly powerful which really helps in increase our productivity and confidence without having to spend a lot of time handling the tasks and commands to run the testing and deployment processes manually.
In this post, we will be covering another stack of CI/CD Pipeline Technology which will be using GitHub Actions and AWS CodeDeploy for Amazon EC2 Deployment.
Table of Contents
- CI/CD Pipeline Stack
- The Requirements
- Create IAM Role and Service Role for AWS CodeDeploy
- Create and Launch EC2 instance
- Install Packages in EC2 Server through SSH
- Configure AWS CodeDeploy Service
- Configure CodeDeploy AppSpec file
- Setting up GitHub Actions workflow pipeline
- Running the Complete Pipeline
1. The CI/CD Pipeline Stack
CI/CD tools are important to help a team to automate their testing and deployment. Some tools specifically handle Continuous Integration (CI) which focusing on build, test and merge the project while some manage the development and deployment (CD) side.
The diagram below shows the CI/CD stack that will be used in this article.
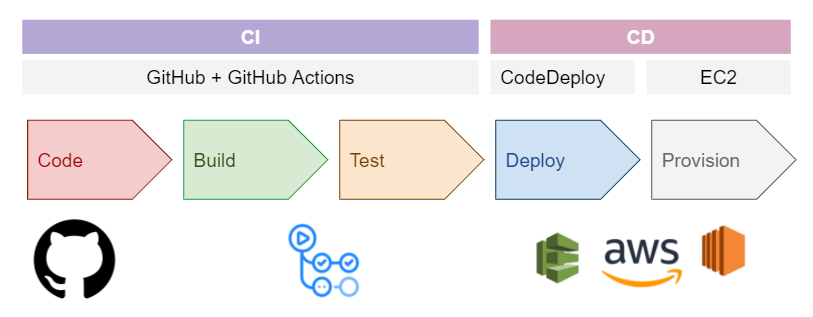
CI/CD Tools used in this article:
- GitHub Actions: performs the build and test (CI)
- AWS CodeDeploy: automates the deployment process to EC2 (CD)
All the project codes are committed in the GitHub repository. GitHub Actions will take place once the user triggers a push event to the respective repository. It will perform the code build process and run the automated tests. Once it is done, GitHub Actions will run the CD job which will trigger the AWS CodeDeploy to do the deployment part. CodeDeploy will help to automate the deployment by fetching the latest committed code in GitHub and update the project code in the EC2 server.
2. The Requirements
To create the CI/CD pipeline, make sure to create these accounts first:
- GitHub Account: To store the code repository.
- AWS Account: To be able to use the AWS resources.
If you want to follow along with the walkthrough, this GitHub repository contains the code for this project. Please feel free to use and follow the codes there.
3. Create IAM Role and Service Role for AWS CodeDeploy
There are two types of IAM roles that need to be created: Instance Role and Service.
Instance Role
In the first step, we need to create the instance role using AWS IAM. This role is important as it gives the proper permission to EC2 to access and read files from S3 buckets.
To create it, go to AWS Management Console and log in using our AWS Account. Then, proceed to IAM in the console and click on Roles. Once we have entered the Roles page, click on Create Role.

We will create roles for EC2 instance, therefore select EC2 as our use case.

Add the following policy:
Then, give the EC2 role a name and Click on Create Role
Service Role
Next, we need to create the IAM service role which will give the AWS CodeDeploy access and read the EC2 instance tags. Go to the Roles page and then Click on Create Role.
Select EC2 and proceed to add the following policy:
Then, give the service role a name and Click on Create Role. After that, we need to edit the trust relationship of the service role.
In order to do this, we need to go to the Roles page and click on the service role name that we have created.

You will see the trust relationships tab on the next page and click on Edit trust relationships.

Edit the policy document as below:
Once edited, click on Update Trust Policy.
All set! Now IAM roles are done.
4. Create and Launch EC2 instance
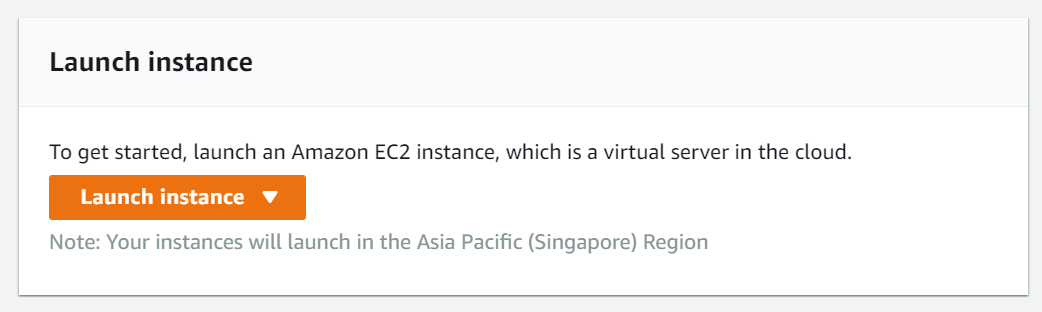
Now, we need to set up our EC2 instance. Go to AWS Management Console and log in using our AWS Account. Then, proceed to EC2 in the console and click on Launch Instances.
Then, choose an Amazon Machine Image (AMI) for the instance. In this article, we will be selecting the Amazon Linux 2 AMI (HVM), SSD Volume Type.

Choose the Instance Type for EC2 and Click on Next: Configure Instance Details

In the configure instance details section, click on the IAM role drop-down and select the role name that you have created earlier.

Under the Tag page, click on Add Tag add new key and value name.

Go to Configure Security Group and we can add any firewall rules that control traffic for of our instance.

Once done, click on Review and Launch. We will be in the Review page and if everything is satisfied according to our needs, we can click Launch.
A modal box will appear asking us whether to select an existing private key pair or creating a new one. In this tutorial, we will be creating new key pair and make sure to download the key pair and save it. Then, click on Launch Instance.

You should see you newly created instance in the list of running instances in the EC2 page.

Alright now our EC2 is setup, let’s dive into the AWS CodeDeploy configurations.
5. Install Packages in EC2 Server through SSH
In order to make sure our application is able to run properly on the EC2 server, we need to install the required packages. Since we are using Flask Application as the example, we are required to install python related packages and also a git module to enable the server environment to use the git services.
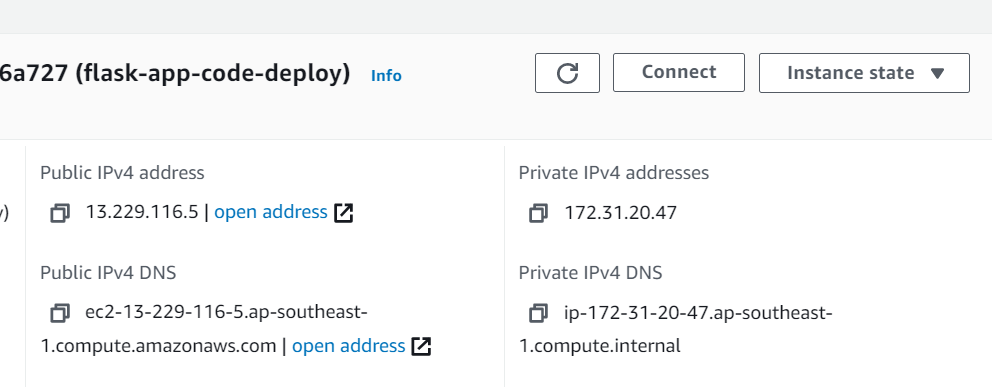
Go to the EC2 page and click on the Instance ID. Then click on the Connect button on the top right of the screen.
Copy the highlighted command below.

Open Command Prompt and locate our .pem file that we created earlier when setting up the EC2 instance. Then, paste the ssh connection command.

Now, we are in the EC2 server.
Install the required packages by running the command below.
- Update to the latest current version of package
2. Install git and python 3
3. Install CodeDeploy Agent
4. Install authbind and modify port 80 (for enabling production server to run app at port 80 without superuser privileges)
5. Clone GitHub Repository. (You may change to your own working GitHub repository)
Alright all done! We can now focus on configuring AWS CodeDeploy Service.
6. Configure AWS CodeDeploy Service
To use the AWS CodeDeploy service we need to define the application and deployment group. All of these can be set up in the AWS CodeDeploy page.
Create an Application
Go to AWS Management Console and log in using our AWS Account. Proceed to CodeDeploy in the console and click on Applications. Then, Click on Create application.

We will need to put the our application name and select EC2/On-premises as our compute platform.
Create the Deployment Group
Create the deployment group in the application.

In the service role, select the service role we have created earlier.

Next, choose Amazon EC2 instances in the environment configuration and put our EC2 instance tag.

For Agent configuration, we can leave it as it is (as the default settings). In the deployment settings, select CodeDeployDefault.OneAtATime. You can enable the load balancing if it is suit your use case otherwise just unselect it.

We can now click on Create deployment group. In our CodeDeploy application, we can now see the newly created deployment group.

7. Configure CodeDeploy AppSpec file
We use EC2/On-Premises compute platform for our application. Therefore, in order to make the deployment automation successful, the AppSpec file must be a YAML-formatted file named appspec.yml and it must be placed in the root of our application project’s source code directory. If you want to understand more about the CodeDeploy AppSpec file, please check this out: CodeDeploy AppSpec File reference — AWS CodeDeploy (amazon.com)
In your root project directory, add appspec.yml . This is what our AppSpec file looks like.
We will be using supervisor to run the application production server. Therefore, we will need to add supervisord.conf file in the root directory. Please check out this link to see what does the supervisord.conf looks like.
Add scripts folder in root directory and add these files below
install_app_dependencies (shell script)
start_server (shell script)
8. Setting up GitHub Actions workflow pipeline
To create the CI/CD workflow in GitHub Actions, create a folder named .github/workflows in our application root that will contain the GitHub action workflows. You can use the code below in the terminal as the guide to achieving this process.
Our workflow.yml will look like this.
Let us break it down and have a look at each part of the workflow:
- The name assigned to this workflow is CI/CD Pipeline
- The workflow will be triggered when commit codes pushed to the main branch in the repository.
- The job defined in this workflow is continuous-integration and continuous-deployment
- The runner used in the workflow is ubuntu-latest (Ubuntu Linux Operating Systems)
Continuous Integration
These are the sequential series of steps defined in the continuous-integration job:
- Step 1: Perform actions/checkout@v2 that will checkout to our repository and downloads it to the runner.
- Step 2: Setup Python 3.7 by using actions — actions/setup-python@v2
- Step 3: Install all the dependencies that consist inside requirements.txt
- Step 4: Configure AWS Credentials. The credentials are advised to store in GitHub Secrets and they can be easily called in any GitHub Actions workflow.
- Step 5: Run Unit Tests.
Continuous Deployment
Next, these are the instructions defined in continuous-deployments job:
- The runner used in the workflow is ubuntu-latest (Ubuntu Linux Operating Systems)
- This job will only run when the continuous-integration build is succeeded. This process can be achieved by using the command needs:[continuous-integration] after the runner has been defined.
- Check if current branch is main by using the command if: github.ref == ‘refs/heads/main’
These are the steps defined in the job:
- Step 1: Configure AWS Credentials.
- Step 2: Create CodeDeploy Deployment.
Yes, we have successfully completed building our CI/CD pipeline!
9. Running the Complete Pipeline
Now, let’s push some changes to our main branch to see the result of our CI/CD workflow in GitHub Actions. We should see something like this in our GitHub Actions for the latest build workflow result.
Amazing! Our GitHub Actions workflow jobs are succeeded.

Let’s see the status of our deployment on the AWS CodeDeploy deployments page.

Fantastic! Our CI/CD pipeline is working seamlessly.
Now, you can try to see the app running on the server using the EC2 public IP.

Tadaaa! Congratulations, we have successfully created a working CI/CD pipeline for Amazon EC2 Deployment using GitHub Actions and AWS CodeDeploy.
You can find the complete code of the project here.
Summary
GitHub Actions and AWS CodeDeploy is one of the great combos in creating the complete CI/CD pipeline. Each of the tools has its own specific roles whereas GitHub Actions focuses on the CI side which involves build and automated unit tests while AWS CodeDeploy handles the deployment cycle of the software from fetching the latest commit from GitHub and updates the code in the EC2 server.
AWS CodeDeploy really helps in automating the deployment process to compute services such as Amazon EC2, AWS Lambda, and your on-premises servers. It is indeed making it easier for us to release new features at a rapid pace plus helping us to avoid downtime during application deployment, and manage the complexity of updating our applications.
In this article, we discussed another stack of CI/CD pipeline which involves GitHub Actions together with AWS CodeDeploy. We have learned about how to set up the IAM roles for CodeDeploy, create an EC2 instance, and installing the required package in the EC2 server through SSH. Along the way, we also learned how to set up the AppSpec file and GitHub Actions CI/CD workflow pipeline. It has been a very interesting walkthrough that can help us automate the deployments of our project in minutes instead of hours or days.
We hope this article will help you build your own customized CI/CD Pipelines for your own awesome software projects.
Источник


