- Why can’t I connect to my Amazon S3 bucket from my Amazon EC2 instance?
- Short description
- Resolution
- Create an IAM instance profile that grants access to Amazon S3
- Attach the IAM instance profile to the EC2 instance
- Validate permissions on your S3 bucket
- Validate network connectivity from the EC2 instance to Amazon S3
- Validate access to S3 buckets
- How to mount Amazon S3 Bucket as a Windows Drive
- To Add new Mapped Drive
- 1. Choose the storage account
- 2. Select an Amazon S3 Bucket to map
- 3. Specify Mapped Drive Letter
- 4. Click Add new drive
- Additional Drive Properties
- Mapped Drive
- Storage
- Caching
- Buckets overview
- About permissions
- Managing public access to buckets
- Bucket configuration options
Why can’t I connect to my Amazon S3 bucket from my Amazon EC2 instance?
Last updated: 2020-12-07
I’m unable to access an Amazon Simple Storage Service (Amazon S3) bucket from my Amazon Elastic Compute Cloud (Amazon EC2) instance. How can I enable read/write access to S3 buckets from an EC2 instance?
Short description
To connect to your S3 buckets from your EC2 instances, you need to do the following:
1. Create an AWS Identity and Access Management (IAM) profile role that grants access to Amazon S3.
2. Attach the IAM instance profile to the instance.
3. Validate permissions on your S3 bucket.
4. Validate network connectivity from the EC2 instance to Amazon S3.
3. Validate access to S3 buckets.
Resolution
Create an IAM instance profile that grants access to Amazon S3
2. Choose Roles, and then choose Create role.
3. Select AWS Service, and then choose EC2.
Note: Creating an IAM role from the console with EC2 selected as the trusted entity automatically creates an IAM instance profile with the same name as the role name. However, if the role is created using the AWS Command Line Interface (AWS CLI) or from the API, an instance profile isn’t automatically created. For more information, refer to I created an IAM role, but the role doesn’t appear in the drop-down list when I launch an instance. What do I do?
4. Select Next: Permissions.
5. Create a custom policy that provides the minimum required permissions to access your S3 bucket. For instructions on creating custom policies, see Writing IAM policies: how to grant access to an Amazon S3 bucket and Managing access to S3 resources.
Note: Creating a policy with the minimum required permissions is a security best practice. However, to allow EC2 access to all your Amazon S3 buckets, you can use the AmazonS3ReadOnlyAccess or AmazonS3FullAccess managed IAM policy.
6. Select Next: Tags, and then select Next: Review.
7. Enter a Role name, and then select Create role.
Attach the IAM instance profile to the EC2 instance
2. Choose Instances.
3. Select the instance that you want to attach the IAM role to.
4. Choose the Actions tab, choose Security, and then choose Modify IAM role.
5. Select the IAM role that you just created, and then choose Save. The IAM role is assigned to your EC2 instance.
Validate permissions on your S3 bucket
2. Select the S3 bucket that you want to verify the policy for.
3. Choose Permissions.
4. Choose Bucket Policy.
5. Search for statements with Effect: Deny.
6. In your bucket policy, edit or remove any Effect: Deny statements that are denying the IAM instance profile access to your bucket. For instructions on editing policies, see Editing IAM policies.
Validate network connectivity from the EC2 instance to Amazon S3
Verify that the EC2 instance has connectivity to S3 endpoints.
The instance must be one of the following:
EC2 instance with a public IP address and a route table entry with the default route pointing to an Internet Gateway.
Private EC2 instance with a default route through a NAT gateway.
Private EC2 instance with connectivity to Amazon S3 using a Gateway VPC endpoint.
Validate access to S3 buckets
2. Verify access to your S3 buckets by running the following command. Replace DOC-EXAMPLE-BUCKET with the name of your S3 bucket.
Note: S3 objects that are encrypted with an AWS Key Management Service (AWS KMS) key, must have kms: Decrypt permissions granted in the IAM role attached to the instance and in the KMS key policy in order for a copy or download to be successful. For more information, see Do I need to specify the AWS KMS key when I download a KMS-encrypted object from Amazon S3?
How to mount Amazon S3 Bucket as a Windows Drive
From this tutorial you will learn how to mount an Amazon S3 Bucket as a Network Drive under Windows (or how to map an S3 Bucket as a Windows Drive).
First of all you need to download and install TntDrive.
The following window appears when you start TntDrive:
![]()
This is the main application window, it shows all mapped drives and lets you add new mapped drives or edit existing drives.
To Add new Mapped Drive
Click Add New Mapped Drive, corresponding dialog will open:
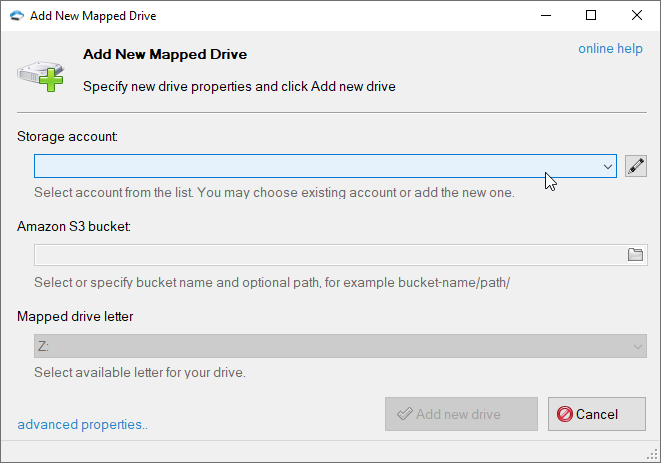
1. Choose the storage account
TntDrive supports various storage types, please choose the storage account you want to work with. If you adding the first drive, you need to add the storage account first.
2. Select an Amazon S3 Bucket to map
Click on the folder icon to get buckets list from the storage and choose desired bucket and optional path. You may also enter the bucket name and path manually.

If you do not have any buckets on your account or need to create the new one, just type the bucket name in the corresponding text-box and it will be created automatically.
You may also specify optional directory/subdirectory after the bucket name
Special note for IAM users: if you do not have permissions to get buckets list or create new buckets, you need to enter existing bucket name.
3. Specify Mapped Drive Letter
This letter will be assigned to the mapped drive.

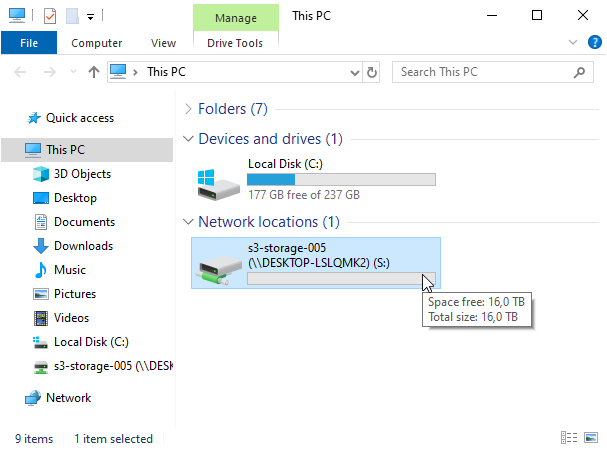
4. Click Add new drive

Your Amazon S3 bucket will appear in My Computer
Additional Drive Properties
You may also specify additional drive properties when adding new drive or editing existing one. Click the Advanced properties link located at the bottom left corner of the dialog.

Mapped Drive
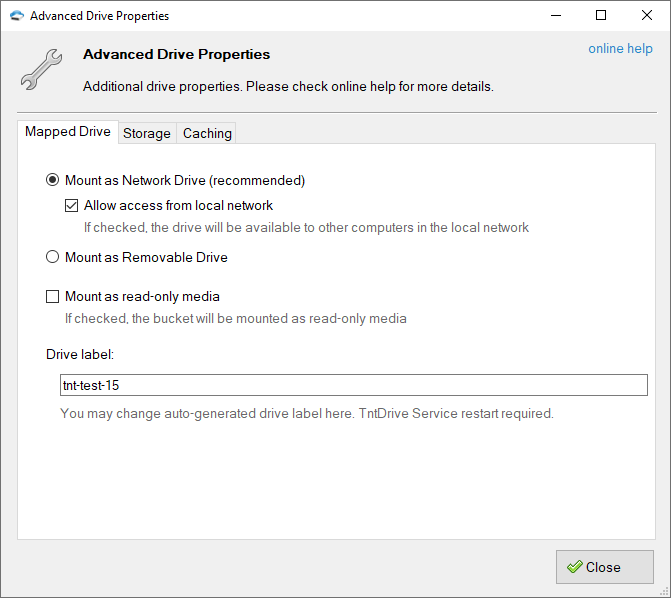
Mount as network drive — mapped drive will appear as a network mounted drive and it will also be available to other computers in your local network.
Allow access from local network — turn this option on if you would like to make mapped drive visible over the local network.
Mount as removable drive — mapped drive will appear as a removable drive and it will be visible only to users of the local system.
There are some differences of how Windows handle network drives and removable drives. It sends less requests to network drive. Windows is also more tolerant to delays when network drive is used. So, the Network Drive type is recommended.
Mount as read-only media — mount Amazon S3 Bucket in a read-only mode.
Enable Win32 Attributes Emulation — turn on to enable emulation of file Last Modification Time, Creation Time, Last Access Time and File Attributes.
Think twice before enabling this option for buckets that contain large number of files, performance could be at risk. Additional request will be sent for an each file to obtain attributes. Enabling File information caching is also recommended when using this option.
Storage
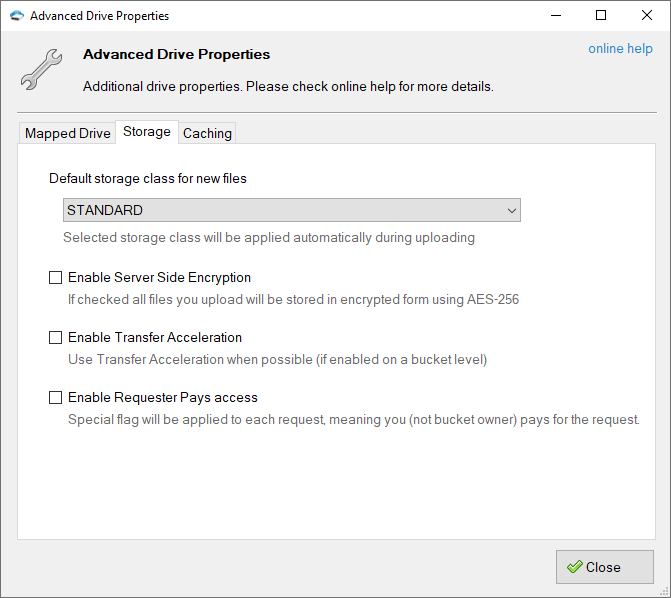
Default Storage Class — allows you to select which storage class will be automatically applied to files you upload via TntDrive. The following storage types are supported for now:
- STANDARD — Standard storage class.
- STANDARD_IA — Standard Infrequent Access storage class (cheaper than Standard but has some limitations, see AWS website for more details).
- ONEZONE_IA — S3 One Zone-IA (Infrequent Access) Storage Class (designed to be used to store data that does not need the extra level of protection provided by geographic redundancy)
- GLACIER — cold storage class for data that will be stored for decades without the need to access. You pay when you need to access your data (check out the pricing for more details)
- DEEP_ARCHIVE — cold storage class for data that will be stored for decades without the need to access. You pay when you need to access your data (check out the pricing for more details)
- INTELLIGENT_TIERING — storage class designed for customers who want to optimize storage costs automatically when data access patterns change, without performance impact or operational overhead. Amazon S3 monitors access patterns of the objects in S3 Intelligent-Tiering, and moves the ones that have not been accessed for 30 consecutive days to the infrequent access tier. If an object in the infrequent access tier is accessed, it is automatically moved back to the frequent access tier. Additional charges may apply, please check pricing for more details.
Enable Server Side Encryption — an Amazon S3 feature that allows you to store files on Amazon S3 in encrypted form using AES-256 encryption. Files decrypted automatically when you download them. Encryption keys are securely stored and managed by Amazon S3.
Enable Transfer Acceleration — an Amazon S3 feature that allows you to upload your files up to the 500% faster, based on the distributed AWS edge network. Click here to learn more about this feature and how to enable it on a bucket level. If this option is enabled and Transfer Acceleration is enabled on a bucket level, TntDrive will use accelerated endpoint to upload your files.
Caching
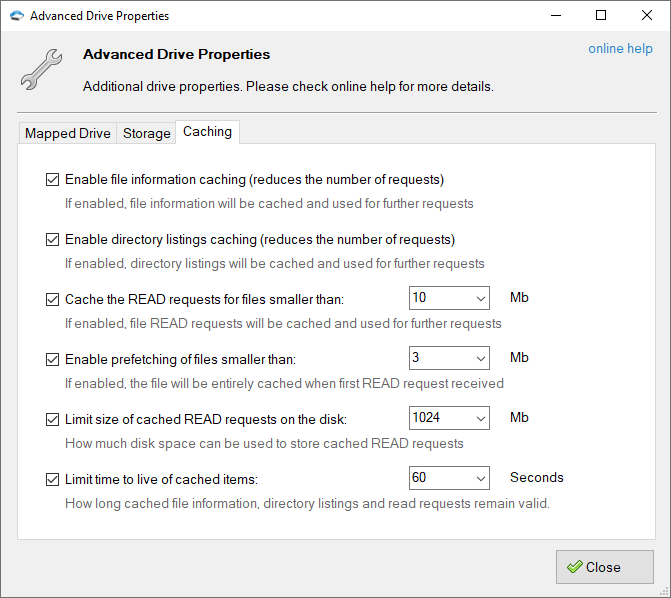
Enable file information caching — if enabled, file information will be cached in memory and used for further requests. Using this option you can reduce the number of requests sent to the server.
You may need to disable this option when working with the same files from multiple locations.
Cached file information is valid for the period specified by the Limit time to live of cached items option described below.
Enable directory listing caching — if enabled, directory listings will be cached in memory and used for further requests. Using this option you can reduce the number of requests sent to the server.
You may need to disable this option when working with the same directories from multiple locations.
Cached directory listings are valid for the period specified by the Limit time to live of cached items option described below.
Cache the READ requests for files smaller than: XX Mb — if enabled, TntDrive will cache portions of files requested by the calling application, for subsequent requests of the same block the cached copy will be returned. By specifying XX Mb you may set the max file size to cache the requests for.
Local disk is used to keep the cached data. You may configure cache location in Tools, Options, Advanced.
Cached file blocks are valid for the period specified by the Limit time to live of cached items option described below.
Enable prefetching of files smaller than: XX Mb — if enabled, TntDrive will download and cache the entire file when the first READ request received. Cached file will be used for all futher READ requests. By specifying XX Mb you may set the max file size to prefetch.
Local disk is used to keep the file. You may configure cache location in Tools, Options, Advanced.
Cached file is valid for the period specified by the Limit time to live of cached items option described below.
Limit size of cached READ requests on the disk: XX Mb — this option lets you limit the disk space used by cached READ requests and prefetched files, by specifying XX Mb you may set the max allowed cache size.
Limit time to live of cached items: XX Seconds — specifies how long the cached data remain valid. If the time interval between the time the item was cached and current time is greater than XX Seconds fresh copy will be requested from the server.
Please note that TntDrive does not update the cache if file/directory was changed outside of the mapped drive. You may use the following command to reset the cache manually: Drives — [Drive] — Reset Cache..
Buckets overview
To upload your data (photos, videos, documents, etc.) to Amazon S3, you must first create an S3 bucket in one of the AWS Regions. You can then upload any number of objects to the bucket.
In terms of implementation, buckets and objects are AWS resources, and Amazon S3 provides APIs for you to manage them. For example, you can create a bucket and upload objects using the Amazon S3 API. You can also use the Amazon S3 console to perform these operations. The console uses the Amazon S3 APIs to send requests to Amazon S3.
This section describes how to work with buckets. For information about working with objects, see Amazon S3 objects overview.
An Amazon S3 bucket name is globally unique, and the namespace is shared by all AWS accounts. This means that after a bucket is created, the name of that bucket cannot be used by another AWS account in any AWS Region until the bucket is deleted. You should not depend on specific bucket naming conventions for availability or security verification purposes. For bucket naming guidelines, see Bucket naming rules.
Amazon S3 creates buckets in a Region that you specify. To optimize latency, minimize costs, or address regulatory requirements, choose any AWS Region that is geographically close to you. For example, if you reside in Europe, you might find it advantageous to create buckets in the Europe (Ireland) or Europe (Frankfurt) Regions. For a list of Amazon S3 Regions, see Regions and Endpoints in the AWS General Reference.
Objects that belong to a bucket that you create in a specific AWS Region never leave that Region, unless you explicitly transfer them to another Region. For example, objects that are stored in the Europe (Ireland) Region never leave it.
Topics
About permissions
You can use your AWS account root user credentials to create a bucket and perform any other Amazon S3 operation. However, we recommend that you do not use the root user credentials of your AWS account to make requests, such as to create a bucket. Instead, create an AWS Identity and Access Management (IAM) user, and grant that user full access (users by default have no permissions).
These users are referred to as administrators. You can use the administrator user credentials, instead of the root user credentials of your account, to interact with AWS and perform tasks, such as create a bucket, create users, and grant them permissions.
The AWS account that creates a resource owns that resource. For example, if you create an IAM user in your AWS account and grant the user permission to create a bucket, the user can create a bucket. But the user does not own the bucket; the AWS account that the user belongs to owns the bucket. The user needs additional permission from the resource owner to perform any other bucket operations. For more information about managing permissions for your Amazon S3 resources, see Identity and access management in Amazon S3.
Managing public access to buckets
Public access is granted to buckets and objects through access control lists (ACLs), bucket policies, or both. To help you manage public access to Amazon S3 resources, Amazon S3 provides settings to block public access. Amazon S3 Block Public Access settings can override ACLs and bucket policies so that you can enforce uniform limits on public access to these resources. You can apply Block Public Access settings to individual buckets or to all buckets in your account.
To help ensure that all of your Amazon S3 buckets and objects have their public access blocked, we recommend that you turn on all four settings for Block Public Access for your account. These settings block all public access for all current and future buckets.
Before applying these settings, verify that your applications will work correctly without public access. If you require some level of public access to your buckets or objects—for example, to host a static website as described at Hosting a static website using Amazon S3—you can customize the individual settings to suit your storage use cases. For more information, see Blocking public access to your Amazon S3 storage.
Bucket configuration options
Amazon S3 supports various options for you to configure your bucket. For example, you can configure your bucket for website hosting, add a configuration to manage the lifecycle of objects in the bucket, and configure the bucket to log all access to the bucket. Amazon S3 supports subresources for you to store and manage the bucket configuration information. You can use the Amazon S3 API to create and manage these subresources. However, you can also use the console or the AWS SDKs.
There are also object-level configurations. For example, you can configure object-level permissions by configuring an access control list (ACL) specific to that object.
These are referred to as subresources because they exist in the context of a specific bucket or object. The following table lists subresources that enable you to manage bucket-specific configurations.
cors (cross-origin resource sharing)
You can configure your bucket to allow cross-origin requests.
You can enable your bucket to send you notifications of specified bucket events.
You can define lifecycle rules for objects in your bucket that have a well-defined lifecycle. For example, you can define a rule to archive objects one year after creation, or delete an object 10 years after creation.
When you create a bucket, you specify the AWS Region where you want Amazon S3 to create the bucket. Amazon S3 stores this information in the location subresource and provides an API for you to retrieve this information.
Logging enables you to track requests for access to your bucket. Each access log record provides details about a single access request, such as the requester, bucket name, request time, request action, response status, and error code, if any. Access log information can be useful in security and access audits. It can also help you learn about your customer base and understand your Amazon S3 bill. В
To use S3 Object Lock, you must enable it for a bucket. You can also optionally configure a default retention mode and period that applies to new objects that are placed in the bucket.
policy and ACL (access control list)
All your resources (such as buckets and objects) are private by default. Amazon S3 supports both bucket policy and access control list (ACL) options for you to grant and manage bucket-level permissions. Amazon S3 stores the permission information in the policy and acl subresources.
Replication is the automatic, asynchronous copying of objects across buckets in different or the same AWS Regions. For more information, see Replicating objects.
By default, the AWS account that creates the bucket (the bucket owner) pays for downloads from the bucket. Using this subresource, the bucket owner can specify that the person requesting the download will be charged for the download. Amazon S3 provides an API for you to manage this subresource.
You can add cost allocation tags to your bucket to categorize and track your AWS costs. Amazon S3 provides the tagging subresource to store and manage tags on a bucket. Using tags you apply to your bucket, AWS generates a cost allocation report with usage and costs aggregated by your tags.
Transfer Acceleration enables fast, easy, and secure transfers of files over long distances between your client and an S3 bucket. Transfer Acceleration takes advantage of the globally distributed edge locations of Amazon CloudFront.
Versioning helps you recover accidental overwrites and deletes.
We recommend versioning as a best practice to recover objects from being deleted or overwritten by mistake.
You can configure your bucket for static website hosting. Amazon S3 stores this configuration by creating a website subresource.


