- Установка драйвера AMD в Ubuntu
- Тест производительности системы
- Установка драйверов AMD на Ubuntu
- Шаг 1. Поиск старой версии
- Шаг 2. Загрузка драйвера
- Шаг 3. Установка драйвера
- Шаг 5. Проверка корректности установки
- Проверка производительности нового драйвера
- Удаление драйверов AMD
- Выводы
- AMDGPU
- Contents
- Selecting the right driver
- Installation
- Experimental
- Enable Southern Islands (SI) and Sea Islands (CIK) support
- Specify the correct module order
- Set required module parameters
- AMDGPU PRO
- ACO compiler
- Loading
- Xorg configuration
- Tear free rendering
- DRI level
- Variable refresh rate
- 10-bit color
- Reduce output latency
- Features
- Video acceleration
- Monitoring
- CLI (default)
- Overclocking
- Boot parameter
- Manual (default)
- Assisted
- Startup on boot
- Power profiles
- Enable GPU display scaling
- Troubleshooting
- Xorg or applications will not start
- Screen artifacts and frequency problem
- Artifacts in Chromium
- R9 390 series poor performance and/or instability
- Freezes with «[drm] IP block:gmc_v8_0 is hung!» kernel error
- Cursor corruption
- System freeze or crash when gaming on Vega cards
- Navi power consumption
- WebRenderer (Firefox) corruption
- Double-speed or «chipmunk» audio, or no audio when a 4K@60Hz device is connected
Установка драйвера AMD в Ubuntu
Одной из актуальных проблем в Linux является настройка корректной и максимально производительной работы видеокарты. В данной статье мы рассмотрим как выполняется установка драйвера AMD в Ubuntu на примере видеокарты Sapphire RX480 с 8 Гб памяти.
В статье мы проведем установку драйвера, научимся проверять его наличие в системе и сравним производительность различных реализаций драйверов в операционной системе Ubuntu.
Для видеокарт данного производителя существуют три актуальных варианта видеодрайвера:
- Mesa – свободное программное обеспечение для видеокарт различных производителей, реализующее API OpenGL и Vulcan. Используется по умолчанию в большинстве операционных систем Linux.
- AMDGPU-PRO – проприетарные драйвера от фирмы AMD. Включают в себя драйвера AMDGPU и различные дополнительные модули с закрытым программным кодом.
- AMDGPU – драйвера для видеокарт от фирмы AMD с открытым программным кодом.
Прежде чем переходить к установке драйвера давайте проверим производительность видеокарты без драйвера, чтобы увидеть действительно ли стоит ставить этот драйвер.
Тест производительности системы
Прежде всего оценим производительность системы без драйвера. Для проверки производительности мы будем использовать тест Unigine Heaven. Данный пакет можно скачать по ссылке. После установки пакета запускаем его и устанавливаем требуемые нам настройки тестирования. В моем случае это были следующие параметры:
- API: OpenGL;
- Качество: Ультра;
- Тесселяция: Экстрим;
- Стерео 3D: Выключено;
- Матрица: Выключить;
- AA: х8;
- Полный экран: Да;
- Разрешение: 1920х1080.
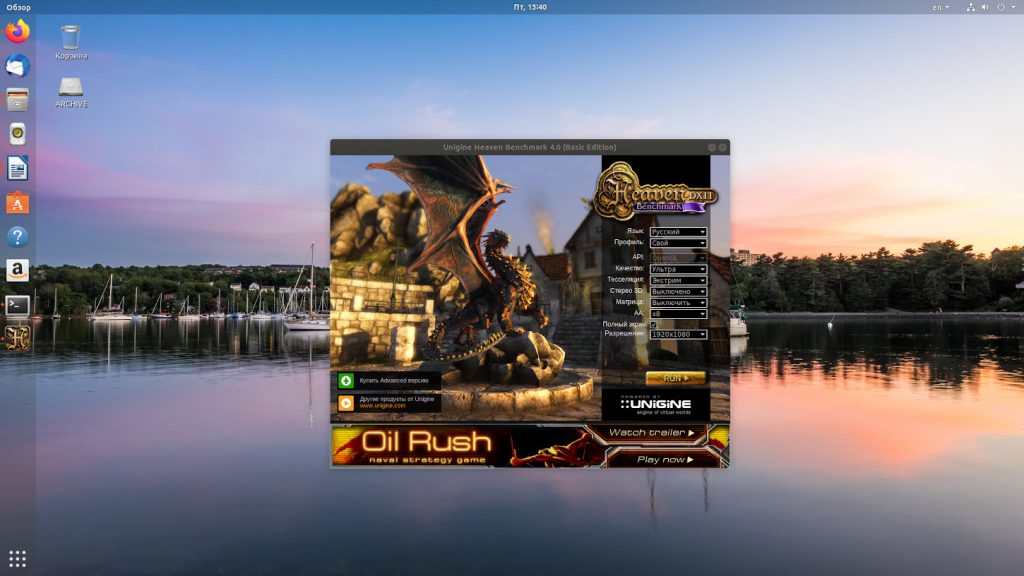
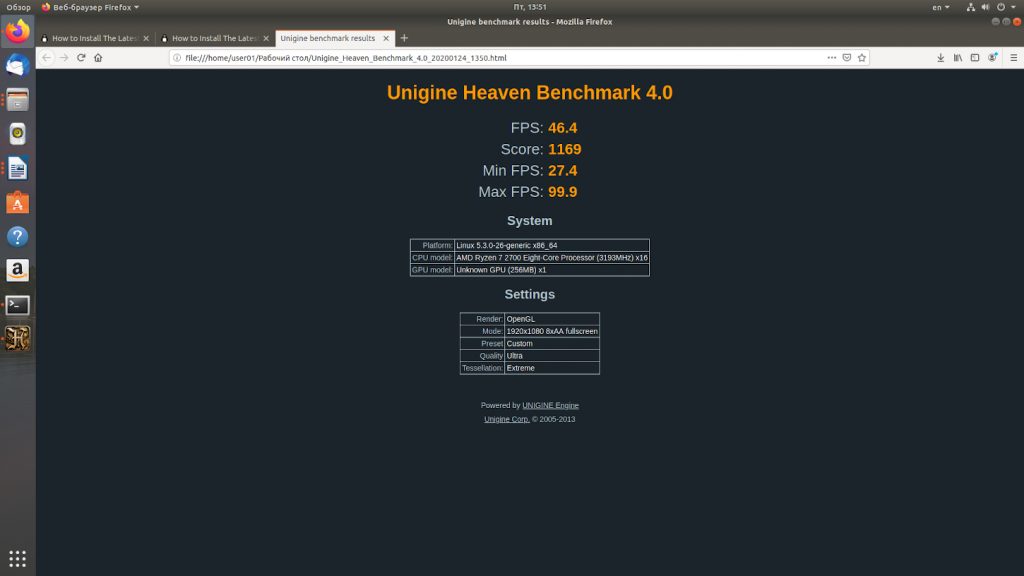
Запускаем пакет тестирования. Выбираем в меню опцию Бенчмарк и ждём результатов. В итоге я получил следующие данные.
Далее разберемся как выполняется установка amdgpu pro в ubuntu 18.04.
Установка драйверов AMD на Ubuntu
Теперь мы можем заняться установкой драйверов AMD (PRO или открытой версии).
Шаг 1. Поиск старой версии
Для проверки установлена ли у нас уже данная реализация драйверов выполняем команду
dpkg -l amdgpu-pro
Если драйвера не обнаружены, то необходимо их установить.

Шаг 2. Загрузка драйвера
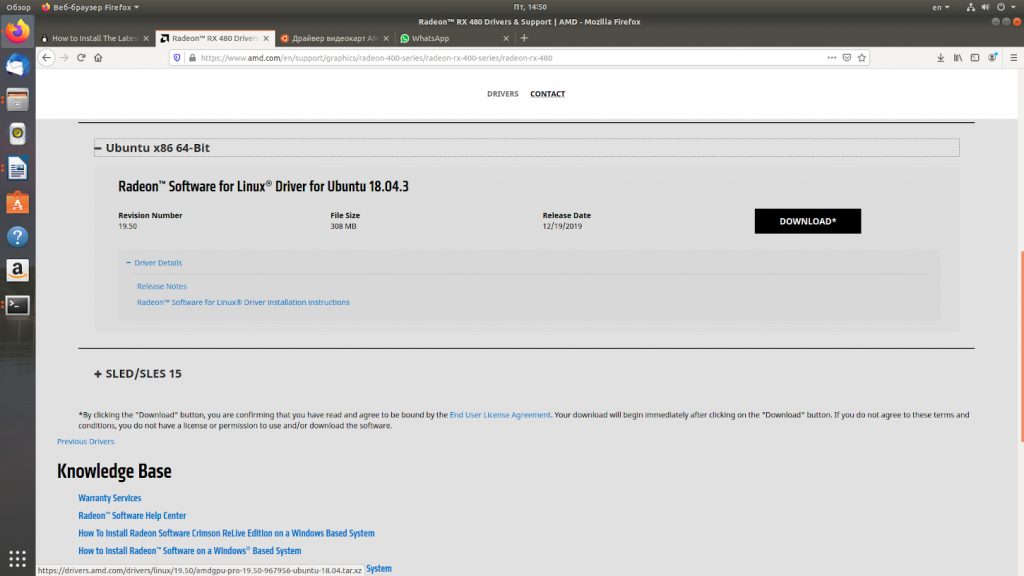
Переходим на страницу загрузки драйверов Radeon по ссылке. Выбираем нашу модель видеокарты. Нажимаем кнопку Submit.
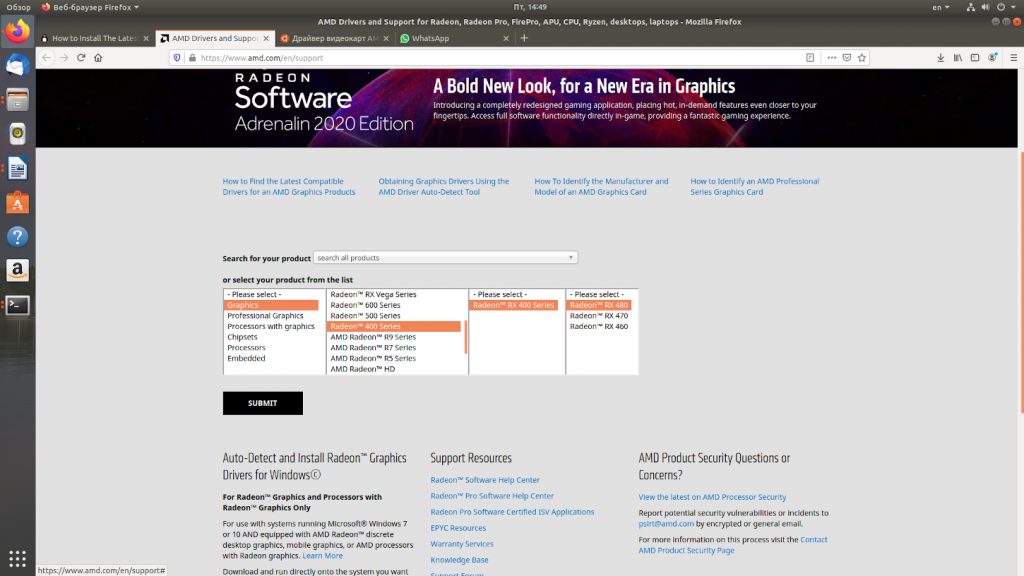
Выбираем версию операционной системы, версию драйвера и нажимаем кнопку Download.
Переходим в папку Загрузки, смотрим название пакета и распаковываем пакет архиватором в данной директории с помощью команды tar:
tar -Jxvf amdgpu-pro-19.50-967956-ubuntu-18.04.tar.xz
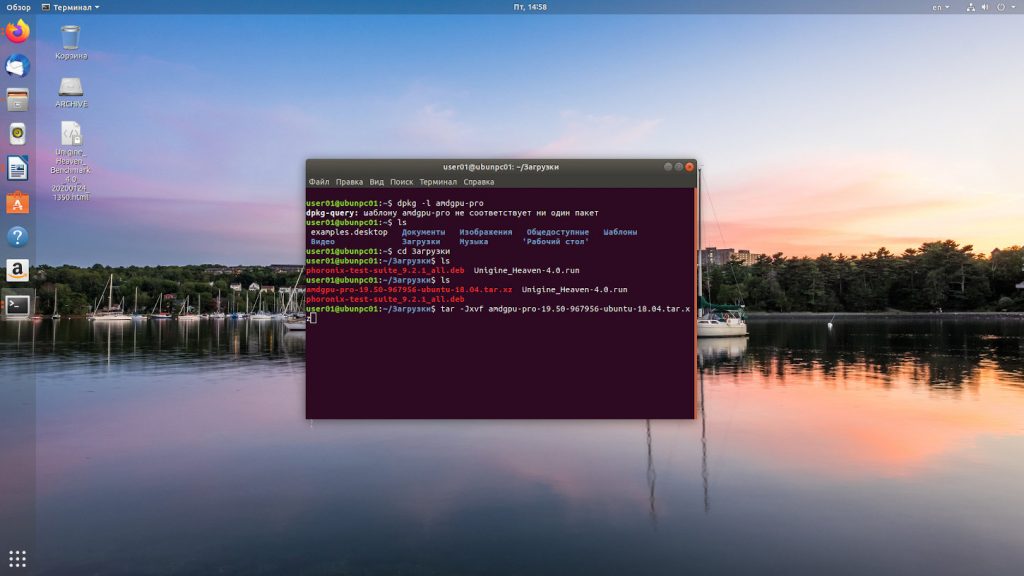
Переходим в папку с распакованными драйверами с помощью команды:
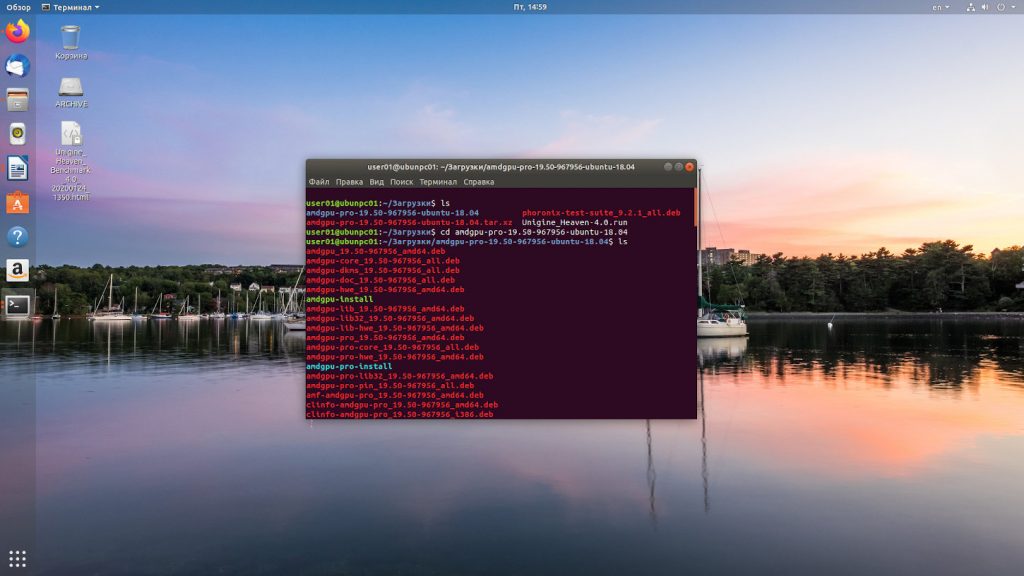
Шаг 3. Установка драйвера
Установка драйвера AMDGPU в Ubuntu открытой версии выполняется командой:
Для установки версии драйвера с проприетарными модулями запускаем команду:
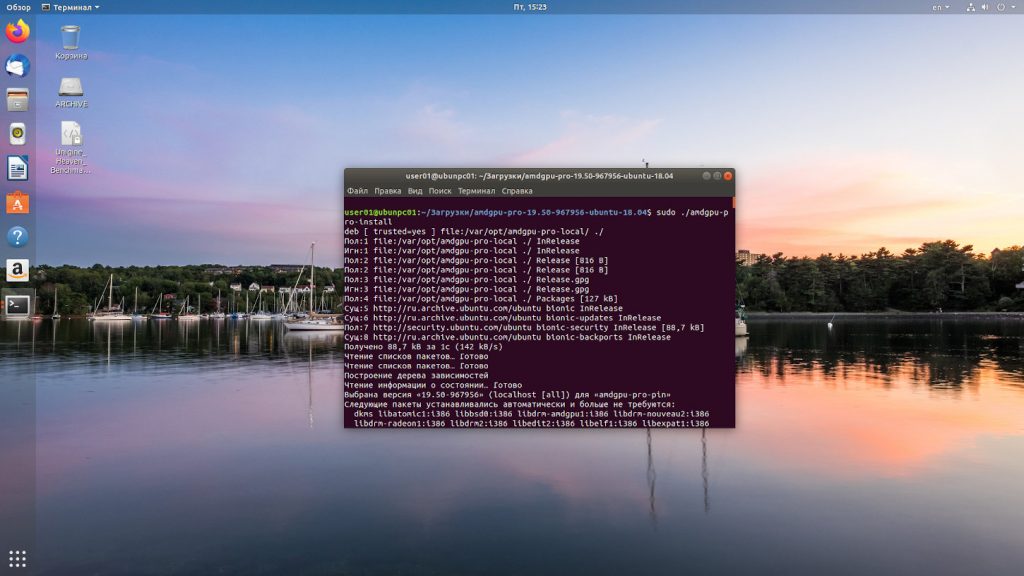
Дожидаемся пока проприетарные драйвера amd ubuntu 18.04 установятся. При выполнении процесса установки стоит проявить терпение и подождать, когда установка завершиться. Затем текущего пользователя добавляем в группу video с помощью команды
sudo usermod -a -G video $LOGNAME

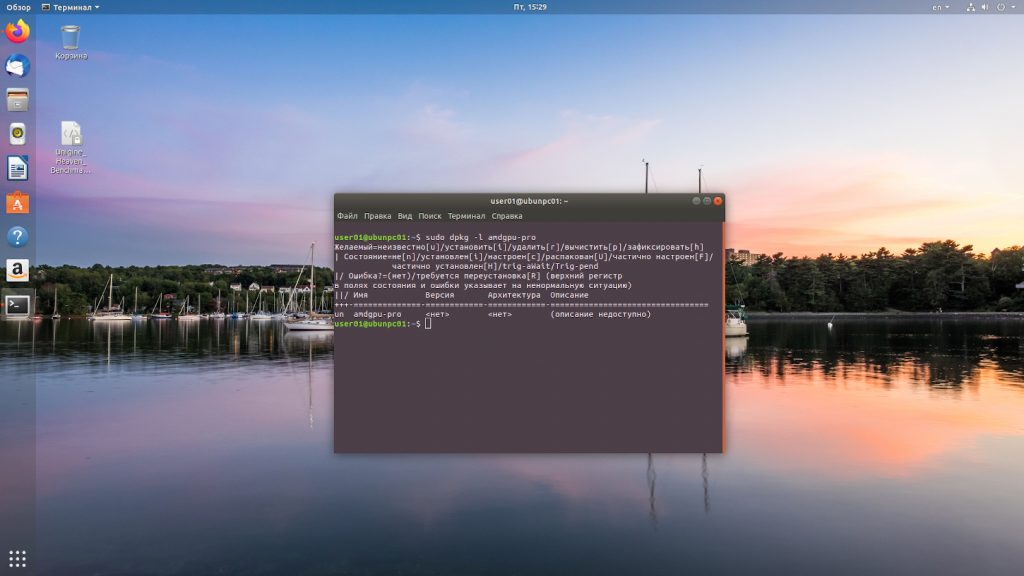
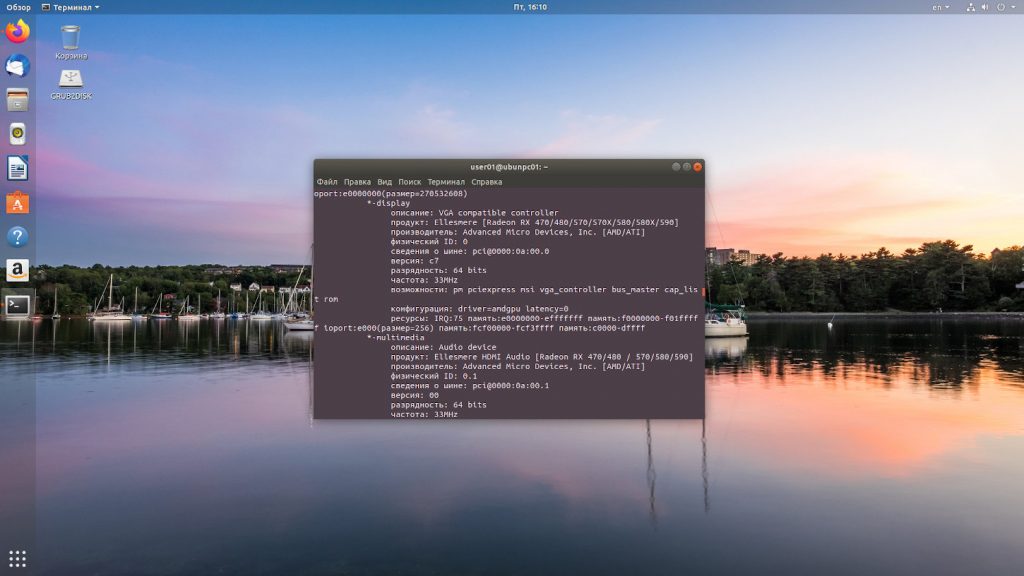
Шаг 5. Проверка корректности установки
После этого перезагружаем систему и проверяем – установлены ли драйвера у нас системе. Это можно сделать несколькими методами.
sudo dpkg -l amdgpu-pro
lspci -k | grep -EA2 “VGA|3D|Display”
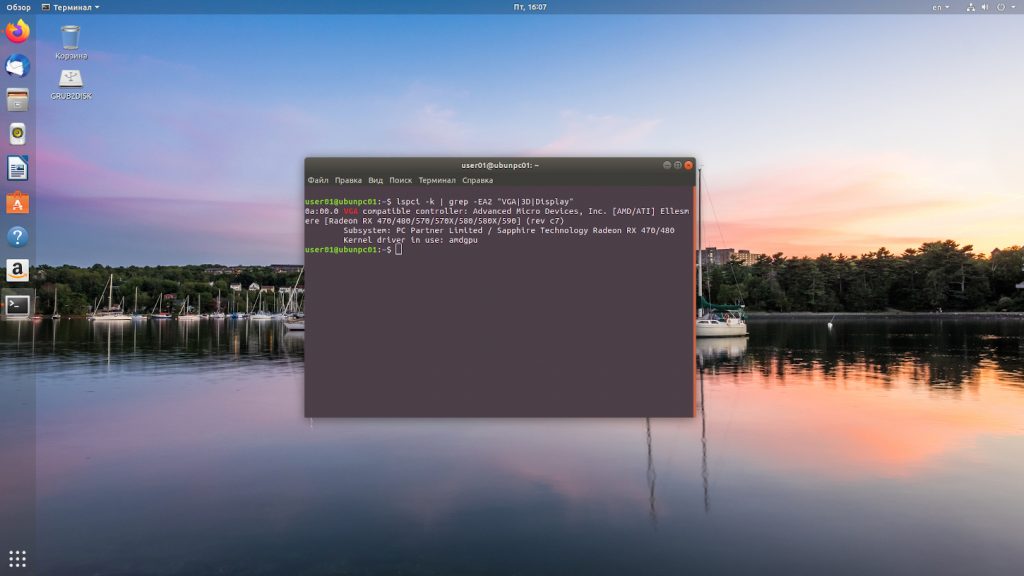

Проматываем результат команды до раздела *-display и смотрим параметры.
Проверка производительности нового драйвера
Теперь мы можем вторично протестировать производительность нашего компьютера с помощью бенчмарка Unigine Heaven. Параметры бенчмарка были оставлены без изменений. Результат оказался выше, чем с драйверами по умолчанию на 10,78%. При этом следует заметить, что разница между минимальным и максимальным FPS также существенно выросла.

Удаление драйверов AMD
Чтобы удалить драйвер AMDGPU Ubuntu следует выполнить тот же скрипт, который вы использовали при установке только с опцией —uninstall. Например:
sudo ./amdgpu-install —uninstall
sudo ./amdgpu-pro-install —uninstall
Выводы
Сегодня мы разобрались с одним важным вопросом о драйверах для карт AMD – стоит ли их заменять на версию от производителя? И я должен ответить, что да, стоит. Прирост производительности составляет 10 процентов, что, думаю, не окажется лишним как в рабочих задачах, так и в играх.
Также мы выяснили какие версии драйверов для видеокарт данного производителя существуют, разобрались с их установкой, удалением и проверкой их наличия в операционной системе Ubuntu 18.04.
Источник
AMDGPU
AMDGPU is the open source graphics driver for AMD Radeon graphics cards from the Graphics Core Next family.
Contents
Selecting the right driver
Depending on the card you have, find the right driver in Xorg#AMD. This page has instructions for AMDGPU and AMDGPU PRO. At the moment there is Xorg radeon driver support for Southern Islands (SI) through Arctic Islands (AI) cards. AMD has no plans to support pre-GCN GPUs. Owners of unsupported GPUs may use the open source radeon driver.
Installation
Install the mesa package, which provides the DRI driver for 3D acceleration.
- For 32-bit application support, also install the lib32-mesa package from the multilib repostory.
- For the DDX driver (which provides 2D acceleration in Xorg), install the xf86-video-amdgpu package.
- For Vulkan support, install the vulkan-radeon or amdvlk package. Optionally install the lib32-vulkan-radeon or lib32-amdvlk package for 32-bit application support.
Experimental
It may be worthwhile for some users to use the upstream experimental build of mesa, to enable features such as AMD Navi improvements that have not landed in the standard mesa packages.
Install the mesa-git AUR package, which provides the DRI driver for 3D acceleration.
- For 32-bit application support, also install the lib32-mesa-gitAUR package from the mesa-git repository or the AUR.
- For the DDX driver (which provides 2D acceleration in Xorg), install the xf86-video-amdgpu-gitAUR package.
- For Vulkan support using the mesa-git repository below, install the vulkan-radeon-git package. Optionally install the lib32-vulkan-radeon-git package for 32-bit application support. This should not be required if building mesa-gitAUR from the AUR.
Enable Southern Islands (SI) and Sea Islands (CIK) support
The linux package enables AMDGPU support for cards of the Southern Islands (SI, ie. GCN 1) and Sea Islands (CIK, ie. GCN 2). When building or compiling a kernel, CONFIG_DRM_AMDGPU_SI=Y and/or CONFIG_DRM_AMDGPU_CIK=Y should be be set in the config.
Specify the correct module order
Even when AMDGPU support for SI/CIK has been enabled by the kernel, the radeon driver may be loaded before the amdgpu driver.
Make sure amdgpu has been set as first module in the Mkinitcpio#MODULES array, e.g. MODULES=(amdgpu radeon) .
Set required module parameters
The module parameters of both amdgpu and radeon modules are cik_support= and si_support= .
They need to be set as kernel parameters or in a modprobe configuration file, and depend on the cards GCN version.
Set module parameters in kernel command line
Set one of the following kernel parameters:
- Southern Islands (SI): radeon.si_support=0 amdgpu.si_support=1
- Sea Islands (CIK): radeon.cik_support=0 amdgpu.cik_support=1
Set module parameters in modprobe.d
Create the configuration modprobe files in /etc/modprobe.d/ , see modprobe.d(5) for syntax details.
For Southern Islands (SI) use option si_support=1 , for Sea Islands (CIK) use option cik_support=1 , e.g.:
Make sure modconf is in the the HOOKS array in /etc/mkinitcpio.conf and regenerate the initramfs.
AMDGPU PRO
AMD provides a proprietary, binary userland driver called AMDGPU PRO, which works on top of the open-source AMDGPU kernel driver.
From Radeon Software 18.50 vs Mesa 19 benchmarks article: When it comes to OpenGL games, the RadeonSI Gallium3D driver simply dominates the proprietary AMD OpenGL driver.
Install the amdgpu-pro-libgl AUR . Optionally install the lib32-amdgpu-pro-libgl AUR package for 32-bit application support.
ACO compiler
The ACO compiler is an open source shader compiler created and developed by Valve Corporation to directly compete with the LLVM compiler, the AMDVLK drivers, as well as Windows 10. It offers lesser compilation time and also performs better while gaming than LLVM and AMDVLK.
Some benchmarks can be seen in It’s FOSS and Phoronix (1) (2) (3).
Since mesa version 20.2, the ACO compiler is enabled by default.
Loading
The amdgpu kernel module is supposed to load automatically on system boot.
- Make sure to #Enable Southern Islands (SI) and Sea Islands (CIK) support when needed.
- Make sure you have the latest linux-firmware package installed. This driver requires the latest firmware for each model to successfully boot.
- Make sure you do not have nomodeset or vga= as a kernel parameter, since amdgpu requires KMS.
- Check that you have not disabled amdgpu by using any kernel module blacklisting.
It is possible it loads, but late, after the X server requires it. In this case:
Xorg configuration
Xorg will automatically load the driver and it will use your monitor’s EDID to set the native resolution. Configuration is only required for tuning the driver.
If you want manual configuration, create /etc/X11/xorg.conf.d/20-amdgpu.conf , and add the following:
Using this section, you can enable features and tweak the driver settings, see amdgpu(4) first before setting driver options.
Tear free rendering
TearFree controls tearing prevention using the hardware page flipping mechanism. If this option is set, the default value of the property is ‘on’ or ‘off’ accordingly. If this option is not set, the default value of the property is auto, which means that TearFree is on for rotated outputs, outputs with RandR transforms applied and for RandR 1.4 slave outputs, otherwise off:
You can also enable TearFree temporarily with xrandr:
Where output should look like DisplayPort-0 or HDMI-A-0 and can be acquired by running xrandr -q .
DRI level
DRI sets the maximum level of DRI to enable. Valid values are 2 for DRI2 or 3 for DRI3. The default is 3 for DRI3 if the Xorg version is >= 1.18.3, otherwise DRI2 is used:
Variable refresh rate
10-bit color
Newer AMD cards support 10bpc color, but the default is 24-bit color and 30-bit color must be explicitly enabled. Enabling it can reduce visible banding/artifacts in gradients, if the applications support this too. To check if your monitor supports it search for «EDID» in your Xorg log file (e.g. /var/log/Xorg.0.log or
To check whether it is currently enabled search for «Depth»):
With the default configuration it will instead say the depth is 24, with 24 bits stored in 4 bytes.
To check whether 10-bit works, exit Xorg if you have it running and run Xorg -retro which will display a black and white grid, then press Ctrl-Alt-F1 and Ctrl-C to exit X, and run Xorg -depth 30 -retro . If this works fine, then 10-bit is working.
To launch in 10-bit via startx , use startx — -depth 30 . To permanently enable it, create or add to:
Various software may have graphical artifacts or crash with 10-bpc color.
Reduce output latency
If you want to minimize latency you can disable page flipping and tear free:
See Gaming#Reducing DRI latency to further reduce latency.
Features
Video acceleration
Monitoring
Monitoring your GPU is often used to check the temperature and also the P-states of your GPU.
CLI (default)
To check your GPU’s P-states, execute:
To monitor your GPU, execute:
To check your GPU utilization, execute:
To check your GPU frequency, execute:
To check your GPU temperature, execute:
To check your VRAM frequency, execute:
To check your VRAM usage, execute:
To check your VRAM size, execute:
With radeontop utility you can view your GPU utilization, both for the total activity percent and individual blocks. Install it with radeontop package. If it does not recognize your GPU, try radeontop-git AUR .
- WattmanGTK — A GTK GUI tool to monitor your GPU’s temperatures P-states
https://github.com/BoukeHaarsma23/WattmanGTK || wattman-gtk-gitAUR .
- TuxClocker — A Qt5 monitoring and overclocking tool.
https://github.com/Lurkki14/tuxclocker || tuxclockerAUR
Overclocking
Since Linux 4.17, it is possible to adjust clocks and voltages of the graphics card via /sys/class/drm/card0/device/pp_od_clk_voltage .
Boot parameter
It is required to unlock access to adjust clocks and voltages in sysfs by appending the Kernel parameter amdgpu.ppfeaturemask=0xffffffff .
Manual (default)
To set the GPU clock for the maximum P-state 7 on e.g. a Polaris GPU to 1209MHz and 900mV voltage, run:
The same procedure can be applied to the VRAM, e.g. maximum P-state 2 on Polaris 5xx series cards:
To check if it worked out, read out clocks and voltage under 3D load:
You can reset to the default values using this:
It is also possible to forbid the driver so switch to certain P-states, e.g. to workaround problems with deep powersaving P-states like flickering artifacts or stutter. To force the highest VRAM P-state on a Polaris RX 5xx card, while still allowing the GPU itself to run with lower clocks, run:
Allow only the three highest GPU P-states:
To set the allowed maximum power consumption of the GPU to e.g. 50 Watts, run
Until Linux kernel 4.20, it will only be possible to decrease the value, not increase.
Assisted
If you are not inclined to fully manually overclock your GPU, there are some overclocking tools that are offered by the community to assist you to overclock and monitor your AMD GPU.
CLI tools
- amdgpu-clocks — A script that can be used to monitor and set custom power states for AMD GPUs. It also offers a Systemd service to apply the settings automatically upon boot.
https://github.com/sibradzic/amdgpu-clocks || amdgpu-clocks-gitAUR
GUI tools
- TuxClocker — A Qt5 monitoring and overclocking tool.
https://github.com/Lurkki14/tuxclocker || tuxclockerAUR
- CoreCtrl — A GUI overclocking tool with a WattMan-like UI that supports per-application profiles.
https://gitlab.com/corectrl/corectrl || corectrlAUR
Startup on boot
If you want your settings to apply automatically upon boot, consider looking at this Reddit thread to configure and apply your settings on boot.
Power profiles
AMDGPU offers several optimizations via power profiles, one of the most commonly used is the compute mode for OpenCL intensive applications. Available power profiles can be listed with:
To use a specific power profile you should first enable manual control over them with:
Then to select a power profile by writing the NUM field associated with it, e.g. to enable COMPUTE run:
Enable GPU display scaling
 This article or section is a candidate for moving to xrandr.
To avoid the usage of the scaler which is built in the display, and use the GPU own scaler instead, when not using the native resolution of the monitor, execute:
Possible values for «scaling mode» are: None , Full , Center , Full aspect .
- To show the available outputs and settings, execute:
- To set scaling mode = Full aspect for just every available output, execute:
Troubleshooting
Xorg or applications will not start
- «(EE) AMDGPU(0): [DRI2] DRI2SwapBuffers: drawable has no back or front?» error after opening glxgears, can open Xorg server but OpenGL apps crash.
- «(EE) AMDGPU(0): Given depth (32) is not supported by amdgpu driver» error, Xorg will not start.
Setting the screen’s depth under Xorg to 16 or 32 will cause problems/crash. To avoid that, you should use a standard screen depth of 24 by adding this to your «screen» section:
Screen artifacts and frequency problem
Dynamic power management may cause screen artifacts to appear when displaying to monitors at higher frequencies (anything above 60Hz) due to issues in the way GPU clock speeds are managed[1][2].
A workaround [3] is saving high or low in /sys/class/drm/card0/device/power_dpm_force_performance_level .
To make it persistent, you may create a udev rule:
To determine the KERNEL name execute:
There is also a GUI solution [4] where you can manage the «power_dpm» with radeon-profile-git AUR and radeon-profile-daemon-git AUR .
Artifacts in Chromium
If you see artifacts in Chromium, try to force the vulkan based backend. Go to chrome://flags and enable #ignore-gpu-blacklist and #enable-vulkan .
R9 390 series poor performance and/or instability
If you experience issues [5] with a AMD R9 390 series graphics card, set radeon.cik_support=0 radeon.si_support=0 amdgpu.cik_support=1 amdgpu.si_support=1 amdgpu.dc=1 as kernel parameters to force the use of amdgpu driver instead of radeon.
If it still does not work, try disabling DPM, by setting the kernel parameters to: radeon.cik_support=0 radeon.si_support=0 amdgpu.cik_support=1 amdgpu.si_support=1
Freezes with «[drm] IP block:gmc_v8_0 is hung!» kernel error
If you experience freezes and kernel crashes during a GPU intensive task with the kernel error » [drm] IP block:gmc_v8_0 is hung!» [6], a workaround is to set amdgpu.vm_update_mode=3 as kernel parameters to force the GPUVM page tables update to be done using the CPU. Downsides are listed here [7].
Cursor corruption
If you experience issues with the mouse cursor sometimes not rendering properly, set Option «SWCursor» «True» in the «Device» section of the /etc/X11/xorg.conf.d/20-amdgpu.conf configuration file.
If you are using xrandr for scaling and the cursor is flickering or disappearing, you may be able to fix it by setting the TearFree property: xrandr —output HDMI-A-0 —set TearFree on .
System freeze or crash when gaming on Vega cards
Dynamic power management may cause a complete system freeze whilst gaming due to issues in the way GPU clock speeds are managed. [8] A workaround is to disable dynamic power management, see ATI#Dynamic power management for details.
Navi power consumption
Some users have reported higher than usual idle power consumption when using kernel 5.3. There is a patch set available for kernel 5.4 that appears to fix the issues.
WebRenderer (Firefox) corruption
Artifacts and other anomalies may present themselves (e.g. inability to select extension options) when WebRenderer is force enabled by the user. Workaround is to fall back to OpenGL compositing.
Double-speed or «chipmunk» audio, or no audio when a 4K@60Hz device is connected
This is sometimes caused by a communication issue between an AMDGPU device and a 4K display connected over HDMI. A possible workaround is to enable HDR or «Ultra HD Deep Color» via the display’s built-in settings. On many Android based TVs, this means setting this to «Standard» instead of «Optimal».
Источник


