- Download Amlogic USB Burning Tool v2.0.7.2
- You can use Amlogic USB Burning Tool to flash firmwares from a Windows PC to Android devices powered by Amlogic processors.
- Did this article help you? If so, please tell me in a comment what do you think about it.
- Download Amlogic USB Burning Tool v3.1.0 (Latest Version)
- Amlogic USB Burning Tool Features
- 1. Easy To Install:
- 2. Flash Stock Firmware:
- 3. Multiple Options:
- 4. Supports All Windows Versions:
- 5. Multi-Language Support:
- 6. View Device Data:
- Amlogic usb burning tool linux
- SELECT UPDATE METHOD
- FLASH FIRMWARE WITH IMG FILE
- 1-A Flash with a .img file by preparing an external drive on PC
- 1-B Flash using a PC connecting to the TV-Box
- Installation process
- 1-B.1 Fix error Get key failed or MAC = 0
- FLASH FIRMWARE VARIOUS FILES OR A ZIP
- 2-A Update with only one ZIP file
- 2-B Update with various files
- FLASH FIRMWARE WITH UBOOT.BIN FILE
- IMPOSSIBLE TO RECOVER THE TV-BOX
Download Amlogic USB Burning Tool v2.0.7.2
You can use Amlogic USB Burning Tool to flash firmwares from a Windows PC to Android devices powered by Amlogic processors.
Download Amlogic USB Burning Tool v2.0.7.2 from here, here or here. Download Amlogic USB Burning Tool v2.0.5.15 from here. Download previous version from here.
How to use Amlogic USB Burning Tool
1. Download Amlogic USB Burning Tool v2.0.7.2 (9.57 MB).
2. Extract the archive and run setup_v2.0.4.3.exe file to install the tool.
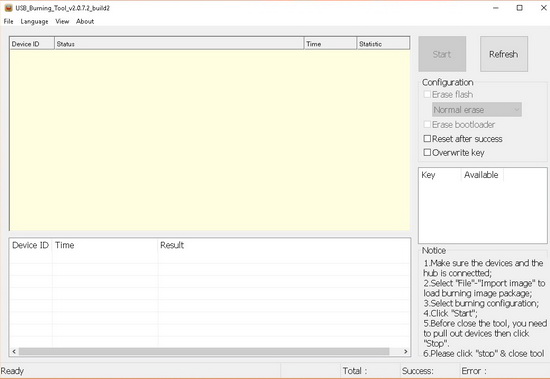
3. Start the USB_Burning_Tool.
4. Click on File->Import image and select your specific .img firmware for your Amlogic device.
5. Make sure that your Amlogic device is powered off, with the USB OTG port connected to your PC. Use a toothpick to press the recovery button, and power the device. The USB burning tool should automatically detect your device.
6. Now click on the ‘Start’ button button to proceed with the firmware update which should last several minutes.
Follow this video tutorial for more help.
Did this article help you? If so, please tell me in a comment what do you think about it.
Don’t miss any of our future video tutorials, follow us on Youtube. Like us on Facebook. Add us in your circles on Google+. Watch our photo albums on Flickr. Subscribe now to our newsletter.
Hi
I got dead mk809iv rk3188 t,Android 4.4.4
Any one advice how to flash with what firmware?
It is not decree by my windows 10 laptop
Now I am verge of get rid off it…
Regards
use mxiii tv box
Hi there, I have got an Amlogic s905x CPU inside my v88pro TvBox. It haven’t a reset button into AV hole. Please reply me how I can do the reset to my device. Is available an Amlogic USB Burning Tool for Linux OS ? Thanks for all…
i have a nobis 9″ tablet with a amlogic chip. aml8726-mxs
and em_m69 v1.2 mother board.
need firmware download, please
Hi, I have a MXQ android box can’t update to 17.0 I get a message saying my device is not compatible. Any ideas please
Источник
Download Amlogic USB Burning Tool v3.1.0 (Latest Version)
Are you using an Android smartphone or tablet powered by Amlogic chipset? If yes, are you looking for a quick way to flash stock firmware on your device? If yes is your answer again, then you are on the right page. Download Amlogic USB Burning Tool from here, install it on your Windows computer and use it to flash stock firmware on your Android device.
Amlogic USB Burning Tool is a small Windows utility tool that lets you flash stock ROM firmware on all Android devices with Amlogic chipset. Here you can download all versions of the Amlogic USB Burning Tool, including its latest version.
Amlogic USB Burning Tool Features
1. Easy To Install:
This tool comes as an installer application. After downloading the tool, just click the setup.exe and follow the systematic on-screen guidelines to install it on your computer.
2. Flash Stock Firmware:
This tool helps you in flashing stock firmware on Android devices powered by Amlogic chipsets. To do that, launch this tool on your Windows computer, load the firmware of your device (.img file) by using the Import Image option in its Window, connect your device, and press the start button.
3. Multiple Options:
Apart from flashing stock firmware on your Android device, you can use it to do other tasks, including Erase Bootloader, Erase Flash, Overwrite Key, and Reset After Success. There are four different Erase Flash methods available as well: Force Erase, Erase All, Force Erase All, and Normal Erase.
4. Supports All Windows Versions:
The Amlogic USB Burning Tool can be installed on computers using any versions of Windows operating system: Windows XP, Windows 7, Windows Vista, Windows 8, Windows 8.1, and Windows 10. Also, it supports both 32 bit and 64 bit Windows operating systems.
5. Multi-Language Support:
This tool is available in two languages: English and Chinese.
6. View Device Data:
By changing the Main Grid in this tool (View -> Select Menu), you can view Device ID, Time, Progress, MAC, Statistic, MAC_BT, MAC_WIFI, and SN/USID.
Источник
Amlogic usb burning tool linux
Today we present a guide to update, recover or unbrick with a firmware file our Android TV-Box with Soc Amlogic S802, S805, S812, S905, S905D, S905W, S905X, S912, S905X2, S905X3, S905Y2 or S922X . We have four methods in this tutorial that we will use depending on the files that we have to update, the most extended method is using the amlogic usb burning tool.
- FIND A FIRMWARE: If we do not have it published we don’t have it, ask to your shop
- NOTE: AndroidPCtv is not responsible for problems that may cause a firmware change. If your TV-Box works well, do not change.

SELECT UPDATE METHOD

- Method 1 = I have a single file with .img extension and I want to make it easy (you need a PC)
- Method 2 = I have several files .ini, .img, .aml, .bin or a zip file (without PC)
- Method 3 = I have several files and the “ u-boot.bin ” (deep recovery system)
- If the TV Box works well for our needs DO NOT UPDATE
- If we don’t know what we are doing DO NOT UPDATE
- If our TV-Box don’t work and does’t have reset button DO NOT TRY TO UPDATE , claim to the store.
- There are many TV-Boxes especially the cheap ones that are copies called ” clones ” that are incompatible with the official roms of the original models and can leave useless our TV Box or do not work the WIFI. It is impossible to know if we have a clone or not without opening the device and comparing it with another original. We recommend buying devices in the stores we recommend and if possible only known models from trusted brands.
- If you do not find firmware for your model you may not have any brand support.
FLASH FIRMWARE WITH IMG FILE
There are two options for this method, in both cases the content of the TV-Box will be completely erased
- Method 1-A = From a PC we will create a special SD card to restore the TV-Box
- Method 1-B = We will connect the TV-Box to a PC and then we will restore the TV-Box
1-A Flash with a .img file by preparing an external drive on PC
- We need an SD card or USB memory that will be completely formatted. If do not work with an external drive type try a different one. There may be compatibility issues or our TV-Box can be upgraded only from USB or SD.
- Download the software Burn Card Maker to create your external drive and update or restore your TV Box
- The first thing is to change the language to English to make it more understandable, we go to the upper menu second option
- Select English, OK, close the program and restart.
- In the top “Choose disk” menu select where we have our SD card or USB drive.
Mark “To Partition and Format”
Click on “Open” and select the IMG file of our firmware
Press “Make” to start the process of creating the external memory - A message will appear that will tell us that the partition system has been generated and we accept
We will see a message to format the drive> Start> OK> Close - As soon as the formatting process is finished, a blue bar will appear and it will be completed.
Once finished we will have our unit created and we can close the program. - In the unit that we created we must have three files:
aml_sdc_burn.ini
aml_sdc_burn.UBOOT
file.img (it is the one that has the whole image of the firmware) - Connect the HDMI cable and with the TV-Box off (take out the DC power cord) we introduce our SD or USB drive.
We keep the Flash Mode button pressed (some models are inside the audio/av jack) and insert the DC power cord to turn it on, wait for the update percentage to appear automatically in our TV screen.
The process can take from 4 to 12 minutes, wait without disconnecting the TV-Box from the power outlet.
If the recovery menu appears, the process has not gone well, it is necessary to repeat it with another SD or USB. - The SD or USB device that we used will be left with a special hidden partition that was created in the process, if you want to reuse it and recover all the space it is advisable to use Minitool Partition Wizard , delete all the partitions and recreate a single one.


1-B Flash using a PC connecting to the TV-Box
- Usually you need a USB Type-A to USB-Type-A cable, buy it at Aliexpress or Amazon.
- To update use the flash tool that comes with the rom, if is not included you can use the one in this article.
Older versions are incompatible and give errors during the process. - Always use a USB 2.0 connector
- If Chinese characters are unzipped in a directory, they must be deleted
- Process for WINDOWS 10 if it gives us detection problems:
Before running the installer of the flashing program we need to disable the secure signature of drivers.
– Windows 10: Start Menu> Settings> Update and Security> Recovery>
Under the Advanced Start option, click Restart Now> Troubleshooting> Advanced Options> Startup Settings> Restart> Press 7 or F7 to Disable the mandatory use of signed drivers.
– NOTE: The computer will reboot and you can install drivers without digital signatures. Restarting the computer again will enable the mandatory use of signed drivers.
Installation process
Download and install the AMLogic tool (read previous notes for Windows 10). We put two versions, first try with the most modern version that we have available if it does not work try with another older version.
- During the installation the corresponding drivers will be installed. If we see the menus in Chinese we have the option to put English in the second option from the top menu.
- Restart the PC
- Run the tool USB_Burning_Tool that has been installed on your PC and in the File / Import image tab select the . img file that you downloaded with the firmware to install.
- Now with your TV-Box off connect it with the correct USB cable (buy it at Aliexpress or Amazon) .
Some TV-Box lights with the power of the own USB OTG others require connecting the power adapter (is better).
After connect keep the Flash Mode button pressed on the device that is usually behind a small hole or inside the audio jack (for the Minix U1 and others of that mark only have to leave the power button pressed until the robot comes out) . - To flash the firmware you don’t need to see anything on the screen, the TV Box don’t even have to be connect to a screen, only to the PC.
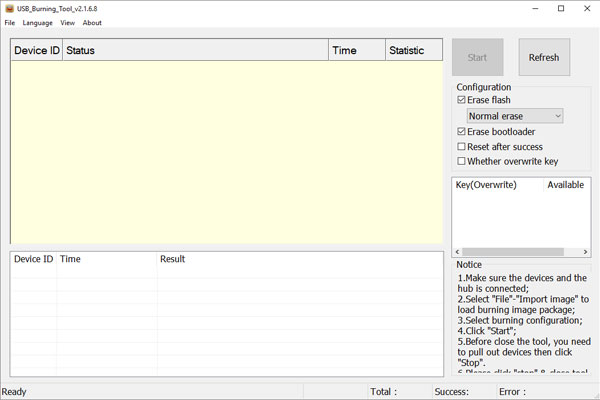
If the “recovery” menu appears on the screen with wipe and other options is that we did not press the button well, retry. - If everything goes well the flash tool on the PC will recognize your TV Box as in the following image.
– NEVER CHECK THE BOX “Reset after success” and “Overwrite key”
– If we have a red message “Get key failed” or MAC = 0, read point 1-B.1 of this manual - Press Start and wait for the percentage counter to reach 100%. Once the process is finished, the TV-Box will start again, it will take longer than usual to start, is a best practice to leave it a few minutes without touch after it starts and restart.


1-B.1 Fix error Get key failed or MAC = 0
If we have the message Get key failed is that we are missing the license files for the TV-Box, together with the rom or the utility the manufacturer usually has to supply us a file with different files inside, we have to copy those files inside the folder “license ” where we have installed the USB Burning Tool .
- Path where to copy the license files in Windows systems 64bit in 32bit without (x86):
“C:Program Files(x86)AmlogicUSB_Burning_Toollicense” - NOTE
In order for the system to work, we need to uninstall the AMLogic tool , reinstall it and copying the license files BEFORE starting it, then we can boot.
FLASH FIRMWARE VARIOUS FILES OR A ZIP
- Method 2-A = I have only a zip file
- Method 2-B = I have various files and the “ u-boot.bin ” (deep recovery system)
2-A Update with only one ZIP file
With this method we will only perform an update also called OTA, it always comes in a file with a ZIP extension that we should not unzip because the signature of the file will be broken and it will not be possible to apply it.
- Copy update ZIP file to a USB memory or SD card
- We run the UPDATE & RESTORE app, we can have an app icon or be in Settings> About …> Update
- Click on the button (1) SELECT and select the ZIP file.
- Press the button (2) UPDATE to start the update process, accept.
- The process will take a few minutes.
- Once the new update is installed we recommend Factory Reset in the settings of the TV-Box.

2-B Update with various files
Unzip the files to the root of a microSD card (not the Zip that goes inside), see the NOTE if we do it from a USB memory or the update fails.
- Android app: From the UPDATE app on Local update mode, select the USB file and press Confirm.
- Using recovery button: We turn off the TV-Box, insert the SD card, keep press the recovery button and turn on the system.
- Once the TV-Box is updated, is recommended to perform a factory reset: Settings > Factory reset.
- NOTE: If we do the update from a USB memory or the update fails in the recovery we will:
– Apply update from EXT> Update from udisk> Select the firmware Zip
– To end the process do: Wipe Data , Wipe Cache and Reboot System .
FLASH FIRMWARE WITH UBOOT.BIN FILE
- Method 3 = I have several files and the “ u-boot.bin ” (deep recovery system)
With this method you can recover the device from a brick if we no have a way to connect it to a PC, is another option to restore the TV Box.
- For this procedure we will need a MicroSD card that we will formated with the Amlogic BootcardMaker tool for more security (although we can do the formatting from a PC) that we downloaded from HERE .
- Run Amlogic BootcardMaker on our PC and select on the menu “Choose disk” the letter of the drive where we have our MicroSD card and press “Open” to load the u-boot.bin file that we downloaded. Once selected, press Make to format the MicroSD.
- With the MicroSD prepared in our PC we copy all the files that we have downloaded to update our TV-Box (a .zip file, factory_update_param.aml , recovery.img and u-boot.bin ) in the root of the card. The u-boot.bin file is optional or it can also be called bootloader.img .
- Introduce the card in our TV-Box with Soc AMLogic.
- Now press the recovery button located at the bottom or inside the A / V connector and at the same time turn on the TV Box. If everything works correctly you will see that an Android robot appears with a percentage bar. When it reaches 100%, the TV Box will reboot only with the new firmware installed.
- Once installed the new firmware is recommended to restore the factory system from settings.

IMPOSSIBLE TO RECOVER THE TV-BOX
If our TV-Box is not recovered by any flash method we may be trying to update in the wrong way, it is advisable to repeat the previous instructions step by step, if it still does not recover we recommend reading the following guide.
Источник


