- Установка Anaconda в ОС Linux
- Требования
- Установка
- Your data science toolkit
- Build machine learning models
- The open-source community at your fingertips
- User interface makes learning easier
- Anaconda for the enterprise
- Installation
- How To Install Anaconda On Linux
- What is Anaconda distribution?
- Anaconda features
- Install Anaconda On Linux
- Multi-user Anaconda installation on Linux
- Verify Anaconda installation
- Launch Anaconda Navigator graphical interface
- Activate and deactivate Conda environment
- Update Anaconda
- Run a simple Python program from Python shell
- Uninstall Anaconda
- Try Miniconda, a minimal version of Anaconda
Установка Anaconda в ОС Linux
Требования
Для использования GUI-пакетов в Linux сперва нужно установить следующие расширения для Qt:
| Debian | apt-get install libgl1-mesa-glx libegl1-mesa libxrandr2libxrandr2 libxss1 libxcursor1 libxcomposite1 libasound2 libxi6libxtst6 |
| RedHat | yum install libXcomposite libXcursor libXi libXtst libXrandralsa-lib mesa-libEGL libXdamage mesa-libGL libXScrnSaver |
| ArchLinux | pacman -Sy libxau libxi libxss libxtst libxcursor libxcompositelibxdamage libxfixes libxrandr libxrender mesa-libgl alsa-liblibglvnd |
| OpenSuse/SLES | zypper install libXcomposite1 libXi6 libXext6 libXau6 libX11-6libXrandr2 libXrender1 libXss1 libXtst6 libXdamage1 libXcursor1libxcb1 libasound2 libX11-xcb1 Mesa-libGL1 Mesa-libEGL1 |
| Gentoo | emerge x11-libs/libXau x11-libs/libxcb x11-libs/libX11 x11-libs/libXext x11-libs/libXfixes x11-libs/libXrender x11-libs/libXix11-libs/libXcomposite x11-libs/libXrandr x11-libs/libXcursor x11-libs/libXdamage x11-libs/libXScrnSaver x11-libs/libXtst media-libs/alsa-lib media-libs/mesa |
Установка
- Загрузите установщик Anaconda для Linux.
- РЕКОМЕНДУЕТСЯ: проверить целостность данных с SHA-256.
Откройте терминал и запустите следующий код:
Введите следующее для установки Anaconda для Python 3.7:
ИЛИ введите следующее для Python 2.7:
Применяйте команду bash вне зависимости от того, используете ли вы командную оболочку Bash или нет.
Если скачали файл не в папку «Загрузки» (Downloads), замените
/Downloads/ на путь к файлу в вашей системе.
Рекомендуется выбрать стандартный путь установки. Не выбирайте путь как /usr для установки Anaconda/Miniconda.
Если выбрать «нет» (no), тогда conda не изменит скрипты оболочки. Для запуска уже после установки, в первую очередь выполните sourse
, а затем — conda init .
/.bashrc .
Чтобы настроить, должна ли активироваться базовая среда для каждой сессии работы с терминалом, запустите conda config —set auto_activate_base False of True . Чтобы запускать conda в любом месте без активации базовой среды по умолчанию, используйте conda config —set auto_activate_base False . Это сработает только в том случае, если предварительно запускалась conda init .
conda init доступна в версиях conda 4.6.12 и старше.
Если установить несколько версий Anaconda, система будет обращаться к самой актуальной, если путь по умолчанию не был изменен.
Источник
Your data science toolkit
With over 25 million users worldwide, the open-source Individual Edition (Distribution) is the easiest way to perform Python/R data science and machine learning on a single machine. Developed for solo practitioners, it is the toolkit that equips you to work with thousands of open-source packages and libraries.
Anaconda Individual Edition
Anaconda Individual Edition is the world’s most popular Python distribution platform with over 25 million users worldwide. You can trust in our long-term commitment to supporting the Anaconda open-source ecosystem, the platform of choice for Python data science.
Search our cloud-based repository to find and install over 7,500 data science and machine learning packages. With the conda-install command, you can start using thousands of open-source Conda, R, Python and many other packages.
Individual Edition is an open source, flexible solution that provides the utilities to build, distribute, install, update, and manage software in a cross-platform manner. Conda makes it easy to manage multiple data environments that can be maintained and run separately without interference from each other.
Build machine learning models
Build and train machine learning models using the best Python packages built by the open-source community, including scikit-learn, TensorFlow, and PyTorch.

The open-source community at your fingertips
With Anaconda Individual Edition, the open-source world is your oyster. From robotics to data visualization, you can access the open-source software you need for projects in any field.

User interface makes learning easier
Anaconda Navigator is a desktop GUI that comes with Anaconda Individual Edition. It makes it easy to launch applications and manage packages and environments without using command-line commands.
Expedite your data science journey with easy access to training materials, documentation, and community resources including Anaconda.org.

Anaconda for the enterprise
With Anaconda’s Team and Enterprise Editions, our stack can handle the most advanced enterprise data science requirements.
Источник
Installation
Review the system requirements listed below before installing Anaconda Individual Edition. If you don’t want the hundreds of packages included with Anaconda, you can install Miniconda, a mini version of Anaconda that includes just conda, its dependencies, and Python.
Looking for Python 3.5 or 3.6? See our FAQ .
System requirements
- License: Free use and redistribution under the terms of the EULA for Anaconda Individual Edition.
- Operating system: Windows 8 or newer, 64-bit macOS 10.13+, or Linux, including Ubuntu, RedHat, CentOS 7+, and others.
- If your operating system is older than what is currently supported, you can find older versions of the Anaconda installers in our archive that might work for you. See Using Anaconda on older operating systems for version recommendations.
- System architecture: Windows- 64-bit x86, 32-bit x86; MacOS- 64-bit x86; Linux- 64-bit x86, 64-bit aarch64 (AWS Graviton2 / arm64), 64-bit Power8/Power9, s390x (Linux on IBM Z & LinuxONE).
- Minimum 5 GB disk space to download and install.
On Windows, macOS, and Linux, it is best to install Anaconda for the local user, which does not require administrator permissions and is the most robust type of installation. However, if you need to, you can install Anaconda system wide, which does require administrator permissions.
Silent mode install
You can use silent mode to automatically accept default settings and have no screen prompts appear during installation.
Using Anaconda on older operating systems
We recommend upgrading your operating system. Most OS that are no longer supported in the latest Anaconda are no longer getting security updates. Upgrading your OS allows you to get the latest packages, performance improvements, bug fixes, etc.
To use Anaconda on older operating systems, download from our archive. You will not be able to use conda to update or install packages beyond the Anaconda version noted in the table below, unless you limit it to versions available at the time that particular version of Anaconda was released. You can see what was available by checking the package table archives.
| Operating system | How to install Anaconda |
|---|---|
| macOS 10.10-10.12; Windows 7 | Use the command line or graphical installers for Anaconda versions 2019.10 and earlier. Download from our archive. |
| macOS 10.9 | |
| macOS 10.7 and 10.8 | Use the command line installers for Anaconda versions 4.2 and earlier. |
| macOS 10.5 and 10.6 | Use the command line installers for Anaconda versions 1.8 and earlier. These installer files end in .sh , not .pkg . |
| Windows XP | Use Anaconda versions 2.2 and earlier. |
| Centos6 (or equivalent) | Use Anaconda versions 2020.11 and earlier. |
| Centos5 (or equivalent) | Use Anaconda versions 4.3 and earlier. |
Installing Anaconda on a non-networked machine (air gap)
- Obtain a local copy of the appropriate Anaconda installer for the non-networked machine. You can copy the Anaconda installer to the target machine using many different methods including a portable hard drive, USB drive, or CD.
- After copying the installer to the non-networked machine, follow the detailed installation instructions for your operating system.
You can install offline copies of both docs.anaconda.com and enterprise-docs.anaconda.com by installing the conda package anaconda-docs: conda install anaconda-docs
You can install offline copies of documentation for many of Anaconda’s open-source packages by installing the conda package anaconda-oss-docs: conda install anaconda-oss-docs
Other ways to get Anaconda or Miniconda
You can find the official Anaconda or Miniconda AMIs on the AWS Marketplace.
You can find the official Anaconda and Miniconda Docker images on Docker Hub.
If you have a CDH cluster, you can install the Anaconda parcel using Cloudera Manager. The Anaconda parcel provides a static installation of Anaconda, based on Python 2.7, that can be used with Python and PySpark jobs on the cluster.
Troubleshooting
If you experience errors during the installation process, review our Troubleshooting topics .
Источник
How To Install Anaconda On Linux
This tutorial explains what is Anaconda Python distribution, the features of Anaconda, and how to install Anaconda on Linux operating system.
What is Anaconda distribution?
Anaconda is a cross-platform distribution of the Python and R programming languages. It is used for data science, machine learning, large-scale data processing and predictive analytics etc. Anaconda is available as four editions namely individual (open source) edition, commercial edition, team edition and enterprise edition. Anaconda individual edition is the world’s most popular Python distribution platform with over 20 million users worldwide. The Individual edition is free for personal use while the three other editions are commercial versions.
Anaconda ships with a command line package and virtual environment manager called Conda, which is used to manage and deploy applications, environments and packages. Conda was created for Python packages, however it can be used for other languages as well.
Using Conda utility, we can,
- Create new Conda environments,
- Install packages into specified Conda environment,
- List packages in a Conda environment,
- Update conda packages,
- Search for packages,
- Clean unused packages,
- Remove packages from environments,
- And more.
It also includes Anaconda Navigator, a graphical alternative for those who are not comfortable with the command line interface.
Anaconda features
Anaconda distribution enables the data scientists to:
- download a collection of over 1500+ Python and R data science packages,
- manage libraries, packages and virtual environments,
- develop and train machine learning and deep learning models,
- analyze data,
- and visualize results using various tools.
Install Anaconda On Linux
As stated already, Anaconda Python distribution comes as free and paid editions. The Individual edition is free for personal use and learning purposes. For the purpose of this guide, I will be using Anaconda Individual edition.
Before installing Anaconda distribution on your Linux machine, make sure you have installed all required prerequisites.
If you are using Arch Linux and its derivatives like Manjaro Linux, install the following prerequistes:
On Debian, Ubuntu and other DEB-based systems:
On Fedora, CentOS, RHEL, AlmaLinux:
After installing the prerequisites, download the latest Anaconda installer for Linux from Anaconda official download page:
Go to the location where you downloaded the Anaconda installer and check the integrity of the downloaded file with SHA-256 :
You will see an output like below:
Compare the above hash value with the official Hashes for Anaconda. If the hash value of the locally downloaded installer file matches with the official hash, you’re good to go.
Now, start Anaconda installation using command:
You should include the bash command regardless of the shell you’re using.
Press ENTER to continue installation:
You will now see the license agreement. Press ENTER key to scroll to the bottom of the license terms. If you don’t want to read the whole license agreement, press q to skip to the end of the license agreement.
Type “Yes” and press ENTER to agree the license agreement and continue installation.
Next the installer will prompt where do you want to install Anaconda. You will be given three choices. Press ENTER to accept the default install location. Press CTRL+C to cancel the installation or mention an alternate installation directory.
I go with the default installation path, which is /home/sk/anaconda3 in my case.
If you’ve chosen the default location, the installer will display PREFIX=/home/ /anaconda and continue the installation. It may take a few minutes to complete.
Next you will be prompted to initialize Anaconda. It is recommended to initialize it, so just type Yes and press ENTER to continue.
After a few seconds, you will see “Thank you for installing Anaconda3!” message if the installation is successful.

Install Anaconda On Linux
For the installation to take effect, close and re-open your Terminal. Alternatively, run the following command:
You will now see the prefix (base) in front of your shell prompt. It means that the conda’s base environment is activated.

Conda base environment is activated
If you don’t want the conda’s base environment activated by default on system startup and wish to run conda from anywhere, run the following command:
Now you won’t see the prefix (base) in your shell prompt.
Multi-user Anaconda installation on Linux
By default, Anaconda will be installed for the current user only. If you wish to install Anaconda for all system users, create a common group, for example condagroup :
Replace condagroup with your own.
Change the group ownership to condagroup on the entire directory where Anaconda is installed. In my case, Anaconda is installed in /home/sk/anaconda3 directory, so I ran the following command:
Replace /home/sk/anaconda3 with the actual path to your installed Anaconda file.
Next, set read and write permission for the owner, root, and the condagroup only using command:
Finally, add all users to the newly created «condagroup»:
Here, ostechnix is the user name and condagroup is the group name.
From now on, the users added to the «condagroup» group can able to access Anaconda, install packages, and create environments etc.
We have successfully installed Anaconda on our Linux machine. Let us verify if the Anaconda is installed correctly or not.
Verify Anaconda installation
We can verify Anaconda installation from commandline and/or from Anaconda Navigator GUI.
To verify Anaconda installation from commandline, run the following command:
If Anaconda is properly installed and working, you will see list of installed packages and their versions as shown in the following output:

Verify Anaconda installation
The another method to verify the Anaconda installation is by entering into the Python shell.
To enter into Python shell, run:
This command will launch the Python shell. If Anaconda is installed and working, it will display «Anaconda, Inc.» message as shown in the below output.
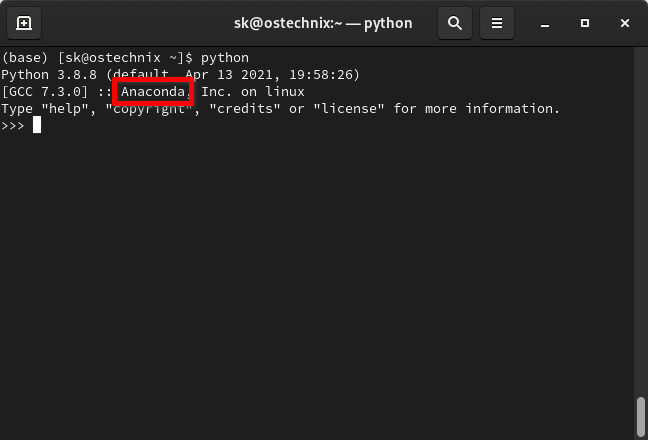
Login to Python shell
To exit the Python shell and go back to your shell prompt, enter the following command:
We can also verify Anaconda installation by opening Anaconda Navigator GUI.
Launch Anaconda Navigator graphical interface
We can manage packages and environments from command line using Conda package manager. If you’re a newbie and bit uncomfortable with commandline, just use Anaconda Navigator GUI.
To launch Anaconda Navigator graphical interface, run the following command from your Terminal:
The default interface of Anaconda Navigator will look like below:

Anaconda Navigator graphical interface
As you can see, the Anaconda navigator includes many popular IDEs by default. As of writing this guide, it has the following 10 IDEs:
- Datalore,
- IBM Watson Studio Cloud,
- JupyterLab,
- Jupyter Notebook,
- Qt Console,
- Spyder,
- Glueviz,
- Orange,
- PyCharm Professional,
- RStudio.
Among the 10 IDEs, the first 6 IDEs were installed by default. You can use any IDE of your choice to write, run and debug your code.
Well, Anaconda is working!
Activate and deactivate Conda environment
By default, a Conda environment named base is created and activated.
If it is not activated by any chance, you can activate the Conda base environment using command:
To deactivate it, run:

Activate and deactivate Conda environment
Update Anaconda
Let first check the currently installed Conda version using command:
Sample output:
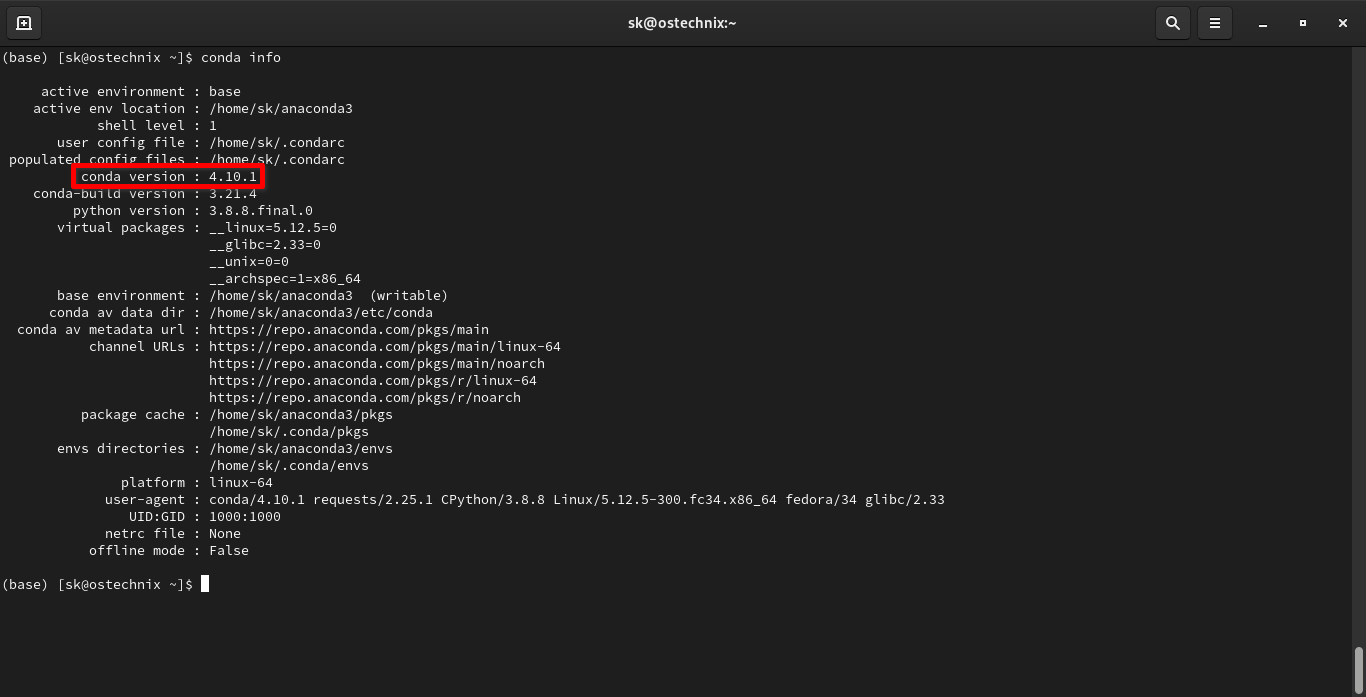
Display Conda version details
As you see, the current Conda version is 4.10.1 .
Let us run the following command to see if there is any latest Conda version available:
If there are any updates available, you will be prompted to update them. Just type y to install the updates:
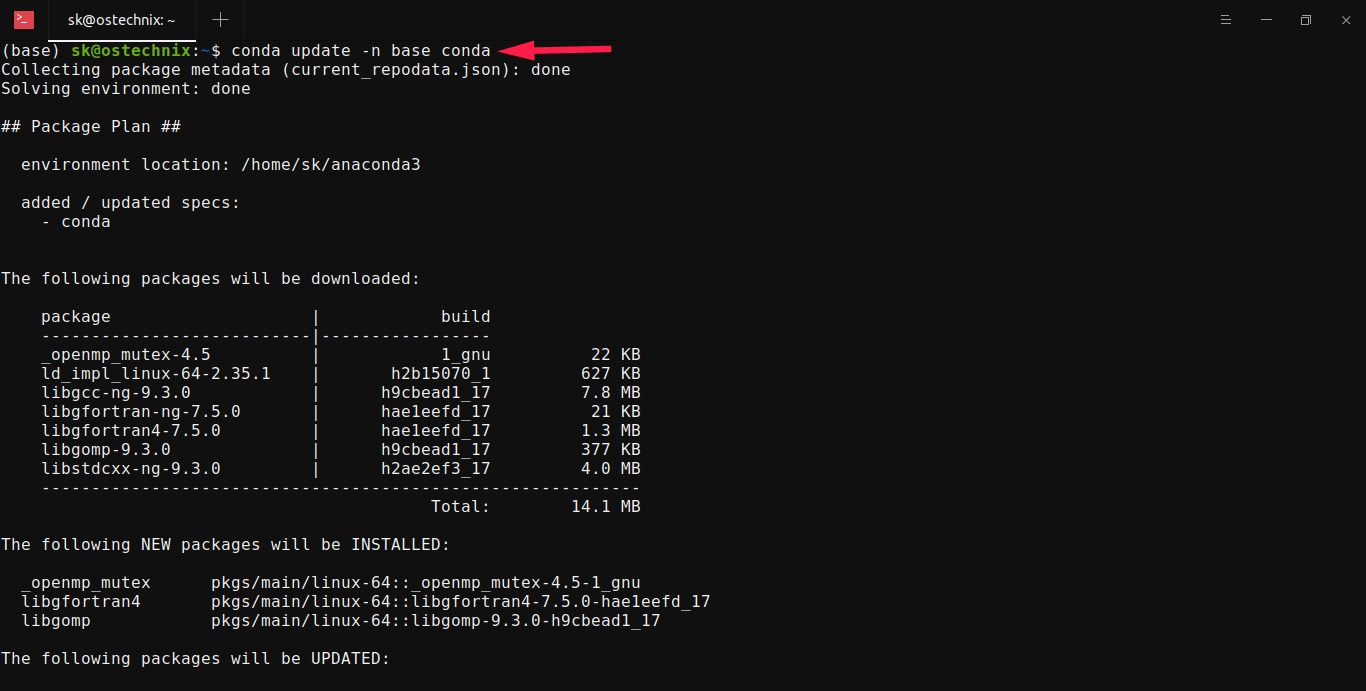
To update all packages to the latest version of Anaconda, run:
Run a simple Python program from Python shell
Launch Python shell using command:
You will now see the >>> sign. It means you’re in Python shell.
Inside the Python shell, type your code. For example, I type the following code:
When you hit ENTER, you will see «Welcome to OSTechNix» message.

Run a simple Python program from Python shell
To exit the Python shell and go back to your shell prompt, enter the following command:
All done. We have installed Anaconda on our Linux machine, verified the Anaconda installation from command line as well as from Anaconda GUI, and finally run a sample Python program from Python shell.
In our upcoming articles, we will learn more about Anaconda Navigator GUI, Python IDEs, and Conda command line interface, creating virtual environments with Conda etc.
If you don’t use Anaconda anymore, you can remove it from your system as shown below.
Uninstall Anaconda
First, you need to Install «anaconda-clean» module which is used to completely uninstall Anaconda from your system.
Next, run the following command to remove Anaconda:
Here, the —yes flag is used to delete all config files and directories.
The above command will create a backup directory called .anaconda_backup in your $HOME directory.
And then, delete the entire Anaconda directory and the backup directory using commands:
Finally, delete all Anaconda entries from your
Make the backup of
/.bashrc file, just in case:
/.bashrc file using your preferred editor:
Find the following lines and delete them. Please double check the lines before deleting them.
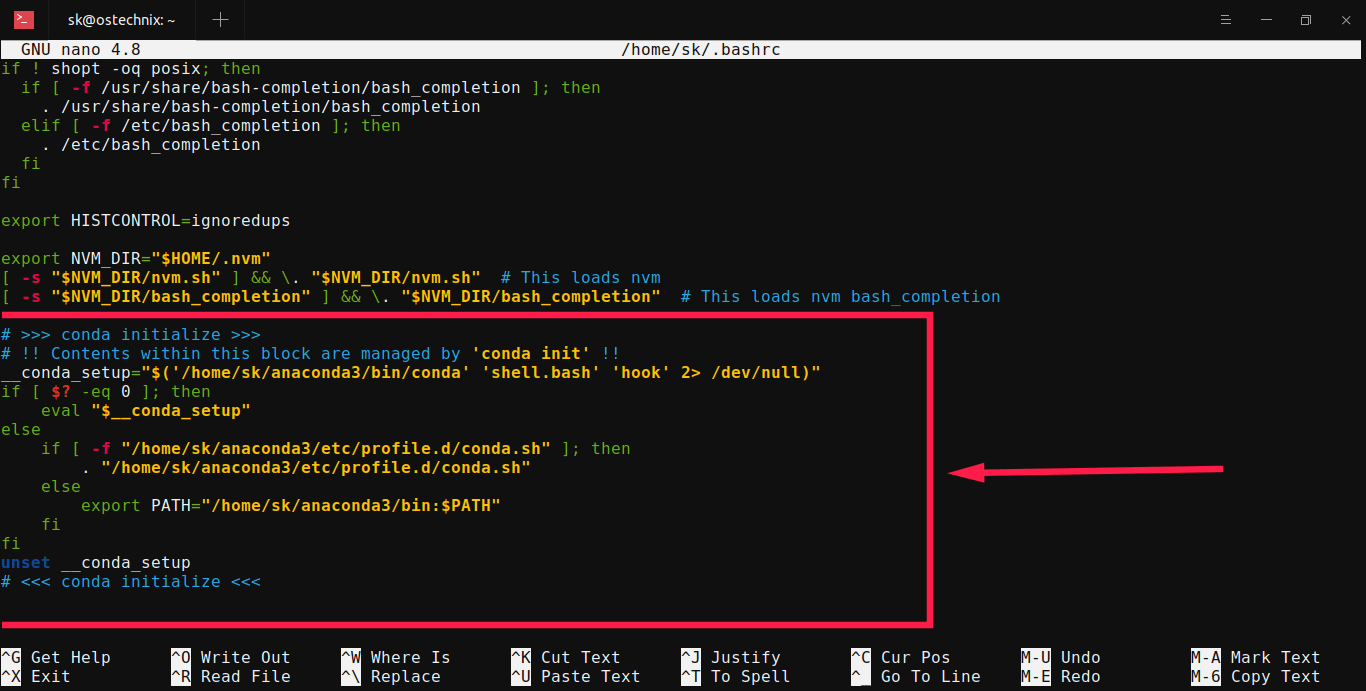
Delete Anaconda entries from bashrc file
Finally, run the following command to take effect the changes immediately:
That’s it. Anaconda has been removed from your system.
Try Miniconda, a minimal version of Anaconda
Anaconda installs around 1500 scientific packages and requires 3 GB disk space. If you use only a few packages from Anaconda distribution, there is no point of keeping 1500+ packages. It is just a waste of disk space. This is where Miniconda comes in help. Miniconda is a minimal and stripped-down version of Anaconda distribution. It contains only Conda package manager, Python and a small number of useful packages. If you require a few applications, Miniconda might be a good choice. To know how to install Miniconda, refer the following link.
Источник


