- 4 Free Ways to Run Android Apps on Your PC
- Mirror Your Phone With Windows
- Run Your Favorite Apps With BlueStacks
- Emulate Full Android Experience With Genymotion
- Run Android Directly on Your PC With Android-x86
- Установка Android на компьютер или ноутбук
- Подготовка
- Запуск с флешки
- Установка на компьютер
- Основная ОС
- Дополнительная система
- ОС на базе Android
- Выводы
- Android + Windows на одном устройстве?
4 Free Ways to Run Android Apps on Your PC
Want to use Android apps on a PC? There are plenty of good, free ways to emulate Android right on your computer, including the Your Phone app, BlueStacks, Genymotion, and Android-x86. Let’s take a look.


Ever wish you could run an Android app or game on your PC so you weren’t relegated to a tiny phone screen? Or maybe you need to test a feature on Android, but don’t have an Android device handy. Here are four free ways to run Android (and its apps) on your computer.
Mirror Your Phone With Windows
For apps installed on your phone, you don’t need anything fancy to get Android on your PC. The Windows Your Phone app provides the ability to mirror the screen of many Samsung phones to your PC, with access to most of your apps through a simple desktop window. Just follow our instructions on connecting your phone to Windows, then choose the Phone Screen option in the sidebar to mirror your device.
Microsoft is working on expanding this feature even further, with the ability to pin Android apps on your taskbar and launch them individually, as long as your phone and computer are connected. At the time of writing, this feature is available in Windows 10’s Insider Previews and is slowly rolling out to the general public.
This isn’t always the ideal solution. If you’re looking to play games, this may come with some delay and graphical blurriness, and you won’t be able to easily share files from your PC directly to an app in Android. But for quick access to Android apps you already have installed, it definitely works in a pinch.
Run Your Favorite Apps With BlueStacks
If you’re just looking to run a couple apps and don’t need the emulator to look like Android, you should try BlueStacks. Over the years, it’s become the best Android app emulator around, and it’s packed with features that ensure your apps and games run smoothly. Since it uses virtualization to emulate Android, you’ll want to jump into your computer’s BIOS and enable Intel VT-x or AMD-V, if your computer supports it, for best performance.
Download and install BlueStacks as you would any other Windows or Mac application. It’ll take up about 2GB of space on your computer (plus any apps you download), and when it launches, you’ll be greeted with its customized home screen. It doesn’t mimic a traditional Android launcher, but you do get access to the Play Store to download any apps you want—they’ll appear on BlueStacks’ home screen and on your Windows desktop as their own shortcuts. Just double-click an icon to run the app in question.
BlueStacks is great for apps that don’t have corresponding desktop apps, but the emulator really shines when it comes to games. BlueStacks comes with built-in mappings for your mouse and keyboard, which you can customize to the touch controls you find on different Android games.
You can also adjust the resolution, DPI, FPS, and amount of CPU or RAM allocated to the emulator, ensuring you get the best balance between speed and graphical fidelity. (This is particularly useful given that BlueStacks is fairly resource-intensive, as many virtual machines are.)
BlueStacks does, unfortunately, come with some ads and clutter, but it’s not as intrusive as it once was, and it’s a small price to pay for the functionality you get—especially considering it uses Android 7.1 as its base, which is higher than most alternatives on the market.
Emulate Full Android Experience With Genymotion
If you’re looking to explore the Android operating system itself—rather than individual apps—Genymotion is a decent emulator. Its main product is designed for developers and costs money to use, but there is a free version of the software you can download for personal use; you just need to create an account on the website first.
Genymotion uses VirtualBox to emulate Android, so you’ll either need to have VirtualBox installed on your PC or download the version with VirtualBox bundled. Install it like you would any other Windows program, ensuring you select the version for «Personal Use» during the wizard. (And like BlueStacks, you’ll want to enable Intel VT-x or AMD-V from your computer’s BIOS if you have it.)
When you start Genymotion, it’ll present you with a list of device templates you can install—this determines the screen resolution, Android version, and resources allotted to the emulator. Install the template you want and double-click it to enter Android. You’ll be able to navigate around the home screen, launch apps, and emulate certain events like GPS location.
Note that you’ll start with a very barebones version of Android that doesn’t even come with many of Google’s apps or modern features, though you can add the Play Store by clicking the «Open Gapps» icon in the sidebar to install it. Also, no matter which template you choose, you won’t get any custom versions of Android—picking the Samsung Galaxy S10 template, for example, won’t get you Samsung’s One UI. It just determines the resolution and specs of the virtual machine. (Genymotion does support Android versions from 4.4 all the way up to 10.0, though.)
Genymotion works well for exploring Android’s settings and other built-in features, though I wouldn’t necessarily use it to run individual apps, as it just doesn’t integrate as well with your PC as something like BlueStacks. If Genymotion doesn’t suit your needs, Google’s official Android software development kit also comes with an Android emulator, though setup is a bit more complex, so I wouldn’t recommend it for most users.
Run Android Directly on Your PC With Android-x86
If you’re looking for something a bit more full-featured, the Android-x86 project gets you as close as you can get to true Android on your PC. Android-x86 is an open-source project that ports Android to the x86 platform, allowing you to run it on your computer instead of an ARM-based phone or tablet.
To run Android-x86, you have a couple of options. If you want to run Android on its own, as a desktop operating system for your PC, you can download it as an ISO disc image and burn it to a USB drive with a program like Rufus. Then, insert that USB drive into the PC in question, reboot, and enter the boot menu (usually by pressing a key like F12 during the boot process).
By booting from your Android-x86 USB drive, you’ll either be able to run Android in a live environment—without having any effect on your PC—or install it to your PC’s hard drive for permanent usage (and better performance).
Alternatively, if you want to run Android-x86 on top of your existing operating system, you can download the disc image and run it inside VirtualBox. This is, again, a bit more advanced if you aren’t familiar with VirtualBox, but our guide to running Windows on a Mac can get you acquainted with the process.
The official site has some tips for getting Android-x86 up and running in a virtual machine as well. It’s more work than using something like BlueStacks, but it’s also closer to pure Android, which is a nice perk.
Установка Android на компьютер или ноутбук
Бывают случаи, когда возникает необходимость воспользоваться мобильной ОС. Но что делать, если рядом нет смартфона с подходящей системой? Рассмотрим подробно, как установить Android на ноутбук либо ПК.
Подготовка
Перед установкой Android необходимо подготовить загрузочную флешку и BIOS. Принцип создания не отличается от записи образа Windows. Нам понадобится:
Переходим к созданию загрузочного накопителя .
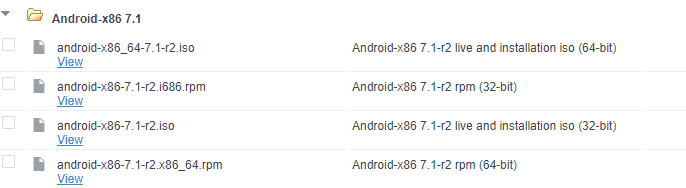
- Скачайте ISO-образ Android разрядности вашего ПК (x64 или x86).

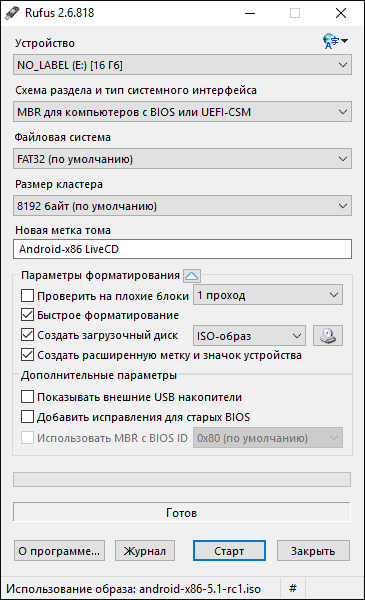
- Установите Rufus → запустите программу.
- Установите параметры, показанные на изображении ниже.
- Нажмите «Старт» → дождитесь окончания процесса.
Далее выполняем настройку BIOS:
- Перезагрузите компьютер.
- До появления загрузочного окна Windows зажмите комбинацию клавиш для входа в BIOS.
Запуск с флешки
Если нет желания либо возможности полноценно устанавливать Android на ПК, то можно его запустить непосредственно с флешки.
- Вставьте накопитель с образом.
- Запустите компьютер.
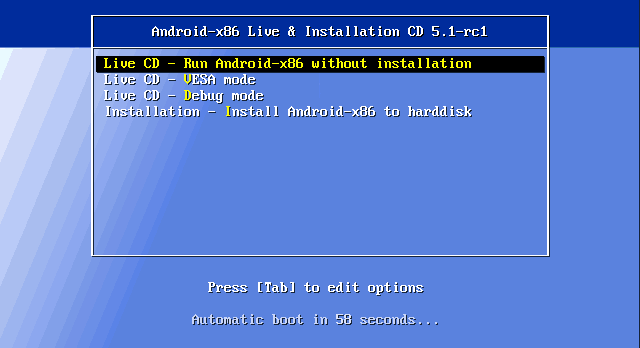
- Если подготовка выполнена правильно, то загрузится меню установки Android.
- Выберите первый пункт (запуск без установки).
- Дождитесь завершения процесса загрузки.
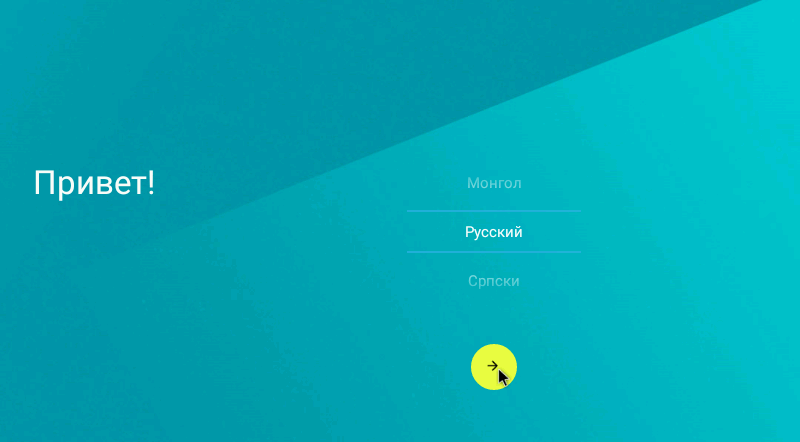
- Появится первоначальное окно настроек Android.
Установка на компьютер
Установить мобильную ОС на компьютер можно двумя способами:
- в качестве основной системы;
- второй дополнительной ОС.
Рассмотрим оба способа более подробно.
Основная ОС
Если хотите использовать Android в качестве единственной ОС, то процесс установки не займет много времени.
- Вставьте флешку.
- Запустите компьютер с ранее настроенным BIOS.
- В появившемся окне нажмите последний пункт (установка Android-x86 на жесткий диск).
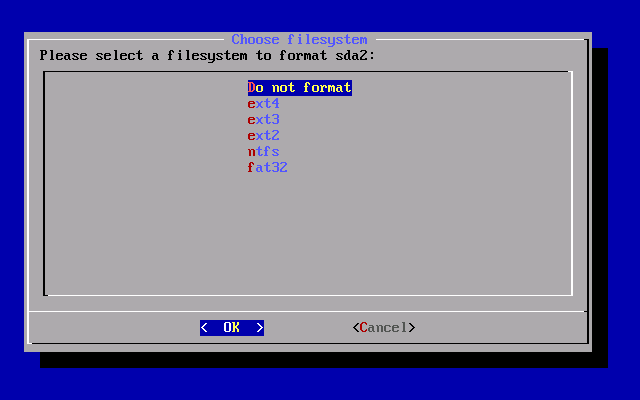
- Выберите раздел HDD для загрузки → «ext4».
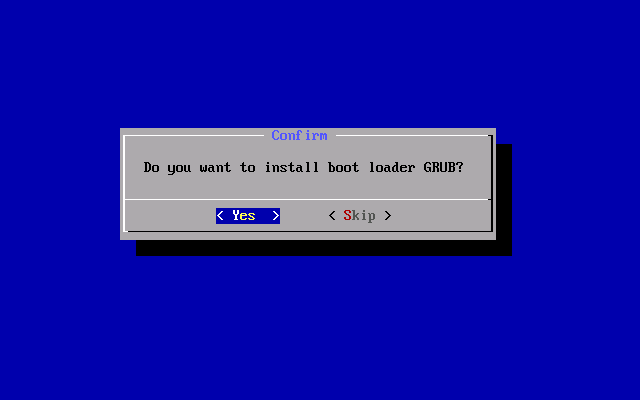
- В следующем окне нажмите «Skip», если планируете использовать только эту ОС.
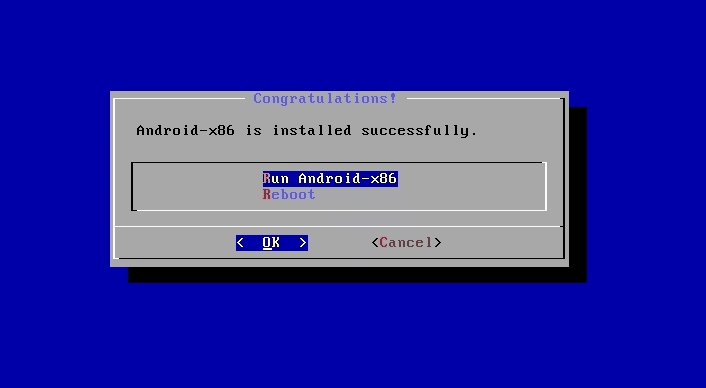
- Дождитесь завершения установки → выберите «Reboot».
- После загрузки настройте параметры Android (страна, Google-аккаунт и т.д.).
После завершения процесса отобразится рабочий стол, готовый к работе.
Дополнительная система
Если планируете использовать Android в качестве второй операционной системы, то необходимо перед установкой разбить диск на разделы.
- Скачайте и установите Minitool Partition Wizard Free.
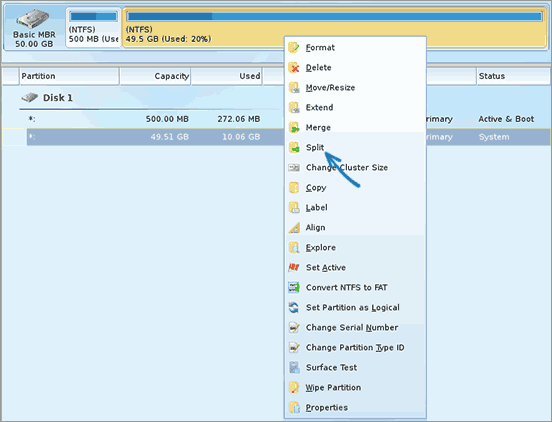
- Запустите программу → кликните ПКМ по диску, который нужно разделить.
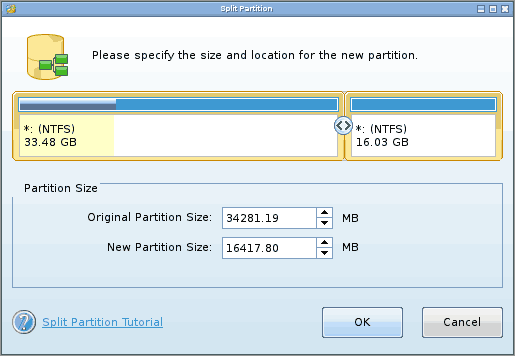
- «Split» → укажите объем → «Оk» → «Apply».
- Выключите ПК.
Переходим к установке Android.
- Вставьте флешку → запустите компьютер.
- Если подготовка выполнена правильно, то отобразится загрузочное меню.
- Выберите последний пункт «Install Android x86 to hard disk» .
- Укажите ранее подготовленный раздел → выберите тип форматирования «ext4» → «ОК».
- Нажмите «Yes» для установки GRUB (позволяет выбрать запускаемую ОС).
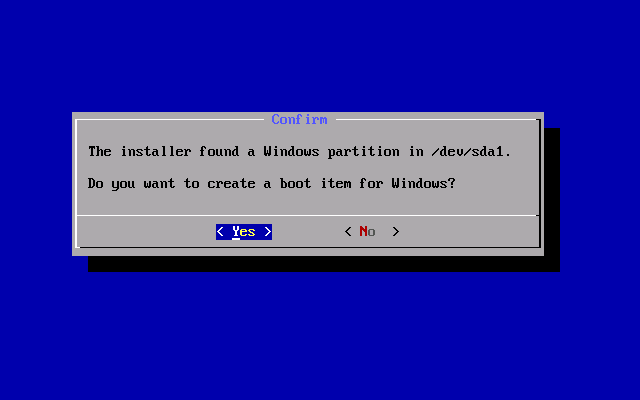
- Нажмите «Yes» для добавления Windows в меню загрузки.
- Дождитесь завершения процесса → нажмите «Reboot».
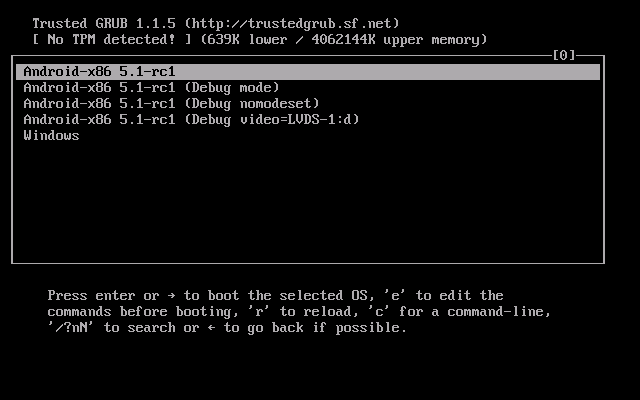
- После перезагрузки отобразится окно GRUB.
- Выберите первый пункт для запуска Android либо последний — для Windows.
- Настройте систему (Время, Google-аккаунт и т.д.).
- Готово.
ОС на базе Android
В 2016 году появилась модифицированная версия Android-x86, которая получила название Remix OS For PC. Ее особенность заключается в интерфейсе, который заточен под взаимодействие с компьютером.
Переходим к процессу установки.
- Скачайте образ.
- Создайте загрузочную флешку.
Выводы
Использовать ОС Android на ПК можно двумя способами: непосредственно с флешки либо с установкой на компьютер. Если планируете постоянно работать с «зеленым роботом», то советую загрузить Remix OS For PC, который полностью заточен под работу с компьютерным интерфейсом.
Android + Windows на одном устройстве?
И речь конечно же не ПК. Сегодня расскажем о несколько уникальных планшетах сразу с 2-мя операционными системами. Без всяких эмуляторов и виртуальных машин, по-настоящему полноценные операционные системы! И причем это не модификация! Устройства с завода рассчитаны на работу в обеих операционных системах.
Такие устройства выпускаются в основном китайскими производителями: Chuwi, Onda, Teclast, Cube и другие. Причем выпускаются они довольно давно. Уникальные условия 2-х архитектур ограничивают производителей мобильной платформой Intel Atom. Последнее время платформа не пользуется популярностью — соответственно и устройств в подобной исполнении, на 2-х операционных системах, все меньше. Но их полным полно на вторичном рынке, например на Avito или Aliexpress.
Считаю самым главным преимуществом этих планшетов в любой момент превратиться в полнофукциональный ноутбук, при наличии специальной клавиатуры. Вы сможете выполнить любую работу в Microsoft Office или посёрфить в полноценной Google Chrome. Эти особенности, особенно сейчас в период самоизоляции и работы дома, действительно стали важны!
Но вы ведь скажите — берите просто ноутбук или просто планшет на Windows(Samsung, Microsoft Surface и др.). Но а как же поиграться? Ведь планшеты на android для этого и берут. И при выборе Android + Windows мы убиваем сразу 2-х зайцев! А так как их выпускают только китайские производители — еще и выигрываем в цене. Подобные устройства новыми стоят 10-20 тыс рублей. А с Avito можно найти и за 4-5 тыс отличный аппарат.
И все таки, эти устройства не полноценная альтернатива ноутбуку, скорее ранее модным нетбукам. Компактность, функциональность, универсальность. Хотим поиграть — включаем Android, поработать, например с таблицей в Excell — переключаем на Windows 10. Даже хваленые iPad, которые сейчас действительно эволюционируют в сторону универсальности в работе и развлечениях не смогут конкурировать в работе с полноценной Windows.
Ну а что с надежностью и ремонтопригодностью?
Надежность устройств полностью прямо зависима от цены. Ремонтнопригодность каждой модели легко оценить по отзывам и темам на 4PDA . Вот только часть моделей достойных моделей:
Chuwi Vi8/10
Chuwi Hi8/10
Chuwi HiBook Pro
CUBE iWork8
CUBE iWork10 Ultimate
CUBE i10 Dual Boot
CUBE i6 Dual Boot
CUBE iWork12
MYTAB Ontario 2
Onda V80 /Plus
Onda V891
Onda V891w
Onda V820W
Onda V919 Air CH
Pipo W2F
Teclast X16
Teclast Tbook 10
Teclast X80
Teclast X89
Teclast X98 Plus II
И еще многие другие более новые модели..
Делитесь мнением в комментариях или читайте наши статьи:


