- Тестирование на устройстве или эмуляторе Android Test on an Android device or emulator
- Запуск на реальном устройстве Android Run on a real Android device
- Подготовка устройства к разработке Enable your device for development
- Запуск приложения на устройстве Run your app on the device
- Запуск приложения на виртуальном устройстве Android с помощью эмулятора Run your app on a virtual Android device using an emulator
- Включить поддержку виртуализации Enable virtualization support
- Эмулятор для разработки машинного кода с Android Studio Emulator for native development with Android Studio
- Эмулятор для кросс-платформенной разработки с помощью Visual Studio Emulator for cross-platform development with Visual Studio
- Установка эмулятора Android с помощью Visual Studio Install Android emulator with Visual Studio
- How to Run Android Apps on Your Windows PC
- Android Studio
- BlueStacks
- Samsung Link to Windows
- So What’s the Best Way?
Тестирование на устройстве или эмуляторе Android Test on an Android device or emulator
Существует несколько способов тестирования и отладки приложения Android с помощью реального устройства или эмулятора на компьютере Windows. There are several ways to test and debug your Android application using a real device or emulator on your Windows machine. В этом разделе описаны некоторые рекомендации. We have outlined a few recommendations in this guide.
Запуск на реальном устройстве Android Run on a real Android device
Чтобы запустить приложение на реальном устройстве Android, сначала необходимо включить устройство Android для разработки. To run your app on a real Android device, you will first need to enable your Android device for development. Параметры разработчика на Android были скрыты по умолчанию, начиная с версии 4,2, и их включение может варьироваться в зависимости от версии Android. Developer options on Android have been hidden by default since version 4.2 and enabling them can vary based on the Android version.
Подготовка устройства к разработке Enable your device for development
Для устройства под управлением последней версии Android 9.0 +: For a device running a recent version of Android 9.0+:
- Подключите устройство к компьютеру разработки Windows с помощью USB-кабеля. Connect your device to your Windows development machine with a USB cable. Вы можете получить уведомление для установки драйвера USB. You may receive a notification to install a USB driver.
- Откройте экран параметров на устройстве Android. Open the Settings screen on your Android device.
- Выберите о телефоне. Select About phone.
- Прокрутите вниз и коснитесь пункта номер сборки семь раз, пока вы не станете разработчиком! Scroll to the bottom and tap Build number seven times, until You are now a developer! . is visible.
- Вернитесь на предыдущий экран, выберите система. Return to the previous screen, select System.
- Выберите Дополнительно, прокрутите вниз и нажмите кнопку Параметры разработчика. Select Advanced, scroll to the bottom, and tap Developer options.
- В окне Параметры разработчика прокрутите вниз, чтобы найти и включить отладку по USB. In the Developer options window, scroll down to find and enable USB debugging.
Сведения об устройстве, на котором работает более старая версия Android, см. в разделе Настройка устройства для разработки. For a device running an older version of Android, see Set Up Device for Development.
Запуск приложения на устройстве Run your app on the device
На панели инструментов Android Studio выберите свое приложение в раскрывающемся меню Run Configurations (конфигурации запуска ). In the Android Studio toolbar, select your app from the run configurations drop-down menu.
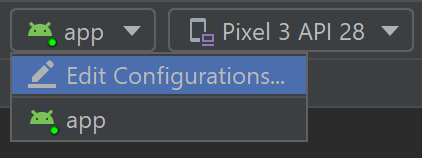
В раскрывающемся меню целевое устройство выберите устройство, на котором требуется запустить приложение. From the target device drop-down menu, select the device that you want to run your app on.

Выберите запустить ▷. Select Run ▷. Это приведет к запуску приложения на подключенном устройстве. This will launch the app on your connected device.
Запуск приложения на виртуальном устройстве Android с помощью эмулятора Run your app on a virtual Android device using an emulator
Первое, что нужно узнать о запуске эмулятора Android на компьютере Windows, это то, что независимо от интегрированной среды разработки (Android Studio, Visual Studio и т. д.) производительность эмулятора значительно улучшена за счет поддержки виртуализации. The first thing to know about running an Android emulator on your Windows machine is that regardless of your IDE (Android Studio, Visual Studio, etc), emulator performance is vastly improved by enabling virtualization support.
Включить поддержку виртуализации Enable virtualization support
Перед созданием виртуального устройства с помощью эмулятора Android рекомендуется включить виртуализацию, включив компоненты Hyper-V и платформы низкоуровневой оболочки Windows (ВХПКС). Before creating a virtual device with the Android emulator, it is recommended that you enable virtualization by turning on the Hyper-V and Windows Hypervisor Platform (WHPX) features. Это позволит процессору компьютера значительно повысить скорость выполнения эмулятора. This will allow your computer’s processor to significantly improve the execution speed of the emulator.
Для запуска платформы Hyper-V и низкоуровневой оболочки Windows компьютер должен: To run Hyper-V and Windows Hypervisor Platform, your computer must:
- Доступно 4 ГБ памяти Have 4GB of memory available
- Наличие 64-разрядного процессора Intel или ЦП AMD ризен с преобразованием адресов второго уровня (SLAT) Have a 64-bit Intel processor or AMD Ryzen CPU with Second Level Address Translation (SLAT)
- Запустите Windows 10 Build 1803 + (Проверьте номер сборки) Be running Windows 10 build 1803+ (Check your build #)
- Обновлены графические драйверы (диспетчер устройств > видеоадаптеры, > обновление драйвера) Have updated graphics drivers (Device Manager > Display adapters > Update driver)
Если компьютер не соответствует этим критериям, вы можете запустить гипервизор Intel HAXM или AMD. If your machine doesn’t fit this criteria, you may be able to run Intel HAXM or AMD Hypervisor. Дополнительные сведения см. в статье аппаратное ускорение для производительности эмулятора или в документации по эмулятору Android Studio. For more info, see the article: Hardware acceleration for emulator performance or the Android Studio Emulator documentation.
Убедитесь, что оборудование и программное обеспечение компьютера совместимы с Hyper-V, открыв командную строку и введя следующую команду: systeminfo Verify that your computer hardware and software is compatible with Hyper-V by opening a command prompt and entering the command: systeminfo

В поле поиска Windows (в нижнем левом углу) введите «компоненты Windows». In the Windows search box (lower left), enter «windows features». Выберите Включение или отключение компонентов Windows в результатах поиска. Select Turn Windows features on or off from the search results.
После появления списка компонентов Windows прокрутите экран, чтобы найти Hyper-V (включая средства управления и платформу) и платформу низкоуровневой оболочки Windows, убедитесь, что флажок установлен, чтобы включить обе функции, а затем нажмите кнопку ОК. Once the Windows Features list appears, scroll to find Hyper-V (includes both Management Tools and Platform) and Windows Hypervisor Platform, ensure that the box is checked to enable both, then select OK.
Перезагрузите компьютер при появлении соответствующего запроса. Restart your computer when prompted.
Эмулятор для разработки машинного кода с Android Studio Emulator for native development with Android Studio
При создании и тестировании собственного приложения Android рекомендуется использовать Android Studio. When building and testing a native Android app, we recommend using Android Studio. Когда приложение будет готово к тестированию, вы можете создать и запустить приложение, выполнив следующие действия. Once your app is ready for testing, you can build and run your app by:
На панели инструментов Android Studio выберите свое приложение в раскрывающемся меню Run Configurations (конфигурации запуска ). In the Android Studio toolbar, select your app from the run configurations drop-down menu.
В раскрывающемся меню целевое устройство выберите устройство, на котором требуется запустить приложение. From the target device drop-down menu, select the device that you want to run your app on.
Выберите запустить ▷. Select Run ▷. Запустится Android Emulator. This will launch the Android Emulator.
После установки приложения на устройстве эмулятора можно использовать параметр Применить изменения для развертывания определенных изменений кода и ресурсов без создания нового apk. Once your app is installed on the emulator device, you can use Apply Changes to deploy certain code and resource changes without building a new APK.
Эмулятор для кросс-платформенной разработки с помощью Visual Studio Emulator for cross-platform development with Visual Studio
Для компьютеров с Windows доступно множество вариантов эмулятора Android . There are many Android emulator options available for Windows PCs. Мы рекомендуем использовать эмулятор AndroidGoogle, так как он предоставляет доступ к последним образам ОС Android и Google Play службам. We recommend using Google’s Android emulator, as it offers access to the latest Android OS images and Google Play services.
Установка эмулятора Android с помощью Visual Studio Install Android emulator with Visual Studio
Если вы еще не установили его, скачайте Visual Studio 2019. If you don’t already have it installed, download Visual Studio 2019. Используйте Visual Studio Installer, чтобы Изменить рабочие нагрузки и убедиться, что у вас есть Рабочая нагрузка для разработки мобильных приложений на .NET. Use the Visual Studio Installer to Modify your workloads and ensure that you have the Mobile development with .NET workload.
Создайте новый проект. Create a new project. После настройки Android Emulatorможно использовать Android Device Manager для создания, дублирования, настройки и запуска различных виртуальных устройств Android. Once you’ve set up the Android Emulator, you can use the Android Device Manager to create, duplicate, customize, and launch a variety of Android virtual devices. Запустите Android Device Manager из меню Сервис с помощью средства: инструменты > Android > Android Device Manager. Launch the Android Device Manager from the Tools menu with: Tools > Android > Android Device Manager.
После открытия Android Device Manager выберите + создать , чтобы создать новое устройство. Once the Android Device Manager opens, select + New to create a new device.
Необходимо присвоить имя устройству, выбрать тип базового устройства из раскрывающегося меню, выбрать процессор и версию ОС, а также несколько других переменных для виртуального устройства. You will need to give the device a name, choose the base device type from a drop-down menu, choose a processor, and OS version, along with several other variables for the virtual device. Дополнительные сведения см. Android Device Manager главном экране. For more information, Android Device Manager Main Screen.
На панели инструментов Visual Studio выберите Отладка (присоединяется к процессу приложения, выполняемому в эмуляторе после запуска приложения) или режим выпуска (отключает отладчик). In the Visual Studio toolbar, choose between Debug (attaches to the application process running inside the emulator after your app starts) or Release mode (disables the debugger). Затем выберите виртуальное устройство в раскрывающемся меню устройство и нажмите кнопку Play ▷ ( воспроизвести ), чтобы запустить приложение в эмуляторе. Then choose a virtual device from the device drop-down menu and select the Play button ▷ to run your application in the emulator.
How to Run Android Apps on Your Windows PC

Android’s application ecosystem has proven to be versatile and developer-friendly after a bit of a slow start. You are free to develop an app for Android and publish it to the Play Store with Google’s restrictions, or you can distribute it yourself outside the Play Store. This has led to a plethora of really cool Android apps, some of which aren’t available on iOS or other platforms. Even in this age of giant phones, you might occasionally want to use those apps on a bigger screen, like the one connected to your Windows PC. Fortunately, with a little leg work, you can run Android apps on a PC. There are a few different ways to go about it, each with their own strengths and weaknesses.
Android Studio
One popular way to get Android apps running on a PC is to go through the Android emulator released by Google as part of the official Android Studio. The emulator can be used to create virtual devices running any version of Android you want with different resolutions and hardware configurations. The first downside of this process is the somewhat complicated setup process.

You’ll need to grab the installer from Google’s site and run through the setup process to download the platforms you want — probably whatever the most recent version of Android happens to be at the time (7.1 at the time of publishing). Google has some pre-configured emulation options available in the menu for Nexus/Pixel devices, but you can set the parameters manually, too. Once you’ve booted your virtual device, you’ll need to get apps installed, but the emulator is the bone stock open source version of Android — no Google apps included.
Since there’s no Play Store, you need to do some file management. Take the APK you want to install (be it Google’s app package or something else) and drop the file into the tools folder in your SDK directory. Then use the command prompt while your AVD is running to enter (in that directory) adb install filename.apk . The app should be added to the app list of your virtual device.
The big upside here is that the emulator is unmodified Android right from the source. The way apps render in the emulator will be the same as they render on devices, and almost everything should run. It’s great for testing app builds before loading them onto test devices. The biggest problem is that the emulator is sluggish enough that you won’t want to make a habit of running apps in it. Games are really out of the question as well.
BlueStacks
If you’re looking to get multiple apps and games up and running on your computer with the minimum of effort, BlueStacks is your friend. BlueStacks presents itself as just a way to get apps working, but it actually runs a full (heavily modified) version of Android behind the scenes. Not only that, but it has the Play Store built-in, so you have instant access to all of your purchased content. It actually adds an entry to your Google Play device list, masquerading as an Android device.
The BlueStacks client will load up in a desktop window with different app categories like games, social, and so on. Clicking on an app or searching does something unexpected — it brings up the full Play Store client as rendered on tablets. You can actually navigate around in this interface just as you would on a real Android device, which makes it clear there’s a lot more to BlueStacks than the “App Player” front end. The main screen in BlueStacks with the app categories is just a custom home screen, so replacing it makes BlueStacks feel almost like a regular Android device.

Having full Play Store access means you won’t be messing around with sideloading apps, and BlueStacks manages to run apps pretty well (and better if you have a CPU that supports hardware virtualization). Most games are playable, but keep in mind you’ll have trouble operating many of them with a mouse. If your PC has a touch screen, you can still use apps and games that rely on more than one touch input. BlueStacks can essentially make a Windows tablet PC into a part-time Android tablet.
The only real issue with BlueStacks is that it’s not running a standard Android build. All the alterations the company made to get apps working on a PC can cause issues — some apps fail to run or crash unexpectedly. This customized environment is also of little value as a development tool because there’s no guarantee things will render the same on BlueStacks as they might on a real Android device without all the back-end modifications. It’s also a freemium service with a $2 pro subscription, or you can install a few sponsored apps.
Samsung Link to Windows
Samsung’s latest high-end phones have enhanced support for Microsoft’s Your Phone Windows 10 client, offering access to your messages, notifications, photos, and yes, apps. The apps aren’t technically running on the PC — they’re mirrored from your phone. However, this system is very fleshed out and officially supported. Everything else we’ve talked about is a bit of a hack or not for regular users, but you can be up and running with Link to Windows in a few minutes.

You will need a Samsung phone that works with the latest Your Phone features. As of this writing, that’s just the Note20 family. The feature will expand to more Samsung phones in the coming months, though.
First, make sure you’ve got the Your Phone app on your Windows PC. Next, launch the Link to Windows client on your Samsung phone — it should be accessible under Advanced Features and from the quick settings. You’ll have to scan a QR code on your computer with the phone and sign into your Microsoft account. And that’s it.
Your app list appears in the Your Phone app, and you can launch any of them. Your phone doesn’t need to be plugged in, but Wi-Fi is recommended. Currently, you can only run a single app, but multi-app support is coming in late 2020.
So What’s the Best Way?
If you need to test something with the intention of putting it on other Android devices, the emulator is still the best way. This is best suited to developers as the configuration and management of apps is complicated. It’s slow, but you’ll be able to see how things will work on the real deal. If you’re interested in getting more than a handful of apps running on your PC so you can actually use and enjoy them, BlueStacks App Player is the best solution for most people. It’s easy, has Play Store access, and works on multitouch Windows devices.
If you happen to have a Samsung phone compatible with Microsoft’s latest Your Phone features, that’s by far the easiest way to get Android apps on your PC. These phones are expensive, so it’s not worth buying one just for this single use case. However, if you’re due for an upgrade and running Android apps on a PC is on your list of priorities, this might influence your decision.


