- Установка Android SDK в Linux
- Установка Java JDK
- Установка Android SDK
- Установка Eclipse
- Установка ADT
- Как установить Android SDK на Ubuntu / Mint Linux?
- Пользовательское соглашение
- Как установить Android SDK на Windows, Mac и Linux
- Ручная установка
- Установка компонентов
- Ссылки
- Ubuntu Documentation
- Preparation and Installation
- Downloading the SDK Starter Package
- Setting up Java
- Downloading the SDK platform tools
- Post-Installation Configuration
- Modifying the PATH Environment Variable
- Preparing Hardware
Установка Android SDK в Linux
Совсем недавно у меня был день рождения, и вот решил себе на юбилей сделать небольшой подарочек, купил LG GT540 Optimus с Операционной Системой Android на борту. В связи с этим в данном блоге решил осветить тему установки пакета для разработки — Android SDK — на Linux, в частности Ubuntu. В примере будет приведена установка для Ubuntu 10.10 (Maverick). Для этого нам понадобится пакет Java JDK, собственно, сам Android SDK, Eclipse и ADT. А теперь обо всем по порядку. Итак, приступим.
Установка Java JDK
Для установки вводим в консоли поочередно следующие команды:
В моем случае было скачано пакетов на
Установка Android SDK
Скачиваем последнюю версию SDK с официального сайта Android, и скачанный архив распаковываем, например, в домашнюю директорию.
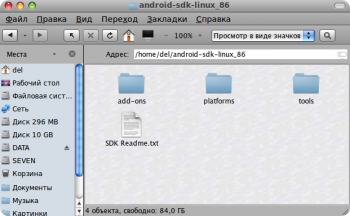
В консоли переходим в поддиректорию tools (в моем примере:
/android-sdk-linux_86/tools ) и запускаем скрипт:
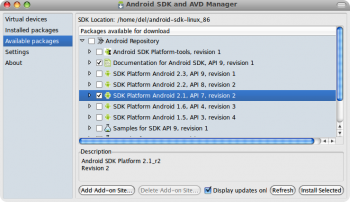
Откроется окно Android SDK, в котором перейдя на вкладку «Available packages» отмечаем галочками нужные нам пакеты. Так как мой LG Optimus идет с Android 2.1 на борту, в примере я выбрал пакет SDK для соответствующей версии, а также документацию.
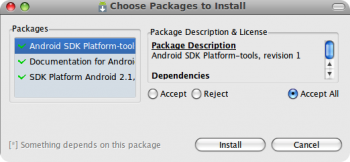
Жмем «Install Selected», а в появившемся окне выбираем «Accept All» и нажимаем «Install».
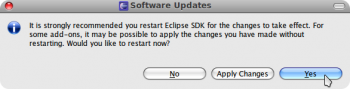
Пакеты весят немало, так что запаситесь терпением (особенно, если скорость вашего интернет-соединения не слишком большая). На предложение перезапуска ADB «Do you want to restart ADB now?» отвечаем «Yes». Ждем надписи об успешном перезапуске демона «ADB: * daemon started successfully *», жмем «Close». Закрываем окно Android SDK и переходим к установке Eclipse и ADT.
Установка Eclipse
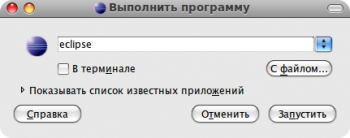
Eclipse присутствует в репозиториях Ubuntu, поэтому сразу вводим в консоли:
Eclipse тоже довольно «увесистый», у меня попросил скачать пакетов на 191MБ.
Установка ADT
Жмем F2, запускаем Eclipse.
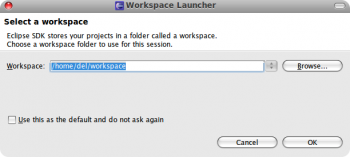
Выбираем директорию для рабочего пространства, жмем «ОК». Можно также отметить галочкой пункт «Use this as default and do not ask again», чтобы подобного выбора больше не предлагалось.
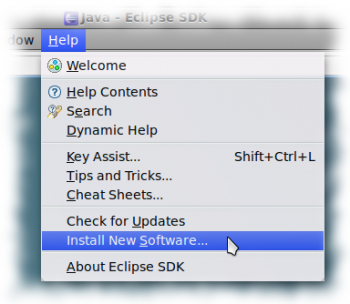
В меню выбираем: Help → Install New Software.
В появившемся окне выбираем «Add» и добавляем репозиторий ADT, указав следующие параметры:
Name: ADT.
Location: https:// dl-ssl.google.com/android/eclipse/
Жмем «ОК».
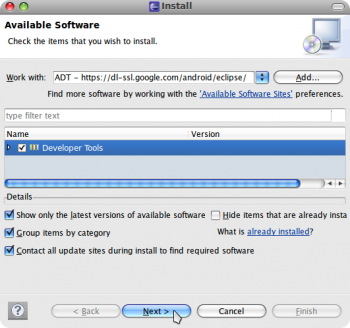
Ставим отметку напротив «Developer Tools» и нажимаем «Next».
В следующем окне снова нажимаем «Next», принимаем лицензионное соглашение (выбираем пункт «I accept the terms of the license agreements») и нажимаем «Finish».
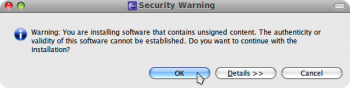
Если во время установки будет сообщено об установке неподписанного ПО, соглашаемся на продолжение.
После установки предлагается перезапустить Eclipse, согласимся.
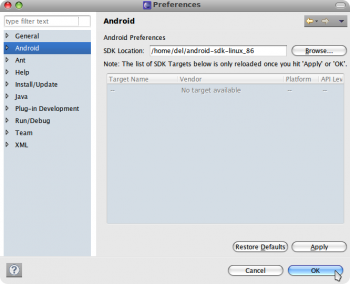
В меню выбираем: Window → Preferences. Переходим на вкладку «Android», нажимаем «Browse» и указываем путь до распакованного в самом начале Android SDK.
На этом установка Android SDK окончена, можно приступать к разработке 😉
Источник
Как установить Android SDK на Ubuntu / Mint Linux?
Наверно есть пользователи и разработчики которые пользуются ОС Linux и им нужно быстро установить на систему Android SDK. Из данной статьи можно узнать как это лучше всего сделать.
Данная статья гарантированно подойдет обладателям Linux Mint 12/13 и Ubuntu 11.10 и 12.04, на других версиях ОС данный способ не тестировался!

Для того чтобы установить Android SDK откройте терминал
sudo add-apt-repository ppa:upubuntu-com/sdk

и подтвердите добавления ключа
sudo apt-get update

после обновления источников введите команду для установки Android SDK
sudo apt-get install android-sdk

Во время установки скачается 144 мб данных и после установки SDK возрастет на 146 мб.
После установки Вы найдете иконку в меню приложений Android SDK

Android SDK Установлен

Спасибо что посетили сайт Fans Android! Оставляйте сайт в закладках, и следите за нашими новостями! Дальше будет ИНТЕРЕСНЕЙ!
Пользовательское соглашение
При выполнении данных инструкций, ни автор статей, ни администрация сайта не несут ответственность. Ответственность за любые поломки, риски, «Ваши» ошибки совершенные в ходе выполнения инструкций, а также возможные последствия использования информации и/или материалов, возлагается полностью на «Лицо, выполняющее данную инструкцию»!
При выполнении данных инструкций, возможна полная или частичная потеря личных данных и контента. Ни какие материальные требования с Вашей стороны, ни Сайту, ни автору Статей, не могут быть выдвинуты! Любой последующий ремонт устройства, либо полная/частичная замена будет производиться только за Ваш счет! Автор статей и Администрация сайта не гарантируют, что при выполнении данных инструкций, будет достигнут 100%-ый результат. Пользователь обязан, ознакомится с терминами и общепринятым сленгом, которые используются Автором статей и Администрацией сайта, чтобы не допустить ошибок при выполнении каких-либо инструкций.
Ответственность за качество используемого программного обеспечения и риски связанные с его работой, возлагаются на его разработчика.
Пользователь подтверждает, что ознакомлен со всеми пунктами настоящего Соглашения и безусловно принимает их.
Источник
Как установить Android SDK на Windows, Mac и Linux
22 октября 2008 года в Android появился магазин приложений Play Market. С тех пор прошло больше 10 лет и сегодня Google Play насчитывает почти 3 миллиона приложений в их числе Telegram с каналом AndroidInsider. Как же разработчикам со всего мира удается создавать качественные продукты? Они используют Android SDK. Чтобы получить все инструменты и средства разработки приложений, необходимо скачать среду разработки Android Studio. Но что, если вы хотите воспользоваться Android SDK с командной строкой без Android Studio и ненужных средств? В этом материале мы подскажем, как правильно установить и настроить Software Development Kit.

Ручная установка
Переходим по этой ссылке, находим раздел «Command line tools only» и скачиваем нужную версию в зависимости от вашей системы.
Создайте папку Android в корневой папке системы. В случае с Windows это локальный диск «С», а в OS X и Linux — домашняя папка пользователя. Распакуйте скачанный архив в папку Android. Для дальнейшей работы необходим установленный пакет Java на компьютере. OS X из коробки его поддерживает, чтобы проверить это, в терминале вбейте «which java», система должна выдать расположение пакета. На Windows и Linux устанавливаем JDK по этой ссылке.
Если вы используете Linux, вам понадобится установить еще несколько пакетов с помощью этой команды «sudo apt-get install lib32ncurses5 lib32stdc++6». Для других версий Linux необходимо найти подходящие пакеты ncurses5 и stdc++6.
Установка компонентов
Переходим в папку «Android/bin», находим исполняемый файл sdkmanager и запускаем, откроется следующее окно:
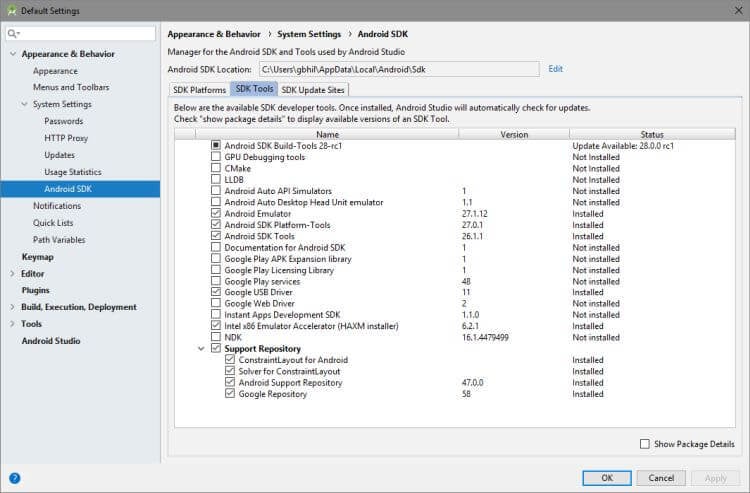
Выбираем «Android SDK Tools» и «Android SDK Platform-Tools», на Windows необходимо выбрать еще и «Google USB Driver». После этого подтвердите условия лицензионного соглашения, и начнется установка инструментов. В Windows они расположатся в папке «Windows\users\Имя пользователя\AppData\Local\Android», а на Linux и Mac в папке «.Android».
Ссылки
Теперь давайте создадим символическую ссылку на эти папки, чтобы можно было быстро запустить инструменты через командную строку.
В Windows переходим в «Этот компьютер → Свойства → Дополнительные параметры системы → Дополнительно → Переменные среды». В «Переменные среды для пользователя» находим строку «Path» и кликаем по ней 2 раза. Откроется окно, в нём нажимаем «Создать» и вставляем полный путь к инструментам через точку с запятой. Должно выглядеть примерно так «C:\Android\tools;C:\Android\platform-tools».
На Mac в домашней папке находим скрытый файл «.bash_profile» или просто «.profile». Открываем его командой «nano
/.profile» и добавляем путь до инструментов:
export PATH=»$HOME/Android/tools:$PATH»
export PATH=»$HOME/Android/platform-tools:$PATH»
Сохраняем файл комбинацией «CMD+X» и далее жмём «Y». На Linux процесс аналогичен, но нужно запускать файл .bashrc.
Вот и всё. Теперь команды Android SDK доступны через консоль. Вы сможете, например, устанавливать образы и вручную обновлять смартфон.
Источник
Ubuntu Documentation
This is a general overview of what the Android SDK is, what it does, and how it can benefit you. This guide also contains instructions on how to set up the Android SDK on Ubuntu 10.04 onwards.
The Android Software Development Kit (AKA SDK) is a software suite for the Android mobile operating system that allows you to write applications for Android in the Java programming language. Most people who use the Android SDK either develop applications for the Android operating system OR they use it for other purposes, such as obtaining elevated privileges on an Android device with the help of third-party software or use it for diagnostic purposes in case of malfunctioning.
The vast majority of Android users probably won’t have to make use of the Android SDK, however, it is useful if you wish to learn more about the Android operating system and even then it’s still a handy tool to have in case something goes wrong.
This tutorial covers Ubuntu 10.04 Lucid Lynx onwards. For anything prior to Lucid, you will have to find it yourself.
Preparation and Installation
Before we set up the SDK, we have some preparation to do. Due to some major changes in the Android SDK made in the last couple of months, setting up the Android SDK is not as easy as it was two years ago, when Android was starting to take off. Setting up the SDK itself is relatively easy once the preparation has been done.
Downloading the SDK Starter Package
First things first, we have to obtain the starter package. The SDK starter package can be obtained at http://developer.android.com/sdk/index.html.
Download the one for Linux (.tgz file) and once it’s finished downloading, extract it to somewhere safe and easy to reach. For example, the home folder. To do so, open up a terminal, navigate to the directory where the SDK was downloaded and enter the following command:
$ tar -xvzf android-sdk_rXX-linux.tgz && mv android-sdk-linux
As of 12 May 2012, the Android SDK is currently up to r18, however that is set to change in the near future, and as such, replace XX with the version of your SDK.
Setting up Java
Prior to SDK r08, everything you’ll need to develop applications was included on a 100-200MB .tgz archive. However, with the release of SDK r08, the tools necessary for creating and building applications was removed and can be obtained by using the Android SDK and AVD Manager which is located in the / /tools folder.
However, you should not execute the Android SDK and AVD manager just yet, as you’ll most likely get a Parse: XML error notice. The reason for this is that after SDK r08, it’s now required to have Java installed before you set up the SDK. To do this, we’ll download the OpenJDK and the Icedtea browser plugin. In a terminal window, enter the following command:
$ sudo apt-get install openjdk-6-jre openjdk-6-jdk icedtea6-plugin
This will download and install the OpenJDK implementation of Java, which will be sufficient enough for us to download the SDK platform tools.
Downloading the SDK platform tools
This is pretty much the actual «installation» of the SDK’s platform tools. One key reason why this step is important is that it contains an important protocol called the Android Debug Bridge (ADB).
ADB comes bundled with the SDK platform tools. It is a command-line tool used to communicate with and control the device over a USB link from a computer. The tool comes bundled with the Android SDK and is commonly used for diagnosing problems with the device. Once you have ADB installed, you can use ADB to copy files to and from the device’s internal memory, install apps, run commands, see logs and more. This makes it an invaluable tool if your device is running into some trouble that might warrant a new device.
Now, in order to obtain the SDK platform tools, we’ll need to initialize the Android SDK and AVD Manager that I mentioned earlier. To do so, enter the following commands in a terminal. The first command will direct you to where the Android SDK and AVD Manager is located, and the second will execute said program.
/android-sdk-linux/tools
Once you do that, a new window will pop up, which is the actual Android SDK and AVD Manager. Click on «Available Packages» and you will be presented with two boxes. One is the Android Repository and the other is the Third-party Add-ons. Click on «Android Repository» then click on Install Selected. A confirmation window will pop up. Click on «Accept All» and then click on the Install button to install the SDK platform tools. It’s quite a bit to download so make sure you have at least 512MB to 2GB of hard drive space available. Once the download has finished, you’ll get a notice saying that the ADB daemon needs to be restarted. Click on «Yes» and everything will finish downloading.
Post-Installation Configuration
Now once the download has finished, or while you’re waiting for the download to finish, we have to configure Ubuntu a little to meet our needs. First, we have to set up the PATH variable to include ADB and other SDK tools, and we have to make sure our hardware will be detected once we initialize ADB.
Modifying the PATH Environment Variable
In the days before Android 2.2, a good number of people used to place their various projects and applications in the directories where the necessary tools they used existed. This was in itself a very flawed method because it cluttered up the directories, and while cleaning up the SDK, one might accidentally delete a crucial file, which will cause the SDK to fail and having to completely reinstall everything.
Modifying the PATH Environment Variable will help out immensely when it comes down to making use of SDK tools like ADB. Doing this will also allow you to execute certain protocols like ADB from ANY location. So if you’re operating from the Desktop, you don’t have to redirect to the SDK’s platform-tools folder to make use of ADB if you need to make use of it.
Enough chatter, let’s get busy. To modify the PATH variable of your system, you need to edit your .bashrc file. To do so, in a terminal, execute the following command:
You will now have the Nano text editor enabled on the terminal. Now, at the very top of the file, enter the following:
/android-sdk-linux/tools
/android-sdk-linux/platform-tools
Once you’re finished, press CTRL + X, Y, and then hit Enter to save your changes and exit the Nano text editor.
Preparing Hardware
Now that we have our PATH variable set up, we need to make sure our hardware will be detected once we initialize ADB. However, up until Natty, udev in Ubuntu wouldn’t allow ADB access to the Android phone via USB. This was fixed in udev version 165-0ubuntu1 — if you are running an earlier version ( apt-cache policy udev will tell you whether you are), you’ll need need to create a new udev rule file as root.
In a terminal, execute the following command that will create the rule file. This will utilize the graphical sudo command, so that we can still have control over the file if we’re not a root user.
$ gksudo gedit /etc/udev/rules.d/51-android.rules
Copy and paste the following udev rules in the text editor that opened up which contains the new rule file we created. The rules included should work with most if not all Android devices across multiple manufacturers, such as HTC, Motorola, LGE, and so forth.
SUBSYSTEM==»usb», ATTRS SUBSYSTEM==»usb», ATTRS SUBSYSTEM==»usb», ATTRS SUBSYSTEM==»usb», ATTRS SUBSYSTEM==»usb», ATTRS SUBSYSTEM==»usb», ATTRS SUBSYSTEM==»usb», ATTRS SUBSYSTEM==»usb», ATTRS SUBSYSTEM==»usb», ATTRS SUBSYSTEM==»usb», ATTRS Once you’ve copied and pasted the udev rules in the text editor which contains your newly created rule file, save your changes and quit. Now that you’ve set your udev rules you have to reboot so that ADB will be in your path. To test your changes, open up a terminal and execute the following: $ adb devices Note: You may need to enable USB debugging mode on your phone first in order for it to be recognised. This will give you two messages: 1) It will tell you it’s initializing the ADB daemon. 2) It should show you a list of connected devices. If all went well you should see your device’s serial number under the list of connected devices. If you see a message like: List of connected devices . No permissions This means your hardware was detected, however you made a mistake in configuring Ubuntu or the udev rule for your phone’s manufacturer was not listed. AndroidSDK (последним исправлял пользователь uusijani 2012-07-28 15:47:15) The material on this wiki is available under a free license, see Copyright / License for details Источник
You can contribute to this wiki, see Wiki Guide for details


