- linux-notes.org
- Установка android tools (ADB,fastboot, QTADB) на Debian/Ubuntu/Linux Mint
- 1. Настраиваем ADB UDEV правила
- 2. Установка android tools
- 3. Добавление ADB к разрешенным подключениям
- 4. Установка QTADB
- 6 thoughts on “ Установка android tools (ADB,fastboot, QTADB) на Debian/Ubuntu/Linux Mint ”
- How To Install Android SDK Tools On Ubuntu 20.04
- Download SDK Tools
- Install SDK Tools
- Download and Install Platform Tools
- Configure Environment Variable
- Using the SDK Manager
- Using the Emulator and AVD Manager
- Summary
linux-notes.org

Установка android tools (ADB,fastboot, QTADB) на Debian/Ubuntu/Linux Mint
Не знаете как установить fastboot на Ubuntu, Debian или Mint? Нужны android tools для программирования под андроид и не знаете как установить их? То данная статья «Установка android tools (ADB,fastboot, QTADB) на Debian/Ubuntu/Linux Mint» именно для Вас. Я все расскажу и покажу, на готовых примерах будет наглядно видно что и как нужно делать.
Если у вас есть Android смартфон, то вам нужно рано или поздно использовать некоторыми конкретными инструментами для Android, такими как ADB или fastboot. Эта статья объясняет, простые шаги, необходимые для установки Android инструментов, в том числе последней Android SDK на компьютере Ubuntu.
1. Настраиваем ADB UDEV правила
До того как Вы будите использовать ваше устройство android в adb mode, нужно:
…
Bus 002 Device 059: ID 18d1:4e42 Google Inc.
Этот вывод говорит что в системе имеется Google Nexus 7 и подключенный с использованием MTP mode и USB Debug on. Так же дает нам понят кто изготовитель и модель телефона (его ID).
Теперь, когда у нас есть эти данные, мы можем создать правила Udev:
your_login_from_OS — это логин с вашей ОС (Debian/Ubuntu/Mint).
Теперь перезапускаем наше созданное udev правило чтобы оно начало работать:
2. Установка android tools
Если вы не планируете делать разработку на андроид устройстве, вам не нужно устанавливать полный SDK. Два андроид-инструмента теперь доступны для Ubuntu и Debian в виде пакетов. Они обеспечивают минимальный набор инструментов, таких как adb и fastboot.
Эти инструменты нужны именно для того что бы получить полный доступ к вашему телефону (права root) , прошить ROM, или установить стороннее ПО.
2.1. Установка минимального пакета для работы
Добавляем репозиторий в систему для установки утилит:
Если «чистая ОС», то можно получить ошибку:
После чего все хорошо добавилось!
Обновим систему для того чтобы «подхватил» только что добавленный репозиторий:
Устанавливаем adb и fastboot:
Инструменты теперь доступны в командной строке.
2.2. Установка компилятора, android SDK
Если вам действительно нужно установить полный Android SDK, вот шаги.
Я проверил это только процесс установки под Ubuntu и Debian, все работало!
2.2.1.Установка ORACLE JAVA 7
Чтобы установить полный Android SDK, нужно для начала установить последнюю версию Oracle Java. Мы также должны предварительно удалить OpenJDK. Oracle Java не доступен в официальных репозиториях Ubuntu потому что это не разрешено в новой лицензии Java.
Пакет в PPA автоматически загружает (и устанавливает) Oracle Java JDK 7 с официального сайта и устанавливает его на компьютере:
Удаляем для начала openSDK, можно сделать следующим образом:
Добавляем нужный репозиторий и обновляем ОС:
Устанавливаем Oracle Java JDK 7:
2.2.2. Установка IA32-LIBS
Android SDK все еще нуждается в пакетах 32 бит совместимости для запуска. Так что, если вы работаете в распределение AMD64, необходимо установить пакет с a32-libs:
Эта библиотека скачает много пакетов, на некоторые нужно будет подтверждение.
2.2.3. Установка android SDK
Скачайте Android SDK. Извлеките его в одну папку и из этой папки запустите следующие команды:
3. Добавление ADB к разрешенным подключениям
Начиная с Android 4.2.2, была введена новая функция безопасности в ADB. Вы должны подтвердить на устройстве, что в настоящее время вы используете доверенное подключение к компьютеру.
Эта функция безопасности нужно ADB версии 1.0.30 и выше.
Вы можете проверить легко свою версию ADB:
Если ADB версия является слишком старой, вы получите:
Когда вы подключите ваш Android устройство в первый раз, он будет отображать сообщение и предлагает вам разрешить подключение к компьютеру в качестве доверенного компьютера. Вы должны прочитать это сообщение и выбрать установить флажок.
4. Установка QTADB
QtADB является мощным графическим менеджером для Android устройств на базе протокола ADB.
QtADB позволит вам:
- Иметь полный доступ к файловой системе Android устройства.
- Управлять установленными приложениями.
- Получить некоторую информацию устройств (уровень заряда батареи, использование памяти, …).
- Сделать некоторое скринши дисплея устройства.
4.1. Требования на стороне телефона
Чтобы иметь возможность в полной мере использовать QtADB с телефоном, он должен:
- Быть зарутован (be rooted)
- Должен быть установленный BusyBox на телефоне (без установленного BusyBox, половина QtADB функциональных не будет работать).
Если ваш телефон работает CyanogenMod, вы должны также получить полный доступ (root) для ADB.
Это делается через Настройки / суперпользователь / Настройки (Settings / Superuser / Settings)

Вы можете проверить вашу конфигурацию телефона с помощью следующей команды:
4.2. Установка QtADB.
Для QtADB требуется:
- Установленная и рабочая ADB (сделано ранее)
- Qt libs версии 4.7 или выше
Первый шаг заключается в установке зависимостей. Затем вы можете загрузить исполняемый файл с сайта в разделе загрузок и установить его. Выберите и скачайте пакет согласно вашей ОС (32-бит i386 или 64-бита AMD64).
Установим библиотеки, нужные для нормально работы:
Переходим в папку и скачиваем нужный для Вас архив:
После скачивания, распакуем данный архив:
Перенесем все в нужную директорию:
Выставим права на папку:
Удалим все ненужное:
Я установил и распаковал для х64- битной ОС и теперь QtADB установлено на ПК.
4.3. Избавляемся от некоторых ошибок
QtADB версии 0.8+ имеет неприятную ошибку.
Когда вы запускаете, некоторые интернет обновление при процессе проверки, дает сбои.
Segmentation fault (core dumped) Ошибка сегментации (ядро сбрасывается)
Когда это проверка обновление устанавливается по умолчанию, мы должны отключить ее. Это делается просто с помощью создания файла конфигурации по умолчанию QtADB.conf, который отключает клавишу CheckForUpdateOnStart:
Этот файл имеет следующие строки :
Теперь QtADB должно прекратить выделоватся и начать работать нормально при запуске.
4.4. Создать запуск GNOME SHELL
Последние шаги, объявите app при запуске Gnome Shell.
Это делается путем создания файла qtadb.desktop:
Объявляем все переменные:
Теперь вы можете запустить QtADB через ваш рабочий стол Gnome Shell и ваша файловая система Fuly в телефоне теперь доступны.
Создать запуск GNOME SHELL
Будьте осторожны, у вас есть все полномочия! МОЖЕТЕ ЧТО ТО НАТВОРИТЬ!
6 thoughts on “ Установка android tools (ADB,fastboot, QTADB) на Debian/Ubuntu/Linux Mint ”
У меня команды add-apt-repository на свежеустановленном последнем дебиане и в помине нету! Вообще статья неправильная, не вводите в заблуждение людей. По другому adb поставил и шаг с настройкой udev пропустил, ибо система сама всё за меня настроила)
Если «чистая ОС», то можно получить ошибку:
После чего все хорошо добавилось!
Кстати пакет называется android-tools-adb на debian. Потом никаких настроек udev делать не надо, debian избавил меня от лишнего геморроя!
Источник
How To Install Android SDK Tools On Ubuntu 20.04
It provides all the steps required to install Android SDK Tools on Ubuntu 20.04 LTS.
In this tutorial, we will discuss all the steps required to install Android SDK Tools, SDK Manager, and AVD Manager on the popular Linux distribution i.e. Ubuntu 20.04 with Java 16. This tutorial provides the steps to install Android SDK Tools on Ubuntu 20.04 LTS, though the steps should be the same for other versions of Ubuntu and Linux systems.
This post is useful for the developers using Android SDK Tools with other IDEs without installing Android Studio for the use cases including hybrid app development using Ionic. It also assumes that a valid JAVA_HOME environment variable exists pointing to the installation directory of Java. You may follow the Java installation tutorials written by us including How To Install Java 8 On Ubuntu, How To Install Java 16 On Ubuntu 20.04 LTS, and How To Install OpenJDK 16 On Ubuntu 20.04 LTS.
In case you are interested in developing Android applications using Android Studio, you can also follow the other tutorials written by us including How To Install Android SDK Tools On Windows, How To Install Android Studio On Windows, and How To Install Android Studio On Ubuntu 20.04.
You may also be required to execute the below-mentioned command in case you have set the options previously for Java 9 or Java 10.
Notes: The Ubuntu 18.04 LTS version of this tutorial is available at — How To Install Android SDK Tools On Ubuntu 18.04. You can continue this tutorial for Ubuntu 20.04 LTS.
Download SDK Tools
Open the download tab of Android Studio and scroll down to the Command line tools only section. This section shows various options to download the SDK tools as shown in Fig 1.
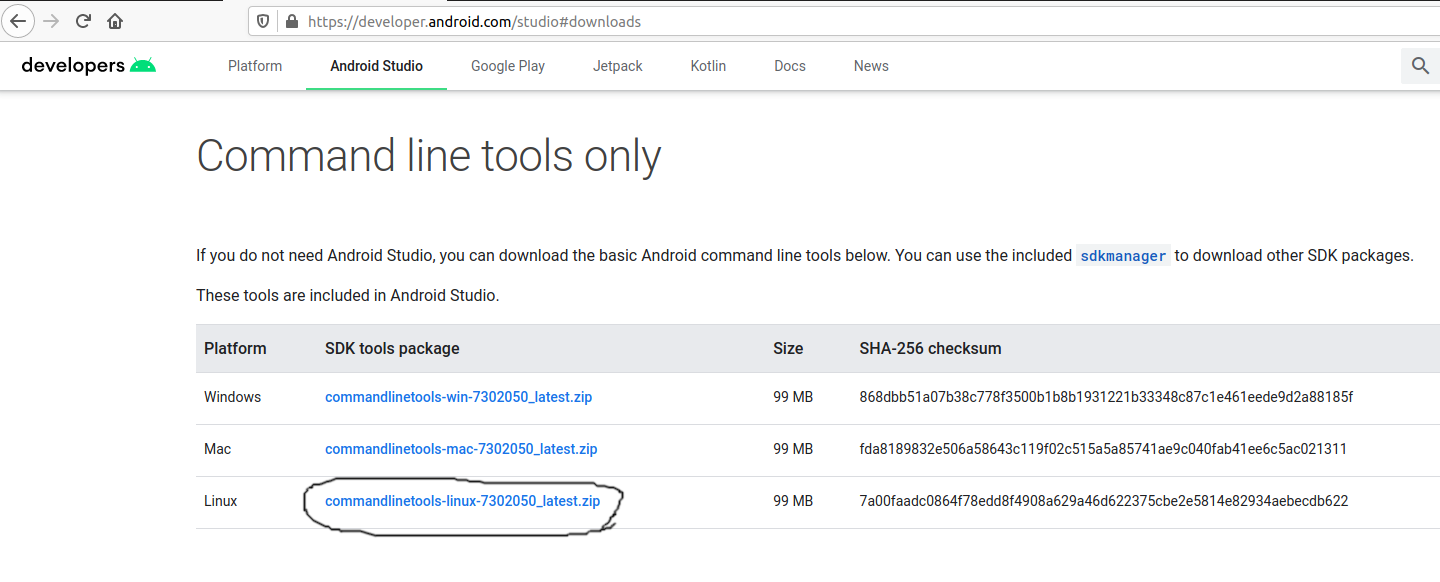
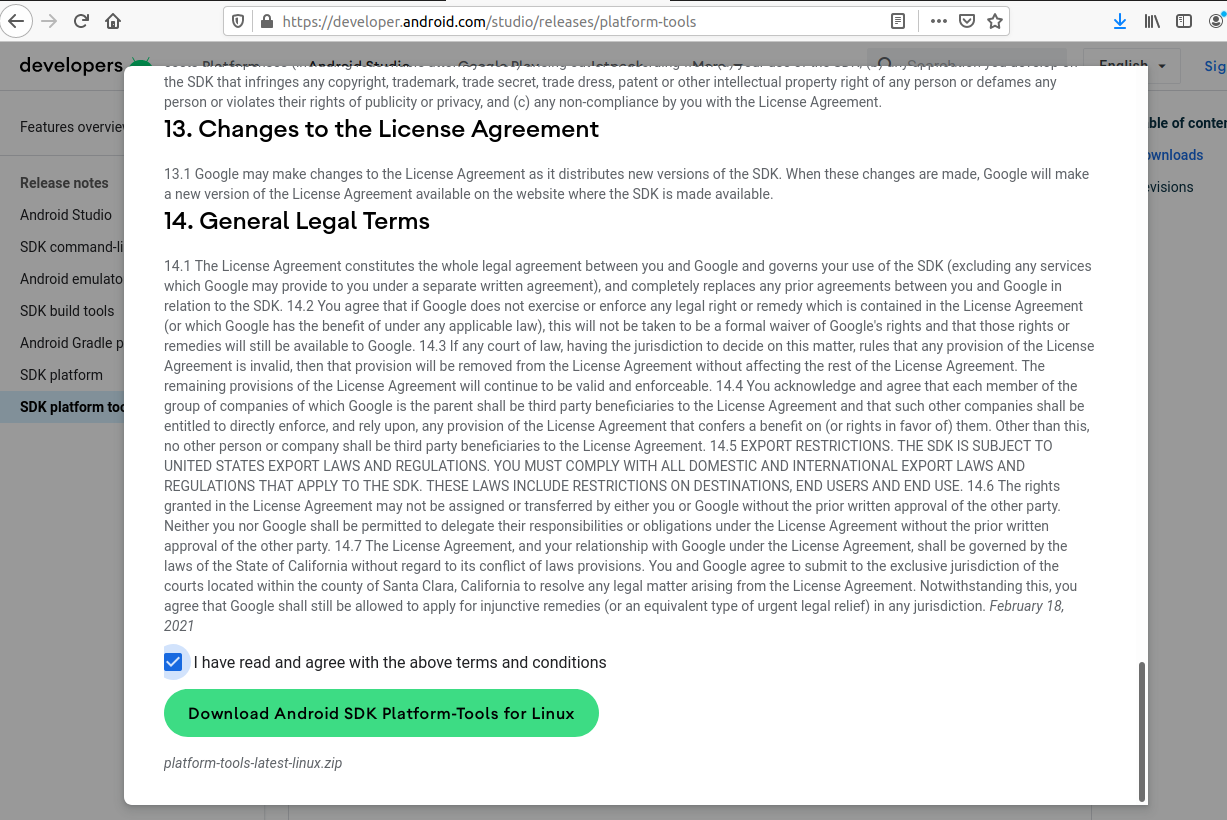
Click on the Download Link as highlighted in Fig 1. It will ask to accept the Terms and Conditions as shown in Fig 2.
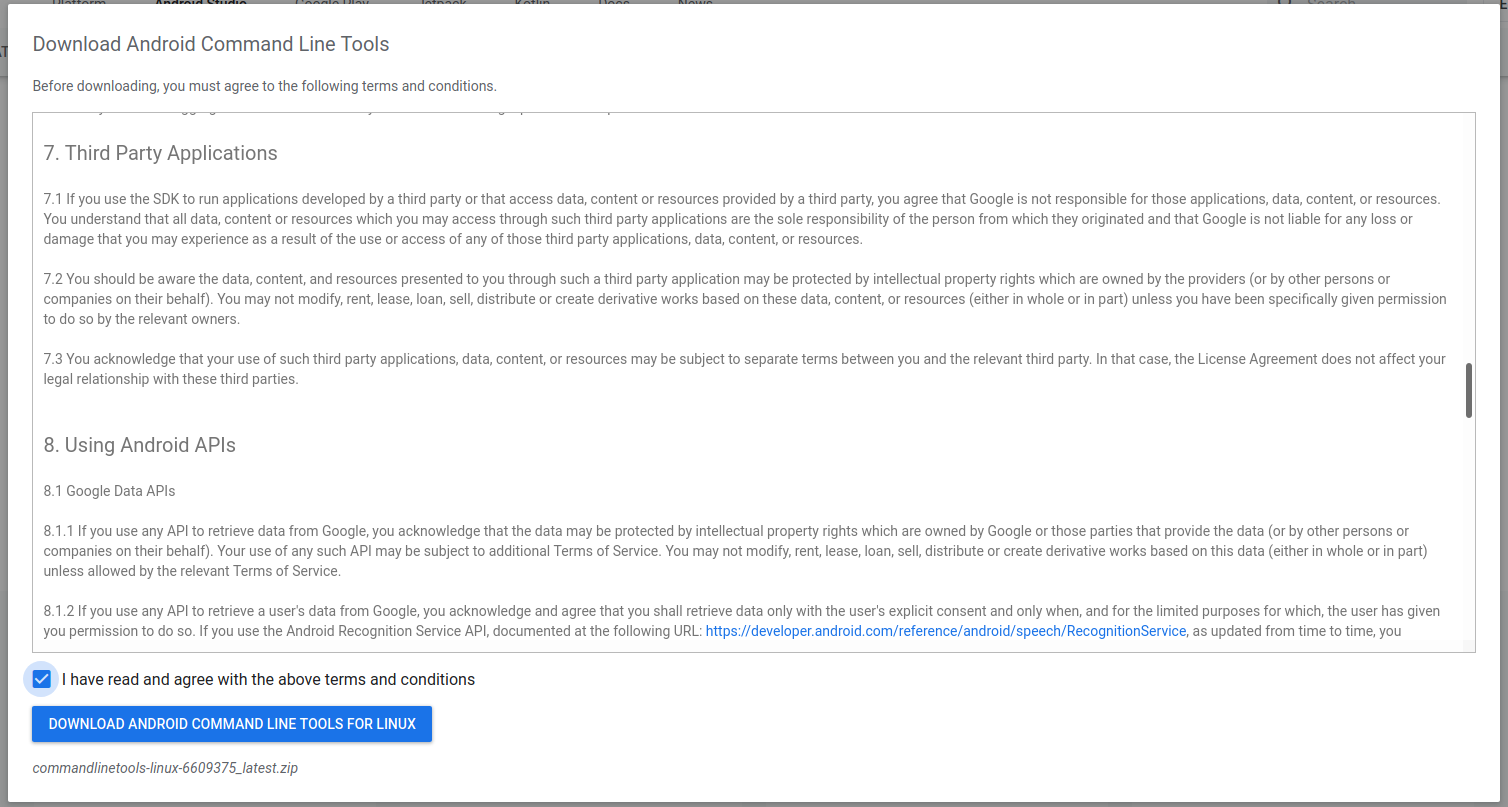
Go through the details, agree to the terms and conditions, and click the Download Button to start the download.
Install SDK Tools
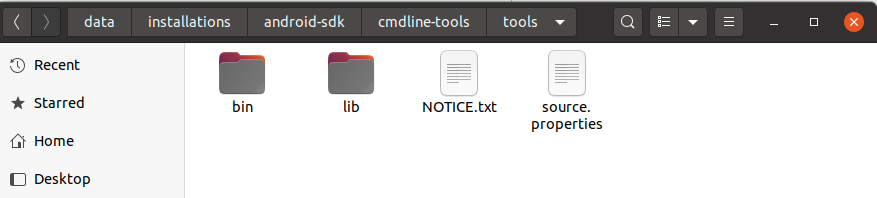
In this step, we will install the Android SDK Tools on Ubuntu. Create a directory having the name set to android-sdk and extract the content of the downloaded SDK Tools zip to this directory. Create another directory android-sdk/cmdline-tools to store the sdk-tools. Make sure that the tools directory is available directly within the android-sdk/cmdline-tools directory created by us.
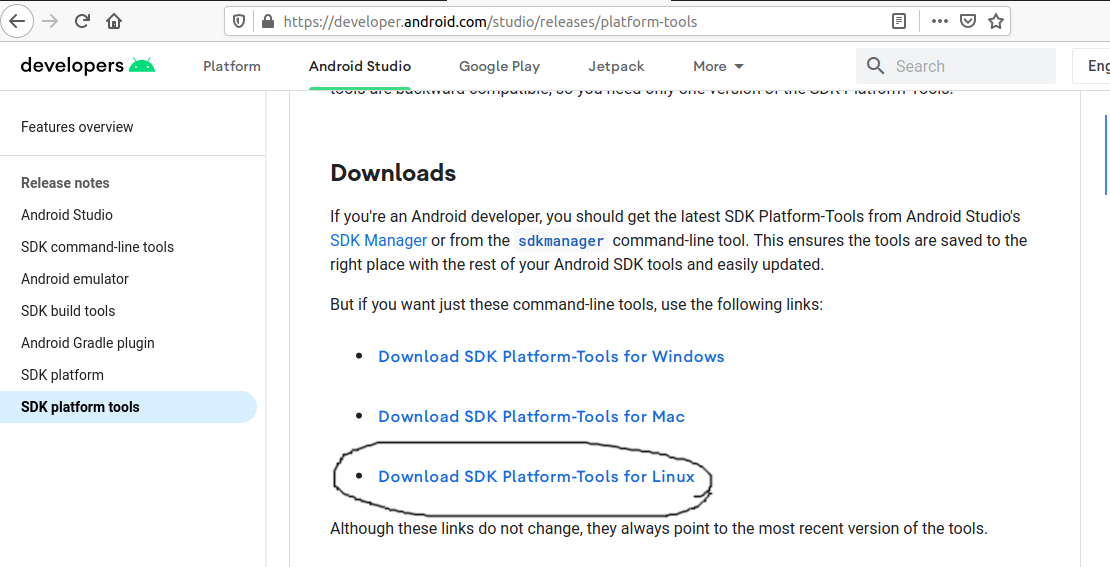
Download and Install Platform Tools
In this step, we will install the Android Platform Tools on Ubuntu. Follow the same steps similar to Android SDK Tools as shown in Fig 4, Fig 5, and Fig 6 to install Android Platform Tools using the download link.
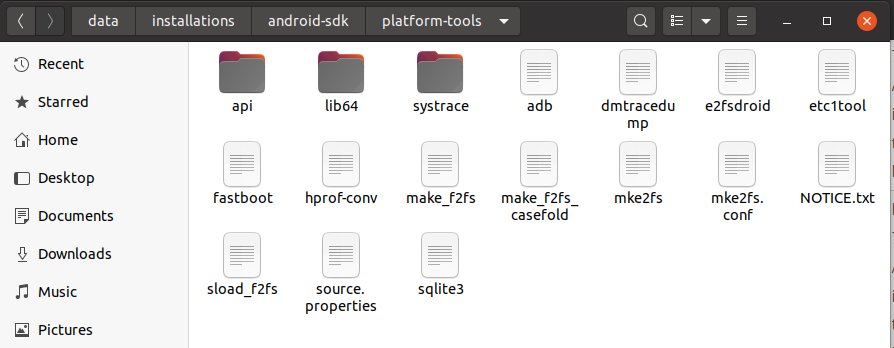
Make sure that the platform-tools content is available within the directory platform-tools. The directory structure should be similar to:
Configure Environment Variable
In this step, we will configure the environment variable to use the SDK tools installed by us. There are two ways to do it. In the first approach, we can update the .bashrc file of the user account. Another approach is to update /etc/profile file which works for all the accounts.
Approach A
Update .bashrc file of the user account.
Notes: Replace the android sdk path based on your installation directory.
Approach B
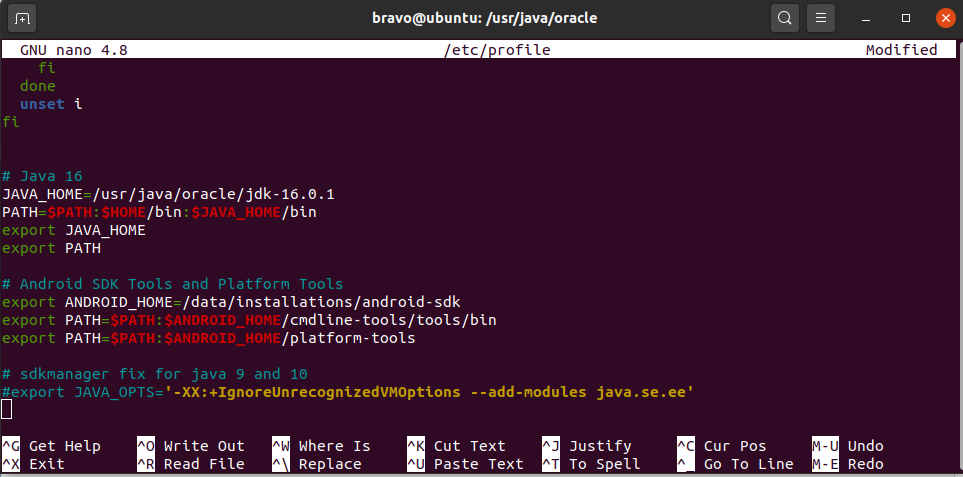
Update /etc/profile file.
Scroll down by pressing the Page Down button and add at the end of this file:
Make sure that you provide the correct path to the android-sdk directory.
Now press Ctrl + O and press Enter to write our change. Press Ctrl + X to exit the nano editor. The nano editor should look like Fig 7.
Notes: Approach B didn’t work for me.
Now test the Android SDK installed by us using the environment variables configured by us.
Using the SDK Manager
Update SDK Manager — Update the SDK manager using the below-mentioned command.
List — We can list the installed and available packages and images using the list command as shown below.
Install Platform — Use the below-mentioned command to install the Android 10 (API level 29) using the SDK manager.
It will ask to accept the terms and conditions. Enter y and hit Enter Key to accept the terms and conditions. This command creates the directories licenses and platforms within android-sdk and installs the package android-30 within the platforms directory having all the required files to run the emulator for Android 11.
If we again check the installed packages, the list command shows the installed options as shown below.
After installing the platforms, the directory structure should be:
Add System Image — We can add system image from available images shown by the list command using the SDK manager as shown below. We are adding the most recent default 64-bit system image.
Accept the License Agreement to complete the download. There are several projects which need Google Play Services. We need system images specific to Google Play Services as shown below.
Now again use the command list as shown below.
After installing the default system image, the directory structure should be:
Install Emulator — You might be required to install the emulator before creating the AVD using SDK Manager. The emulator gets installed while adding the system images in the previous steps.
Install Build Tools — Install the most recent build tool listed by the list command.
After installing the build tools, the directory structure should be:
Now again use the command list as shown below.
Using the Emulator and AVD Manager
Create AVD — Create the AVD using the system image downloaded in the previous step as shown below. Replace with actual name.
The above commands ask a bunch of questions to configure the AVD if we choose the custom hardware profile option. We have excluded the details of these options from this tutorial since these configuration details depend on the actual needs. After completing all the configurations, it creates the AVD using the name provided by us while configuring it.
List AVDs — Now go to the tools directory(only required in case you have omitted to add tools path to PATH while configuring environment variables) on the command line and check the installed platform as shown below.
It will list all the AVDs installed by us.
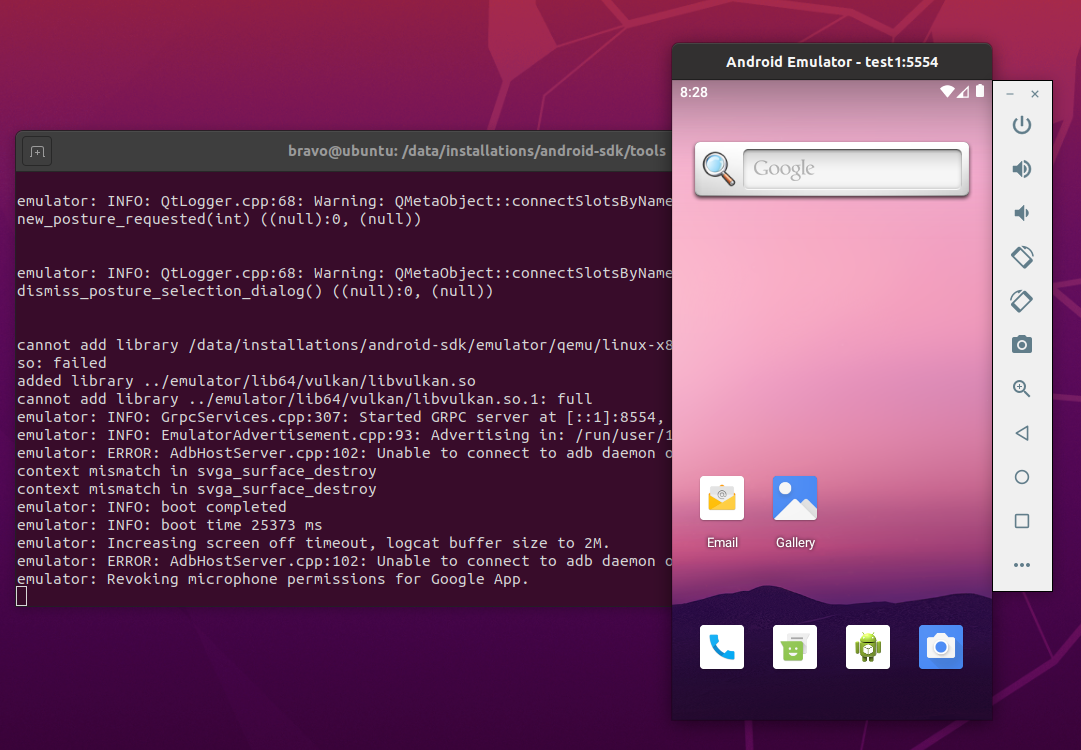
Launch AVD — We can launch the AVD using the emulator as shown below.
The emulator will take some time to completely launch the AVD. The final results should look similar to Fig 8.
Notes: I have used Ubuntu 20.04 LTS installed as VM using VMware Workstation Player, hence I have enabled the Virtualization for my Virtual Machine.
Delete Emulator — We can also delete an existing emulator as shown below.
Summary
This tutorial provided all the steps required to install Android SDK Tools and Android Platform Tools on Ubuntu 20.04 LTS. It also provided the steps required to launch the AVD using the Android Emulator.
Источник


