- Android studio error windows
- Fix: Android Studio Windows 10 errors in 4 quick steps
- Can’t run Android Studio on Windows 10? Here’s what to do
- 1: Make sure you have installed SDK
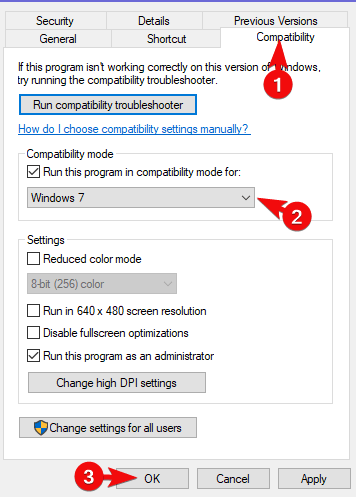
- 2: Run application as admin and in a compatibility mode
- 3: Disable UAC and antivirus
- 4: Reinstall all associated applications
- Устранение неполадок в Android Emulator Android emulator troubleshooting
- Проблемы развертывания в Windows Deployment issues on Windows
- Ошибки развертывания Deployment errors
- Ошибка доступа к MMIO MMIO access error
- Отсутствующие сервисы Google Play Missing Google Play Services
- Проблемы производительности Performance issues
- Аппаратное ускорение отключено Hardware acceleration is not enabled
- Аппаратное ускорение включено, но эмулятор работает слишком медленно Acceleration is enabled but the emulator runs too slowly
- Проблемы с аппаратным ускорением Hardware acceleration issues
- Аппаратное ускорение недоступно Hardware acceleration not available
- Неправильные настройки BIOS Incorrect BIOS settings
- Проблемы с Hyper-V Hyper-V issues
- Проблемы с HAXM HAXM issues
- Процесс HAXM не запущен HAXM process is not running
- Конфликты HAXM с другими технологиями виртуализации HAXM virtualization conflicts
- Неправильные настройки BIOS Incorrect BIOS settings
- Отключение Hyper-V Disabling Hyper-V
- Отключение функции Device Guard Disabling Device Guard
- Дополнительные советы по устранению неполадок Additional troubleshooting tips
- Запуск эмулятора из командной строки Starting the emulator from the command line
- Просмотр журналов Device Manager Viewing Device Manager logs
- Проблемы развертывания в macOS Deployment issues on macOS
- Ошибки развертывания Deployment errors
- Ошибка доступа к MMIO MMIO access error
- Отсутствующие сервисы Google Play Missing Google Play Services
- Проблемы производительности Performance issues
- Аппаратное ускорение отключено Hardware acceleration is not enabled
- Аппаратное ускорение включено, но эмулятор работает слишком медленно Acceleration is enabled but the emulator runs too slowly
- Проблемы с аппаратным ускорением Hardware acceleration issues
- Проблемы с платформой гипервизора Hypervisor Framework issues
- Проблемы с HAXM HAXM issues
- Дополнительные советы по устранению неполадок Additional troubleshooting tips
- Запуск эмулятора из командной строки Starting the emulator from the command line
- Просмотр журналов Device Manager Viewing Device Manager logs
Android studio error windows
Android Studio — IDE для разработки приложений для Андроид от Google на основе IntelliJ IDEA.
Установка:
Страница загрузок на официальном сайте.
Windows:
Необходимо установить JDK и прописать системную переменную JAVA_HOME
Чтобы использовать Android Studio с эмулятором на Windows XP SP3 необходимо скачать и установить старую версию Intel Hardware Accelerated Execution Manager (extra_intel_haxm-windows_r02.zip) extra_intel_haxm-windows_r02.zip ( 1,66 МБ )
OS X:
Установка Andoid Studio на OS X намного проще — необходимо проинсталировать JDK, а затем Android Studio.
Не запускается эмулятор
Запускается эмулятор, но появляется ошибка «pixel launcher isn’t responding»
При запуске эмулятора лаунчер сообщает: Pixel launcher isn’t responding. Ни какой реакции на нажатия.
Произошло на машине с встроенной видеокартой Intel HD Graphics 3000 — в Windows 10 драйвер не поддерживает OpenGL (вероятно связанно с этим).
Решение: в наcтройках AVD установить значение Software-GLES 2.0 для Emulated performance\Graphics

|
Создание быстрого x86 эмулятора Android (AVD) на примере Android 5.0.1 (API 21) Запускаем Android SDK Manager. Загружаем Intel x86 Atom System Image (ознакомьтесь также с Using Hardware Acceleration, Как разогнать эмулятор Android )
Пользуемся Изменение места хранения AVD. Инструкция.
Учебники по Android Studio: Renamed Properties in BuildTypes Renamed Properties in ProductFlavors Т.е. например в build.gradle вместо runProguard false необходимо написать minifyEnabled true Просьба: если вы автор последнего сообщения — просто редактируйте его, а не добавляйте новое. Добавляем систему контроля версий Mercurial
О инсталляции и работе с Mercurial хорошо написано здесь:
Устанавливаем Mercurial, если необходимо добавляем в %PATH% путь (в моем случае D:\Program Files\TortoiseHg\). избавится от проблемы удалось только вернувшись на 0.2.0 — удалить Android Studio через uninstal, затем удалить вручную каталог — там много остается. Ошибки: Ошибка Gradle project sync failed error — Решение В теме нет куратора. По вопросам наполнения шапки обращайтесь к модераторам раздела через кнопку Сообщение отредактировал derak1129 — 26.09.20, 17:13 Fix: Android Studio Windows 10 errors in 4 quick steps
The most used OS in the world has the most active developers, as well. Of course, we’re referring to Android and its applications. Now, the majority of users will run Android Studio on Linux, but a substantial number develops apps on the Windows OS. As of lately, users who upgraded from Windows 7/8 to Windows 10, have had a hard time running Android Studio. We made sure to enlist a few solutions for the issue at hand. If you’re unable to run Android Studio on Windows 10, follow the steps we provided below. Can’t run Android Studio on Windows 10? Here’s what to do1: Make sure you have installed SDKThe strange occurrence of applications working on Windows 7 or Windows 8 and suddenly failing on Windows 10 is nothing new. However, in this case, the majority of users were able to run Android Studio on Windows 10 as seamlessly as they did on previous Windows iterations. Just some users weren’t able to do run this development tool, even after multiple tries. Even though this is rare, we still must advise you to check the Java SDK (Software Development Kit) from Oracle. Without it, Android Studio won’t work. Even if you upgraded to Windows 10 over previous iterations, reinstalling this tool might help. Maybe some pieces haven’t migrated with the system and that’s what’s causing the problem in the first place. 2: Run application as admin and in a compatibility modeAnother applicable approach whenever a third-party application won’t work is to grant it the administrative permission. In addition, running the program in a compatibility mode might help as well. Lots of third-party applications won’t work as intended on Windows 10 due to a more restrictive nature of the system. However, you can, as we said, troubleshoot this by tweaking the compatibility options. Follow the steps below to allow the administrative permission to Android Studio:
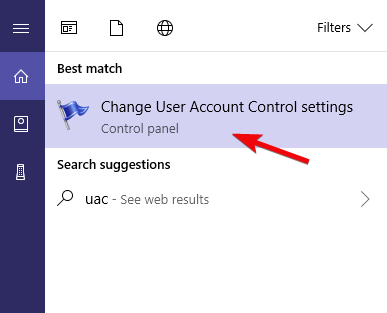
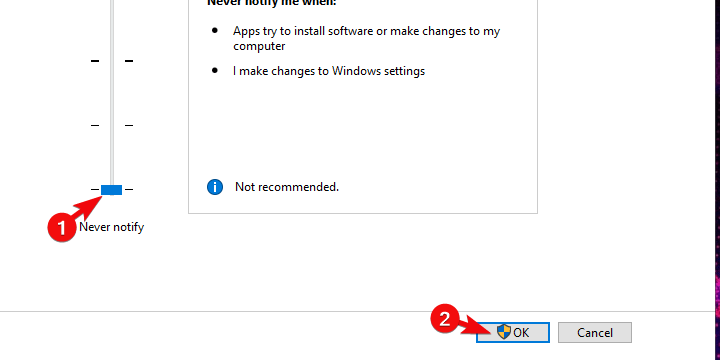
3: Disable UAC and antivirusEven we can’t openly recommend disabling UAC (User Account Control) in Windows (due to obvious security reasons), you can try it out temporarily. When it comes to more delicate and complex applications, which Android Studio certainly is, the system-imposed restrictions might be too much. Here’s how to disable UAC in Windows 10:
Moreover, while we’re talking about restrictions, a third-party antivirus can occasionally block the execution of various applications. For that reason, if you’ve entrusted system protection to a third-party solution, make sure to disable it temporarily. Certain users managed to get Android Studio to work when real-time protection was off. 4: Reinstall all associated applicationsFinally, all remaining solutions we can grasp and include in this list point towards the reinstallation. Now, as we already mentioned, a system upgrade to Windows 10 should allow you to use all applications from previous Windows iteration. However, in this scenario, we highly recommend reinstalling everything and starting from a scratch. Of course, if you have some projects, make sure to back them up before uninstalling Android Studio and SDK. Hopefully, you’ll be able to continue with your work later on. Here’s where to download Java SE Development Kit. And the latest Windows 10 – compatible version of Android Studio is to be found, here. That should do it. Don’t forget to share any alternative solutions in the comments section below. We’ll be thankful for your participation in the matter. RELATED STORIES YOU SHOULD CHECK OUT: Устранение неполадок в Android Emulator Android emulator troubleshootingВ этой статье описаны наиболее типичные ошибки и предупреждения, возникающие при настройке и запуске Android Emulator. Кроме того, описываются решения для этих ошибок, а также различные советы по устранению неполадок, которые помогут вам диагностировать проблемы с эмулятором. This article describes the most common warning messages and issues that occur while configuring and running the Android Emulator. In addition, it describes solutions for resolving these errors as well as various troubleshooting tips to help you diagnose emulator problems. Проблемы развертывания в Windows Deployment issues on WindowsЭмулятор может отображать некоторые сообщения об ошибках при развертывании приложения. Some error messages may be displayed by the emulator when you deploy your app. Здесь описаны наиболее распространенные ошибки и решения. The most common errors and solutions are explained here. Ошибки развертывания Deployment errorsЕсли отображается ошибка о сбое при установке APK на ваш компьютер или при запуске Android Debug Bridge ( adb ), убедитесь, что пакет SDK для Android может подключиться к эмулятору. If you see an error about a failure to install the APK on the emulator or a failure to run the Android Debug Bridge ( adb ), verify that the Android SDK can connect to your emulator. Для проверки связи с эмулятором сделайте следующее: To verify emulator connectivity, use the following steps: Запустите эмулятор из Android Device Manager (выберите ваше виртуальное устройство и зажмите Запустить ). Launch the emulator from the Android Device Manager (select your virtual device and click Start ). Откройте командную строку и перейдите в папку, в которой установлен adb. Open a command prompt and go to the folder where adb is installed. Если пакет SDK для Android установлен в расположении по умолчанию, adb находится в каталоге C:\Program Files (x86)\Android\android-sdk\platform-tools\adb.exe ; в противном случае измените этот путь для расположения пакета SDK для Android на вашем компьютере. If the Android SDK is installed at its default location, adb is located at C:\Program Files (x86)\Android\android-sdk\platform-tools\adb.exe ; if not, modify this path for the location of the Android SDK on your computer. Введите следующую команду: Type the following command: Если эмулятор доступен из Android SDK, то он отобразится в списке подключенных устройств. If the emulator is accessible from the Android SDK, the emulator should appear in the list of attached devices. Пример: For example: Если эмулятор не появился в этом списке, запустите Диспетчер пакетов SDK для Android , примените все обновления и запустите эмулятор еще раз. If the emulator does not appear in this list, start the Android SDK Manager , apply all updates, then try launching the emulator again. Ошибка доступа к MMIO MMIO access errorЕсли появляется сообщение Произошла ошибка доступа к MMIO , перезапустите эмулятор. If the message An MMIO access error has occurred is displayed, restart the emulator. Отсутствующие сервисы Google Play Missing Google Play ServicesЕсли виртуальное устройство, запущенное в эмуляторе, не поддерживает установленные сервисы Google Play или Google Play Маркет, это часто связано с тем, что виртуальное устройство было создано без этих пакетов. If the virtual device you are running in the emulator does not have Google Play Services or Google Play Store installed, this condition is often caused by creating a virtual device without including these packages. При создании виртуального устройства (см. раздел Управление виртуальными устройствами с помощью Android Device Manager) не забудьте выбрать один или оба из следующих вариантов: When you create a virtual device (see Managing Virtual Devices with the Android Device Manager), be sure to select one or both of the following options:
Например, это виртуальное устройство будет включать сервисы Google Play и Google Play Маркет: For example, this virtual device will include Google Play Services and Google Play Store:
Образы Google Play Маркет доступны только для некоторых типов базовых устройств, например Pixel, Pixel 2, Nexus 5 и Nexus 5X. Google Play Store images are available only for some base device types such as Pixel, Pixel 2, Nexus 5, and Nexus 5X. Проблемы производительности Performance issuesПроблемы производительности обычно вызваны одной из следующих проблем: Performance issues are typically caused by one of the following problems: Эмулятор работает без аппаратного ускорения. The emulator is running without hardware acceleration. Виртуальное устройство, работающее в эмуляторе, не использует образ системы на базе x86. The virtual device running in the emulator is not using an x86-based system image. В следующих разделах подробно описаны эти сценарии. The following sections cover these scenarios in more detail. Аппаратное ускорение отключено Hardware acceleration is not enabledЕсли не включено аппаратное ускорение, при запуске виртуального устройства из Device Manager будет отображаться диалоговое окно с сообщением об ошибке, указывающее, что платформа гипервизора Windows (WHPX) настроена неправильно: If hardware acceleration is not enabled, starting a virtual device from the Device Manager will produce a dialog with an error message indicating that the Windows Hypervisor Platform (WHPX) is not configured properly:
Если это сообщение об ошибке отображается, см. инструкции по проверке и включению аппаратного ускорения в разделе Проблемы с аппаратным ускорением. If this error message is displayed, see Hardware acceleration issues below for steps you can take to verify and enable hardware acceleration. Аппаратное ускорение включено, но эмулятор работает слишком медленно Acceleration is enabled but the emulator runs too slowlyРаспространенной причиной этой проблемы является отсутствие образа на базе x86 в виртуальном устройстве (AVD). A common cause for this problem is not using an x86-based image in your virtual device (AVD). При создании виртуального устройства (см. раздел Управление виртуальными устройствами с помощью Android Device Manager) не забудьте выбрать образ системы на базе x86: When you create a virtual device (see Managing Virtual Devices with the Android Device Manager), be sure to select an x86-based system image:
Проблемы с аппаратным ускорением Hardware acceleration issuesПри использовании Hyper-V или HAXM для аппаратного ускорения вы можете столкнуться с проблемами конфигурации или конфликтами с другим программным обеспечением на компьютере. Whether you are using Hyper-V or HAXM for hardware acceleration, you may run into configuration problems or conflicts with other software on your computer. Проверьте, включено ли аппаратное ускорение (и какой метод ускорения используется в эмуляторе), введя следующую команду в командной строке: You can verify that hardware acceleration is enabled (and which acceleration method the emulator is using) by opening a command prompt and entering the following command: Эта команда предполагает, что пакет SDK для Android установлен в расположении по умолчанию C:\Program Files (x86)\Android\android-sdk ; в противном случае измените этот путь для расположения пакета SDK для Android на вашем компьютере. This command assumes that the Android SDK is installed at the default location of C:\Program Files (x86)\Android\android-sdk ; if not, modify the above path for the location of the Android SDK on your computer. Аппаратное ускорение недоступно Hardware acceleration not availableЕсли Hyper-V доступен, ответом на команду emulator-check.exe accel будет следующее сообщение: If Hyper-V is available, a message like the following example will be returned from the emulator-check.exe accel command: Если HAXM доступен, выводится подобное сообщение: If HAXM is available, a message like the following example will be returned: Если аппаратное ускорение недоступно, будет отображаться следующее сообщение (эмулятор ищет HAXM, если не удается найти Hyper-V): If hardware acceleration is not available, a message like the following example will be displayed (the emulator looks for HAXM if it is unable to find Hyper-V): Если аппаратное ускорение недоступно, инструкции по его включению на компьютере см. в разделе Ускорение с помощью Hyper-V. If hardware acceleration is not available, see Accelerating with Hyper-V to learn how to enable hardware acceleration on your computer. Неправильные настройки BIOS Incorrect BIOS settingsЕсли BIOS настроен неправильно и не поддерживает аппаратное ускорение, при выполнении команды emulator-check.exe accel будет отображаться подобное сообщение: If the BIOS has not been configured properly to support hardware acceleration, a message similar to the following example will be displayed when you run the emulator-check.exe accel command: Чтобы устранить эту проблему, перезагрузите BIOS на компьютере и включите следующие параметры: To correct this problem, reboot into your computer’s BIOS and enable the following options:
Если аппаратное ускорение включено и BIOS настроен правильно, эмулятор должен успешно работать с аппаратным ускорением. If hardware acceleration is enabled and the BIOS is configured properly, the emulator should run successfully with hardware acceleration. Однако с Hyper-V и HAXM все равно могут возникать проблемы, как описано далее. However, problems may still result due to issues that are specific to Hyper-V and HAXM, as explained next. Проблемы с Hyper-V Hyper-V issuesВ некоторых случаях при включении одновременно Hyper-V и платформы гипервизора Windows в диалоговом окне Включение и отключение компонентов Windows Hyper-V включается некорректно. In some cases, enabling both Hyper-V and Windows Hypervisor Platform in the Turn Windows features on or off dialog may not properly enable Hyper-V. Чтобы убедиться, что Hyper-V включен, сделайте следующее: To verify that Hyper-V is enabled, use the following steps: Введите powershell в поле поиска Windows. Enter powershell in the Windows search box. Щелкните правой кнопкой мыши Windows PowerShell в результатах поиска и выберите Запуск от имени администратора. Right-click Windows PowerShell in the search results and select Run as administrator. В консоли PowerShell выполните следующую команду: In the PowerShell console, enter the following command: Если Hyper-V не включен, будет отображаться сообщение, как в следующем примере, указывающее, что Hyper-V отключен : If Hyper-V is not enabled, a message similar to the following example will be displayed to indicate that the state of Hyper-V is Disabled : В консоли PowerShell выполните следующую команду: In the PowerShell console, enter the following command: Если гипервизор не включен, будет отображаться сообщение, как в следующем примере, указывающее, что платформа гипервизора отключена : If the Hypervisor is not enabled, a message similar to the following example will be displayed to indicate that the state of HypervisorPlatform is Disabled : Если Hyper-V и (или) платформа гипервизора не включены, используйте следующие команды PowerShell для их включения: If Hyper-V and/or HypervisorPlatform are not enabled, use the following PowerShell commands to enable them: После завершения этих команд выполните перезагрузку. After these commands complete, reboot. Дополнительные сведения о включении Hyper-V (в том числе методы включения Hyper-V с помощью средства обслуживания и администрирования образов развертывания) см. в разделе Установка Hyper-V. For more information about enabling Hyper-V (including techniques for enabling Hyper-V using the Deployment Image Servicing and Management tool), see Install Hyper-V. Проблемы с HAXM HAXM issuesПроблемы с HAXM часто вызваны конфликтом с другими технологиями виртуализации, неправильной конфигурацией или устаревшим драйвером HAXM. HAXM issues are often the result of conflicts with other virtualization technologies, incorrect settings, or an out-of-date HAXM driver. Процесс HAXM не запущен HAXM process is not runningЕсли решение HAXM установлено, введите следующую команду в командной строке, чтобы проверить, что процесс HAXM запущен: If HAXM is installed, you can verify that the HAXM process is running by opening a command prompt and entering the following command: Если процесс HAXM запущен, вы увидите примерно следующий результат: If the HAXM process is running, you should see output similar to the following result: Если параметр STATE не равен RUNNING , то для решения этой проблемы см. раздел Использование Intel Hardware Accelerated Execution Manager. If STATE is not set to RUNNING , see How to Use the Intel Hardware Accelerated Execution Manager to resolve the problem. Конфликты HAXM с другими технологиями виртуализации HAXM virtualization conflictsHAXM может конфликтовать с другими технологиями, использующими виртуализацию, такими как Hyper-V, Windows Device Guard и некоторые антивирусы: HAXM can conflict with other technologies that use virtualization, such as Hyper-V, Windows Device Guard, and some antivirus software: Hyper-V – если вы используете версию Windows младше версии Windows 10 с обновлением за апрель 2018 г. (сборка 1803) , а Hyper-V включен, см. раздел Отключение Hyper-V, чтобы включить HAXM. Hyper-V – If you are using a version of Windows before the Windows 10 April 2018 update (build 1803) and Hyper-V is enabled, follow the steps in Disabling Hyper-V so that HAXM can be enabled. Device Guard – Device Guard и Credential Guard могут препятствовать отключению Hyper-V на компьютерах с Windows. Device Guard – Device Guard and Credential Guard can prevent Hyper-V from being disabled on Windows machines. Порядок отключения Device Guard и Credential Guard см. в разделе Отключение Device Guard. To disable Device Guard and Credential Guard, see Disabling Device Guard. Антивирусное ПО – если на вашем компьютере запущенно антивирусное ПО, использующее аппаратную виртуализацию (например, Avast), отключите или удалите его, перезагрузите компьютер и снова запустите эмулятор Android. Antivirus Software – If you are running antivirus software that uses hardware-assisted virtualization (such as Avast), disable or uninstall this software, reboot, and retry the Android emulator. Неправильные настройки BIOS Incorrect BIOS settingsЕсли вы используете HAXM на компьютере с Windows, HAXM не заработает, пока технология виртуализации (Intel VT-x) не будет включена в BIOS. If you are using HAXM on a Windows PC, HAXM will not work unless virtualization technology (Intel VT-x) is enabled in the BIOS. Если VT-x отключен, то при попытке запуска Android Emulator вы получите следующую ошибку: If VT-x is disabled, you will get an error similar to the following when you attempt to start the Android Emulator: Компьютер удовлетворяет требованиям для запуска HAXM, но технология виртуализации Intel (VT-x) отключена. This computer meets the requirements for HAXM, but Intel Virtualization Technology (VT-x) is not turned on. Для исправления этой ошибки перезагрузите компьютер в BIOS, включите VT-x и SLAT (трансляция адресов второго уровня) и перезагрузите компьютер обратно в Windows. To correct this error, boot the computer into the BIOS, enable both VT-x and SLAT (Second-Level Address Translation), then restart the computer back into Windows. Отключение Hyper-V Disabling Hyper-VЕсли вы используете версию Windows младше версии Windows 10 с обновлением за апрель 2018 г. (сборка 1803) , а Hyper-V включен, нужно отключить Hyper-V и перезапустить компьютер для установки и использования HAXM. If you are using a version of Windows before the Windows 10 April 2018 Update (build 1803) and Hyper-V is enabled, you must disable Hyper-V and reboot your computer to install and use HAXM. Если вы используете версию Windows 10 с обновлением за апрель 2018 г. (сборка 1803) или более позднюю, Android Emulator версии 27.2.7 или более поздней может использовать Hyper-V (вместо HAXM) для аппаратного ускорения, поэтому отключать Hyper-V не требуется. If you are using Windows 10 April 2018 Update (build 1803) or later, Android Emulator version 27.2.7 or later can use Hyper-V (instead of HAXM) for hardware acceleration, so it is not necessary to disable Hyper-V. Технологию Hyper-V можно отключить из панели управления, выполнив следующие действия: You can disable Hyper-V from the Control Panel by following these steps: Введите компоненты windows в поле поиска Windows и выберите Включение и отключение компонентов Windows в результатах поиска. Enter windows features in the Windows search box and select Turn Windows features on or off in the search results. Снимите флажок Hyper-V : Uncheck Hyper-V :
Перезагрузите компьютер. Restart the computer. Также для отключения гипервизора Hyper-V можно использовать следующую команду Powershell: Alternately, you can use the following PowerShell command to disable the Hyper-V Hypervisor: Disable-WindowsOptionalFeature -Online -FeatureName Microsoft-Hyper-V-Hypervisor Intel HAXM и Microsoft Hyper-V не могут быть активны одновременно. Intel HAXM and Microsoft Hyper-V cannot both be active at the same time. К сожалению, переключение между технологиями Hyper-V и HAXM без перезагрузки компьютера невозможно. Unfortunately, there is no way to switch between Hyper-V and HAXM without restarting your computer. В некоторых случаях выполнение описываемых выше действий не позволяет отключить технологию Hyper-V, если включены функции Device Guard и Credential Guard. In some cases, using the above steps will not succeed in disabling Hyper-V if Device Guard and Credential Guard are enabled. Если вам не удается отключить Hyper-V (или по всем признакам эта технология отключена, но установка HAXM все равно завершается сбоем), отключите функции Device Guard и Credential Guard, выполнив действия, описываемые в следующем разделе. If you are unable to disable Hyper-V (or it seems to be disabled but HAXM installation still fails), use the steps in the next section to disable Device Guard and Credential Guard. Отключение функции Device Guard Disabling Device GuardФункции Device Guard и Credential Guard могут препятствовать отключению технологии Hyper-V на компьютерах под управлением ОС Windows. Device Guard and Credential Guard can prevent Hyper-V from being disabled on Windows machines. Это часто происходит на компьютерах, присоединенных к доменам, которые настраиваются и контролируются управляющей ими организацией. This situation is often a problem for domain-joined machines that are configured and controlled by an owning organization. Чтобы проверить, выполняется ли функция Device Guard в ОС Windows 10, выполните следующие действия: On Windows 10, use the following steps to see if Device Guard is running: Введите Сведения о системе в поле поиска Windows и выберите Сведения о системе в результатах поиска. Enter System info in the Windows search box and select System Information in the search results. В разделе Сведения о системе проверьте наличие службы Безопасность на основе виртуализации Device Guard и убедитесь, что она имеет состояние Выполняется : In the System Summary , look to see if Device Guard Virtualization based security is present and is in the Running state:
Если функция Device Guard включена, выполните следующие действия для ее отключения: If Device Guard is enabled, use the following steps to disable it: Убедитесь, что технология Hyper-V отключена в окне Включение или отключение компонентов Windows , как описывается в предыдущих разделах. Ensure that Hyper-V is disabled (under Turn Windows Features on or off ) as described in the previous section. В поле поиска Windows введите gpedit.msc и выберите элемент Изменение групповой политики. In the Windows Search Box, enter gpedit.msc and select the Edit group policy search result. Будет запущен редактор локальных групповых политик. These steps launch the Local Group Policy Editor. В редакторе локальных групповых политик выберите Конфигурация компьютера > Административные шаблоны > Система > Device Guard : In the Local Group Policy Editor , navigate to Computer Configuration > Administrative Templates > System > Device Guard :
Измените значение параметра Включить средство обеспечения безопасности на основе виртуализации на Отключено (как показано выше) и закройте редактор локальных групповых политик. Change Turn On Virtualization Based Security to Disabled (as shown above) and exit the Local Group Policy Editor. В поле поиска Windows введите cmd. In the Windows Search Box, enter cmd. Когда в результатах поиска появится элемент Командная строка , щелкните пункт Командная строка правой кнопкой мыши и выберите Запустить от имени администратора. When Command Prompt appears in the search results, right-click Command Prompt and select Run as Administrator. Скопируйте и вставьте следующие команды в окно командной строки (если диск Z: используется, выберите вместо него букву свободного диска): Copy and paste the following commands into the command prompt window (if drive Z: is in use, pick an unused drive letter to use instead): Перезапустите компьютер. Restart your computer. На экране загрузки должен появиться запрос следующего вида: On the boot screen, you should see a prompt similar to the following message: Вы действительно хотите отключить Credential Guard? Do you want to disable Credential Guard? Нажмите указанную в запросе клавишу, чтобы отключить Credential Guard. Press the indicated key to disable Credential Guard as prompted. После перезагрузки компьютера еще раз убедитесь, что технология Hyper-V отключена (см. ранее описываемые действия). After the computer reboots, check again to ensure that Hyper-V is disabled (as described in the previous steps). Если технология Hyper-V по-прежнему не отключена, значит, отключение функций Device Guard или Credential Guard запрещено политиками на вашем присоединенном к домену компьютере. If Hyper-V is still not disabled, the policies of your domain-joined computer may prevent you from disabling Device Guard or Credential Guard. В таком случае вы можете запросить у администратора домена исключение, которое позволит отключить Credential Guard. In this case, you can request an exemption from your domain administrator to allow you to opt out of Credential Guard. Кроме того, вы можете использовать для работы с HAXM компьютер, который не присоединен к домену. Alternately, you can use a computer that is not domain-joined if you must use HAXM. Дополнительные советы по устранению неполадок Additional troubleshooting tipsСледующие рекомендации часто помогают диагностировать проблемы с эмулятором Android. The following suggestions are often helpful in diagnosing Android emulator issues. Запуск эмулятора из командной строки Starting the emulator from the command lineЕсли эмулятор еще не запущен, вы можете запустить его из командной строки (а не из среды Visual Studio) для просмотра его выходных данных. If the emulator is not already running, you can start it from the command line (rather than from within Visual Studio) to view its output. Как правило, образы AVD эмулятора Android хранятся в следующем расположении (замените имя_пользователя своим именем пользователя Windows): Typically, Android emulator AVD images are stored at the following location (replace username with your Windows user name): C:\Users\имя_пользователя\.android\avd C:\Users\username\.android\avd Запустите эмулятор с образом AVD из этого расположения, передав имя папки AVD. You can launch the emulator with an AVD image from this location by passing in the folder name of the AVD. Например, эта команда запускает виртуальное устройство Android с именем Pixel_API_27 : For example, this command launches an AVD named Pixel_API_27 : В этом примере предполагается, что пакет SDK для Android установлен в расположении по умолчанию C:\Program Files (x86)\Android\android-sdk ; в противном случае измените этот путь для расположения пакета SDK для Android на вашем компьютере. This example assumes that the Android SDK is installed at the default location of C:\Program Files (x86)\Android\android-sdk ; if not, modify the above path for the location of the Android SDK on your computer. При выполнении этой команды вы получите много строк выходных данных во время запуска эмулятора. When you run this command, it will produce many lines of output while the emulator starts up. В частности, вы увидите строки, как в следующем примере, если аппаратное ускорение включено и работает должным образом (в этом примере для аппаратного ускорения используется HAXM): In particular, lines such as the following example will be printed if hardware acceleration is enabled and working properly (in this example, HAXM is used for hardware acceleration): Просмотр журналов Device Manager Viewing Device Manager logsЧасто можно диагностировать проблемы с эмулятором, просмотрев журналы Device Manager. Often you can diagnose emulator problems by viewing the Device Manager logs. Эти журналы записываются в следующее расположение: These logs are written to the following location: C:\Users\имя_пользователя\AppData\Local\Xamarin\Logs\16.0 C:\Users\username\AppData\Local\Xamarin\Logs\16.0 Просмотрите файл DeviceManager.log в текстовом редакторе, например в Блокноте. You can view each DeviceManager.log file by using a text editor such as Notepad. Следующий пример записи журнала указывает, что HAXM не найден на компьютере: The following example log entry indicates that HAXM was not found on the computer: Проблемы развертывания в macOS Deployment issues on macOSЭмулятор может отображать некоторые сообщения об ошибках при развертывании приложения. Some error messages may be displayed by the emulator when you deploy your app. Ниже описаны наиболее распространенные ошибки и решения. The most common errors and solutions are explained below. Ошибки развертывания Deployment errorsЕсли отображается ошибка о сбое при установке APK на ваш компьютер или при запуске Android Debug Bridge ( adb ), убедитесь, что пакет SDK для Android может подключиться к эмулятору. If you see an error about a failure to install the APK on the emulator or a failure to run the Android Debug Bridge ( adb ), verify that the Android SDK can connect to your emulator. Для проверки связи сделайте следующее: To verify connectivity, use the following steps: Запустите эмулятор из Android Device Manager (выберите ваше виртуальное устройство и зажмите Запустить ). Launch the emulator from the Android Device Manager (select your virtual device and click Start ). Откройте командную строку и перейдите в папку, в которой установлен adb. Open a command prompt and go to the folder where adb is installed. Если пакет SDK для Android установлен в расположении по умолчанию, adb находится в каталоге /Library/Developer/Xamarin/android-sdk-macosx/platform-tools/adb ; в противном случае измените этот путь для расположения пакета SDK для Android на вашем компьютере. If the Android SDK is installed at its default location, adb is located at /Library/Developer/Xamarin/android-sdk-macosx/platform-tools/adb ; if not, modify this path for the location of the Android SDK on your computer. Введите следующую команду: Type the following command: Если эмулятор доступен из Android SDK, то он отобразится в списке подключенных устройств. If the emulator is accessible from the Android SDK, the emulator should appear in the list of attached devices. Пример: For example: Если эмулятор не появился в этом списке, запустите Диспетчер пакетов SDK для Android , примените все обновления и запустите эмулятор еще раз. If the emulator does not appear in this list, start the Android SDK Manager , apply all updates, then try launching the emulator again. Ошибка доступа к MMIO MMIO access errorЕсли появляется сообщение Произошла ошибка доступа к MMIO , перезапустите эмулятор. If An MMIO access error has occurred is displayed, restart the emulator. Отсутствующие сервисы Google Play Missing Google Play ServicesЕсли виртуальное устройство, запущенное в эмуляторе, не поддерживает установленные сервисы Google Play или Google Play Маркет, это обычно связано с тем, что виртуальное устройство было создано без этих пакетов. If the virtual device you are running in the emulator does not have Google Play Services or Google Play Store installed, this condition is usually caused by creating a virtual device without including these packages. При создании виртуального устройства (см. раздел Управление виртуальными устройствами с помощью Android Device Manager) не забудьте выбрать один или оба из следующих вариантов: When you create a virtual device (see Managing Virtual Devices with the Android Device Manager), be sure to select one or both of the following:
Например, это виртуальное устройство будет включать сервисы Google Play и Google Play Маркет: For example, this virtual device will include Google Play Services and Google Play Store:
Образы Google Play Маркет доступны только для некоторых типов базовых устройств, например Pixel, Pixel 2, Nexus 5 и Nexus 5X. Google Play Store images are available only for some base device types such as Pixel, Pixel 2, Nexus 5, and Nexus 5X. Проблемы производительности Performance issuesПроблемы производительности обычно вызваны одной из следующих проблем: Performance issues are typically caused by one of the following problems: Эмулятор работает без аппаратного ускорения. The emulator is running without hardware acceleration. Виртуальное устройство, работающее в эмуляторе, не использует образ системы на базе x86. The virtual device running in the emulator is not using an x86-based system image. В следующих разделах подробно описаны эти сценарии. The following sections cover these scenarios in more detail. Аппаратное ускорение отключено Hardware acceleration is not enabledЕсли аппаратное ускорение не включено, может появиться диалоговое окно с сообщением о том, что устройство будет запущено без ускорения , при развертывании приложения в эмуляторе Android. If hardware acceleration is not enabled, a dialog may pop up with a message such as device will run unaccelerated when you deploy your app to the Android emulator. Если вы не знаете, включено ли аппаратное ускорение на компьютере (или хотите знать, какая технология обеспечивает ускорение), см. инструкции по проверке и включению аппаратного ускорения в разделе Проблемы с аппаратным ускорением. If you are not certain whether hardware acceleration is enabled on your computer (or you would like to know which technology is providing the acceleration), see Hardware acceleration issues below for steps you can take to verify and enable hardware acceleration. Аппаратное ускорение включено, но эмулятор работает слишком медленно Acceleration is enabled but the emulator runs too slowlyРаспространенной причиной этой проблемы является отсутствие образа на базе x86 в виртуальном устройстве. A common cause for this problem is not using an x86-based image in your virtual device. При создании виртуального устройства (см. раздел Управление виртуальными устройствами с помощью Android Device Manager) не забудьте выбрать образ системы на базе x86: When you create virtual device (see Managing Virtual Devices with the Android Device Manager), be sure to select an x86-based system image:
Проблемы с аппаратным ускорением Hardware acceleration issuesПри использовании платформы гипервизора или HAXM для аппаратного ускорения эмулятора вы можете столкнуться с проблемами, вызванными неправильной установкой или устаревшей версией macOS. Whether you are using the Hypervisor Framework or HAXM for hardware acceleration of the emulator, you may run into problems caused by installation issues or an out-of-date version of macOS. Следующие разделы помогут вам устранить эту проблему. The following sections can help you resolve this issue. Проблемы с платформой гипервизора Hypervisor Framework issuesЕсли вы используете macOS 10.10 или более поздней версии на более новом компьютере Mac, эмулятор Android будет автоматически использовать платформу гипервизора для аппаратного ускорения. If you are using macOS 10.10 or later on a newer Mac, the Android emulator will automatically use the Hypervisor Framework for hardware acceleration. Но на более старых компьютерах Mac или компьютерах Mac под управлением версии macOS ранее 10.10 платформа гипервизора может не поддерживаться. However, some older Macs or Macs running a version of macOS earlier than 10.10 may not provide Hypervisor Framework support. Чтобы определить, поддерживает ли компьютер Mac платформу гипервизора,откройте окно терминала и введите следующую команду: To determine whether or not your Mac supports the Hypervisor Framework, open a Terminal and enter the following command: Если компьютер Mac поддерживает платформу гипервизора, эта команда вернет следующий результат: If your Mac supports the Hypervisor Framework, the above command will return the following result: Если платформа гипервизора недоступна на компьютере Mac, следуйте инструкциям в разделе Ускорение с помощью HAXM, чтобы вместо этого использовать HAXM для ускорения. If the Hypervisor Framework is not available on your Mac, you can follow the steps in Accelerating with HAXM to use HAXM for acceleration instead. Проблемы с HAXM HAXM issuesЕсли Android Emulator не запускается, обычно это вызвано проблемами с HAXM. If the Android Emulator does not start properly, this problem is often caused by problems with HAXM. Проблемы с HAXM часто вызваны конфликтом с другими технологиями виртуализации, неправильной конфигурацией или устаревшим драйвером HAXM. HAXM issues are often the result of conflicts with other virtualization technologies, incorrect settings, or an out-of-date HAXM driver. Переустановите драйвер HAXM при помощи процедуры, описанной в разделе Установка HAXM. Try reinstalling the HAXM driver, using the steps detailed in Installing HAXM. Дополнительные советы по устранению неполадок Additional troubleshooting tipsСледующие рекомендации часто помогают диагностировать проблемы с эмулятором Android. The following suggestions are often helpful in diagnosing Android emulator issues. Запуск эмулятора из командной строки Starting the emulator from the command lineЕсли эмулятор еще не запущен, вы можете запустить его из командной строки (а не из среды Visual Studio для Mac) для просмотра его выходных данных. If the emulator is not already running, you can start it from the command line (rather than from within Visual Studio for Mac) to view its output. Как правило, образы AVD эмулятора Android хранятся в следующем расположении: Typically, Android emulator AVD images are stored at the following location: Запустите эмулятор с образом AVD из этого расположения, передав имя папки AVD. You can launch the emulator with an AVD image from this location by passing in the folder name of the AVD. Например, эта команда запускает виртуальное устройство Android с именем Pixel_2_API_28 : For example, this command launches an AVD named Pixel_2_API_28 : Если пакет SDK для Android установлен в расположении по умолчанию, эмулятор находится в каталоге /Library/Developer/Xamarin/android-sdk-macosx/emulator ; в противном случае измените этот путь для расположения пакета SDK для Android на вашем компьютере Mac. If the Android SDK is installed at its default location, the emulator is located in the /Library/Developer/Xamarin/android-sdk-macosx/emulator directory; if not, modify this path for the location of the Android SDK on your Mac. При выполнении этой команды вы получите много строк выходных данных во время запуска эмулятора. When you run this command, it will produce many lines of output while the emulator starts up. В частности, вы увидите строки, как в следующем примере, если аппаратное ускорение включено и работает должным образом (в этом примере для аппаратного ускорения используется платформа гипервизора): In particular, lines such as the following example will be printed if hardware acceleration is enabled and working properly (in this example, Hypervisor Framework is used for hardware acceleration): Просмотр журналов Device Manager Viewing Device Manager logsЧасто можно диагностировать проблемы с эмулятором, просмотрев журналы Device Manager. Often you can diagnose emulator problems by viewing the Device Manager logs. Эти журналы записываются в следующее расположение: These logs are written to the following location: |


 под сообщениями, на которые необходимо добавить ссылки.