- Android studio Where to install NDK file? (downloaded it in zip)
- 4 Answers 4
- EXTRA stuff:
- Some Links
- Install and configure the NDK and CMake
- Install the NDK and CMake
- Configure a specific version of CMake
- Install a specific version of the NDK
- Configure specific versions of the NDK in your project
- Default NDK version per AGP version
- Install and configure the NDK and CMake
- Install the NDK and CMake
- Configure a specific version of CMake
- Install a specific version of the NDK
- Configure specific versions of the NDK in your project
- Default NDK version per AGP version
Android studio Where to install NDK file? (downloaded it in zip)
My android studio said it wanted to update. But when I did I tried to update it but it wouldn’t work so I had to launch:
C:\Users\username\AppData\Local\Android\sdk\tools\android.bat
to install other packages. But the NDK file wouldn’t update, so I manually downloaded it from:
Now I have this zip file and where should I extract the folder? Grateful for any help!!
The folder name is android-ndk-r13b .

4 Answers 4
Yes, rename the extracted folder android-ndk-r13b (probably the exact name will be outdated someday soon) to ndk-bundle (you can put the NDK [and SDK for that matter] anywhere, and leave the name alone if you want
then, make the settings point to the location where you put it.
Android Studio , File menu | Project Structure Ctrl + Alt + Shift + s
(short-cut: ctrl+Alt+Shift+s):

It might also be helpful to you to set/check the following environmental variables :
EXTRA stuff:
While were doing environmental variables (belt-and-braces for SDK ):
JDK is the Java Development Kit.
JRE is the Java Run-time Environment.
If your tight on memory ( RAM ) for Gradle (700 Megabytes is about as low as you can go, other tools like monitor.bat use this variable too, it’s ubiquitous) (clearly you want to make it as big a possible, without swapping making it extremely slow to build
Some Links
Download the .zip file. Start the installation through SDK manager .
Go to %userprofile%\AppData\Local\Android\sdk\ndk-bundle and copy .installer folder to desktop and cancel the downloading in SDK manager .
Open .installer folder and open .installationdata file and check the folder in which the file is being downloaded like:
%userprofile%\AppData\Local\Temp\PackageOperation01.
Copy downloaded .zip file to the folder PackageOperation01 or whatever listed in .installationdata file.
Now copy the .installer folder from desktop to %userprofile%\AppData\Local\Android\sdk\ndk-bundle
and start the SDK manager
and start the installation again for NDK .
The SDK manager will start the installation skipping the download process.
Install and configure the NDK and CMake
To compile and debug native code for your app, you need the following components:
- The Android Native Development Kit (NDK): a set of tools that allows you to use C and C++ code with Android.
- CMake: an external build tool that works alongside Gradle to build your native library. You do not need this component if you only plan to use ndk-build.
- LLDB: the debugger Android Studio uses to debug native code. By default, LLDB will be installed alongside Android Studio.
This page describes how to use Android Studio or the sdkmanager tool to download and install these components.
Install the NDK and CMake
When you install the NDK, Android Studio selects the latest available NDK. For most projects, installing this default version of the NDK is sufficient. If your project needs one or more specific versions of the NDK, though, you can download and configure specific versions. Doing so helps you ensure reproducible builds across projects that each depend on a specific version of the NDK. Android Studio installs all versions of the NDK in the android-sdk /ndk/ directory.
To install CMake and the default NDK in Android Studio, do the following:
With a project open, click Tools > SDK Manager.
Click the SDK Tools tab.
Select the NDK (Side by side) and CMake checkboxes.
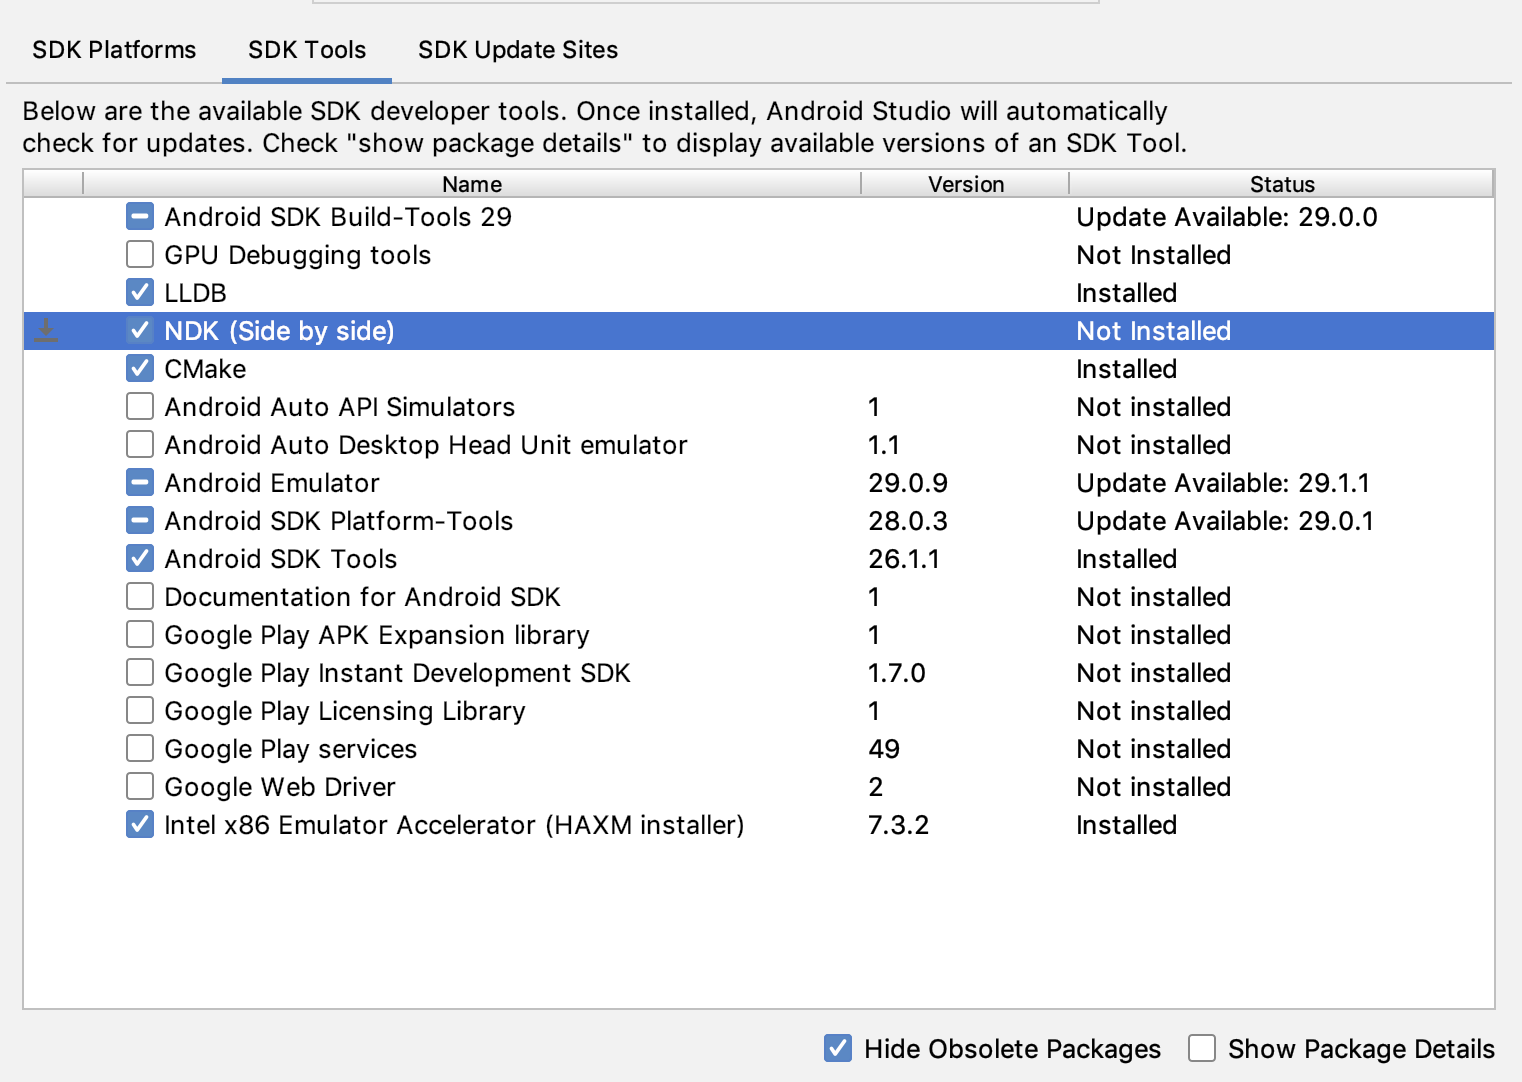 Figure 1: The SDK Tools window showing the NDK (Side by side) option
Click OK.
A dialog box tells you how much space the NDK package consumes on disk.
Click OK.
When the installation is complete, click Finish.
Your project automatically syncs the build file and performs a build. Resolve any errors that occur.
Configure a specific version of CMake
The SDK Manager includes the 3.6.0 forked version of CMake and version 3.10.2. Projects that don’t set a specific CMake version are built with CMake 3.10.2. To set the CMake version, add the following to your module’s build.gradle file:
If you want to use a CMake version 3.7 or higher that is not included by the SDK Manager, follow these steps:
- Download and install CMake 3.7 or higher from the official CMake website.
- Specify the CMake version you want Gradle to use in your module’s build.gradle file.
Either add the path to the CMake installation to your PATH environment variable or include it in your project’s local.properties file, as shown below. If Gradle is unable to find the version of CMake you specified in your build.gradle file, you get a build error.
If you don’t already have the Ninja build system installed on your workstation, go to the official Ninja website, and download and install the latest version of Ninja available for your OS. Make sure to also add the path to the Ninja installation to your PATH environment variable.
Install a specific version of the NDK
To install a specific version of the NDK, do the following:
With a project open, click Tools > SDK Manager.
Click the SDK Tools tab.
Select the Show Package Details checkbox.
Select the NDK (Side by side) checkbox and the checkboxes below it that correspond to the NDK versions you want to install. Android Studio installs all versions of the NDK in the android-sdk /ndk/ directory.
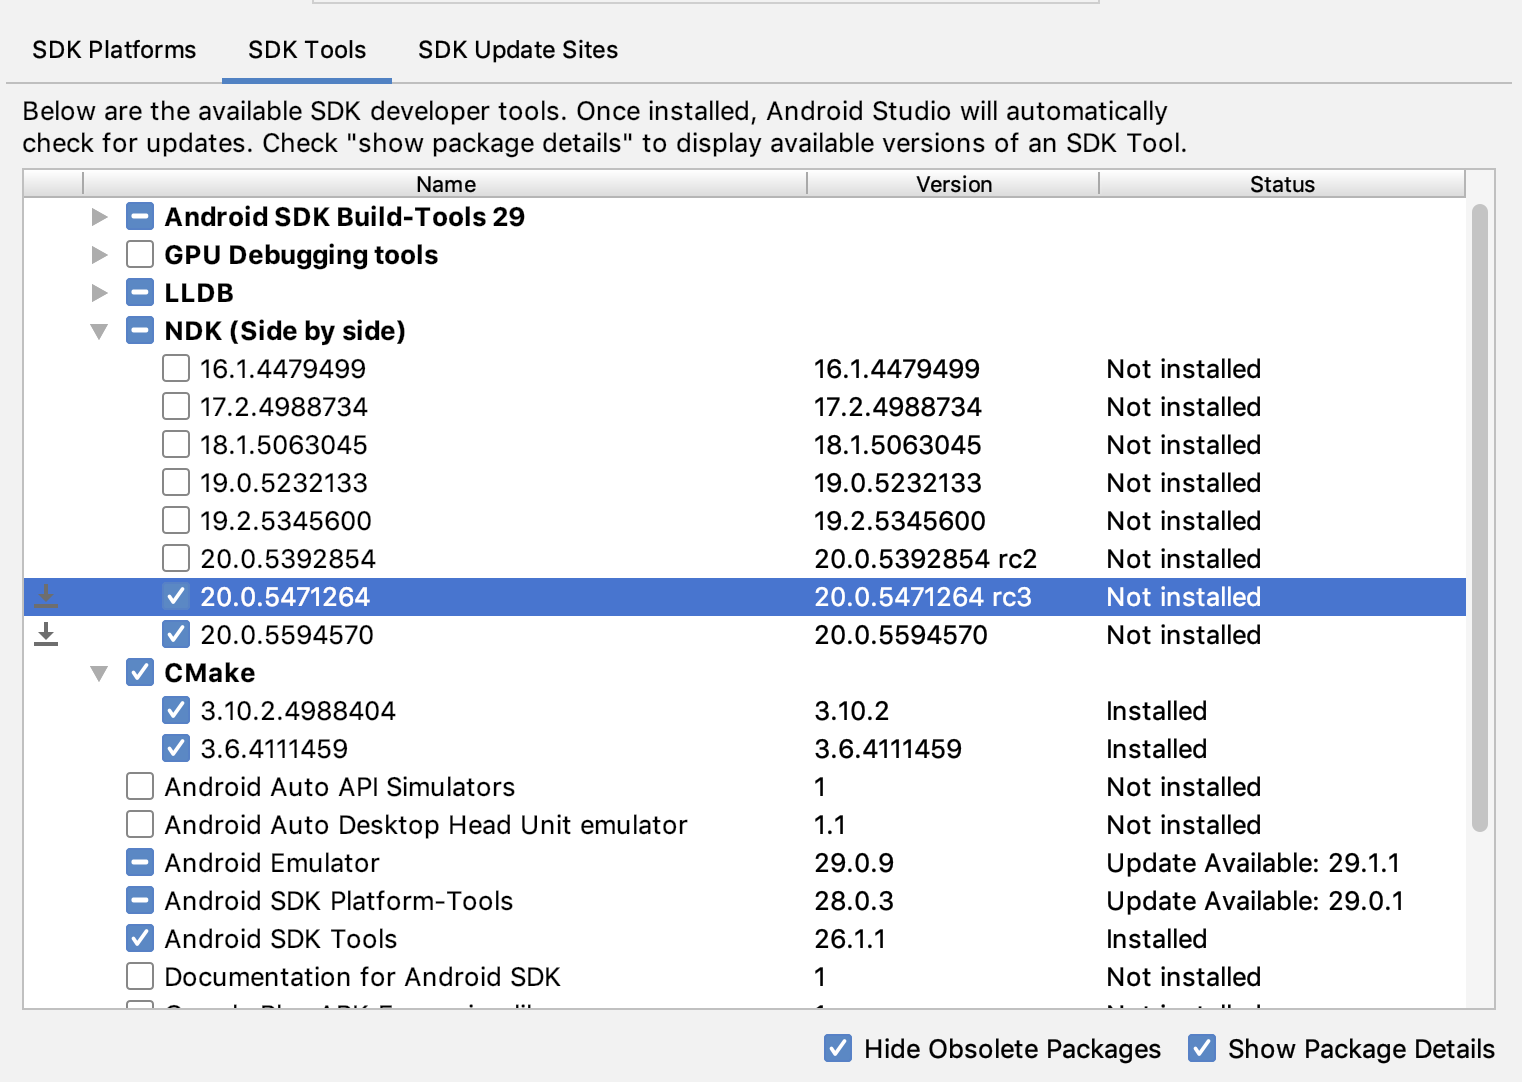 Figure 2: The SDK Tools window showing the NDK (Side by side) options
Click OK.
A dialog box tells you how much space the NDK package(s) consumes.
Click OK.
When the installation is complete, click Finish.
Your project automatically syncs the build file and performs a build. Resolve any errors that occur.
Configure each module with the version of the NDK you want it to use. When using Android Studio 3.6 or higher, if you do not specify the version, the Android Gradle plugin chooses a version that it is known to be compatible with.
Configure specific versions of the NDK in your project
You may need to configure the version of the NDK in your project if one of the following is true:
- Your project is inherited and you need to use specific versions of the NDK and the Android Gradle plugin (AGP). For more information, see Configure the NDK for the Android Gradle plugin.
- You have multiple versions of the NDK installed and you want to use a specific one. In this case, specify the version using the android.ndkVersion property in the module’s build.gradle file, as shown in the following code sample.
Default NDK version per AGP version
Before release, each AGP version is thoroughly tested with the latest stable NDK release at that time. For AGP version 3.6 and above, that NDK version will be used to build your projects if you do NOT specify an NDK version in the build.gradle file. The default NDK version is documented inside the AGP release notes. The current default NDK versions are listed in the following table:
| Android Studio/Gradle Plugin Version | |||||
|---|---|---|---|---|---|
| 4.1 | 4.0 | 3.6 | 3.5 | 3.4 | |
| Default NDK version specified for the version of AGP | 21.1.6352462 | 21.0.6113669 | 20.0.5594570 | No default specified | |
Content and code samples on this page are subject to the licenses described in the Content License. Java is a registered trademark of Oracle and/or its affiliates.
Install and configure the NDK and CMake
To compile and debug native code for your app, you need the following components:
- The Android Native Development Kit (NDK): a set of tools that allows you to use C and C++ code with Android.
- CMake: an external build tool that works alongside Gradle to build your native library. You do not need this component if you only plan to use ndk-build.
- LLDB: the debugger Android Studio uses to debug native code. By default, LLDB will be installed alongside Android Studio.
This page describes how to use Android Studio or the sdkmanager tool to download and install these components.
Install the NDK and CMake
When you install the NDK, Android Studio selects the latest available NDK. For most projects, installing this default version of the NDK is sufficient. If your project needs one or more specific versions of the NDK, though, you can download and configure specific versions. Doing so helps you ensure reproducible builds across projects that each depend on a specific version of the NDK. Android Studio installs all versions of the NDK in the android-sdk /ndk/ directory.
To install CMake and the default NDK in Android Studio, do the following:
With a project open, click Tools > SDK Manager.
Click the SDK Tools tab.
Select the NDK (Side by side) and CMake checkboxes.
Figure 1: The SDK Tools window showing the NDK (Side by side) option
Click OK.
A dialog box tells you how much space the NDK package consumes on disk.
Click OK.
When the installation is complete, click Finish.
Your project automatically syncs the build file and performs a build. Resolve any errors that occur.
Configure a specific version of CMake
The SDK Manager includes the 3.6.0 forked version of CMake and version 3.10.2. Projects that don’t set a specific CMake version are built with CMake 3.10.2. To set the CMake version, add the following to your module’s build.gradle file:
If you want to use a CMake version 3.7 or higher that is not included by the SDK Manager, follow these steps:
- Download and install CMake 3.7 or higher from the official CMake website.
- Specify the CMake version you want Gradle to use in your module’s build.gradle file.
Either add the path to the CMake installation to your PATH environment variable or include it in your project’s local.properties file, as shown below. If Gradle is unable to find the version of CMake you specified in your build.gradle file, you get a build error.
If you don’t already have the Ninja build system installed on your workstation, go to the official Ninja website, and download and install the latest version of Ninja available for your OS. Make sure to also add the path to the Ninja installation to your PATH environment variable.
Install a specific version of the NDK
To install a specific version of the NDK, do the following:
With a project open, click Tools > SDK Manager.
Click the SDK Tools tab.
Select the Show Package Details checkbox.
Select the NDK (Side by side) checkbox and the checkboxes below it that correspond to the NDK versions you want to install. Android Studio installs all versions of the NDK in the android-sdk /ndk/ directory.
Figure 2: The SDK Tools window showing the NDK (Side by side) options
Click OK.
A dialog box tells you how much space the NDK package(s) consumes.
Click OK.
When the installation is complete, click Finish.
Your project automatically syncs the build file and performs a build. Resolve any errors that occur.
Configure each module with the version of the NDK you want it to use. When using Android Studio 3.6 or higher, if you do not specify the version, the Android Gradle plugin chooses a version that it is known to be compatible with.
Configure specific versions of the NDK in your project
You may need to configure the version of the NDK in your project if one of the following is true:
- Your project is inherited and you need to use specific versions of the NDK and the Android Gradle plugin (AGP). For more information, see Configure the NDK for the Android Gradle plugin.
- You have multiple versions of the NDK installed and you want to use a specific one. In this case, specify the version using the android.ndkVersion property in the module’s build.gradle file, as shown in the following code sample.
Default NDK version per AGP version
Before release, each AGP version is thoroughly tested with the latest stable NDK release at that time. For AGP version 3.6 and above, that NDK version will be used to build your projects if you do NOT specify an NDK version in the build.gradle file. The default NDK version is documented inside the AGP release notes. The current default NDK versions are listed in the following table:
| Android Studio/Gradle Plugin Version | |||||
|---|---|---|---|---|---|
| 4.1 | 4.0 | 3.6 | 3.5 | 3.4 | |
| Default NDK version specified for the version of AGP | 21.1.6352462 | 21.0.6113669 | 20.0.5594570 | No default specified | |
Content and code samples on this page are subject to the licenses described in the Content License. Java is a registered trademark of Oracle and/or its affiliates.


