- Download Google USB Drivers for Windows 10/8.1/7 [Latest]
- Download Google USB Drivers
- Direct Download
- Download via Android Studio
- How to Install Google USB Drivers
- On Windows 10
- On Windows 7 and Windows 8/8.1
- How to Modify Google USB Drivers to Support Other Android Devices
- Step 1: Get the VID and PID of your Android Device
- Step 2: Modify ‘android_winusb.inf’ file
- Step 3: Install the Modified USB Drivers
- Install OEM USB drivers
- Install a USB driver
- Windows 10
- Windows 8.1
- Windows 7
- Get OEM drivers
Download Google USB Drivers for Windows 10/8.1/7 [Latest]
Google USB Drivers are required to connect Google Pixel or Nexus devices to Windows PC using a USB cable. You will need these drivers to transfer files or sync data on your Pixel/Nexus device, and especially when working with the Android ADB and Fastboot tools.
You can download the latest Google USB Drivers from here and follow the instructions on how to manually install them on your Windows PC. Furthermore, we have also provided instructions on how to modify the ‘android_winusb.inf‘ file included in the drivers to support other Android devices.
Normally, the said USB drivers come bundled with SDK Manager in the Android Studio IDE, which IS constantly updated with the latest available drivers. But if you’re an average Android user, chances are that you might not have the IDE set up on your PC. That’s because it is used mostly by experienced developers and enthusiasts. In that case, you can use the standalone USB drivers, which as provided directly by Google for users who might face issues of Windows not recognizing their phone over a USB connection.
Google USB drivers also act as ‘Android ADB and Fastboot Drivers‘. So you can install them on your PC to use ADB (Android Debug Bridge) for debugging apps and ROMs, or use Fastboot to unlock the bootloader or flash factory images on your Pixel/Nexus device.
To sum up, the drivers are useful in various situations. With that in mind, go ahead to download the latest version of the USB Drivers from below and follow the instructions on how to install them on your Windows PC.
Download Google USB Drivers
Now, there are two different ways/methods to download the USB driver on Windows. You can either download the Google USB Driver ZIP file manually. Or, you can use the SDK Manager in the Android Studio to download it.
The latter gives an added benefit, that is the SDK Manager will automatically notify you when a newer version is available. The former method, on the contrary, will require you to manually check if a newer driver version is available and download it again.
In our personal experience, downloading the ZIP package directly is easier than using the Android Studio. But the choice is solely up to you. We have covered both the methods below.
Note: If you’re using macOS or Linux, you would not need these drivers.
Direct Download
Just click on the link below to download the Google USB Driver ZIP file to your PC.
Once downloaded, extract the ZIP file to a suitable location on your computer. The extracted ‘usb_drivers’ folder should contain the required ‘android_winusb.inf’ driver file.
Download via Android Studio
First of all, make sure that you have downloaded and installed the latest version of Android Studio on your Windows PC. Once you have it installed, follow the instructions below:
- Launch ‘Android Studio’ on your PC.
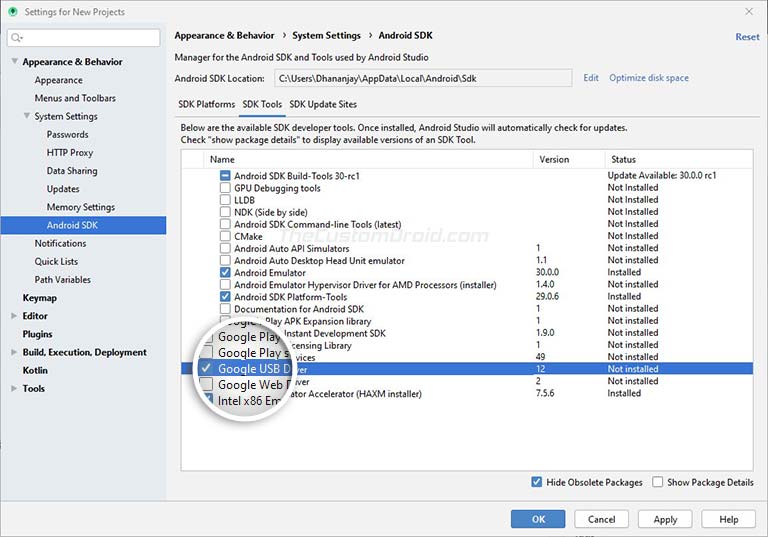
- Click on ‘Tools’ and select ‘SDK Manager’.
- Go to the ‘SDK Tools’ tab.
- Select ‘Google USB Driver’ and click on ‘Ok’.
- Finally, click on ‘Ok’ when prompted with the ‘Confirm change’ message.
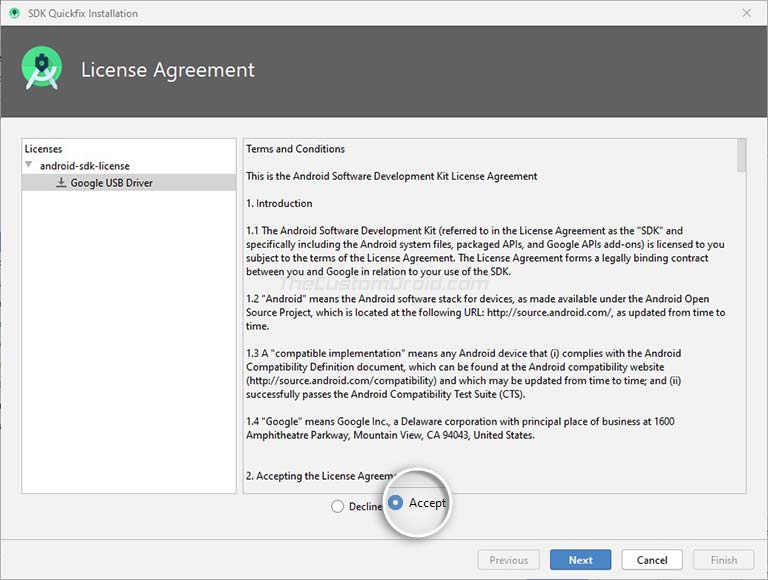
- You should see a ‘License Agreement’ message on the screen. Simply select ‘Accept’ and click on ‘Next’.
Android Studio will now download the Google USB drivers to ‘android_sdk\extras\google\usb_driver\‘ on your PC. Here ‘android_sdk’ is the folder where the Android SDK is installed on your PC.
How to Install Google USB Drivers
The Google USB Drivers come in the form of an ‘android_winusb.inf’ setup information file, rather than a Windows executable. So, you will need to manually install it on your Windows PC. The same steps can also be used to upgrade the existing drivers installed on your PC to the latest version available.
Now follow the installation guide below according to the Windows OS version you’re using. It’s quite easy and wouldn’t take more than a minute to install them.
On Windows 10
To install Google Android USB Drivers on Windows 10, follow the instructions below.
- First, connect your Android device to the PC’s USB port.
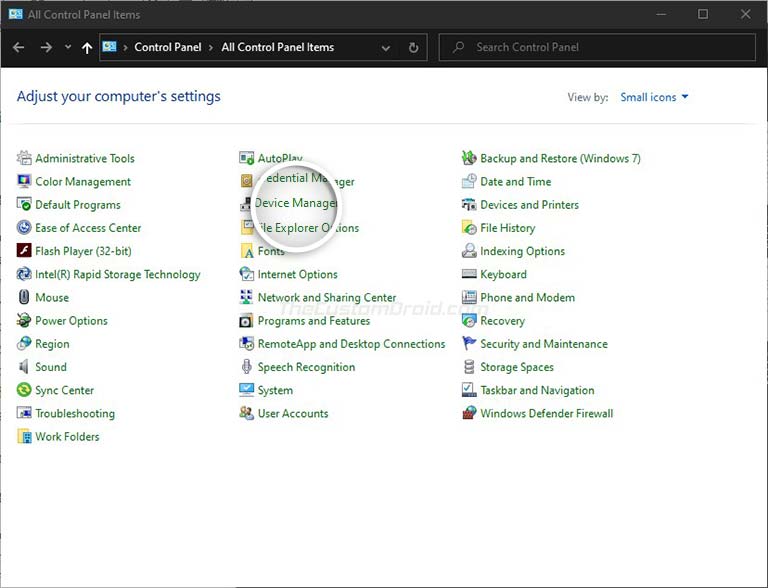
- Go to the ‘Control Panel‘ and click on ‘Device Manager‘.
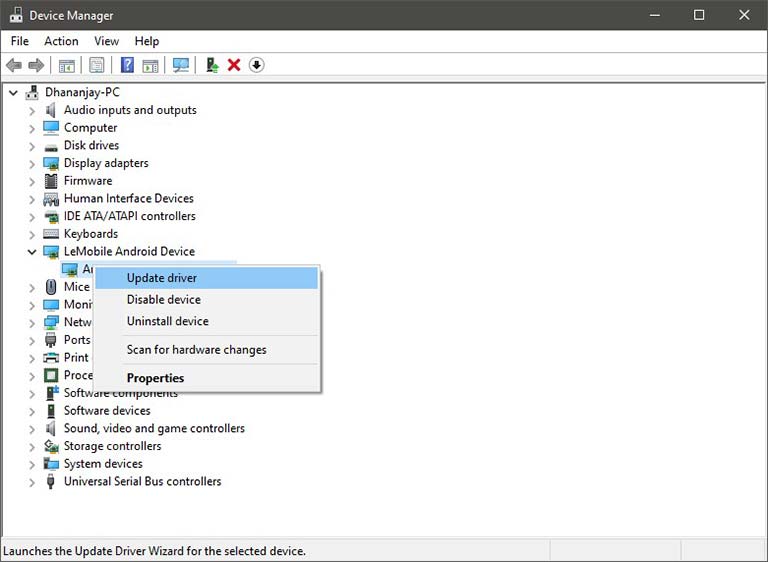
‘Device Manager’ on your Windows 10 PC» width=»768″ height=»588″ srcset=»https://www.thecustomdroid.com/wp-content/uploads/2020/02/Install-Google-USB-Drivers-on-Windows-10-01.jpg 768w, https://www.thecustomdroid.com/wp-content/uploads/2020/02/Install-Google-USB-Drivers-on-Windows-10-01-300×230.jpg 300w» sizes=»(max-width: 768px) 100vw, 768px»/>
- Double-click on your device category to expand the list of connected devices.
- Right-click on your Android device’s name and click on ‘Update driver‘.
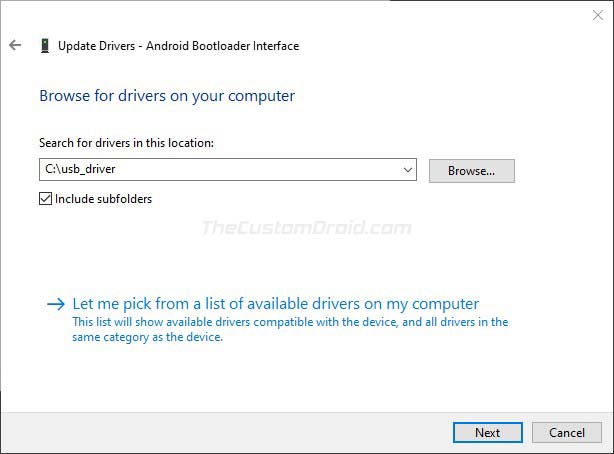
- Click on ‘Browse my computer for driver software‘ in the Hardware Update wizard.
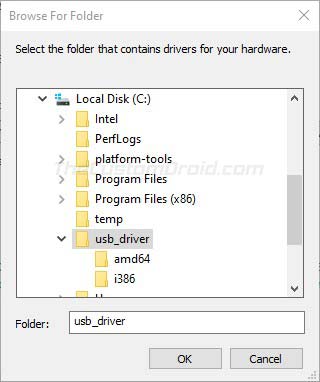
- Click ‘Browse‘ and select the ‘usb_driver‘ folder.
- For example: If you downloaded the drivers using Android Studio, the folder should be located in ‘android_sdk\extras\google\’ on the PC. Or, if you downloaded the ZIP file, then just locate the extracted ‘usb_driver’ folder.
- For example: If you downloaded the drivers using Android Studio, the folder should be located in ‘android_sdk\extras\google\’ on the PC. Or, if you downloaded the ZIP file, then just locate the extracted ‘usb_driver’ folder.
- Finally, click ‘Next‘ to install the drivers.
On Windows 7 and Windows 8/8.1
To install Google Android USB drivers on Windows 7, Windows 8, and Windows 8.1 PC, follow the instructions below.
- First, connect your Android device to the Windows PC’s USB port.
- Then right-click on ‘Computer‘ and select ‘Manage‘.
- Select Devices in the left pane.
- Double-click on ‘Other device‘ in the right pane to expand it.
- Right-click on the device name (e.g. Google Pixel) and select the ‘Update Driver‘ option.
- Click on ‘Browse my computer for driver software‘ in the Hardware Update wizard.
- Click ‘Browse‘ and locate the ‘usb_driver’ folder.
- Finally, click on ‘Next‘ to install the USB drivers.
You should now have the Google USB Drivers installed. Your Windows PC should now detect and recognize your Android device over the USB connection.
Important Note
If the drivers fail to install even after following the steps, OR the ADB/Fastboot commands do no work even if the drivers are installed, then it could be because you’re using a USB 3.0/3.1/3.2 port or an AMD based PC. This is an issue faced by a lot of users recently.
To fix it, simply try using a USB 2.0 port (If it’s not available, you can also use a USB 2.0 hub) on your PC. Also, try using an Intel-based PC for especially when using ADB/Fastboot tools.
How to Modify Google USB Drivers to Support Other Android Devices
Like we mentioned above, Google USB Drivers also work as ‘ADB Drivers’. But by default, they only support the Google Pixel and Nexus devices.
While Android OEMs do provide their own drivers, but it’s more often than they miss to include the required ADB USB drivers in them. In such cases, you can easily modify the ‘android_winusb.inf’ file in Google USB Drivers to support any other Android device to use the ADB and Fastboot tools.
In order for the drivers to support your non-Pixel/Nexus device, you will first need to acquire the Vendor ID (VID) and Product ID (PID) of your device. Once you have them, the second step is to edit the ‘android_winusb.inf’ file and add a new device section with the VID and PID of your own device. And finally, the third and last step is to install the modified drivers.
Sounds confusing? It’s quite simple actually. Just follow the step-by-step instructions below.
Step 1: Get the VID and PID of your Android Device
- First, connect your Android device to the PC using the USB cable.
- Go to ‘Control Panel‘ > ‘Device Manager‘ on the PC.
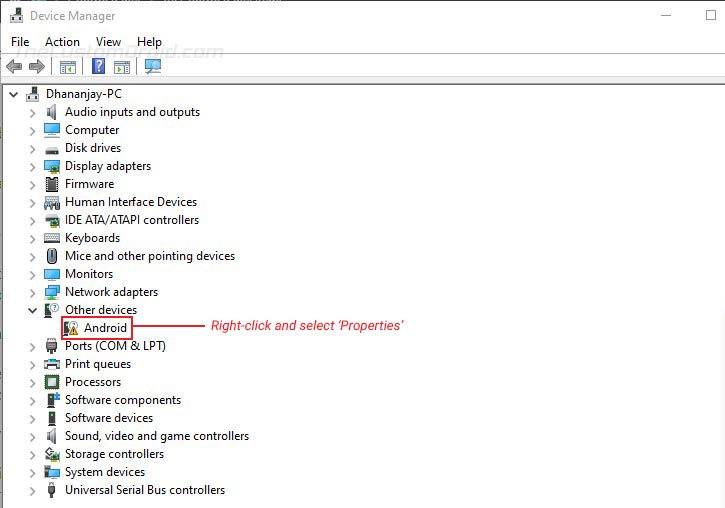
- Locate your unrecognized Android device. An unrecognized device can normally be located under the ‘Universal Serial Bus controllers‘ OR ‘Other devices‘ sections in Device Manager. You would see a yellow-colored triangle warning icon beside the connected device.
- Right-click on the device name and click on ‘Properties‘.
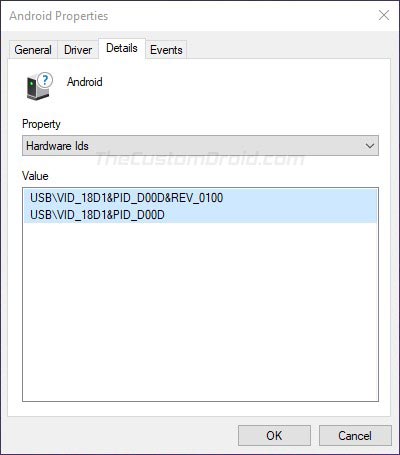
- Go to the ‘Details‘ tab and select ‘Hardware Ids‘ from the dropdown menu.
- You should now see the Vendor and Product IDs of your Android device.
Step 2: Modify ‘android_winusb.inf’ file
Now that you have the required IDs, you can modify/edit the ‘android_winusb.inf’ file to add your device to the supported list.
- First, locate the ‘usb_driver‘ folder on your PC. Inside the folder, you should have the ‘android_winusb.inf‘ file.
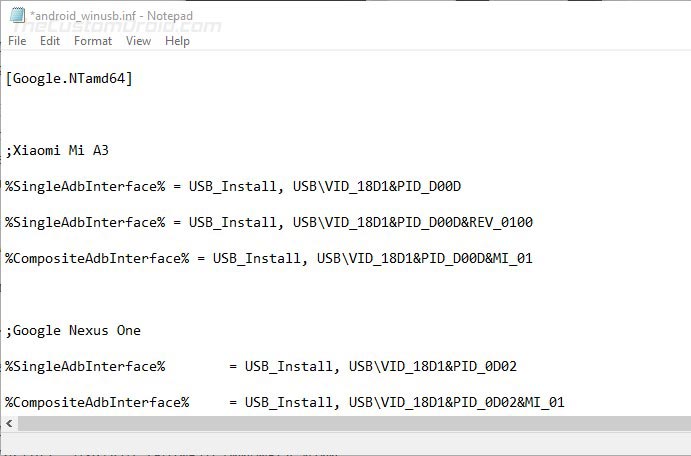
- Open the file using a text editor and locate the ‘[Google.NTx86]‘ section if your Windows PC is 32-bit (x86) or the ‘[Google.NTamd64]‘ section if your Windows PC is 64-bit (x64).
- In the said section, you will see a number of items with the following format:
- You can copy the above lines into the respective section and edit it accordingly.
- The first thing to do is to replace the ‘[device name]‘ item with your actual device name (Nothing specific, it could be anything).
- Next, you have to add your device’s VID and PID values to the %SingleAdbInterface% and %CompositeAdbInterface% items.
- In case your device also has a REV_xxxx ID, you will need to add two lines for the %SingleAdbInterface% item. One without and another with the REV ID. The line with the REV ID should look like:
- For the %CompositeAdbInterface% item, you will further need to add ‘MI_01‘ ID towards the end. With the MI_01 ID, the line should look like:
- For example, my Xiaomi Mi A3 has a VID and PID as ‘USB\VID_18D1&PID_D00D’ & ‘USB\VID_18D1&PID_D00D&REV_0100’. In that case, the lines should look like the following:
Once you have added the lines under the proper section (depending on your PC’s architecture), save the file and exit.
Step 3: Install the Modified USB Drivers
You have now successfully modified the Google USB Drivers to support your Android device. The last step is to install these modified drivers for your device.
To do so, go to ‘Control Panel’ > ‘Device Manager’ and right-click on your device’s name. Then select ‘Update drivers’ to launch the Hardware Update wizard. Simply click on ‘Browse my computer for driver software’ and select ‘Browse’. Now locate the ‘usb_driver’ folder that contains the modified android_winusb.inf file and select it.
Finally, click on ‘Next’ to install the modified drivers for your device. That’s it! Your Windows PC should now recognize your Android device over ADB or Fastboot.
Installing the Google USB Drivers is the easiest solution to make your Windows PC successfully recognize your Android device. And while it should work for most other Android devices too, it’s not a hundred percent guaranteed. And if this happens, you may want to install your device’s OEM specific drivers from this page or by clicking your device manufacturer link below.
For low-level firmware flashing, you could also use MediaTek or Qualcomm USB drivers.
If you face any issues installing the drivers on your PC, feel free to ask us through the comments.
Install OEM USB drivers
If you are developing on Windows and want to connect a device for testing, then you need to install the appropriate USB driver. This page provides links to the web sites for several original equipment manufacturers (OEMs), where you can download the appropriate USB driver for your device.
If you’re developing on Mac OS X or Linux, then you shouldn’t need a USB driver. Instead read Using Hardware Devices.
To connect and debug with any of the Google Nexus devices using Windows, you need to install the Google USB driver.
Install a USB driver
First, find the appropriate driver for your device from the OEM drivers table below.
Once you’ve downloaded your USB driver, follow the instructions below to install or upgrade the driver, based on your version of Windows and whether you’re installing for the first time or upgrading an existing driver. Then see Using Hardware Devices for other important information about using an Android device for development.
Caution: You may make changes to android_winusb.inf file found inside usb_driver\ (for example, to add support for other devices), however, this will lead to security warnings when you install or upgrade the driver. Making any other changes to the driver files may break the installation process.
Windows 10
To install the Android USB driver on Windows 10 for the first time, do the following:
- Connect your Android device to your computer’s USB port.
- From Windows Explorer, open Computer Management.
- In the Computer Management left pane, select Device Manager.
- In the Device Manager right pane, locate and expand Portable Devices or Other Devices, depending on which one you see.
- Right-click the name of the device you connected, and then select Update Driver Software.
- In the Hardware Update wizard, select Browse my computer for driver software and click Next.
- Click Browse and then locate the USB driver folder. For example, the Google USB Driver is located in android_sdk \extras\google\usb_driver\ .
- Click Next to install the driver.
Windows 8.1
To install the Android USB driver on Windows 8.1 for the first time, do the following:
- Connect your Android device to your computer’s USB port.
- Access search, as follows:
Touch screen: On your computer, swipe in from the right edge of the screen and tap Search.
Using a mouse: Point to the lower-right corner of the screen, move the mouse pointer up, and then click Search.
- In the search box, type into and then click Device Manager.
- Double-click the device category, and then double-click the device you want.
- Click the Driver tab, click Update Driver, and follow the instructions.
Windows 7
To install the Android USB driver on Windows 7 for the first time, do the following:
- Connect your Android device to your computer’s USB port.
- Right-click on Computer from your desktop or Windows Explorer, and select Manage.
- Select Devices in the left pane.
- Locate and expand Other device in the right pane.
- Right-click the device name (such as Nexus S) and select Update Driver Software. This will launch the Hardware Update Wizard.
- Select Browse my computer for driver software and click Next.
- Click Browse and locate the USB driver folder. (The Google USB Driver is located in android_sdk \extras\google\usb_driver\ .)
- Click Next to install the driver.
Or, to upgrade an existing Android USB driver on Windows 7 and higher with the new driver:
- Connect your Android device to your computer’s USB port.
- Right-click on Computer from your desktop or Windows Explorer, and select Manage.
- Select Device Manager in the left pane of the Computer Management window.
- Locate and expand Android Phone in the right pane.
- Right-click on Android Composite ADB Interface and select Update Driver. This will launch the Hardware Update Wizard.
- Select Install from a list or specific location and click Next.
- Select Search for the best driver in these locations; uncheck Search removable media; and check Include this location in the search.
- Click Browse and locate the USB driver folder. (The Google USB Driver is located in android_sdk \extras\google\usb_driver\ .)
- Click Next to upgrade the driver.
Get OEM drivers
| OEM | Driver URL |
|---|---|
| Acer | http://www.acer.com/worldwide/support/ |
| alcatel one touch | http://www.alcatelonetouch.com/global-en/support/ |
| Asus | https://www.asus.com/support/Download-Center/ |
| Blackberry | https://swdownloads.blackberry.com/Downloads/entry.do?code=4EE0932F46276313B51570F46266A608 |
| Dell | http://support.dell.com/support/downloads/index.aspx?c=us&cs=19&l=en&s=dhs& |
ck=anavml
If you don’t see a link for the manufacturer of your device here, go to the support section of the manufacturer’s website and search for USB driver downloads for your device.
Content and code samples on this page are subject to the licenses described in the Content License. Java is a registered trademark of Oracle and/or its affiliates.


 ‘Device Manager’ on your Windows 10 PC» width=»768″ height=»588″ srcset=»https://www.thecustomdroid.com/wp-content/uploads/2020/02/Install-Google-USB-Drivers-on-Windows-10-01.jpg 768w, https://www.thecustomdroid.com/wp-content/uploads/2020/02/Install-Google-USB-Drivers-on-Windows-10-01-300×230.jpg 300w» sizes=»(max-width: 768px) 100vw, 768px»/>