How to install Ansible on Windows?

Love Ansible, but wondering how to get it running on Windows?
Ansible is one of the most popular configuration administration and infrastructure automation tools. It helps to automate infrastructure configuration/provisioning, software deployments, and general infrastructure management.
Ansible was initially available on Linux. However, with Microsoft’s new viewpoint on open source, their community improvements, and their acceptance of a more agile, DevOps-minded software development method, Windows support is gradually catching up the pace.
Although Windows support requires a slight bit more configuration, it’s not very bad once the initial setup is done. There are two possible ways to get it installed.
Using Cygwin
Have you heard of Cygwin?
It is a POSIX-compatible environment to run on Windows. Means – you can run many things on Windows, which you usually do on UNIX-based OS.
If its the first time you heard about Cygwin then I would refer to their official website to get more understanding.
The default Cygwin installation doesn’t cover Ansible. Hence, you got to select them during installation, as explained below manually.
- Download Cygwin (Chose 32 bit or 64 bit Cygwin package as per your system)

- Run the Cygwin installation file which you downloaded above and follow the screen.

- Select download source as “Install from Internet.”

- Set a root directory where you would like your application installed

- Select a directory where you would like to install your Cygwin packages

- Select Direct connection if you’re not using a proxy.

- Select a mirror to download your packages. You can choose any from the list.

- Packages available for installation will be shown; this is where we have to select ansible – select view as Full explicitly and then search for “ansible” and then select the latest version as shown below.
- Ansible-doc is optional, click next

- Review and confirm changes by clicking next

- It will download and install the necessary packages.

- Once done, you will get a success message, click Finish

Congratulation! You have installed Cygwin with Ansible on Windows. Let’s verify it.
- Double click on Cygwin Terminal icon from the desktop and type ansible —version

And, as you can see, it has successfully installed.
Go ahead and play around with it. If you are interested in learning Ansible, then check out this Udemy course.
Using Ubuntu on Windows 10
Thanks to Microsoft. Now it is possible to install Ubuntu on Windows 10.
Let’s get it started.
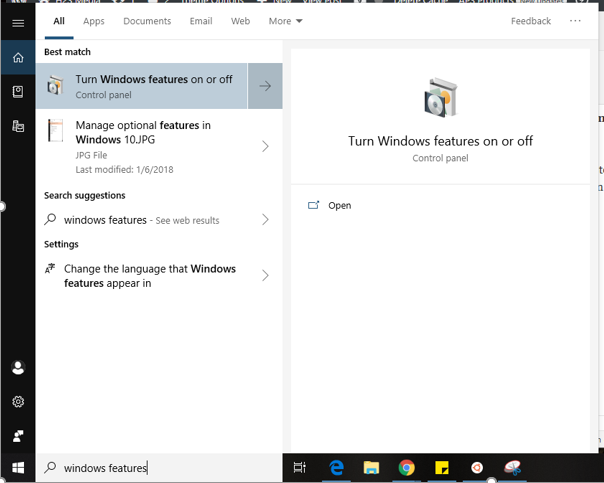
- Search for Windows features in the search box. And when the “Turn Windows features on or off ” appears, click on that.

- A window will open with a bunch of features. Scroll down and check the box of Windows Subsystem for the Linux option. And after that, click on the OK button.

- Open the Microsoft Store and search for Ubuntu to install the latest version.

- After the installation, you will see a launch button, use that to open the Ubuntu bash.
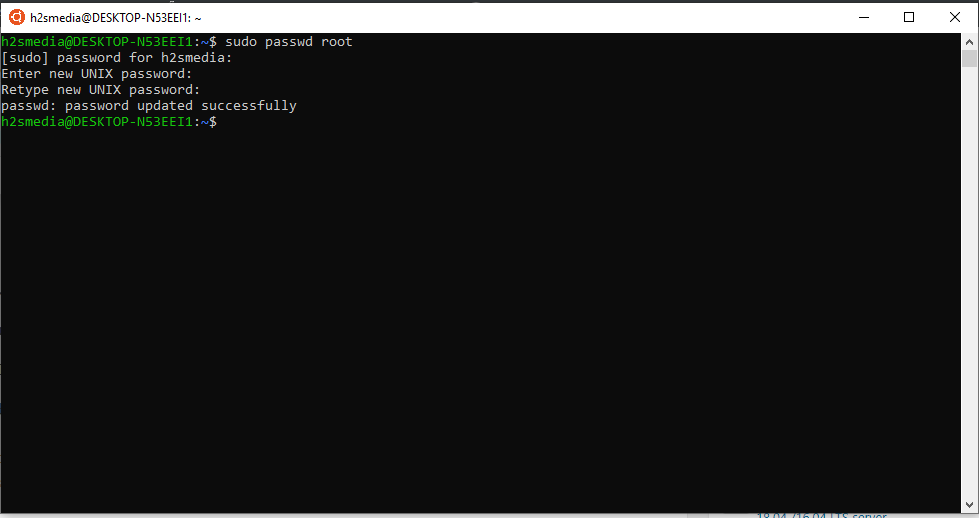
- On Ubuntu bash, it will ask you to set the username and password for the default user. You can also set the root account password from here by typing sudo passwd root

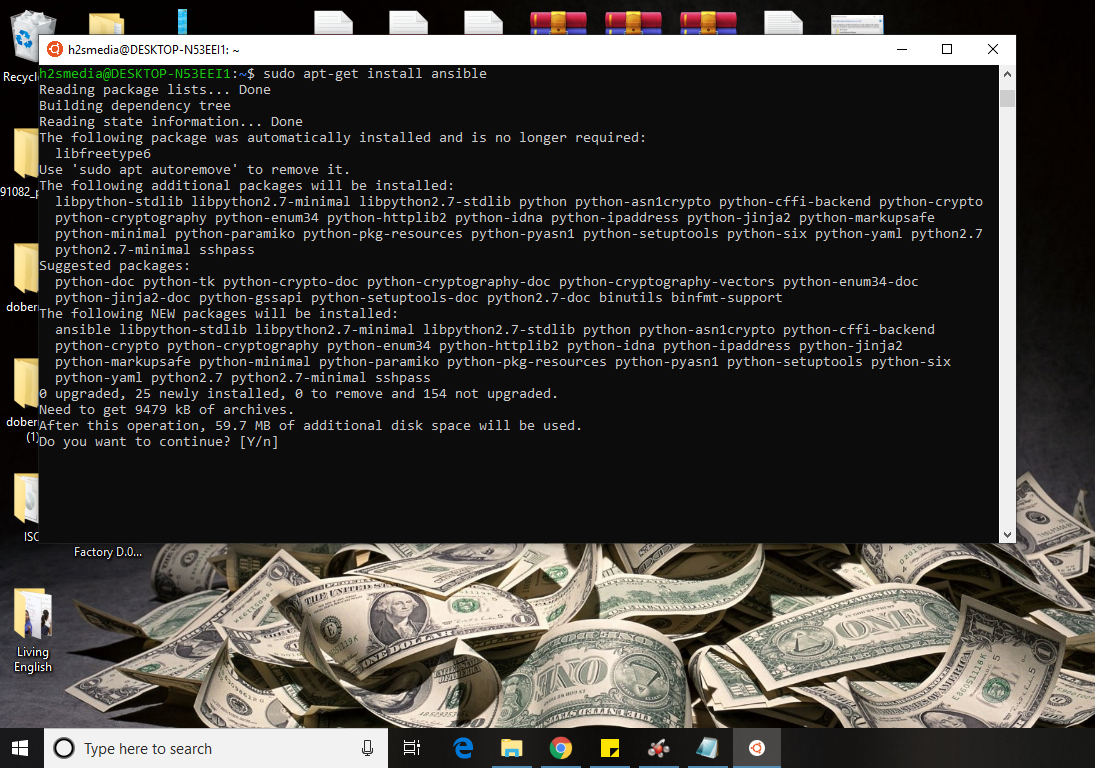
- Its time to get the Ansible installed with the following commands.
- Press Y when it asks for…

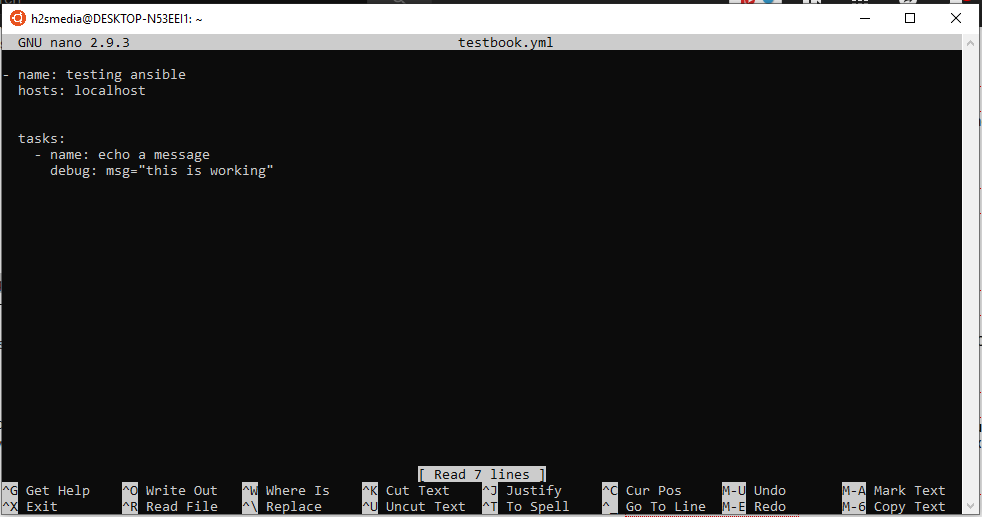
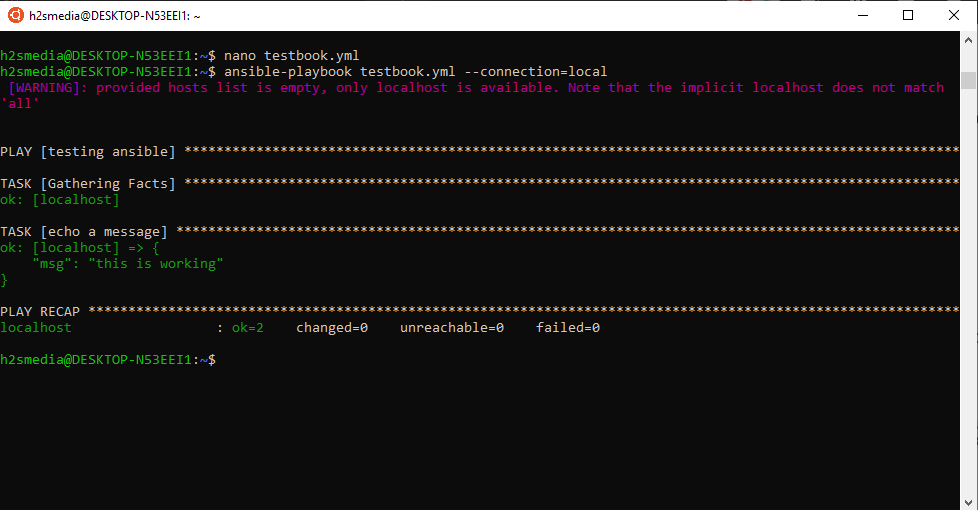
After the installation, let’s test whether by creating and running a demo playbook.
- Create a file called testbook.yml
- Add the following lines and save the file

And, finally, run the playbook.
Conclusion
I hope this helps you to install Ansible on Windows. Check out this blog post to learn about the playbook to automate the tasks.
How to Install Ansible on Windows 10
Know simple way to configure Ansible on Windows 10 using Windows subsystems for Linux such as Debian, Open Suse or Ubuntu.
Ansible is an open source software available for Linux Based systems such as Debian, Redhat, Ubuntu, Centos and more… Besides the free product, it also comes in an enterprise version called Ansible Tower. It was acquired by RedHat (2015) and written in Python. It is basically powerful and simple to setup tool that uses for making the automation process. It can help in configuration management, application deployment, and task automation.
This tool is capable of handling complex operations without the need of some agent on the remote machine. It can connect remotely via SSH or Powershell.
Ansible is very much able to handle multiple tasks simultaneously. For example, the user can upgrade some remote server while simultaneously detaching that from any cluster. Means many complex tasks can be done from a single point on the screen. It also has an extensible architecture which allows users to use Ansible modules to add extra functionality into it. They are mostly standalone and written in language like Python, Perl, Ruby, Bash, etcetera. So, now let’s see how to install the Ansible on Windows 10 without any virtual machine or virtualization software like VirtualBox.
Install Ansible on Windows 10
- Open the Window’s Turn Windows features on or off section.
- Select the Windows Subsystem for Linux to activate it.
- Go to the Microsoft app store.
- Search for Linux.
- Multiple Linux system will appear like Debian, Ubuntu, OpenSuse
- Select the Ubuntu or any other Linux you want to install the Ansible. Here we are using Ubuntu 18.04
- Once the Ubuntu installed on Windows 10, it will ask you to create the user.
- Now add the Ansible PPA repo on Windows 10’s Ubuntu app.
- Use installation commands to install the Ansible on Windows 10 Linux subsystem.
- Now you can run Ansible on Windows to perform different management and automation tasks.
Tutorial in Detail with screenshots:
Step 1: Turn Windows features on or off
Basically, this features already on the Windows 10 and we just need to turn it on from the features option. For that just search for Windows features in the Search box. And when the “Turn Windows features on or off ” appears click on that.
Step 2: Install the Windows SubSystem for Linux
Now a window will open with a bunch of features. Scroll down and check the box of Windows Subsystem for Linux option. And after that click on the OK button.

Step 3: Open the Microsoft Store
To open the App store of Microsoft for Windows click on the search box and type Microsoft store. The moment it will appear, click on that.

Step 4: Install Ubuntu 18.04 on Windows 10
Now search for the Ubuntu and install the latest version which is 18.04. As soon as it appears, you will see GET button, click on that and install it on your Windows 10. After the installation, you will see a launch button, use that to open the Ubuntu Bash. You can install any other Linux system such as Debian, Kali Linux, and OpenSuSE to install the Ansible.

When the Ubuntu Bash opens, it will ask you to set the username and password for default user of your Ubuntu on Windows. We can also set the root account password from here. Just type sudo passwd root
Step 6: Install Ansible on Windows
For installing and running Ansible on Windows just use the below-given commands:
Note: For older Ubuntu versions such as Ubuntu 14.04, 15.04, and 16.04, we need to add the repo of Ansible but the latest version such as Ubuntu 18.04 can get the Ansible installation files directly from via its package management.
Press Y when it asks for…
Step 7: Test Ansible on Windows
After the installation of Ansible, we will test it whether it is working or not. So, we create a demo playbook file for it.
Create a file called testbook.yml
Now add the following lines into it and then exit and save the file.
Step 8: Now run the ansible command to check whether it is working or not.
Note: We are pointing the ansible to localhost because we want to test the file present on localhost.
It will prompt a message the mentioned host file is empty. So, in the next, we will also give it some demo inventory file.
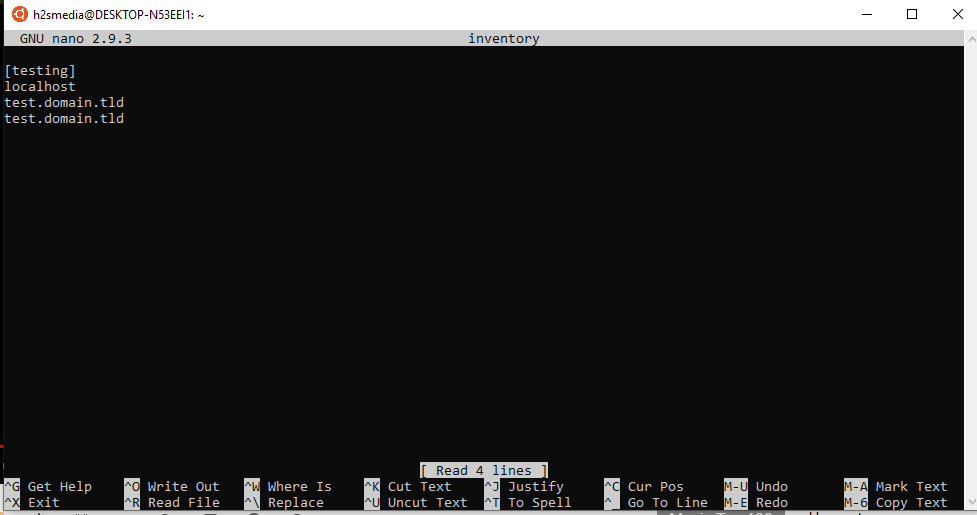
Step 9: Create a demo inventory for Ansible
Create a file with any name you want, we are using ‘inventory’. So, the command is:
Now add the following lines into it… Here we are adding some random non-existing demo domains in a group of localhost in the file for testing purpose.
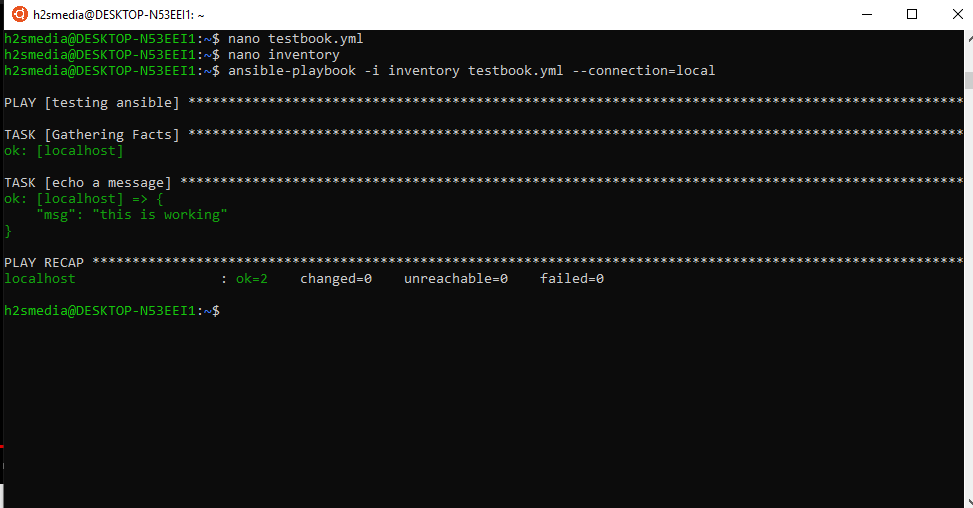
Step 10: Run the Ansible command with inventory
This time again we run the same command above but with inventory file available
This time you will see that it will not be going to show any error.
So, in this way, we can install the Ansible on Windows 10 for testing and other purposes.
Other Useful Resources:
Управляем через Ansible Windows системами
Однажды задался целью вот моя основная система — это Ubuntu LTS релизы, начинал с 12.04 и уже на 18.04 . Администрируя инфраструктуру часто приходится сталкиваться с различными системами, что-то под Wine запускаю, что-то под Virtualbox , подключаюсь как через SSH и т. д. И вот задался целью все-таки добить шаги посредством которых я смогу посредством инструмента ansible взаимодействовать с Windows системами.
Для себя выделил интересные этапы взаимодействия
- если Windows система не в домене
- если Windows система в домене
$ apt — cache show ansible | grep Version
$ sudo apt — get install ansible — y
А если добавить репозитарий Ansible то версия из него более новая:
$ sudo apt — get install — y software — properties — common
$ sudo apt — add — repository ppa : ansible / ansible
$ apt — cache show ansible | grep Version
$ sudo apt — get install ansible python3 — pip python — pip — y
Устанавливаю пакет для использования модуля winrm:
$ sudo pip install http : //github.com/diyan/pywinrm/archive/master.zip#egg=pywinrm
$ sudo find / — name «winrm»
$ sudo nano / etc / ansible / hosts
Предварительные действия которые нужно выполнить на Windows 7 Pro x64 SP1
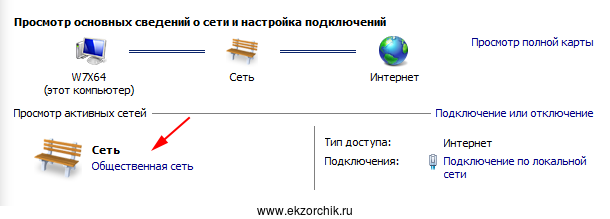
Шаг №1: Изменить тип активной сети
Пуск — Панель управления — Центр управления сетями и общим доступом , чтобы активная расположение сети было не « Общественная сеть », а либо « Домашняя », либо « Сеть предприятия ». Делается это если в данной оснастке щелкнуть чуть ниже « Просмотр активных сетей » на « Общественная сеть » и изменить на « Домашняя сеть »:
или через консоль командной строки:
Служба «Служба удаленного управления Windows (WS-Management)» запускается.
Служба «Служба удаленного управления Windows (WS-Management)» успешно запущена.
Служба WinRM не настроена на прием запросов на компьютере.
Необходимо внести следующие изменения:
Задайте для типа службы WinRM значение отложенного автозапуска.
Настройте параметр LocalAccountTokenFilterPolicy, чтобы предоставлять административные права локальным пользователям удаленным образом.
Выполнить изменения [y/n]? y
Служба WinRM была обновлена для приема запросов.
Тип службы WinRM успешно изменен.
Параметр LocalAccountTokenFilterPolicy настроен так, чтобы предоставлять административные права локальным пользователям удаленным образом.
Служба WinRM не настроена на разрешение удаленного управления компьютером.
Необходимо внести следующие изменения:
Создайте прослушиватель WinRM на HTTP://* для приема запросов WS-Man на любом из IP-адресов этого компьютера.
Разрешите исключение брандмауэра WinRM.
Выполнить изменения [y/n]? y
Служба WinRM обновлена для удаленного управления.
Создан прослушиватель WinRM на HTTP://* для приема запросов WS-Man на любом из IP-адресов этого компьютера.
Исключение брандмауэра WinRM включено.
Отобразить текущую политику Аутентификации через winrm:


