- Hadoop: Setting up a Single Node Cluster.
- Purpose
- Prerequisites
- Supported Platforms
- Required Software
- Installing Software
- Download
- Prepare to Start the Hadoop Cluster
- Standalone Operation
- Pseudo-Distributed Operation
- Настройка маленького кластера Hadoop 2.2.0 с нуля
- Предварительные настройки
- Создание отдельной учетной записи для запуска Hadoop
- /etc/hosts
- Отключение IPv6
- Установка Apache Hadoop
- Обновление $HOME/.bashrc
- Настройка Apache Hadoop
- Running Hadoop On Ubuntu Linux (Multi-Node Cluster)
- Tutorial approach and structure
- Prerequisites
- Configuring single-node clusters first
- Done? Let’s continue then!
- Networking
- SSH access
- Hadoop
- Cluster Overview (aka the goal)
- Masters vs. Slaves
- Configuration
- conf/masters ( master only)
- conf/slaves ( master only)
- conf/*-site.xml (all machines)
- Additional Settings
- Formatting the HDFS filesystem via the NameNode
- Starting the multi-node cluster
- HDFS daemons
- MapReduce daemons
- Stopping the multi-node cluster
- MapReduce daemons
- HDFS daemons
- Running a MapReduce job
- Caveats
- java.io.IOException: Incompatible namespaceIDs
- Solution 1: Start from scratch
- Solution 2: Manually update the namespaceID of problematic DataNodes
- Where to go from here
- Related Links
- Change Log
- Michael G. Noll
Hadoop: Setting up a Single Node Cluster.
Purpose
This document describes how to set up and configure a single-node Hadoop installation so that you can quickly perform simple operations using Hadoop MapReduce and the Hadoop Distributed File System (HDFS).
Prerequisites
Supported Platforms
GNU/Linux is supported as a development and production platform. Hadoop has been demonstrated on GNU/Linux clusters with 2000 nodes.
Windows is also a supported platform but the followings steps are for Linux only. To set up Hadoop on Windows, see wiki page.
Required Software
Required software for Linux include:
Java™ must be installed. Recommended Java versions are described at HadoopJavaVersions.
ssh must be installed and sshd must be running to use the Hadoop scripts that manage remote Hadoop daemons if the optional start and stop scripts are to be used. Additionally, it is recommmended that pdsh also be installed for better ssh resource management.
Installing Software
If your cluster doesn’t have the requisite software you will need to install it.
For example on Ubuntu Linux:
Download
To get a Hadoop distribution, download a recent stable release from one of the Apache Download Mirrors.
Prepare to Start the Hadoop Cluster
Unpack the downloaded Hadoop distribution. In the distribution, edit the file etc/hadoop/hadoop-env.sh to define some parameters as follows:
Try the following command:
This will display the usage documentation for the hadoop script.
Now you are ready to start your Hadoop cluster in one of the three supported modes:
Standalone Operation
By default, Hadoop is configured to run in a non-distributed mode, as a single Java process. This is useful for debugging.
The following example copies the unpacked conf directory to use as input and then finds and displays every match of the given regular expression. Output is written to the given output directory.
Pseudo-Distributed Operation
Hadoop can also be run on a single-node in a pseudo-distributed mode where each Hadoop daemon runs in a separate Java process.
Источник
Настройка маленького кластера Hadoop 2.2.0 с нуля

В данной статье будет по шагам разобран процесс создания небольшого кластера Hadoop для опытов.
Несмотря на то, что в интернете на иностранных ресурсах есть полно материала про настройку/развертывание Hadoop, большинство из них либо описывают настройку ранних версий (0.X.X и 1.X.X), либо описывают только настройку в режиме single mode/pseudo distributed mode и лишь частично fully distributed mode. На русском языке материала практически нет вовсе.
Когда мне самому понадобился Hadoop, то я далеко не с первого раза смог все настроить. Материал был неактуален, часто попадались конфиги, которые используют deprecated параметры, поэтому использовать их нежелательно. А даже когда все настроил, то задавался многими вопросами, на которые искал ответы. Также встречались похожие вопросы у других людей.
Всем кому интересно, прошу пожаловать по кат.
Предварительные настройки
В качестве операционной системы для нашего кластера я предлагаю использовать Ubuntu Server 12.04.3 LTS, но при минимальных изменениях можно будет проделать все шаги и на другой ОС.
Все узлы будут работать на VirtualBox. Системные настройки для виртуальной машины я выставлял небольшие. Всего 8 GB пространства для жёсткого диска, одно ядро и 512 Мб памяти. Виртуальная машина также оснащена двумя сетевыми адаптерами: один NAT, а другой для внутренней сети.
После того, как была скачена и установлена операционная система, необходимо обновиться и установить ssh и rsync:
Для работы Hadoop можно использовать либо 6 или 7 версию.
В данной статье будем работать с OpenJDK 7 версии:
Хотя можно использовать версию от Oracle.
Очищаем ОС от всех зависимостей OpenJDK sudo apt-get purge openjdk*
Устанавливаем python-software-properties который позволит добавлять новые PPA:
Создание отдельной учетной записи для запуска Hadoop
Мы будем использовать выделенную учетную запись для запуска Hadoop. Это не обязательно, но рекомендуется. Также предоставим новому пользователю права sudo, чтобы облегчить себе жизнь в будущем.
Во время создания нового пользователя, необходимо будет ввести ему пароль.
/etc/hosts
Нам необходимо, чтобы все узлы могли легко обращаться друг к другу. В большом кластере желательно использовать dns сервер, но для нашей маленькой конфигурации подойдет файл hosts. В нем мы будем описывать соответствие ip-адреса узла к его имени в сети. Для одного узла ваш файл должен выглядеть примерно так:
Для управления узлами кластера hadoop необходим доступ по ssh. Для созданного пользователя hduser предоставить доступ к master.
Для начала необходимо сгенерировать новый ssh ключ:
Во время создания ключа будет запрошен пароль. Сейчас можно его не вводить.
Следующим шагом необходимо добавить созданный ключ в список авторизованных:
Проверяем работоспособность, подключившись к себе:
Отключение IPv6
Если не отключить IPv6, то в последствии можно получить много проблем.
Для отключения IPv6 в Ubuntu 12.04 / 12.10 / 13.04 нужно отредактировать файл sysctl.conf:
Добавляем следующие параметры:
Сохраняем и перезагружаем операционную систему.
Для того, чтобы отключить ipv6 только в hadoop можно добавить в файл etc/hadoop/hadoop-env.sh:
Установка Apache Hadoop
Скачаем необходимые файлы.
Актуальные версии фреймворка располагаются по адресу: www.apache.org/dyn/closer.cgi/hadoop/common
На момент декабря 2013 года стабильной версией является 2.2.0.
Создадим папку downloads в корневом каталоге и скачаем последнюю версию:
Распакуем содержимое пакета в /usr/local/, переименуем папку и выдадим пользователю hduser права создателя:
Обновление $HOME/.bashrc
Для удобства, добавим в .bashrc список переменных:
На этом шаге заканчиваются предварительные подготовки.
Настройка Apache Hadoop
Все последующая работа будет вестись из папки /usr/local/hadoop.
Откроем etc/hadoop/hadoop-env.sh и зададим JAVA_HOME.
Опишем, какие у нас будут узлы в кластере в файле etc/hadoop/slaves
Этот файл может располагаться только на главном узле. Все новые узлы необходимо описывать здесь.
Основные настройки системы располагаются в etc/hadoop/core-site.xml:
Настройки HDFS лежат в etc/hadoop/hdfs-site.xml:
Здесь параметр dfs.replication задает количество реплик, которые будут хранится на файловой системе. По умолчанию его значение равно
3. Оно не может быть больше, чем количество узлов в кластере.
Параметры dfs.namenode.name.dir и dfs.datanode.data.dir задают пути, где будут физически располагаться данные и информация в HDFS. Необходимо заранее создать папку tmp.
Сообщим нашему кластеру, что мы желаем использовать YARN. Для этого изменим etc/hadoop/mapred-site.xml:
Все настройки по работе YARN описываются в файле etc/hadoop/yarn-site.xml:
Настройки resourcemanager нужны для того, чтобы все узлы кластера можно было видеть в панели управления.
Запустим hadoop службы:
*В предыдущей версии Hadoop использовался скрипт sbin/start-all.sh, но с версии 2.*.* он объявлен устаревшим.
Необходимо убедиться, что запущены следующие java-процессы:
Протестировать работу кластера можно при помощи стандартных примеров:
Теперь у нас есть готовый образ, который послужит основой для создания кластера.
Далее можно создать требуемое количество копий нашего образа.
На копиях необходимо настроить сеть. Необходимо сгенерировать новые MAC-адреса для сетевых интерфейсов и выдать и на них необходимые ip-адреса. В моем примере я работаю с адресами вида 192.168.0.X.
Поправить файл /etc/hosts на всех узлах кластера так, чтобы в нем были прописаны все соответствия.
Для удобства, изменить имена новых узлов на slave1 и slave2.
Сгенерируйте на узлах новые SSH-ключи и добавьте их все в список авторизованных на узле master.
На каждом узле кластера изменим значения параметра dfs.replication в etc/hadoop/hdfs-site.xml. Например, выставим везде значение 3.
Добавим на узле master новые узлы в файл etc/hadoop/slaves:
Когда все настройки прописаны, то на главном узле можно запустить наш кластер.
На slave-узлах должны запуститься следующие процессы:
Теперь у нас есть свой мини-кластер.
Давайте запустим задачу Word Count.
Для этого нам потребуется загрузить в HDFS несколько текстовых файлов.
Для примера, я взял книги в формате txt с сайта Free ebooks — Project Gutenberg.
Перенесем наши файлы в HDFS:
Запустим Word Count:
Отслеживать работу можно через консоль, а можно через веб-интерфейс ResourceManager’а по адресу master:8088/cluster/apps/
По завершению работы, результат будет располагаться в папке /out в HDFS.
Для того, чтобы скачать его на локальную файловую систему выполним:
Если у вас возникнут вопросы, то задавайте их в комментариях.
Источник
Running Hadoop On Ubuntu Linux (Multi-Node Cluster)
In this tutorial I will describe the required steps for setting up a distributed, multi-node Apache Hadoop cluster backed by the Hadoop Distributed File System (HDFS), running on Ubuntu Linux.
Hadoop is a framework written in Java for running applications on large clusters of commodity hardware and incorporates features similar to those of the Google File System (GFS) and of the MapReduce computing paradigm. Hadoop’s HDFS is a highly fault-tolerant distributed file system and, like Hadoop in general, designed to be deployed on low-cost hardware. It provides high throughput access to
In a previous tutorial, I described how to setup up a Hadoop single-node cluster on an Ubuntu box. The main goal of this tutorial is to get a more sophisticated Hadoop installation up and running, namely building a multi-node cluster using two Ubuntu boxes.
This tutorial has been tested with the following software versions:
- Ubuntu Linux 10.04 LTS (deprecated: 8.10 LTS, 8.04, 7.10, 7.04)
- Hadoop 1.0.3, released May 2012

Tutorial approach and structure
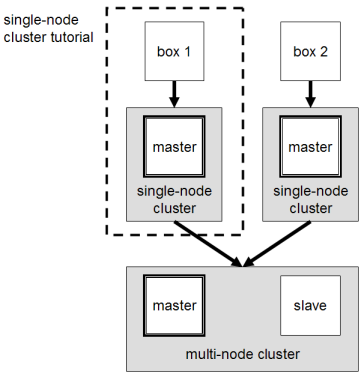
From two single-node clusters to a multi-node cluster – We will build a multi-node cluster using two Ubuntu boxes in this tutorial. In my humble opinion, the best way to do this for starters is to install, configure and test a “local” Hadoop setup for each of the two Ubuntu boxes, and in a second step to “merge” these two single-node clusters into one multi-node cluster in which one Ubuntu box will become the designated master (but also act as a slave with regard to data storage and processing), and the other box will become only a slave. It’s much easier to track down any problems you might encounter due to the reduced complexity of doing a single-node cluster setup first on each machine.
Let’s get started!
Prerequisites
Configuring single-node clusters first
The tutorial approach outlined above means that you should read now my previous tutorial on how to setup up a Hadoop single-node cluster and follow the steps described there to build a single-node Hadoop cluster on each of the two Ubuntu boxes. It is recommended that you use the ‘‘same settings’’ (e.g., installation locations and paths) on both machines, or otherwise you might run into problems later when we will migrate the two machines to the final multi-node cluster setup.
Just keep in mind when setting up the single-node clusters that we will later connect and “merge” the two machines, so pick reasonable network settings etc. now for a smooth transition later.
Done? Let’s continue then!
Now that you have two single-node clusters up and running, we will modify the Hadoop configuration to make one Ubuntu box the “master” (which will also act as a slave) and the other Ubuntu box a “slave”.
Shutdown each single-node cluster with bin/stop-all.sh before continuing if you haven’t done so already.
Networking
This should come hardly as a surprise, but for the sake of completeness I have to point out that both machines must be able to reach each other over the network. The easiest is to put both machines in the same network with regard to hardware and software configuration, for example connect both machines via a single hub or switch and configure the network interfaces to use a common network such as 192.168.0.x/24 .
To make it simple, we will assign the IP address 192.168.0.1 to the master machine and 192.168.0.2 to the slave machine. Update /etc/hosts on both machines with the following lines:
SSH access
The hduser user on the master (aka hduser@master ) must be able to connect a) to its own user account on the master – i.e. ssh master in this context and not necessarily ssh localhost – and b) to the hduser user account on the slave (aka hduser@slave ) via a password-less SSH login. If you followed my single-node cluster tutorial, you just have to add the hduser@master ’s public SSH key (which should be in $HOME/.ssh/id_rsa.pub ) to the authorized_keys file of hduser@slave (in this user’s $HOME/.ssh/authorized_keys ). You can do this manually or use the following SSH command:
This command will prompt you for the login password for user hduser on slave , then copy the public SSH key for you, creating the correct directory and fixing the permissions as necessary.
The final step is to test the SSH setup by connecting with user hduser from the master to the user account hduser on the slave . The step is also needed to save slave ’s host key fingerprint to the hduser@master ’s known_hosts file.
So, connecting from master to master …
…and from master to slave .
Hadoop
Cluster Overview (aka the goal)
The next sections will describe how to configure one Ubuntu box as a master node and the other Ubuntu box as a slave node. The master node will also act as a slave because we only have two machines available in our cluster but still want to spread data storage and processing to multiple machines.
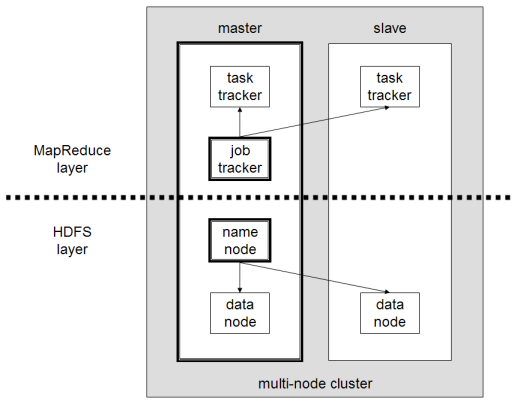
The master node will run the “master” daemons for each layer: NameNode for the HDFS storage layer, and JobTracker for the MapReduce processing layer. Both machines will run the “slave” daemons: DataNode for the HDFS layer, and TaskTracker for MapReduce processing layer. Basically, the “master” daemons are responsible for coordination and management of the “slave” daemons while the latter will do the actual data storage and data processing work.
Masters vs. Slaves
Typically one machine in the cluster is designated as the NameNode and another machine the as JobTracker, exclusively. These are the actual «master nodes». The rest of the machines in the cluster act as both DataNode and TaskTracker. These are the slaves or «worker nodes».
Configuration
conf/masters ( master only)
Despite its name, the conf/masters file defines on which machines Hadoop will start secondary NameNodes in our multi-node cluster. In our case, this is just the master machine. The primary NameNode and the JobTracker will always be the machines on which you run the bin/start-dfs.sh and bin/start-mapred.sh scripts, respectively (the primary NameNode and the JobTracker will be started on the same machine if you run bin/start-all.sh ).
Here are more details regarding the conf/masters file:
The secondary NameNode merges the fsimage and the edits log files periodically and keeps edits log size within a limit. It is usually run on a different machine than the primary NameNode since its memory requirements are on the same order as the primary NameNode. The secondary NameNode is started by «bin/start-dfs.sh« on the nodes specified in «conf/masters« file.
Again, the machine on which bin/start-dfs.sh is run will become the primary NameNode.
On master , update conf/masters that it looks like this:
conf/slaves ( master only)
The conf/slaves file lists the hosts, one per line, where the Hadoop slave daemons (DataNodes and TaskTrackers) will be run. We want both the master box and the slave box to act as Hadoop slaves because we want both of them to store and process data.
On master , update conf/slaves that it looks like this:
If you have additional slave nodes, just add them to the conf/slaves file on master , one hostname per line.
conf/*-site.xml (all machines)
You must change the configuration files conf/core-site.xml , conf/mapred-site.xml and conf/hdfs-site.xml on ALL machines as follows.
First, we have to change the fs.default.name parameter (in conf/core-site.xml ), which specifies the NameNode (the HDFS master) host and port. In our case, this is the master machine.
Second, we have to change the mapred.job.tracker parameter (in conf/mapred-site.xml ), which specifies the JobTracker (MapReduce master) host and port. Again, this is the master in our case.
Third, we change the dfs.replication parameter (in conf/hdfs-site.xml ) which specifies the default block replication. It defines how many machines a single file should be replicated to before it becomes available. If you set this to a value higher than the number of available slave nodes (more precisely, the number of DataNodes), you will start seeing a lot of “(Zero targets found, forbidden1.size=1)” type errors in the log files.
The default value of dfs.replication is 3 . However, we have only two nodes available, so we set dfs.replication to 2 .
Additional Settings
There are some other configuration options worth studying. The following information is taken from the Hadoop API Overview.
In file conf/mapred-site.xml :
mapred.local.dir Determines where temporary MapReduce data is written. It also may be a list of directories. mapred.map.tasks As a rule of thumb, use 10x the number of slaves (i.e., number of TaskTrackers). mapred.reduce.tasks As a rule of thumb, use num_tasktrackers * num_reduce_slots_per_tasktracker * 0.99 . If num_tasktrackers is small (as in the case of this tutorial), use (num_tasktrackers — 1) * num_reduce_slots_per_tasktracker .
Formatting the HDFS filesystem via the NameNode
Before we start our new multi-node cluster, we must format Hadoop’s distributed filesystem (HDFS) via the NameNode. You need to do this the first time you set up an Hadoop cluster.
To format the filesystem (which simply initializes the directory specified by the dfs.name.dir variable on the NameNode), run the command
Background: The HDFS name table is stored on the NameNode’s (here: master ) local filesystem in the directory specified by dfs.name.dir . The name table is used by the NameNode to store tracking and coordination information for the DataNodes.
Starting the multi-node cluster
Starting the cluster is performed in two steps.
- We begin with starting the HDFS daemons: the NameNode daemon is started on master , and DataNode daemons are started on all slaves (here: master and slave ).
- Then we start the MapReduce daemons: the JobTracker is started on master , and TaskTracker daemons are started on all slaves (here: master and slave ).
HDFS daemons
Run the command bin/start-dfs.sh on the machine you want the (primary) NameNode to run on. This will bring up HDFS with the NameNode running on the machine you ran the previous command on, and DataNodes on the machines listed in the conf/slaves file.
In our case, we will run bin/start-dfs.sh on master :
On slave , you can examine the success or failure of this command by inspecting the log file logs/hadoop-hduser-datanode-slave.log .
As you can see in slave ’s output above, it will automatically format its storage directory (specified by the dfs.data.dir parameter) if it is not formatted already. It will also create the directory if it does not exist yet.
At this point, the following Java processes should run on master …
(the process IDs don’t matter of course)
…and the following on slave .
MapReduce daemons
Run the command bin/start-mapred.sh on the machine you want the JobTracker to run on. This will bring up the MapReduce cluster with the JobTracker running on the machine you ran the previous command on, and TaskTrackers on the machines listed in the conf/slaves file.
In our case, we will run bin/start-mapred.sh on master :
On slave , you can examine the success or failure of this command by inspecting the log file logs/hadoop-hduser-tasktracker-slave.log . Example output:
At this point, the following Java processes should run on master …
(the process IDs don’t matter of course)
…and the following on slave .
Stopping the multi-node cluster
Like starting the cluster, stopping it is done in two steps. The workflow however is the opposite of starting.
- We begin with stopping the MapReduce daemons: the JobTracker is stopped on master , and TaskTracker daemons are stopped on all slaves (here: master and slave ).
- Then we stop the HDFS daemons: the NameNode daemon is stopped on master , and DataNode daemons are stopped on all slaves (here: master and slave ).
MapReduce daemons
Run the command bin/stop-mapred.sh on the JobTracker machine. This will shut down the MapReduce cluster by stopping the JobTracker daemon running on the machine you ran the previous command on, and TaskTrackers on the machines listed in the conf/slaves file.
In our case, we will run bin/stop-mapred.sh on master :
At this point, the following Java processes should run on master …
…and the following on slave .
HDFS daemons
Run the command bin/stop-dfs.sh on the NameNode machine. This will shut down HDFS by stopping the NameNode daemon running on the machine you ran the previous command on, and DataNodes on the machines listed in the conf/slaves file.
In our case, we will run bin/stop-dfs.sh on master :
(again, the output above might suggest that the NameNode was running and stopped on slave , but you can be assured that the NameNode ran on master )
At this point, the only following Java processes should run on master …
…and the following on slave .
Running a MapReduce job
Just follow the steps described in the section Running a MapReduce job of the single-node cluster tutorial.
I recommend however that you use a larger set of input data so that Hadoop will start several Map and Reduce tasks, and in particular, on both master and slave . After all this installation and configuration work, we want to see the job processed by all machines in the cluster, don’t we?
Here’s the example input data I have used for the multi-node cluster setup described in this tutorial. I added four more Project Gutenberg etexts to the initial three documents mentioned in the single-node cluster tutorial. All etexts should be in plain text us-ascii encoding.
Download these etexts, copy them to HDFS, run the WordCount example MapReduce job on master , and retrieve the job result from HDFS to your local filesystem.
Here’s the example output on master after executing the MapReduce job…
…and the logging output on slave for its DataNode daemon…
…and on slave for its TaskTracker daemon.
If you want to inspect the job’s output data, you need to retrieve the job results from HDFS to your local file system (see instructions in the single-node cluster tutorial.
Caveats
java.io.IOException: Incompatible namespaceIDs
If you observe the error “java.io.IOException: Incompatible namespaceIDs” in the logs of a DataNode ( logs/hadoop-hduser-datanode-.log ), chances are you are affected by issue HDFS-107 (formerly known as HADOOP-1212).
The full error looked like this on my machines:
There are basically two solutions to fix this error as I will describe below.
Solution 1: Start from scratch
This step fixes the problem at the cost of erasing all existing data in the cluster’s HDFS file system.
- Stop the full cluster, i.e. both MapReduce and HDFS layers.
- Delete the data directory on the problematic DataNode: the directory is specified by dfs.data.dir in conf/hdfs-site.xml ; if you followed this tutorial, the relevant directory is /app/hadoop/tmp/dfs/data .
- Reformat the NameNode. WARNING: all HDFS data is lost during this process!
- Restart the cluster.
When deleting all the HDFS data and starting from scratch does not sound like a good idea (it might be ok during the initial setup/testing), you might give the second approach a try.
Solution 2: Manually update the namespaceID of problematic DataNodes
Big thanks to Jared Stehler for the following suggestion. This workaround is “minimally invasive” as you only have to edit a single file on the problematic DataNodes:
- Stop the problematic DataNode(s).
- Edit the value of namespaceID in $
/current/VERSION to match the corresponding value of the current NameNode in $ /current/VERSION . - Restart the fixed DataNode(s).
If you followed the instructions in my tutorials, the full paths of the relevant files are:
- NameNode: /app/hadoop/tmp/dfs/ name /current/VERSION
- DataNode: /app/hadoop/tmp/dfs/ data /current/VERSION (background: dfs.data.dir is by default set to $
/dfs/data , and we set hadoop.tmp.dir in this tutorial to /app/hadoop/tmp ).
If you wonder how the contents of VERSION look like, here’s one of mine:
Where to go from here
If you’re feeling comfortable, you can continue your Hadoop experience with my tutorial on how to code a simple MapReduce job in the Python programming language which can serve as the basis for writing your own MapReduce programs.
Related Links
From yours truly:
From other people:
Change Log
Only major changes are listed here.
- 2011-07-17: Renamed the Hadoop user from hadoop to hduser based on readers’ feedback. This should make the distinction between the local Hadoop user (now hduser ), the local Hadoop group ( hadoop ), and the Hadoop CLI tool ( hadoop ) more clear.
Michael G. Noll

Product manager. Computer scientist. Writer. Open source software committer. Currently focusing on product & technology strategy and competitive analysis in the Office of the CTO at Confluent. Read more »
Источник


