- How to Configure Apache Server in Kali Linux complete Tutorial for beginner
- What is an apache Web Server?
- How to Configure Apache Server in Kali Linux?
- OLD Method to start Restart Apache2 web service
- Use GUIs to Start Restart Apache2 web Server in Linux
- Check the status of Apache server
- Start, Stop and Restart the Apache webserver in Kali Linux
- Another way to start, stop of restart Apache2 service by following commands
- The Default Web Page
- Ethical hacking and penetration testing
- InfoSec, IT, Kali Linux, BlackArch
- Configuring and starting network services on Kali Linux (Apache, MySQL, SSH, PostgreSQL, NetworkManager and Bluetooth)
- Table of contents
- Network services in Kali Linux
- Apache on Kali Linux
- Configuring virtual hosts
- Frequently used directives
- Authentication requirement
- Access contol
- MySQL on Kali Linux
- Solving the problem with error “#1698 — Access denied for user ‘root’@’localhost’” in Kali Linux
- MySQL password in Kali Linux
- How to reset MySQL password in Kali Linux
- Error “ERROR 2002 (HY000): Can’t connect to local MySQL server through socket ‘/var/run/mysqld/mysqld.sock’ (2 «No such file or directory»)” in Kali Linux
- Error “ERROR 1045 (28000): Access denied for user ‘root’@’localhost’ (using password: NO)”
- Error “ERROR 1045 (28000): Access denied for user ‘root’@’localhost’ (using password: YES)”
- SSH in Kali Linux
- Generating new SSH host keys
- Setting up Kali Linux login via SSH without password
- Configuring PostgreSQL Databases
- Connection type and client authentication
- Creating users and databases
- PostgreSQL Cluster Management
- How to change PostgreSQL passord
- NetworkManager
- Bluetooth
How to Configure Apache Server in Kali Linux complete Tutorial for beginner
In the article, I am going to cover how to configure apache server in Kali Linux, webserver apache in Kali Linux. Apache web server is similar methods are used in other Linux distribution. Simple commands can make an expert in using the webserver.
Originally this post is written on Jun 11, 2014, and last updated in April 2021. This article is not related to the cheap web server, web hosting, business web hosting, cloud hosting or any type of dedicated hosting service. This article defines only local webserver on Kali Linux for local Penetration testing.
What is an apache Web Server?
A web server is a type of server, that delivers web pages to the clients as per their request. Every Web server has an IP Address and domain name for identification. Server Administrator can make local webserver setup.
You can make a simple computer to work as a web server, It may be Windows, Linux or mac. You can install any web server software on your basic system. For example Xamp, Wamp etc.
Both of these software has apache web server.
I dont want to go in depth related this topic. So come back on the topic Web server in Kali Linux.
This is time to say thanks to Kali Linux developers, who have installed already Apache webserver in Kali Linux. But by default, apache service is not running.
I will explain in this article about configuration of apache server.
How do you know you web server is running or not? what happened if server is running.
When your server is ready to deliver web pages then you can access through web browser.
Clients access the web pages through a Web browser like Google Chrome, Firefox, Safari, etc.
You need to enter URL or IP address into the address bar of the web browser and the page will be delivered by Web server scripting.
If you enter https://www.cyberpratibha.com/blog in the Address bar it will be served by Web Server.
How to Configure Apache Server in Kali Linux?
In Kali Linux, you don’t need to set up a web server because Kali Linux has a pre-installed apache server. Hacker uses this webserver to deliver a web page containing malicious code to the victim by the help of a local webserver or by doing port forwarding.
We can trap them by using social engineering method for example Phishing. There are others who use the HTTP service in penetration testing.
it manages dedicated web server capacity to deliver pages and have web server load balancing.
OLD Method to start Restart Apache2 web service
Use GUIs to Start Restart Apache2 web Server in Linux
It is the easiest way to start, stop and restart the Apache2 service in GUI mode. Select Applications from the top bar of the Kali screen, next sub-menu bar will be displayed, Select Kali Linux menu, another fly-out display bar will appear, then go on the services menu, again next fly-out menu bar will display, In this bar web service can be start, stop and restart.

Once a selection happened, a command shell will open and the status of service will be displayed. When the Apache server has been started, the default page will be display by typing Attacker’s ip address in the web browser. IceWeasle is default web browser in Kali Linux distribution.
Note: GUI to start, stop, restart apache2 is not support in Kali Linux 2016.2 version.
Check the status of Apache server
Your first step to check the apache server is installed on your machine or not. Use the following command to check installed package apache2
apt list –installed apache2
In the above result, you can see apache2 installed.
Next check the status of apache web server in Kali Linux. Use the following command to do that:
Press the “q” to exit command.
You can see in the result apache service status is inactive. If the service is inactive then you can access its web pages.
Open a web browser and type localhost/127.0.0.1 then hit enter.
You will get an error “Unable to connect”.
It means the webserver is not running on your Kali Linux machine. Now your next step to start the apache server.
Start, Stop and Restart the Apache webserver in Kali Linux
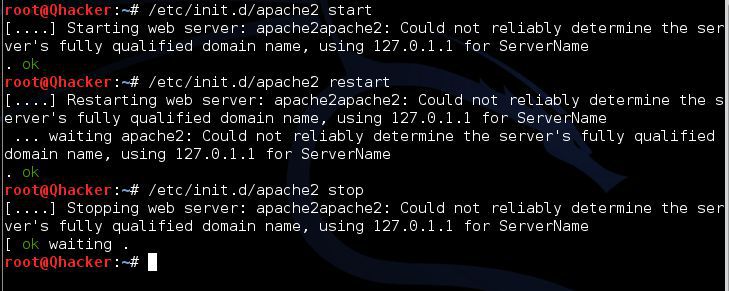
It is easy to start, stop and restart Web Server using the simple command in the terminal /etc/init.d/apache2 followed by requested action (stop, start or restart). Following commands are used
#/etc/init.d/apache2 start
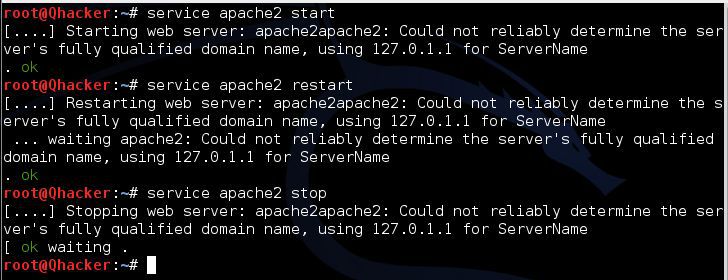
Another way to start, stop of restart Apache2 service by following commands
#service apache2 start
#service apache2 stop
#service apache2 restart
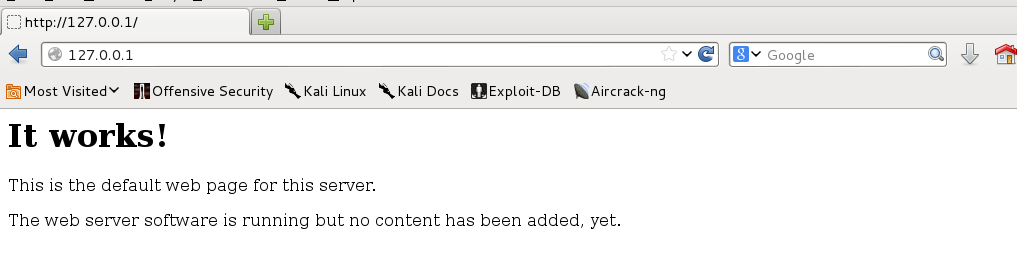
The Default Web Page
Once the Apache service is up and running the default (It works!) page may need to be changed, to do this make the web content that ought to be shown on the page and spare it as index.html in the /var/www/ index. Then again, the current index.html document in this area could be modified what’s more new pages might be included.
MODULE 3:- Basics of Kali Linux
Источник
Ethical hacking and penetration testing
InfoSec, IT, Kali Linux, BlackArch
Configuring and starting network services on Kali Linux (Apache, MySQL, SSH, PostgreSQL, NetworkManager and Bluetooth)
Table of contents
Services (sometimes called daemons) are programs that run in the background and perform various functions for the system.
In this section, we will look at such important services as
- Apache is a web server that allows you to run websites and web applications
- MySQL is a popular database management system used by many web applications
- SSH is a network protocol that has become the industry standard for remotely connecting to machines; allows you to execute commands and transfer files.
- PostgreSQL is a Free Object-Relational Database Management System
Network services in Kali Linux
A special feature of Kali Linux is that many popular network service packages are installed on the system, but they do not start automatically. To use them, you need to make a launch yourself or add them to autorun when your computer turns on.
This is for security reasons — you cannot connect to services on your system unless you take explicit steps to enable them. In general, this minimizes exposure during a penetration test, when it is harmful to advertise your presence and there is a risk of detection due to unexpected network interactions.
Obviously, SSH and Apache are disabled by default, which basically imply network activity. It may not seem obvious why the MySQL service, which is the database management system, is disabled by default? MySQL also allows remote connections, for this reason MySQL and some other services that are not networked by their main purpose are disabled.
But in fact, one exception is made, namely NetworkManager is launched when the computer is turned on. If you really want to remain invisible even when you are connected to computer networks, you need to turn off the automatic launch of NetworkManager.
Apache on Kali Linux
A typical Kali Linux installation includes the Apache web server provided by the apache2 package. As a network service, it is disabled by default. You can start it manually with
As more and more programs are distributed as web applications, it is important to have some knowledge of Apache in order to host these applications, whether for local use or for making them available over the network.
Apache is a modular server, and many of the functionality is implemented by external modules that are loaded by the main program during its initialization. The default configuration includes only the most common modules, but the inclusion of new modules is easily done using the a2enmod script, after which you need to specify the name of the desired module:
to disable modules. These programs actually create (or remove) symbolic links in /etc/apache2/mods-enabled/ pointing to the actual files (stored in /etc/apache2/mods-available/).
There are many modules, but two of them deserve primary attention: PHP and SSL. Web applications written in PHP are executed by the Apache web server using a dedicated module provided by the libapache2-mod-php package, and its installation automatically enables this module.
Apache 2.4 has the SSL module out of the box, which is required for secure HTTP (HTTPS). First you need to enable it with
then the necessary directives must be added to the config files. An example configuration is provided in the /etc/apache2/sites-available/default-ssl.conf file. See http://httpd.apache.org/docs/trunk/mod/mod_ssl.html for more information.
A complete list of standard Apache modules can be found on the Internet at http://httpd.apache.org/docs/trunk/mod/index.html.
With standard configuration, the web server listens on port 80 (as configured in /etc/apache2/ports.conf) and by default uses pages from the /var/www/html/ directory (as specified in /etc/apache2/sites-enabled/000-default.conf).
For more information about the structure of web server files, see the article “Basics of working with a web server for a pentester”.
Configuring virtual hosts
Apache can serve multiple websites (for example, hackware.ru and kali.tools) because the HTTP requests include the hostname for which the request was made. For Apache, each site is a virtual host. Each virtual host can have its own folder. Virtual hosts can be bound to hostname (eg study.loc), IP (eg 127.0.0.3) and port (*:81). If you are interested in this question, then see the article “Creating Apache Virtual Hosts on Windows”, which describes in detail what virtual hosts are and how to configure them on your web server.
The default configuration for Apache 2 includes name-based virtual hosts. In addition, the default virtual host is defined in the /etc/apache2/sites-enabled/000-default.conf file; this virtual host will be used if no host is found that matches the request sent by the client.
Important note: Requests for unknown virtual hosts will always be served by the first defined virtual host, so the package comes with a 000-default.conf config file, which is sorted before any other files you might create.
Each additional virtual host is then described by a file stored in /etc/apache2/sites-available/. The file is usually named the hostname of the site followed by a .conf suffix (for example: www.example.com.conf). Then you can enable the new virtual host with
Below is the minimal virtual host configuration for a website whose files are stored in /srv/www.example.com/www/ (defined using the DocumentRoot directive):
You might also consider adding CustomLog and ErrorLog directives to configure Apache, which will point to files for saving web server logs.
Frequently used directives
Let’s take a quick look at some of the commonly used Apache configuration settings.
The main configuration file usually contains several Directory blocks; they allow you to specify different types of behavior for the server depending on the location of the file being served. Such a block usually includes the Options and AllowOverride directives:
The DirectoryIndex directive contains a list of files to try to find when the client’s request matches a directory. The first existing file in the list is used and sent as a response.
The Options directive is followed by a list of options to be enabled: the “None” value disables all options; accordingly, “All” includes all of them except MultiViews. The following options are available:
- ExecCGI — Indicates that CGI scripts can be executed.
- FollowSymLinks — Tells the server that it is possible to follow symbolic links and that the response should contain what the link points to.
- SymLinksIfOwnerMatch — Also tells the server to follow symbolic links, but only when the link and its target have the same owner.
- Includes — includes Server Side Includes (SSI). These are directives embedded in HTML pages and executed on the fly for every request.
- Indexes — Tells the server to display the contents of a directory if the HTTP request sent by the client points to a directory without an index file (that is, when no files mentioned by the DirectoryIndex directive exist in that directory).
- MultiViews — enables content negotiation; this can be used by the server to return a web page that matches the preferred language specified by the browser.
Authentication requirement
In some cases, access to part of the website must be restricted, so only legitimate users who enter the correct username and password are allowed access to the content.
The .htaccess file contains Apache configuration directives that are applied every time a request is made for an item in the directory that stores this .htaccess file. These directives are recursive, i.e. act on all subdirectories.
Most of the directives that can be executed in the Directory block also apply in the .htaccess file. The AllowOverride directive lists all the options that can be enabled or disabled using .htaccess. A common use for this option is to restrict ExecCGI so that the administrator chooses which users can run programs under the web server ID (user www-data).
Sample .htaccess file requiring authentication
Basic authentication does not provide security : The authentication system used in the above example (Basic) has minimal security as the password is sent in clear text (it is encoded only as base64, which is a simple encoding, not an encryption method). It should also be noted that documents protected by this mechanism pass through the network in the clear. If security is important, the entire HTTP session should be encrypted using Transport Layer Security (TLS).
The /etc/apache2/authfiles/htpasswd-private file contains a list of users and passwords; it is usually processed with the htpasswd command. For example, to add a user or change a password, use the following command:
If the file has not been created yet, then it can be created with the command:
Access contol
The Require directive controls access restrictions for a directory (and, recursively, its subdirectories).
It can be used to restrict access based on many criteria; we will focus on the description of access restriction based on the client’s IP address, but it can be made much more powerful, especially if several Require directives are combined in a RequireAll block.
For example, you can restrict access to the local network (only users from the current local network have access):
For more examples, see the article “Site access control (blocking by IP, User-Agent)”.
MySQL on Kali Linux
Many web applications use MySQL databases to store information. Therefore, along with Apache, MySQL is usually used.
The MySQL package is already installed in Kali Linux, to run it run:
To enable MySQL autostart run:
To disable MySQL autostart run:
Solving the problem with error “#1698 — Access denied for user ‘root’@’localhost’” in Kali Linux
MySQL 5.7 changed the security model: now logging into MySQL as root requires sudo (the password can still be empty). With these settings, many web applications will not work.
To access the MySQL/MariaDB database as a regular user without using sudo privileges, go to the MySQL command line prompt
and execute the following SQL queries:
Please note that you need to enter the PASSWORD.
Then try logging into the database without sudo as shown below.
Another option is to create new MySQL users. Let’s look at the example of creating a user for phpMyAdmin:
1. Connect to mysql
2. Create a user for phpMyAdmin
Run the following commands (replace PASSWORD with your desired password):
If your phpMyAdmin connects to localhost then that should be enough.
MySQL password in Kali Linux
For a newly installed MySQL, the root password is empty. To change it, run and follow the instructions:
How to reset MySQL password in Kali Linux
If you suddenly forgot your MySQL password in Kali Linux, then you can reset the root password, open two terminals, in the first type:
In another terminal
In the MySQL/MariaDB prompt that opens:
Please note that the NEW PASSWORD line needs to be replaced with the password you want to set for root MySQL.
In the first terminal press CTRL+C or run the command in any terminal:
In any terminal:
That’s it, now your MySQL password is new.
Error “ERROR 2002 (HY000): Can’t connect to local MySQL server through socket ‘/var/run/mysqld/mysqld.sock’ (2 «No such file or directory»)” in Kali Linux
If when trying to use MySQL, for example:
you see an error
this means the MySQL service is not running. To run, run:
Error “ERROR 1045 (28000): Access denied for user ‘root’@’localhost’ (using password: NO)”
This error is caused by the fact that you are trying to connect to the DBMS without a password, for example, like this:
To connect with a password, use the -p option, after which you need to specify a password:
Error “ERROR 1045 (28000): Access denied for user ‘root’@’localhost’ (using password: YES)”
This error is caused by the fact that you entered an incorrect password.
SSH in Kali Linux
SSH allows you to remotely login, transfer files, or execute commands. This tool (ssh) and service (sshd) have become the industry standard for remotely connecting to machines.
Although the openssh-server package is installed by default, the SSH service is disabled by default and thus does not start at boot time. You can manually start the SSH service with:
or configure it to run at boot time with:
The SSH service has a relatively normal default configuration, but given its powerful capabilities and sensitive nature, it is good to know what you can do with its /etc/ssh/sshd_config configuration file. All parameters are documented in the manual, to open it type:
The default configuration disables password-based login for the root user, which means that you must first configure SSH keys using ssh-keygen. You can propagate this to all users by setting “PasswordAuthentication” to “no”, or you can remove this restriction by changing the “PermitRootLogin” to “yes” (instead of the default “prohibit-password”). The SSH service listens on port 22 by default, but you can change this with the “Port” directive.
To apply the new settings, you must run
Generating new SSH host keys
Each SSH server has its own cryptographic keys; they are called “SSH host keys” and are stored in /etc/ssh/ssh_host_*. They must be confidential; you cannot use the same keys on multiple machines.
When you install your system by copying a complete disk image (instead of using debian-installer), the image may contain pre-generated SSH host keys that you must replace with new keys. The image may also contain a default root password that you will want to reset while generating keys. You can do all this with the following commands:
Setting up Kali Linux login via SSH without password
If you regularly work with the system via SSH, then most likely you will want to configure a static IP address, for this refer to the instructions “How to configure Kali Linux to use a static IP address”.
On the local machine (with which we are logging in) type:
Without preliminary connection, we execute the command on the remote machine — IP (192.168.1.35), you have to change the username (mial) to your own:
Now we need to copy the contents of the id_rsa.pub file to the remote machine. It is very simple to do this (do not forget to change the data — username and IP to your own):
From now on, you no longer need to type the login password:
Configuring PostgreSQL Databases
PostgreSQL is a database server. It is rarely useful on its own, but it is used by many other storage services. These services typically access the database server over the network and typically require authentication credentials to connect. Thus, configuring these services requires the creation of PostgreSQL databases and user accounts with appropriate rights in the database. To do this, we need the service to be running, so let’s start with
Multiple versions of PostgreSQL are supported : The PostgreSQL package allows you to co-install multiple versions of the database server. It is also possible to process multiple clusters (a cluster is a collection of databases served by the same postmaster). For this, the configuration files are stored in the /etc/postgresql/version/cluster-name/ file.
In order for the clusters to work side-by-side, each new clan is assigned the next available port number (usually 5433 for the second cluster). The postgresql.service file is an empty shell, which makes it easier to work with all clusters, since each cluster has its own block (postgresql@version-cluster.service).
Connection type and client authentication
By default, PostgreSQL listens for incoming connections in two ways: on TCP port 5432 of the localhost interface and on the file socket /var/run/postgresql/.s.PGSQL.5432. This can be configured in postgresql.conf with various directives: listen_addresses for listening addresses, port for TCP port, and unix_socket_directories to specify the directory where file-based sockets are created.
Clients are authenticated differently depending on how they connect. The pg_hba.conf configuration file defines who is allowed to connect to each socket and how they are authenticated. By default, file socket connections use the Unix user account as the PosgreSQL username and assume no further authentication is required. On a TCP connection, PostgreSQL requires the user to authenticate with a username and password (although this is not a Unix username/password, but PostgreSQL itself).
The postgres user is special and has full administrative privileges over all databases. We will use this ID to create new users and new databases.
Creating users and databases
The createuser command adds a new user and dropuser removes it. Likewise, createdb adds a new database and dropdb drops it. Each of these commands have their own manual pages. Each command acts on the default cluster (runs on port 5432), but you can pass the —port= port to change the users and databases of the alternate cluster.
These commands must connect to the PostgreSQL server to do their job, and they must be authenticated as a user with sufficient authority to perform the specified operation. The easiest way to achieve this is to use the postgres Unix account and connect to a file socket:
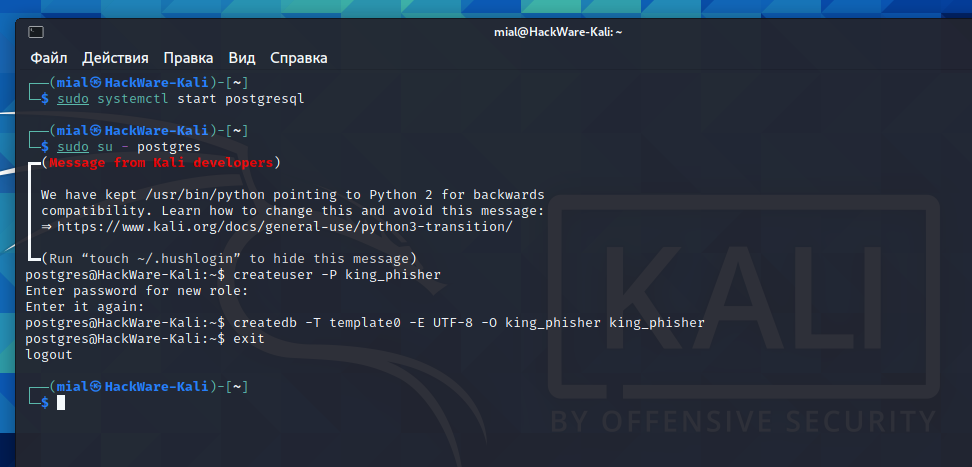
In the above example, the -P option asks createuser to prompt for a password after creating a new user king_phisher. Let’s look at the createdb command, -O defines the user who owns the new database (who thus has full rights to create tables, grant permissions, etc.). We also want to be able to use Unicode strings, so we add the -E UTF-8 option to set the encoding, which in turn requires us to use the -T option to select a different database template.
We can now verify that we can connect to the database over a socket listening on localhost (-h localhost) as user king_phisher (-U king_phisher):
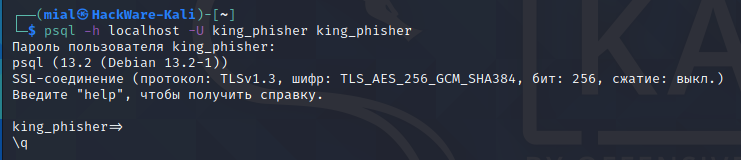
As you can see, the connection was successful.
PostgreSQL Cluster Management
First, it is worth noting that the concept of “PostgreSQL cluster” is a Debian-specific addition and that you will not find a reference to this term in the official PostgreSQL documentation. In terms of PostgreSQL tools, such a cluster is just an instance of a database server running on a specific port.
However, the Debian postgresql-common package provides several tools for managing these clusters: pg_createcluster, pg_dropcluster, pg_ctlcluster, pg_upgradecluster, pg_renamecluster, and pg_lsclusters. We will not describe all of these tools here, but you can refer to their respective manual pages for more information.
You should be aware that when a new major version of PostgreSQL is installed on your system, it will create a new cluster that will run on the next port (usually 5433), and you will continue to use the old version until you migrate your databases from the old cluster to the new one.
You can get a list of all clusters and their status using pg_lsclusters. More importantly, you can automate the migration of your cluster to the latest PostgreSQL version using pg_upgradecluster old-version cluster-name. To do this, you may need to first drop the cluster (empty) created for the new version (using pg_dropcluster new-version cluster-name). The old cluster is not dropped in the process, but it also does not start automatically. You can remove it as soon as you have verified that the updated cluster is working properly.
Default PostgreSQL username: postgres
Default PostgreSQL password: postgres
How to change PostgreSQL passord
At the psql prompt, enter the command:
NetworkManager
As already mentioned, one service related to the operation of the network does start automatically. This service is NetworkManager.
You can check its status and make sure it works even though you didn’t enable it:
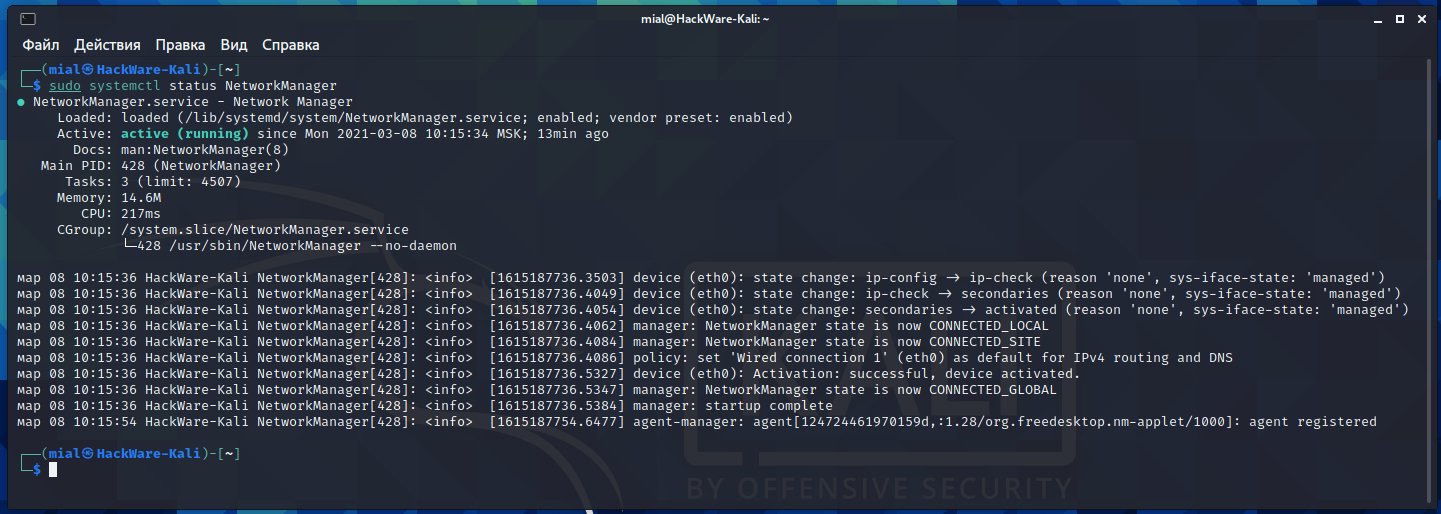
NetworkManager is a system network service that manages your network devices and connections, attempting to keep active network connectivity when available. It manages ethernet, WiFi, mobile broadband (WWAN), and PPPoE devices, and provides VPN integration with a variety of different VPN services.
If you turn off NetworkManager or remove this service from startup, your computer will be left without an Internet connection. In fact, you can still connect to the network using command line utilities. By the way, this is how NetworkManager works — it sets network interfaces in the “up” state (that is, turns them on) and uses utilities to make connections. That is, NetworkManager automates the process of connecting to networks by applying settings that you enter into a graphical user interface.
If you want your computer to remain invisible on the network, does not try to connect, does not use Wi-Fi and does not even search for networks, then stop the NetworkManager service:
To remove NetworkManager from startup run:
To start NetworkManager again:
To re-add NetworkManager to autostart:
Bluetooth
The service for working with Bluetooth devices is disabled by default. To enable it, run the command:
Источник


