- 3 простых шага по исправлению ошибок API32.DLL
- 1- Очистите мусорные файлы, чтобы исправить api32.dll, которое перестало работать из-за ошибки.
- 2- Очистите реестр, чтобы исправить api32.dll, которое перестало работать из-за ошибки.
- 3- Настройка Windows для исправления критических ошибок api32.dll:
- Как вы поступите с файлом api32.dll?
- Некоторые сообщения об ошибках, которые вы можете получить в связи с api32.dll файлом
- API32.DLL
- процессов:
- DLL DOWNLOADER
- Download J_api32.dll for Windows 10, 8.1, 8, 7, Vista and XP
- What is J_api32.dll? What Does It Do? link
- Table of Contents
- Operating Systems That Can Use the J_api32.dll Library link
- Other Versions of the J_api32.dll Library link
- How to Download J_api32.dll Library? link
- How to Install J_api32.dll? How to Fix J_api32.dll Errors? link
- Method 1: Installing the J_api32.dll Library to the Windows System Directory link
- Method 2: Copying the J_api32.dll Library to the Program Installation Directory link
- Method 3: Uninstalling and Reinstalling the Program that Gives You the J_api32.dll Error link
- Method 4: Fixing the J_api32.dll Error Using the Windows System File Checker link
- Method 5: Fixing the J_api32.dll Error by Updating Windows link
- Guides to Manually Update the Windows Operating System link
- The Most Seen J_api32.dll Errors link
- How To Use BMW INPA EDIABAS 5.0.2
3 простых шага по исправлению ошибок API32.DLL
Файл api32.dll из unknown company является частью unknown product. api32.dll, расположенный в c:windows\ api32 .dll с размером файла 2402 байт, версия файла Unknown version, подпись 9330114548e35e9636f680dfeb211ddb.
В вашей системе запущено много процессов, которые потребляют ресурсы процессора и памяти. Некоторые из этих процессов, кажется, являются вредоносными файлами, атакующими ваш компьютер.
Чтобы исправить критические ошибки api32.dll,скачайте программу Asmwsoft PC Optimizer и установите ее на своем компьютере
1- Очистите мусорные файлы, чтобы исправить api32.dll, которое перестало работать из-за ошибки.
- Запустите приложение Asmwsoft Pc Optimizer.
- Потом из главного окна выберите пункт «Clean Junk Files».
- Когда появится новое окно, нажмите на кнопку «start» и дождитесь окончания поиска.
- потом нажмите на кнопку «Select All».
- нажмите на кнопку «start cleaning».
2- Очистите реестр, чтобы исправить api32.dll, которое перестало работать из-за ошибки.

3- Настройка Windows для исправления критических ошибок api32.dll:

- Нажмите правой кнопкой мыши на «Мой компьютер» на рабочем столе и выберите пункт «Свойства».
- В меню слева выберите » Advanced system settings».
- В разделе «Быстродействие» нажмите на кнопку «Параметры».
- Нажмите на вкладку «data Execution prevention».
- Выберите опцию » Turn on DEP for all programs and services . » .
- Нажмите на кнопку «add» и выберите файл api32.dll, а затем нажмите на кнопку «open».
- Нажмите на кнопку «ok» и перезагрузите свой компьютер.
Всего голосов ( 23 ), 13 говорят, что не будут удалять, а 10 говорят, что удалят его с компьютера.
Как вы поступите с файлом api32.dll?
Некоторые сообщения об ошибках, которые вы можете получить в связи с api32.dll файлом
(api32.dll) столкнулся с проблемой и должен быть закрыт. Просим прощения за неудобство.
(api32.dll) перестал работать.
api32.dll. Эта программа не отвечает.
(api32.dll) — Ошибка приложения: the instruction at 0xXXXXXX referenced memory error, the memory could not be read. Нажмитие OK, чтобы завершить программу.
(api32.dll) не является ошибкой действительного windows-приложения.
(api32.dll) отсутствует или не обнаружен.
API32.DLL

Проверьте процессы, запущенные на вашем ПК, используя базу данных онлайн-безопасности. Можно использовать любой тип сканирования для проверки вашего ПК на вирусы, трояны, шпионские и другие вредоносные программы.
процессов:
Cookies help us deliver our services. By using our services, you agree to our use of cookies.
DLL DOWNLOADER
Download DLL and other System-Files for Windows

Download J_api32.dll for Windows 10, 8.1, 8, 7, Vista and XP
What is J_api32.dll? What Does It Do? link
The J_api32.dll library was developed by Micromedia.
The size of this dynamic link library is 0.04 MB and its download links are healthy. It has been downloaded 738 times already.
Table of Contents
Operating Systems That Can Use the J_api32.dll Library link
Other Versions of the J_api32.dll Library link
The newest version of the J_api32.dll library is the 1.0.0.0 version. This dynamic link library only has one version. No other version has been released.
How to Download J_api32.dll Library? link
- First, click on the green-colored «Download» button in the top left section of this page (The button that is marked in the picture).
 Step 1:Start downloading the J_api32.dll library
 - After clicking the «Download» button at the top of the page, the «Downloading» page will open up and the download process will begin. Definitely do not close this page until the download begins. Our site will connect you to the closest DLL Downloader.com download server in order to offer you the fastest downloading performance. Connecting you to the server can take a few seconds.
 Step 1:Start downloading the J_api32.dll library
How to Install J_api32.dll? How to Fix J_api32.dll Errors? link
ATTENTION! Before beginning the installation of the J_api32.dll library, you must download the library. If you don’t know how to download the library or if you are having a problem while downloading, you can look at our download guide a few lines above.
Method 1: Installing the J_api32.dll Library to the Windows System Directory link
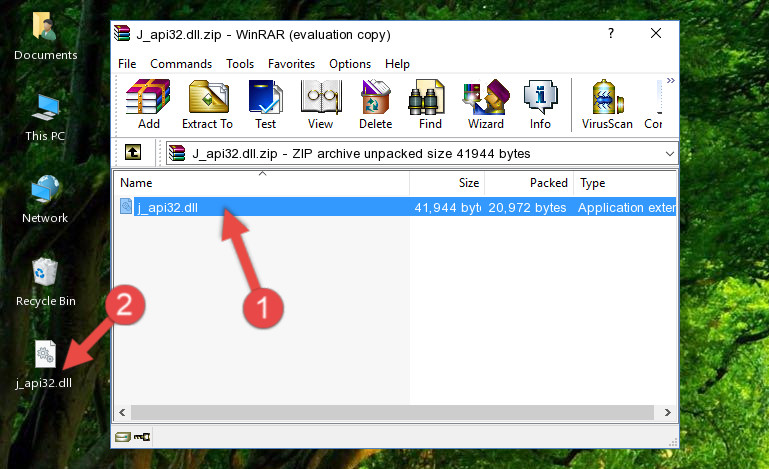
- The file you will download is a compressed file with the «.zip» extension. You cannot directly install the «.zip» file. Because of this, first, double-click this file and open the file. You will see the library named «J_api32.dll» in the window that opens. Drag this library to the desktop with the left mouse button. This is the library you need. Step 1:Extracting the J_api32.dll library from the .zip file
- Copy the «J_api32.dll» library you extracted and paste it into the «C:\Windows\System32» directory. Step 2:Copying the J_api32.dll library into the Windows/System32 directory
- If your system is 64 Bit, copy the «J_api32.dll» library and paste it into «C:\Windows\sysWOW64» directory.
 Step 1:Extracting the J_api32.dll library from the .zip file
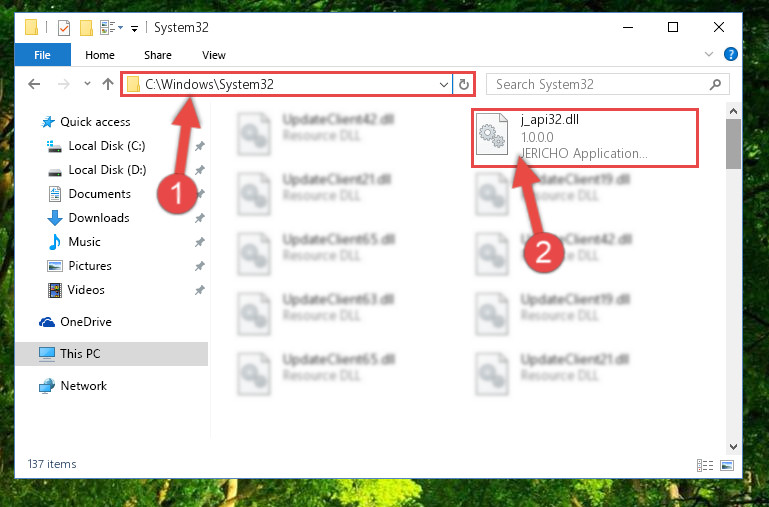 Step 2:Copying the J_api32.dll library into the Windows/System32 directory
NOTE! On 64 Bit systems, you must copy the dynamic link library to both the «sysWOW64» and «System32» directories. In other words, both directories need the «J_api32.dll» library.
NOTE! We ran the Command Prompt on Windows 10. If you are using Windows 8.1, Windows 8, Windows 7, Windows Vista or Windows XP, you can use the same methods to run the Command Prompt as an administrator.
- Open the Start Menu and type in «cmd«, but don’t press Enter. Doing this, you will have run a search of your computer through the Start Menu. In other words, typing in «cmd» we did a search for the Command Prompt.
- When you see the «Command Prompt» option among the search results, push the «CTRL» + «SHIFT» + «ENTER » keys on your keyboard.
- A verification window will pop up asking, «Do you want to run the Command Prompt as with administrative permission?» Approve this action by saying, «Yes«.
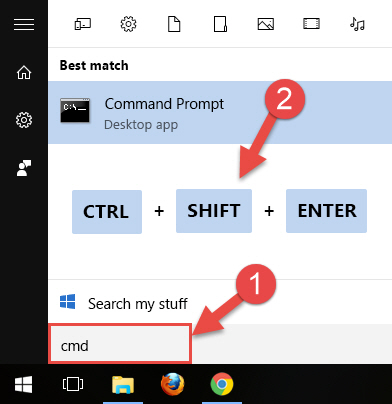 Step 4:Running the Command Prompt with administrative permission
%windir%\System32\regsvr32.exe /u J_api32.dll
%windir%\System32\regsvr32.exe /i J_api32.dll
%windir%\SysWoW64\regsvr32.exe /i J_api32.dll
Method 2: Copying the J_api32.dll Library to the Program Installation Directory link
- First, you must find the installation directory of the program (the program giving the dll error) you are going to install the dynamic link library to. In order to find this directory, «Right-Click > Properties» on the program’s shortcut. Step 1:Opening the program’s shortcut properties window
- Open the program installation directory by clicking the Open File Location button in the «Properties» window that comes up. Step 2:Finding the program’s installation directory
- Copy the J_api32.dll library into this directory that opens. Step 3:Copying the J_api32.dll library into the program’s installation directory
- This is all there is to the process. Now, try to run the program again. If the problem still is not solved, you can try the 3rd Method.
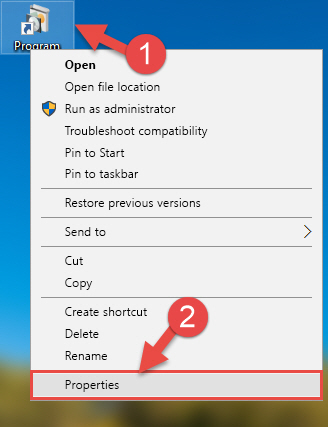 Step 1:Opening the program’s shortcut properties window
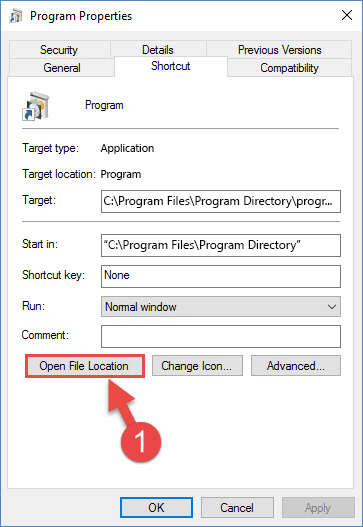 Step 2:Finding the program’s installation directory
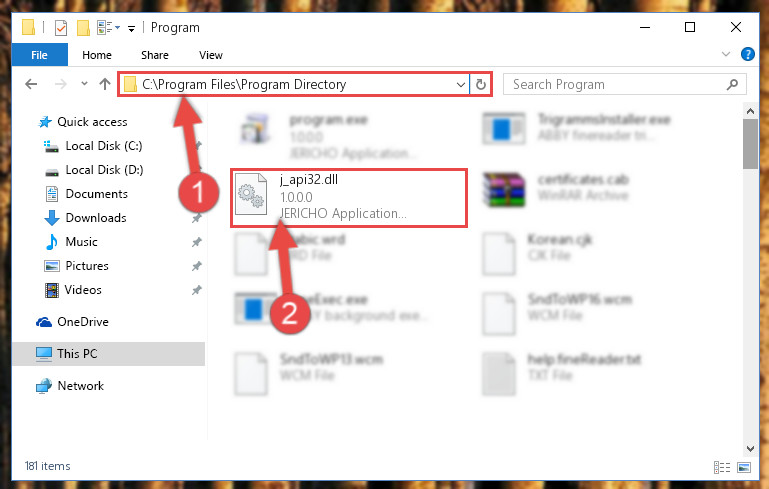 Step 3:Copying the J_api32.dll library into the program’s installation directory
Method 3: Uninstalling and Reinstalling the Program that Gives You the J_api32.dll Error link
- Open the Run tool by pushing the «Windows» + «R» keys found on your keyboard. Type the command below into the «Open» field of the Run window that opens up and press Enter. This command will open the «Programs and Features» tool.
Method 4: Fixing the J_api32.dll Error Using the Windows System File Checker link
- First, we must run the Windows Command Promptas an administrator.
NOTE! We ran the Command Prompt on Windows 10. If you are using Windows 8.1, Windows 8, Windows 7, Windows Vista or Windows XP, you can use the same methods to run the Command Prompt as an administrator.
- Open the Start Menu and type in «cmd«, but don’t press Enter. Doing this, you will have run a search of your computer through the Start Menu. In other words, typing in «cmd» we did a search for the Command Prompt.
- When you see the «Command Prompt» option among the search results, push the «CTRL» + «SHIFT» + «ENTER » keys on your keyboard.
- A verification window will pop up asking, «Do you want to run the Command Prompt as with administrative permission?» Approve this action by saying, «Yes«.
Step 1:Running the Command Prompt with administrative permission
Method 5: Fixing the J_api32.dll Error by Updating Windows link
Some programs require updated dynamic link libraries from the operating system. If your operating system is not updated, this requirement is not met and you will receive dll errors. Because of this, updating your operating system may solve the dll errors you are experiencing.
Most of the time, operating systems are automatically updated. However, in some situations, the automatic updates may not work. For situations like this, you may need to check for updates manually.
For every Windows version, the process of manually checking for updates is different. Because of this, we prepared a special guide for each Windows version. You can get our guides to manually check for updates based on the Windows version you use through the links below.
Guides to Manually Update the Windows Operating System link
The Most Seen J_api32.dll Errors link
When the J_api32.dll library is damaged or missing, the programs that use this dynamic link library will give an error. Not only external programs, but also basic Windows programs and tools use dynamic link libraries. Because of this, when you try to use basic Windows programs and tools (For example, when you open Internet Explorer or Windows Media Player), you may come across errors. We have listed the most common J_api32.dll errors below.
You will get rid of the errors listed below when you download the J_api32.dll library from DLL Downloader.com and follow the steps we explained above.
- «J_api32.dll not found.» error
- «The file J_api32.dll is missing.» error
- «J_api32.dll access violation.» error
- «Cannot register J_api32.dll.» error
- «Cannot find J_api32.dll.» error
- «This application failed to start because J_api32.dll was not found. Re-installing the application may fix this problem.» error
How To Use BMW INPA EDIABAS 5.0.2
BMW INPA how to use- with frequently asked questions:
INPA EDIABAS download:
Inpa diver.zip (unknown security)
Inpa 5.0.1.zip (unknown security)
Inpa 5.0.2.zip (tested & worked on Windows XP)
INPA cable: K+DCAN cable switch mode:
Old K+Dcan cable vs K+DCAN cable switch mode:
Credits to BMW Group!
I take no credit for composing the package, just sharing it
Table of Contents
1.3 IFH-0002: Interface isn’t connected or doesn’t respond………………………………………… 4
1.4 IFH-0003: Data transmission HOST/Interface failed…………………………………………….. 4
1.5 IFH-0010: Data transmission to control unit disturbed ………………………………………….. 5
1.6 IFH-0013: Command not implemented………………………………………………………………. 5
1.7 Error: EBAS32.EXE not found or illegal version! …………………………………………………. 5
1.8 EDIABA error: Error (95) SYS-0005: OBJECT FILE NOT FOUND ………………………. 6
1.9 Createfile_error: OPEN CONNECTION; IFH 0018- INITIALIZATION ERROR…………. 6
1.10 Battery and Ignition not recognised …………………………………………………………………… 6
1.11 Warning when starting OBD Setup……………………………………………………………………. 7
1.12 ERROR C1015: Too Many String Variables in Job………………………………………………. 8
1.13 Failure: EDIABAS Fehler 159, NET-0009: TIMEOUT…………………………………………… 8
1.14 Failure: The name of the file or folder can’t be changed……………………………………….. 9
2.1 APLDLL or API32.DLL can’t be found. …………………………………………………………….. 10
2.2 Error Message 0020: Incorrect or Missing Driver. The programme will be aborted!…. 12
2.3 SYS-00002: ECU variation description file not found………………………………………….. 12
2.4 INPA Error: Error at Compiling à Abort! ………………………………………………………….. 13
2.5 IFH-0018: Inizialisation Error – INPA doesn’t work but Toolset yet ……………………….. 14
2.6 IFH-0027: IFH not found à The Programm was aborted! …………………………………… 14
2.7 INPA Error: Opening Inpa – Transmission error returned a_0x2 ………………………….. 15
2.8 INPA Error: Only a white screen appears when you run INPALOAD.EXE. …………….. 15
2.9 INPA Error: DTM is no longer supported ………………………………………………………….. 16
2.10 INPA Error: Bridge16.exe can’t be initialised …………………………………………………….. 16
2.11 Error when opening the error file à abort:………………………………………………………… 17
2.12 Compiler: File: \INPA\DEUTSCH\***.OUT not found! …………………………………………. 17
3.1 EDIABAS error 100: SYS-0010: INITIALIZATION ERROR …………………………………. 18
3.2 EDIABAS Error 126 (only up to Ediabas V6.4.x)………………………………………………… 18
3.3 IFH-0006: Command not accepted and IFH-0018: Initialization Error and IFH-0038:
Interface Command not implemented………………………………………………………………. 18
3.4 IFH-0006: Command not accepted………………………………………………………………….. 19
3.5 IFH-0009: ECU isn’t connected or doesn’t respond……………………………………………. 20
3.6 SYS-0002: ECU OBJECT FILE NOT FOUND…………………………………………………… 20
3.7 SYS-0005: Controller description file not found. The programme will be aborted! …… 20
3.8 ToolSet Error: Runtime error ’372’…………………………………………………………………… 21
3.9 Tool Set Error: Run-time error ’5’ – Invalid Procedure Call ………………………………….. 21
3.10 Tool Set Problem: If an SGBD is opened, then only the hourglass appears and the
3.11 EDIABAS error 20: IFH-0010: Data transmission to control unit disturbed …………….. 21
3.12 EDIABAS Error 134: API-0014: Result not found ………………………………………………. 22
3.13 It takes too long to load an SGBD in the Tool Set ……………………………………………… 22
3.14 Black Windows in the Tool Set ……………………………………………………………………….. 22
4.1 Installation of EDIABAS and INPA…………………………………………………………………… 23
4.2 xBD-Export of SGBDs, Group SGBDs, INPA scripts and INPA configuration files using
4.3 How can I find out if the serial interface COM1 has been taken?………………………….. 25
4.5 How can I switch between OBD and ADS interfaces? ………………………………………… 26
4.6 In which directory structure is OBD.ini saved?…………………………………………………… 27
4.7 How can I find out what interface I installed with INPA? ……………………………………… 27
4.8 How do I find out what EDIABAS package is installed?………………………………………. 27
4.9 How can I uninstall EDIABAS or INPA?……………………………………………………………. 27
4.10 How can tell if the EDIABAS server is running as a 16-bit or a 32-bit application? ….. 27
4.11 What is the difference between \EDIABAS\bin\ToolSet.exe and
4.12 What is an SGBD and what is its connection to EDIABAS? ………………………………… 28
4.13 Where are the individual SGBD names and their meanings given in plain English?… 28
4.15 What do SGBDs with the name _xxx mean?…………………………………………………….. 29
4.16 What is the group file used for?………………………………………………………………………. 29
4.19 What is the meaning of the file EDIABAS.ini? …………………………………………………… 29
4.20 How is the simulation file connected to the trace file?…………………………………………. 31
4.21 Why have an XBD Generator? ……………………………………………………………………….. 31
4.22 What are the prerequisites for remote access via TCP/IP? …………………………………. 31
4.23 What is the VC Tool and when is it used? ………………………………………………………… 32
1. EDIABAS Error Messages
1.1 Driver Error
Message comes along with an ADS or OBD connector.
This error occurs if another program or device has taken the COM1 port of your PC.
If you want to work with EDIABAS or INPA, please make sure that the COM1 port is not
1.2 DirectNt.sys can’t be opened
This error only occurs with an NT computer if the ADS driver hasn’t been installed.
The instructions for installing the ADS driver can be found in the “Installation Guide/Update
Guide” ADS_DOKU.pdf in the directory C:\EDIABAS\Hardware\ADS\ or on the Intranet page
1.3 IFH-0002: Interface isn’t connected or doesn’t respond
Reason: In the Ediabas.ini file, the interface is set to STD:FUNK. However, you have
connected an ADS or OBD connector.
Solution: Modify the interface setting in Ediabas.ini.
1.4 IFH-0003: Data transmission HOST/Interface failed
Reason 1: In the Ediabas.ini file, the interface is set to STD:OBD. However, you have
connected an ADS connector.
Solution 1: Modify the interface setting.
Reason 2: The data transmission failed when sending (e.g. short circuit in the line).
Solution 2: Get rid of the short circuit, for example.
Reason 3: Connector not connected or no power supplied.
Solution 3: Check whether the connector is connected and is supplied with power.
Reason 4: The device manager has been used to disable the FIFO buffer for COM1.
Solution 4: In the device manager (Windows XP: Enter “Start” à “Control Panel” à
“System” à “Hardware” à “Device Manager” à Ports (COM & LPT)), and then
select COM1 from the ports. Then under the “Port Settings” tab, select
“Advanced”. There must be a check-mark by “Use FIFO buffers” and “8” must be
selected for the receive buffer and transmit puffer.
Frequently Asked Questions
BMW Group about
EDIABAS, INPA and the Tool Set Page 5 of 32
TI-430 Andreas Schandl Release date: 29.09.2006
1.5 IFH-0010: Data transmission to control unit disturbed
This problem can occur with XP computers with the OBD interface.
Reason: With Windows XP, it is not possible to automatically set the receive and transmit
buffers using OBDSetup.exe, like in Windows NT.
Solution: Set the receive and transmit buffers to 8 as shown in the following:
Use Start à My Computer à Control Panelà System à Hardware à Device
Manager à Ports (COM & LPT) and then click with the right mouse button to call
up the properties of the COM port that is being used. Under the Port Settings tab,
set the Data bits of the receive and transmit buffers to 8.
1.6 IFH-0013: Command not implemented
Reason: The error was caused by another programme that accessed the COM1 interface.
Usually, the “HotSync” programme is installed on the computer for the organiser.
Solution: Check the programmes that are started automatically when Windows is started.
1.7 Error: EBAS32.EXE not found or illegal version!
This error occurs if the path variable is set with the path C:\EDIABAS\BIN in the system and
user variables (Start à My Computer à Control Panel à System à Advanced and then in
the “Environment“ tab).
Frequently Asked Questions
BMW Group about
EDIABAS, INPA and the Tool Set Page 6 of 32
TI-430 Andreas Schandl Release date: 29.09.2006
1.8 EDIABAS error: Error (95) SYS-0005: OBJECT FILE NOT FOUND
Reason 1: No SGBD in C:\EDIABAS\ECU
Solution 1: Copy the SGBD into the Ecu directory.
Reason 2: No group file in C:\EDIABAS\ECU (for group call)
Solution 2: Copy the group file to C:\EDIABAS\ECU
Reason 3: No path definition C:\EDIABAS\BIN
Solution 3: Set the system variable (see 2.1)
Reason 4: Incorrect path definition in EDIABAS.INI
Solution 4: Set the EcuPath path in Ediabas.ini to C:\EDIABAS\ECU
Reason 5: The SGBD name contains reserved characters or is too long. Only 8 characters
are allowed (a-z, A-Z, 0-9, “_”).
1.9 Createfile_error: OPEN CONNECTION; IFH 0018- INITIALIZATION
ERROR
The following error appears when Ediabas is started: Createfile_error: OPEN
CONNECTION
The following error appears when Ediabas is started: Error 28: IFH 0018- INITIALIZATION
ERROR. (Also see Section 3.3)
Reason: Ediabas is attempting to access port COM1. However, the port doesn’t exist, or it
has been taken by another programme (e.g. HotSync from Palm, infrared).
Solution: Install a COM1 interface or free it.
1.10 Battery and Ignition not recognised
Reason: With a Dell Latitude D600 laptop, pin 9 has no function and it is therefore not
able to correctly recognise the battery status.
Solution 1: Use OBD via USB, see C:\EDIABAS\BIN\INI.PDF Chapter 2.2 for this.
Solution 2: The laptop is connected to the docking station.
Solution 3: Workaround for the OBD driver as of February 2004: A file “OBD.ini” must be
created in the directory C:\WINDOWS for Windows XP, or alternatively
C:\WINNT for Windows NT, with the following entry. This is because with
UBATT=OFF, the battery status is not determined via hardware, but is
permanently set to “Battery voltage available”. Also see OBD_DOKU.pdf in the
Entry in OBD.ini:
Frequently Asked Questions
BMW Group about
EDIABAS, INPA and the Tool Set Page 7 of 32
TI-430 Andreas Schandl Release date: 29.09.2006
1.11 Warning when starting OBD Setup
A warning occurs when starting C:\EDIABAS\HARDWARE\OBD\OBDSetup.exe. After You
want to start Tool Set or INPA You will get the following error message:
Reason: The value of the variable DWORD (here RxFIFO) can not be set by
Solution: You have to set the value of the DWORT in the registry. You have to open the
Regedit by using Start à Ausführen… à enter regedit à OK. Choose the
following path in the regedit: HKEY_LOCAL_MACHINE à System à
CurrentControlSet à click on Services. On the right side of the window You can
cklick on the name of the DWORd value which is defective (here RxFIFO). Enter
the value 8 with the base hexadecimal. Click Ok an close the regedit. Now You
can start the Tool Set or INPA without an error.
If You have warnings for other DWORDs when startig OBDSetup.exe, You will
have to set the value of the coloum „Expected“ for the wrong value in the registry.
Frequently Asked Questions
BMW Group about
EDIABAS, INPA and the Tool Set Page 8 of 32
TI-430 Andreas Schandl Release date: 29.09.2006
1.12 ERROR C1015: Too Many String Variables in Job
Reason: In a job only a maximum of 6 string-variables is acceptable.
Solution: You have to reduce the number of variables.
1.13 Failure: EDIABAS Fehler 159, NET-0009: TIMEOUT
Frequently Asked Questions
BMW Group about
EDIABAS, INPA and the Tool Set Page 9 of 32
TI-430 Andreas Schandl Release date: 29.09.2006
Reason 1: The configuration for the remotehost is false.
Solution 1: Set the corresponding networkname for the remotehost in the configuration file
Reason 2: The inface-cable on the OPPS is not correct.
Solution 2: You need a special OPPS-Cable for the connection with the CAN-BUS. (since
Reason 3: In the remotecontrol the OPPS-interface is used by default (since EDIABAS 7.0).
The remotecontrol between two PC’s is not possible with this configuration.
Solution 3: Close all diagnosticapplications and EDIABAS-Processes that are running and
open the file “remote_mit_pc.bat” in the directory C:\EDIABAS\bin.
1.14 Failure: The name of the file or folder can t be changed
Reason: EDIABAS or another component of EDIABAS is still open.
Solution: You have to shut down the diagnosticapplication and EDIABAS. If necessary, the
fileexplorer and the editors which access the EDIABAS-Directory have to close
Frequently Asked Questions
BMW Group about
EDIABAS, INPA and the Tool Set Page 10 of 32
TI-430 Andreas Schandl Release date: 29.09.2006
2 Error Message INPAs
2.1 APLDLL or API32.DLL can’t be found.
When calling INPA under Windows NT, the following error messages appear:
Reason 1: The path C:\EDIABAS\BIN has not been set in the ‘Path’ system variable.
Solution with Windows NT:
Set the system variable: Please log into your system as the administrator with administrator
rights. Use Start à My Computer à Control Panel to call the “System” menu. In the
“Environment” tab, double click the system variable ‘Path’.
Frequently Asked Questions
BMW Group about
EDIABAS, INPA and the Tool Set Page 11 of 32
TI-430 Andreas Schandl Release date: 29.09.2006
Go to the end of the field value. There, enter a semicolon and then enter the path
C:\EDIABAS\BIN. Click “Set” and “OK”.
Solution with Windows XP:
Set the system variable: Please log into your system as the administrator with administrator
rights. Use Start à Control Panel to call the “System” menu. Under “Advanced” and the
“Environment” tab, double click the system variable ‘Path’.
Go to the end of the variables field value. There, enter a semicolon and then enter the path
Completely restart your computer. (Don’t login under a new name or the like.) It should no
longer be a problem to call INPA.
Reason 2: Ediabas is not installed, only INPA is.
Solution 2: Install Ediabas.
When calling INPA under Windows 95, 98, the following error message appears:
Frequently Asked Questions
BMW Group about
EDIABAS, INPA and the Tool Set Page 12 of 32
TI-430 Andreas Schandl Release date: 29.09.2006
Reason: The path C:\EDIABAS\BIN has not been set in the ‘Path’ system variable.
Solution: Set the system variable:
Open the file Autoexec.bat in the directory C:\ by clicking it with the right mouse key with the
shift key pressed, and then select “Open with”. The best thing is to use the Notepad to
display the file.
Now, at “path”, enter the path c:\ediabas\bin.
Save the change and close the file.
Completely restart your computer. (Don’t login under a new name or the like.)
2.2 Error Message 0020: Incorrect or Missing Driver. The programme will
be aborted!
You have access to \\smuc0900\sg. You are linked to this drive and would like to start an
Reason 1: Missing Ediabas.ini file in C:\Winnt.
Reason 2: You are not connected to the controller.
For developers: Simulation is not switched on in the Ediabas.ini file.
Solution: Copy the Ediabas.ini file from C:\Ediabas\Bin to C:\Winnt.
2.3 SYS-00002: ECU variation description file not found.
The error occurs when starting an INPA script.
Frequently Asked Questions
BMW Group about
EDIABAS, INPA and the Tool Set Page 13 of 32
TI-430 Andreas Schandl Release date: 29.09.2006
Reason 1: The *.prg SGBD is not located in the path C:\Ediabas\Ecu.
Solution 1: Copy the *.prg SGBD into the ECU directory.
Reason 2: The external table T_GRTB.prg doesn’t exist in the directory C:\EDIABAS\ECU
or it is obsolete.
Solution 2: Copy the file into the ECU directory or update the external table using the ECCO
2.4 INPA Error: Error at Compiling à Abort!
The following error message appears when starting an INPA script.
Reason 1: An INPA script with the ending IPO was started by the programme INPA.EXE
instead of by the programme INPALOAD.EXE.
Solution 1: Only start INPA scripts that end with IPO with INPALOAD.EXE.
Reason 2: The selected INPA script doesn’t exist in the C:\INPA\SGDAT\ directory.
Solution 2: Update the INPA scripts using the ECCO Web Client.
Reason 3: INPA Version 5.0.1: The INPA script *.IPO can’t be started with a double-click in
the directory C:\INPA\SGDAT\*.IPO.
Solution 3: Update to Version 5.0.2.
Reason 4: INPA Version 5.0.1: The desktop link of an INPA script doesn’t work.
Solution 4: The target path must be expanded to include the INPALOAD path. To do this,
click the desktop link once with the right mouse button and go to ‘Properties’.
Expand the target path to include C:\INPA\BIN\INPALOAD.exe for Windows NT
(see Fig.) and C:\EC-Apps\INPA\BIN\INPALOAD.exe for Windows XP.
Frequently Asked Questions
BMW Group about
EDIABAS, INPA and the Tool Set Page 14 of 32
TI-430 Andreas Schandl Release date: 29.09.2006
Grund 5: The file startger.ipo of the german installation and the file startus.ipo of the
english installation don’t exist in the directory \INPA\CFGDAT\.
Lösung 5: Install INPA once again.
2.5 IFH-0018: Inizialisation Error – INPA doesn’t work but Toolset yet
The error occurs if a SGBD is running by INPA or CASCADE. If the same SGBD is loaded in
the Toolset it will not occure an inizialisation error.
Reason 1: The communications port COM1 doesn’ exist, but COM3 yet. The Toolset is
working without the inizialisation error, because the file OBD.ini exists in the
directory C:\Ediabas\bin\. But the file OBD.ini has to exist in the direcory
Solution 1: Copy the file OBD.ini in the directory C:\Windows or create a new one. (Creation
of OBD.ini q.v. 3.3).
2.6 IFH-0027: IFH not found à The Programm was aborted!
The error occurs when starting INPA.
Frequently Asked Questions
BMW Group about
EDIABAS, INPA and the Tool Set Page 15 of 32
TI-430 Andreas Schandl Release date: 29.09.2006
Reason 1: The setting for the interface in the configuration file Ediabas.ini doesn’t exist.
Solution 1: Please do the settings for the interface e.g.:
Reason 2: The setting for the interface in the configuration file Ediabas.ini is
Interface=STD:OMITEC, but the OMITEC driver isn’t installed correctly.
Solution 2: Install the OMITEC driver with the instructions
InstructionforOMITECInstallation.pdf via the GIS server.
Reason 3: The setting for the interface in the configuration file Ediabas.ini is
Interface=OMITEC, but the correct setting is Interface=STD:OMITEC.
Solution 3: Please do the settings for the interface Interface=STD:OMITEC.
Reason 4: The old OMITEC driver wasn’t uninstalled correctly.
Solution 4: Please uninstall the old OMITEC driver with the instructions
InstructionforOMITECInstallation.pdf via the GIS server.
2.7 INPA Error: Opening Inpa – Transmission error returned a_0x2
Reason: During the installation of Ediabas/Inpa, the configuration “Without configuration”
Solution: When running the installation programme, select a configuration, e.g. “BMW
Plant 1.1 Munich”.
2.8 INPA Error: Only a white screen appears when you run INPALOAD.EXE.
Frequently Asked Questions
BMW Group about
EDIABAS, INPA and the Tool Set Page 16 of 32
TI-430 Andreas Schandl Release date: 29.09.2006
Reason 1: The api.dll or api32.dll file has been manually copied into the WINDOWS
directory with Windows XP and into the WINNT directory with Windows NT.
Solution 1: Delete the file api.dll or alternatively api32.dll from the WINDOWS or alternatively
the WINNT directory. The file may only exist in the directory \EDIBAS\BIN\.
Reason 2: You have installed the 32-bit version of INPA (as of Version 5.0.1) and have not
performed an update of the INPA scripts.
Solution 2: Update the INPA scripts using the ECCO Web Client.
2.9 INPA Error: DTM is no longer supported
Reason: This error message appears if INPA.INI has been copied from Version 4.7.7 to
Solution: Since it can’t be excluded that even more files from the old version have been
mixed with the new ones, the old ones must be deleted, or alternatively
reinstalled (see Chapter 5). Reinstall INPA using the Global Information Service
2.10 INPA Error: Bridge16.exe can’t be initialised
Frequently Asked Questions
BMW Group about
EDIABAS, INPA and the Tool Set Page 17 of 32
TI-430 Andreas Schandl Release date: 29.09.2006
Reason 1: A 16-bit INPA script has been started with the 32-bit version of INPA (as
Solution 1a): Update the INPA scripts using the ECCO Web Client.
Solution 1b): Convert the INPA script to the standard ‘includes’ for the 32-bit version.
To do this, contact the respective person responsible for INPA at TI-43x
Reason 2: A 16-bit DLL has been found, which means the developer of the INPA
script is using a 16-bit DLL.
Solution 2: The developer of the INPA script must convert the DLL to 32-bit.
2.11 Error when opening the error file à abort:
Reason: This error occurs with Windows XP because the user doesn’t have the correct
rights to change files in the directory C:\INPA\Bin.
Solution: The user needs “Power user” rights or the user needs the appropriate write rights
to the “INPA” directory.
2.12 Compiler: File: \INPA\DEUTSCH\***.OUT not found!
Reason: The path C:\EDIABAS\BIN has not been set in the ‘Path’ system variable.
Solution: Set the path C:\EDIABAS\BIN in the ‘Path’ system variable. (q.v. chapter 2.1).
Frequently Asked Questions
BMW Group about
EDIABAS, INPA and the Tool Set Page 18 of 32
TI-430 Andreas Schandl Release date: 29.09.2006
3 Tool Set Error Messages
3.1 EDIABAS error 100: SYS-0010: INITIALIZATION ERROR
Reason: This message comes when an SGBD has an automatic concept switch between
multiple diagnostics logs and is not connected to the controller.
Solution: Connect the controller.
3.2 EDIABAS Error 126 (only up to Ediabas V6.4.x)
Reason: This error message appears if you start the Tool Set while an INPA script is
running. This is also true the other way round. The reason for this is that only one
programme can access EDIABAS at a time.
Solution: Therefore, before you start the ToolSet, you must exit INPA.
3.3 IFH-0006: Command not accepted and IFH-0018: Initialization Error and
IFH-0038: Interface Command not implemented
Errors IFH-0006 and IFH-0018 occur if any SGBD is loaded in the Tool Set. Error IFH-0038
is generated when loading the utility file into the Tool Set.
Reason 1: The error was caused by another programme that accessed the COM1
interface. This programme could be “HotSync” for Palm or “ActiveSync”
Solution 1: Check the programmes that are started automatically when Windows is
started (see Chapter 4.1).
Reason 2: The COM1 interface is taken by a serial printer.
Solution 2: Uninstall the printer.
Reason 3: The infrared interface is active.
Solution 3: Deactivate the infrared interface.
Reason 4: There is no COM1 interface (COM3 instead, for example)
Solution 4a): Install the COM1 interface.
Solution 4b): Create a file with the name OBD.ini and make the following entry to set
the existing serial interface (COM3, for example):
Frequently Asked Questions
BMW Group about
EDIABAS, INPA and the Tool Set Page 19 of 32
TI-430 Andreas Schandl Release date: 29.09.2006
The file OBD.ini must be saved in the directory C:\WINDOWS\ for
Windows XP or in directory C:\WINNT\ for Windows NT up to the Ediabas
Package 1.3 and as of Ediabas Package 1.4 in directory
C:\EDIABAS\BIN\. The current version of the Ediabas Package can be
seen in the files C:\EDIABAS\version.txt or C:\EDIABAS\package.pdf.
Reason 5: Only for IBM notebooks: The COM1 interface is reserved for the docking
station; the COM3 interface is installed instead.
Solution 5a): see solution 4b:
Solution 5b): Set the COM3 port to COM1: In the device manager (Windows XP:
Select “Start” à “Control Panel” à “System” à “Hardware” and then
select COM3 from the ports under the menu item “Device Manager”.
Then use the right mouse button à “Properties” à “Port Settings” à
“Advanced” to reach the “Advanced Settings for COM3”. Set COM1 in the
COM Port Number. The message that COM1 is already taken can be
ignored in this case.
Reason 6: The old OMITEC driver wasn’t uninstalled correctly.
Solution 6: Please uninstall the old OMITEC driver with the instructions
InstructionforOMITECInstallation.pdf via the GIS server.
3.4 IFH-0006: Command not accepted
This error occurs if a SGBD is loaded in the Tool Set when the OBD connector is being used.
Reason 1: ODB has actually been set as the interface in Ediabas.ini, but the Tool Set uses
the multi-instance with another interface, e.g. K-Line. The setting for the multiinstance
and the interfaces used here is made in the file Tool32.ini in the
directory C:\Windows (for Windows XP) or alternatively C:\Winnt (for Windows
NT). Then, the entries in Tool32.ini, or alternatively the interface apply and not
the ones in Ediabas.ini. The use of multi-instance in the Tool Set is identified in
the title bar, for example with “Tool32:1”, for single multi-instance.
Solution 2: Enter the interface that is being used in Tool32.ini or disable multi-instance with
Reason 2: A SGBD is loaded in the Tool Set when the diagnosis protocol UDS is being
used. For UDS-SGBDs You have to use the interface OMITEC but in the
EDIABAS.ini the setting fort he interface ist „STD:OBD“.
Solution 2: Change the setting for thr interface to „interface = STD:OMITEC“ in the
EDIABAS.ini file. The OMITEC connector has to be stressed by the voltage (blue
blinking). If the connector can’t be stressed by the voltage and You want to load
the SGBD yet, You will use the simulation mode. You can activate the simulation
mode e.g. with the menue „configuration -> EDIABAS“. Notice, if you want to use
the simulation mode, a simulation file for the interface will have to exist in the
Frequently Asked Questions
BMW Group about
EDIABAS, INPA and the Tool Set Page 20 of 32
TI-430 Andreas Schandl Release date: 29.09.2006
3.5 IFH-0009: ECU isn’t connected or doesn’t respond
Reason 1: In the Ediabas.ini file, the interface is set to STD:ADS. However, you have
connected an OBD connector.
Solution 1: Modify the interface setting.
Reason 2: The ignition is switched off.
Solution 2: Switch the ignition on.
Reason 3: The device manager has been used to disable the FIFO buffer for COM1.
Solution 3: In the device manager (Windows XP: Enter “Start” à “Control Panel” à
“System” à “Hardware” à “Device Manager” à Ports (COM & LPT)), and select
COM1 from the ports and under the “Port Settings” tab, select “Advanced”. There
must be a check-mark by “Use FIFO buffers” and the highest possible setting
must be selected for the receive buffer.
3.6 SYS-0002: ECU OBJECT FILE NOT FOUND
Reason 1: If the external table T_GRTB.prg doesn’t exist in the directory C:\EDIABAS\ECU\
the error message will be displayed when You execute the job
IDENT_FUNKTIONAL of a functional SGBD.
Solution 1: You have to download the external table using the ECCO Web Export and copy it
in the directory C:\EDIABAS\ECU\.
Reason 2: The SGBD, which You want to start doesn’t exist in the directory
C:\EDIABAS\ECU or is an old one.
Solution 2: You have to download the SGBD using the ECCO Web Client and copy it in the
3.7 SYS-0005: Controller description file not found. The programme will be
aborted!
Reason 1: The SGBD is not located in the path C:\Ediabas\Ecu.
Solution 1: Copy the SGBD into the Ecu directory.
Reason 2: This error occurs if the EcuPath in Ediabas.ini (C:\Ediabas\Bin) isn’t set to
Solution 2: Set the correct path.
Frequently Asked Questions
BMW Group about
EDIABAS, INPA and the Tool Set Page 21 of 32
TI-430 Andreas Schandl Release date: 29.09.2006
3.8 ToolSet Error: Runtime error ’372’
The following error message appears.
Reason: The old version msflxgrd.ocx exists under c:\winnt\system32.
Solution: msflxgrd.ocx under c:\Ediabas\bin must be registered. To do this, select “Start”
à “Run…” and execute regsvr32 :\ediabas\bin\msflxgrd.ocx in the window and
confirm with “OK“.
The following must be entered for Windows XP: “regsvr32 c:\ediabas\bin\
3.9 Tool Set Error: Run-time error ’5’ – Invalid Procedure Call
Reason: The Tool Set was started twice in a very short period of time.
Solution: Close all Tool Set processes that are running and start the Tool Set again with
only one double-click.
3.10 Tool Set Problem: If an SGBD is opened, then only the hourglass
appears and the SGBD is not loaded.
Reason: An old version Richtx32.ocx exists under c:\winnt\system32.
Solution: Richtx32.ocx under c:\Ediabas\bin must be registered. To do this, select “Start”
à “Run…” and execute “regsvr32 :\ediabas\bin\richtx32.ocx“ in the window and
confirm with „OK“.
The following must be entered for Windows XP: „regsvr32 c:\ediabas\bin\
3.11 EDIABAS error 20: IFH-0010: Data transmission to control unit
disturbed
Reason 1: When using the EDIC card, the error message is issued when executing the
Solution 1: Changes must be made in the file “XEDICC.ini” in the “…\Ediabas\Bin” directory.
There, the parameters set for high-speed must be commented out and the
parameters for low-speed must be enabled:
Frequently Asked Questions
BMW Group about
EDIABAS, INPA and the Tool Set Page 22 of 32
TI-430 Andreas Schandl Release date: 29.09.2006
Reason 2: A SGBD is loaded in the Tool Set when the diagnosis protocol UDS is being
used. You use the interface OMITEC but the connector isn’t stressed by the
voltage (no blue blinking).
Solution 2: Connect the OMITEC wit the vehicle. The OMITEC connector has to be stressed
by the voltage (blue blinking). If the connector can’t be stressed by the voltage
and You want to load the SGBD yet, You will use the simulation mode. You can
activate the simulation mode e.g. with the menue „configuration -> EDIABAS“.
Notice, if you want to use the simulation mode, a simulation file for the interface
will have to exist in the simulation path.
3.12 EDIABAS Error 134: API-0014: Result not found
The error occurs if a SGBD is loaded in the Tool Set when the diagnosis protocol UDS is
being used and the Job FS_LESEN is being executed.
Reason: You use the setting “read error like INPA”, but the Toolset can’t support the
function yet for UDS-SGBDs.
Solution: Please remove the setting “read error like INPA” in the menue “configuration ->
3.13 It takes too long to load an SGBD in the Tool Set
Loading motor or transmission SGBDs takes an above average amount of time.
Reason: Large SGBDs often contain many and extensive tables and their information has
Solution: Under the Configuration menu item in the Tool Set and then Tool Set, the
checkmark by the selection of table information must be removed.
3.14 Black Windows in the Tool Set
After loading a SGBD one or more windows of the Tool Set are black windows.
Reason: The registration of the richtextbox is invalid.
Solution: You have to register the richtextbox. Execute the batch file REGSVR32.BAT in
the directory C:\Ediabas\bin\.
Frequently Asked Questions
BMW Group about
EDIABAS, INPA and the Tool Set Page 23 of 32
TI-430 Andreas Schandl Release date: 29.09.2006
4 General Questions
4.1 Installation of EDIABAS and INPA
The Installation of EDIABA, INPA and NFS have to be done webbased via the Global
Information Service (GIS). You can reach the GIS homepage with the following link:
In the forum „BMW Standard Tools Werk“ You can find the installation data of EDIABAS,
INPA and NFS. The path ist shown below:
BMWStandard ToolsWerk
Standard Tools / Tool InstallationWerk
For acces rights for the GIS forum „BMW Standard Tool Werk“ send an mail to
Referenz@bmw.de stating the name the Q/QX number an the reason. We can give access
rights for this forum only for colleagues from the T departements. Colleagues from other
departments and supplieres can get the installation via the GIS forum „BMW Standard Tools
Entwicklung“. You can apply for access rights using the following link:
Please pay attention to the intallation instructions which You can get in the same directories
of the installation data. After the intallation You have to download the SGBDs, INPA scripts,
Group SGBDs, INPA configuration files and external tables using the ECCO Web Client.
Which data You have to download is described in the following chapter 4.2.
4.2 xBD-Export of SGBDs, Group SGBDs, INPA scripts and INPA
configuration files using the ECCO Web Client
The update of SGBDs, group SGBDs, external tables, INPA scripts and INPA configuration
files can be done webbased using the ECCO Web Client.
You can apply for acces rigths for ECCO at the user service center (Tel. 089-382-55555)
stating Your valid Q/QT/QX number.
You can reach the homepage of the ECCO Web Clients with the following link:
http://www6.muc/ppea. After login You have to select the link xBD Export in the navigation
bar and You can see the search screen. You have the possibility to search for a single file or
search for all files assigned to a certain type serie or search for a several release periods.
Frequently Asked Questions
BMW Group about
EDIABAS, INPA and the Tool Set Page 24 of 32
TI-430 Andreas Schandl Release date: 29.09.2006
If You have installed EDIABAS You will need following files:
- SGBD_Revisionen
- GRP_SGBD_Revisionen
- ExterneTabelle_Revisionen
If You have installed INPA You will need following files:
- SGBD_Revisionen
- GRP_SGBD_Revisionen
- ExterneTabelle_Revisionen
- Inpa_Script_Revisionen
In the column „Verfügbare Dateitypen“ You have to select the data types. These column is
very important vor the export of the files, i.e. the data types which are selected will be
exported. Please pay attention on the correct selection.
If You have installed EDIABAS You will select the following data types:
- SGBDprg_english or SGBDprg_deutsch
- SGBDgrp
- EXTABprg_english or EXTABprg_deutsch
If You have installed INPA You will select the following data types in addition to the data
- INPAipo_english or INPAipo_deutsch
Frequently Asked Questions
BMW Group about
EDIABAS, INPA and the Tool Set Page 25 of 32
TI-430 Andreas Schandl Release date: 29.09.2006
- Select also „Benutzereinst. verwenden“
- Select also „INPA-Konf.-Dateien“
After the download of the necessary files You have to copy the files in the right directories:
- SGBDen: SGBDprg_deutsch à alle *.prg-Dateien
- externe Tabellen: EXTABprg_deutsch à T_GRTB.prg, T_PCOD.prg
- Gruppen-SGBDen: SGBDgrp_deutsch à alle *.grp-Dateien
- INPA scripts: INPAipo_english à all *.ipo files
à all *.ger files or *.eng files
ger = german INPA config, eng = english INPA config
If You have problems with the xBD Export using ECCO Web Client please call the user
service center: Tel. 089-382-55555 or send a mail to ECCO hotline: ecco.hotline@bmw.de.
4.3 How can I find out if the serial interface COM1 has been taken?
There is a way to find out if the serial interface, for example COM1, has been taken, but it is
not possible to find out what programme has taken the interface.
As described in the respective sections of Chapter 3, the programmes that most often take
COM1 are HotSync for the Palm and ActiveSync for the lpack or a Nokia software. In order
to establish whether these programmes are automatically started when you start the
computer, please check your ‘Autostart’ settings. Do this by making sure that these
programmes don’t appear in the following directories:
– C:\Documents and Settings\All Users\Startmenu\Programs\Autostart\
– C:\Documents and Settings\Your QX Number\Startmenu\Programs\Autostart\
Another way to check the utilisation of COM1 is to look in the system information. The
system information can be run with the DOS command winmsd in an input prompt (Start à
Run… à enter winmsd à OK). Here, it is important that you only run winmsd if the Ediabas
server is closed. Under the path System Summary à Components à Ports à Serial, the
information about the active serial ports COM1, COM2, and so on will be shown if they exist.
The current value can be seen in the element “Busy”. If this value is “No”, then the interface
is free, and if it is “Yes”, then the interface has been taken by a programme. You can’t find
out what programme it is here.
Frequently Asked Questions
BMW Group about
EDIABAS, INPA and the Tool Set Page 26 of 32
TI-430 Andreas Schandl Release date: 29.09.2006
4.4 How do I start INPA?
Start Inpa using Inpaload.exe in C:\Inpa\Bin or alternatively C:\EC-Apps\Inpa\Bin or use
Start à All Programs à EDIABAS INPA ELDI NCS NFS à INPA(_.IPO) to start the general
reworking programme. This corresponds to calling Inpaload.exe under
smuc0900\sg\Inpa\Bin or alternatively C:\Inpa\Bin.
4.5 How can I switch between OBD and ADS interfaces?
The appropriate driver must be installed for the interface that you want to use. In the
installation guide for INPA (http://smuc0900/TI-430 or http://smuc0900/TI-430 under Subjects à
EDIABAS /INPA à EDIABAS or INPA), you can look up how a driver is installed.
Now, you can change the interface directly in the file Ediabas.ini (C:\EDIABAS\BIN). You
only have to make the appropriate change to the line where the interface is entered.
Interface = STD:OBD, i.e the OBD interface will be used.
Interface = ADS, i.e the ADS interface will be used.
Frequently Asked Questions
BMW Group about
EDIABAS, INPA and the Tool Set Page 27 of 32
TI-430 Andreas Schandl Release date: 29.09.2006
For the case that OBD is being used via USB, an additional entry is necessary in OBD.ini.
See C:\EDIABAS\BIN\INI.PDF for this.
4.6 In which directory structure is OBD.ini saved?
If the OBD.ini file exists, then in order to not run the interface via COM1 by default (compare
to 1 i), then the OBD.ini file must be saved in the directory C:\WINDOWS\ for Windows XP
or in directory C:\WINNT\ for Windows NT up to the Ediabas Package 1.3 and as of Ediabas
Package 1.4 in directory C:\EDIABAS\BIN\. The current version of the Ediabas Package can
be seen in the files C:\EDIABAS\version.txt or C:\EDIABAS\package.pdf.
4.7 How can I find out what interface I installed with INPA?
To do this, you have 2 possibilities:
- Call Start à All Programs à EDIABAS INPA ELDI NCS NFS à EDIABAS Tool32. In
the configuration menu, select Ediabas. There, you will find the desired information in the
- However, you can also check in the Ediabas.ini (C:\EDIABAS\BIN) to see what
interface you have installed. For the OBD interface, you will find the line ‘Interface =
STD:OBD’ and for the ADS Interface the line ’Interface = ADS’.
4.8 How do I find out what EDIABAS package is installed?
The version of the currently installed Ediabas package can be seen in the files
C:\EDIABAS\version.txt or C:\EDIABAS\package.pdf.
4.9 How can I uninstall EDIABAS or INPA?
You uninstall INPA by deleting the Ediabas and Inpa folders under C:\.
Reason: No registry entries are made during the installation.
4.10 How can tell if the EDIABAS server is running as a 16-bit or a 32-bit
application?
Under Windows 95 and 98, the EDIABAS server runs as a 16-bit version. The can be
recognised by the yellow E in the task bar.
Frequently Asked Questions
BMW Group about
EDIABAS, INPA and the Tool Set Page 28 of 32
TI-430 Andreas Schandl Release date: 29.09.2006
Under Windows NT4 and XP, the EDIABAS server runs as a 32-bit version. This can be
recognised by the green E in the task bar.
As of 2003, there is the EDIABAS Version 6.4. This can also run as a 32-bit application
under Windows 95/98 and XP.
4.11 What is the difference between \EDIABAS\bin\ToolSet.exe and
\EDIABA\bin\Tool32.exe?
Tool32.exe is current and when it is started, the Ediabas server will start as a 32-bit
application. ToolSet.exe is an old version and is required under Windows 3.11.
4.12 What is an SGBD and what is its connection to EDIABAS?
The controller description files (SGBD) contain the controller-specific know-how. Each SGBD
contains the order telegram of the respective controller and decodes its reply telegrams. In
the process, the raw data (bytes) is converted into directly useable variables (Data types: int,
long, real, string), i.e the error code is converted into error text.
For each controller variation, there is exactly one variation-specific SGBD.
The SGBDs are loaded and interpreted by the EDIABAS runtime system by an application
programme when the order is issued. The file name of the SGBD (without extension) is the
name with which the application programme addresses a controller variation or controller
4.13 Where are the individual SGBD names and their meanings given in
plain English?
Click the “Show” Version List SGBD button on the ”Dienste Tool” interface. There will be a
list of all SGBDs by name with the current version number, the person responsible at BMW,
and the name of the associated controller. It is only possible to access the version list when
the network is in operation or it can be viewed at \\smuc0900\Referenz\Referenz.sgbd.
4.14 What is a Job?
Jobs are services that EDIABAS provides. They aren’t hard coded in EDIABAS, but are a
main component of each SGBD.
Each job has a fixed name and any number of results. Jobs are independent of each other.
There is no data exchange between jobs.
A job corresponds to a function with one complete order. It usually reads data from a
controller, analyses it and returns results that can be used directly by different applications.
A job normally works with one diagnostics telegram (multiple in exceptional cases).
Frequently Asked Questions
BMW Group about
EDIABAS, INPA and the Tool Set Page 29 of 32
TI-430 Andreas Schandl Release date: 29.09.2006
4.15 What do SGBDs with the name _xxx mean?
SGBDs that begin with “_” (e.g. _LWS5), contain jobs that are only intended for development
(e.g.: writing the ident data). These SGBDs are not used in production or in customer service.
4.16 What is the group file used for?
Among other things, INPA uses group files to select the respective SGBD. The group
identifies the controller and starts the corresponding SGBD. The choice is made using the
diagnostics, and as of E65 using the variation index in addition.
The group files are located in C:\EDIABAS\ECU and have the following naming convention:
D_00xx.grp were assigned up to the E65; xx = the controller address; For example:
D_0032.grp = transmission. The name D_. grp is assigned after the E65 and is
legible; for example D_KLIMA.grp or D_MOTOR.grp, etc.
Updating the group files as of the E65 has changed since February 2004. The table with the
information about which controller must load which SGBD, depending on the diagnostics and
variation index, was moved from the group file to an external table. At runtime, the swappedout
table C:\ECU\T_GRTB.prg is used. Therefore, it is now only necessary to update this
table and not D_. prg.
Additional Information for SGBD Developers:
In the file STD_GRTB.b2s, the diagnostics and variation indexes of the individual SGBDs
can be seen as well as the group file to which the respective SGBD is assigned. You can
find the file STD_GRTB.b2s on drive \smuc0900\sg\ in directory \Referenz\Ediabas\Include\.
4.17 Diagnostics Index
- a) Who creates it? Reinhold Drexel, TI-430
- b) What is it used for? Identification of the controller
- c) When does it change? When a new SGBD is due
4.18 Variation Index
- a) Who creates it? Data handling team
- b) What is it used for? Identification of the ECU
- c) When does it change? When the SGBD and/or the PABD changes (PABD, if
something in ECU programming changes), e.g. if the
authentication changes or a timing has changed).
4.19 What is the meaning of the file EDIABAS.ini?
Ediabas.ini is the configuration file. Normally, no changes must be made here after the
installation. One reason for a change to Ediabas.ini is, for example, if you want to work with
a simulation file, i.e. there doesn’t have to be a ECU.
The Ediabas.ini can be found in the \Ediasbas\Bin directory.
EcuPath:
The group files (d_*.grp) and SGBDs (*.prg) are found in the path given for EcuPath. In the
developer versions, it also contains *.b2v, *.b2s and *.txt files.
SimulationPath:
Frequently Asked Questions
BMW Group about
EDIABAS, INPA and the Tool Set Page 30 of 32
TI-430 Andreas Schandl Release date: 29.09.2006
The path given in the SimulationPath is where the simulation files are located for groups
(d_*.sim) and for SGBDs (*.sim), which are only relevant to SGBD and INPA developers.
TracePath:
If ApiTrace and/or lfhTrace are activated, then the traces will be stored there with api.trc and
TraceSize:
You can set the size of the trace files ApiTrace and IfhTrace. If 1024 is set, then the
maximum size of the file is 1 MB; for 512, it is a maximum of 500 KB.
ApiTrace:
The ApiTrace file is activated by replacing the zero with a number from 1 to 7. The api.trc file
contains the job and result names with their data. If ApiTrace is not needed, this should be
set to zero to increase the performance of EDIABAS. You can find information about the
trace level in the Ediabas documentation.
IfhTrace:
The lfhTrace file is activated by replacing the zero with a number from 1 to 3. The ifh.trc file
only consists of the telegrams that have been sent (INPUT) and received (OUTPUT). If
lfhTrace is not needed, this should be set to zero to increase the performance of EDIABAS.
Simulation:
Simulation is used to check the SGBDs and INPA scripts without being directly connected to
a ECU. This function is activated by changing the zero to 1.
Interface:
You can directly change the interface here. You only have to make the appropriate change
to the line where the interface is entered.
Interface = STD:OBD, i.e the OBD interface will be used.
Interface = ADS, i.e the ADS interface will be used.
The prerequisite is to have the appropriate driver installed for the interface.
Excerpt form the Ediabas.ini file:
Frequently Asked Questions
BMW Group about
EDIABAS, INPA and the Tool Set Page 31 of 32
TI-430 Andreas Schandl Release date: 29.09.2006
4.20 How is the simulation file connected to the trace file?
There is one simulation file for each ECU. In this file are the ECU’s request and reply
telegrams. This file has the same name as the ECU description file, however it has the
ending “*.SIM” (e.g. DME31.SIM).
There is also a separate simulation file for each interface that is to be simulated. The
filename is made up of the name of the interface with the ending “*.SIM” (e.g. EDIC.SIM).
The setting of the EDIABAS configuration element called Interface will be used as the
interface name. The interface-specific return values are in the interface simulation files.
The trace file records the telegrams that have been sent (INPUT) and received (OUTPUT).
The recording of such traces can be enabled in the Tool Set in the menu bar under
“Configuration” as well as in the Ediabas.ini configuration file.
A simulation file can be automatically created from the ifh.trc trace file by using
trace2sim.exe. This tool is found in \\smuc0900\sg\Ediabas\Sim\ trace2sim.exe.
4.21 Why have an XBD Generator?
Before the introduction of the SGBD generator, the source code was edited with a text editor
(up to 40,000 lines). For this purpose, it was necessary to learn the special, C-based
programming language BEST/2 (description language for ECU). Manual programming is
known to be very prone to errors (copy & paste), and it is very difficult to implement the
guidelines specified in the diagnostics specification sheet part 5 as the SGBD becomes
Now, the SGBD Generator is to be used to create an SGBD by means of menu-driven input
of the data, in which the BMW guidelines are kept. This should result in less effort for the
developer, but it definitely requires a certain amount of practice in working with the SGBD
Generator. A major advantage is the automatic integration of standard ‘include’ files,
whereby new standard ‘includes’ can be added without further ado (new sample XML).
4.22 What are the prerequisites for remote access via TCP/IP?
EDIABAS for WIN32 makes it possible to access the diagnostics interfaces and the attached
ECUs that are connected to another PC. The prerequisite for this is a network connection of
locally and remotely controlled PCs via TCP/IP as well as a WIN32 operating system that is
supported by EDIABAS.
Applications and EDIABAS run on the local PC and the interface handler (IFH) as well as the
IFH-Server run on the PC to be remotely controlled. Before accessing the remotely
controlled PC, the IFH server IFHSRV32.EXE must be started. The remote control is
activated, or alternatively controlled using the EDIABAS configuration file EDIABAS.INI. The
EDIABAS configuration must be performed manually on both PCs.
The EDIABAS configurations TracePath and SimulationPath are not transferred from the
local PC to the remotely controlled PC, rather the respective configurations of the
EDIABAS.INI file that is on the remotely controlled PC is used.
The network protocol TCP (NetworkProtocol entry) as well as a freely selectable port
number must be given on both PCs. The port number must be identical on both PC and


