- How to create a bootable installer for macOS
- What you need to create a bootable installer
- Download macOS
- Use the ‘createinstallmedia’ command in Terminal
- How to get old versions of macOS
- Check compatibility
- Download macOS using Safari on your Mac
- macOS Support
- Upgrade to macOS Big Sur
- Check compatibility
- Make a backup
- Free up space
- Download macOS Big Sur
- Get to know macOS Big Sur
- Control Center
- Notification Center
- Safari
- Messages
- Photos
- macOS Big Sur 4+
- Apple
- Снимки экрана
- Описание
- Download and install Windows support software on your Mac
- Install the latest macOS updates
- Format a USB flash drive
- Download the Windows support software
- Install the Windows support software
- Learn more
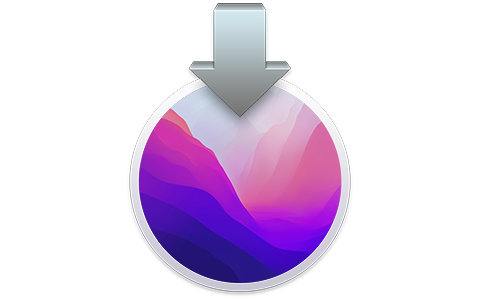
How to create a bootable installer for macOS
You can use an external drive or secondary volume as a startup disk from which to install the Mac operating system.
These advanced steps are primarily for system administrators and others who are familiar with the command line. You don’t need a bootable installer to upgrade macOS or reinstall macOS, but it can be useful when you want to install on multiple computers without downloading the installer each time.
What you need to create a bootable installer
- A USB flash drive or other secondary volume formatted as Mac OS Extended, with at least 14GB of available storage
- A downloaded installer for macOS Big Sur, Catalina, Mojave, High Sierra, or El Capitan
Download macOS
- Download: macOS Big Sur, macOS Catalina, macOS Mojave, or macOS High Sierra
These download to your Applications folder as an app named Install macOS [ version name ]. If the installer opens after downloading, quit it without continuing installation. To get the correct installer, download from a Mac that is using macOS Sierra 10.12.5 or later, or El Capitan 10.11.6. Enterprise administrators, please download from Apple, not a locally hosted software-update server. - Download: OS X El Capitan
This downloads as a disk image named InstallMacOSX.dmg. On a Mac that is compatible with El Capitan, open the disk image and run the installer within, named InstallMacOSX.pkg. It installs an app named Install OS X El Capitan into your Applications folder. You will create the bootable installer from this app, not from the disk image or .pkg installer.
Use the ‘createinstallmedia’ command in Terminal
- Connect the USB flash drive or other volume that you’re using for the bootable installer.
- Open Terminal, which is in the Utilities folder of your Applications folder.
- Type or paste one of the following commands in Terminal. These assume that the installer is in your Applications folder, and MyVolume is the name of the USB flash drive or other volume you’re using. If it has a different name, replace MyVolume in these commands with the name of your volume.
Big Sur:*
Catalina:*
Mojave:*
High Sierra:*
El Capitan:
* If your Mac is using macOS Sierra or earlier, include the —applicationpath argument and installer path, similar to the way this is done in the command for El Capitan.
After typing the command:
- Press Return to enter the command.
- When prompted, type your administrator password and press Return again. Terminal doesn’t show any characters as you type your password.
- When prompted, type Y to confirm that you want to erase the volume, then press Return. Terminal shows the progress as the volume is erased.
- After the volume is erased, you may see an alert that Terminal would like to access files on a removable volume. Click OK to allow the copy to proceed.
- When Terminal says that it’s done, the volume will have the same name as the installer you downloaded, such as Install macOS Big Sur. You can now quit Terminal and eject the volume.


Источник
How to get old versions of macOS
If your Mac isn’t compatible with the latest macOS, you might still be able to upgrade to an earlier macOS, such as macOS Catalina, Mojave, High Sierra, Sierra, or El Capitan.
To get the latest features and maintain the security, stability, compatibility, and performance of your Mac, it’s important to keep your software up to date. Apple recommends that you always use the latest macOS that is compatible with your Mac.
Check compatibility
The version of macOS that came with your Mac is the earliest version it can use. For example, if your Mac came with macOS Big Sur, it will not accept installation of macOS Catalina or earlier.
If a macOS can’t be used on your Mac, the App Store or installer will let you know. For example, it might say that it’s not compatible with this device or is too old to be opened on this version of macOS. To confirm compatibility before downloading, check the minimum hardware requirements:
Download macOS using Safari on your Mac
Safari uses these links to find the old installers in the App Store. After downloading from the App Store, the installer opens automatically.
- macOS Catalina 10.15 can upgrade Mojave, High Sierra, Sierra, El Capitan, Yosemite, Mavericks
- macOS Mojave 10.14 can upgrade High Sierra, Sierra, El Capitan, Yosemite, Mavericks, Mountain Lion
- macOS High Sierra 10.13 can upgrade Sierra, El Capitan, Yosemite, Mavericks, Mountain Lion
Safari downloads the following older installers as a disk image named InstallOS.dmg or InstallMacOSX.dmg. Open the disk image, then open the .pkg installer inside the disk image. It installs an app named Install [ Version Name ]. Open that app from your Applications folder to begin installing the operating system.
- macOS Sierra 10.12 can upgrade El Capitan, Yosemite, Mavericks, Mountain Lion, or Lion
- OS X El Capitan 10.11 can upgrade Yosemite, Mavericks, Mountain Lion, Lion, or Snow Leopard
- OS X Yosemite 10.10can upgrade Mavericks, Mountain Lion, Lion, or Snow Leopard
Источник
macOS Support
Upgrade to macOS Big Sur
Before installing this upgrade, make sure that your Mac is ready.
Check compatibility
macOS Big Sur supports most Mac models introduced in 2013 and later.
Make a backup
Before you upgrade, make a complete backup with Time Machine, or store your files in iCloud.
Free up space
If the installer needs more storage space to upgrade, you can free up space using tools that come with your Mac.
Download macOS Big Sur
If you’re using macOS Mojave or later, choose Apple menu > System Preferences, then click Software Update. If you’re using an earlier macOS, use the App Store instead.
Get to know macOS Big Sur
Learn about some of the new features of macOS Big Sur.
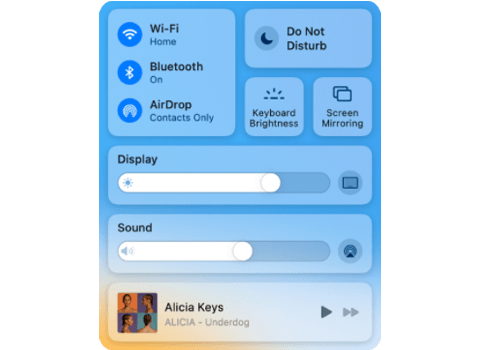
Control Center
Control Center brings favorite controls such as Bluetooth, Wi-Fi, Do Not Disturb, and Sound together in a single place—so you can easily adjust them at any time.
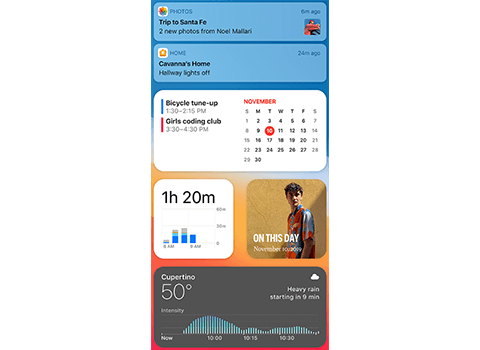
Notification Center
Notification Center puts notifications and data-rich widgets together in a singular view, making it simple to get information at a glance.
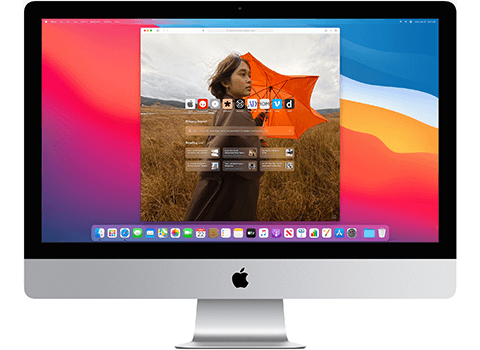
Safari
Customize your start page, navigate with ease using the new tab bar, and access a new privacy report to see just how Safari protects your privacy as you browse.

Discover great places around the world and navigate easier with guides, cycling directions, indoor maps, Look Around, electric vehicle routing, and more.
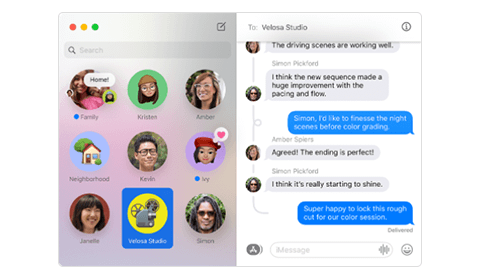
Messages
Send messages to friends and family using new tools that make it easier to keep track of group conversations and give you fun, engaging ways to express yourself.
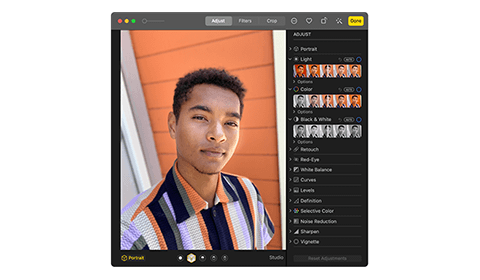
Photos
Use the expanded editing capabilities in Photos to easily make simple changes and more advanced adjustments to your photos.
Источник
macOS Big Sur 4+
Apple
Снимки экрана
![]()
![]()
![]()
![]()
![]()
![]()
Описание
macOS Big Sur поднимает Mac на новый уровень производительности и визуальной эстетики. Оцените эффектный дизайн, который делает работу на Mac еще удобнее. Отдайте должное самому масштабному обновлению Safari. Попробуйте новые функции Карт и Сообщений. И узнайте еще больше о способах защиты личных данных.
Дизайн
• Работать с контентом в приложениях стало еще удобнее благодаря лаконичным панелям инструментов и полноразмерным боковым меню.
• Строка меню теперь шире. Она почти незаметна, пока не понадобится.
• Системные звуки зазвучали по‑новому: они оповестят о загрузке, передаче файлов, перемещении объектов в Корзину, снятии защиты и других действиях.
Пункт управления
• В Пункте управления есть все, что нужно для управления. Откройте его из строки меню, чтобы быстро изменить настройки.
• Раскройте нужное меню, чтобы перейти к дополнительным параметрам
• Элементы из Пункта управления можно перенести в строку меню.
Центр уведомлений
• В обновленном Центре уведомлений собраны все уведомления и виджеты.
• После раскрытия интерактивных уведомлений отображаются действия и дополнительная информация.
• Информативные виджеты для Календаря, Часов, Заметок, Фото, Подкастов, Напоминаний, Экранного времени, Акций и Погоды.
• В режиме редактирования можно настроить виджеты и их размер.
• Поддержка виджетов сторонних разработчиков.
Safari
• Скоростной браузер с высокой производительностью и энергоэффективностью.*
• Для стартовой страницы можно выбрать фон и разделы: список для чтения, вкладки iCloud, отчет о конфиденциальности и т. п.
• Больше расширений, а также новая категория для их поиска в App Store.
• Новый дизайн вкладок и значки. Наведите указатель на вкладку для предпросмотра веб‑сайта.
• Бета-версия функции «Перевод» поддерживает английский, испанский, упрощенный китайский, французский, немецкий, русский и португальский (Бразилия).
• В отчете о конфиденциальности рассказано, как Safari защищает Вас в интернете и какие трекеры были заблокированы.
• Safari безопасно проверяет пароли на случай утечки.
• Safari спрашивает, использовать ли расширение на веб‑сайте.
Сообщения
• Закрепите до 9 избранных разговоров вверху списка.
• Упоминания: адресуйте сообщение в групповом разговоре.
• Цепочки ответов: ответьте на определенное сообщение.
• Сообщения можно отправить с эффектом воздушных шариков, конфетти и другими.
• По хештегу #images легко найти GIF-анимацию и добавить ее в сообщение.
• С Memoji можно легко создать своего персонажа и отправлять стикеры, отражающие Вашу индивидуальность и настроение.
Карты
• Путеводители от любимых брендов помогут выбрать, куда сходить и чем заняться.
• Функция «Осмотритесь» для виртуальных прогулок по улицам.
• Карты зданий помогут сориентироваться в аэропортах и торговых центрах.
• Велосипедные маршруты удобны для планирования поездки на велосипеде.
• Маршруты для электромобилей помогут спланировать поездку для поддерживаемых электромобилей, добавленных на iPhone.
Некоторые функции доступны не во всех регионах и не на всех устройствах Apple.
* Производительность зависит от конфигурации системы, сетевого подключения и других факторов.
Источник
Download and install Windows support software on your Mac
After using Boot Camp Assistant to install or upgrade Microsoft Windows on your Mac, you might also need to install the latest Windows support software (drivers) from Apple.
When you install Microsoft Windows on your Mac, Boot Camp Assistant automatically opens the Boot Camp installer, which installs the latest Windows support software (drivers). If that doesn’t happen, or you experience any of the following issues while using Windows on your Mac, follow the steps in this article.
- Your Apple mouse, trackpad, or keyboard isn’t working in Windows.
Force Touch isn’t designed to work in Windows. - You don’t hear audio from the built-in speakers of your Mac in Windows.
- The built-in microphone or camera of your Mac isn’t recognized in Windows.
- One or more screen resolutions are unavailable for your display in Windows.
- You can’t adjust the brightness of your built-in display in Windows.
- You have issues with Bluetooth or Wi-Fi in Windows.
- You get an alert that Apple Software Update has stopped working.
- You get a message that your PC has a driver or service that isn’t ready for this version of Windows.
- Your Mac starts up to a black or blue screen after you install Windows.
If your Mac has an AMD video card and is having graphics issues in Windows, you might need to update your AMD graphics drivers instead.

Install the latest macOS updates
Before proceeding, install the latest macOS updates, which can include updates to Boot Camp.
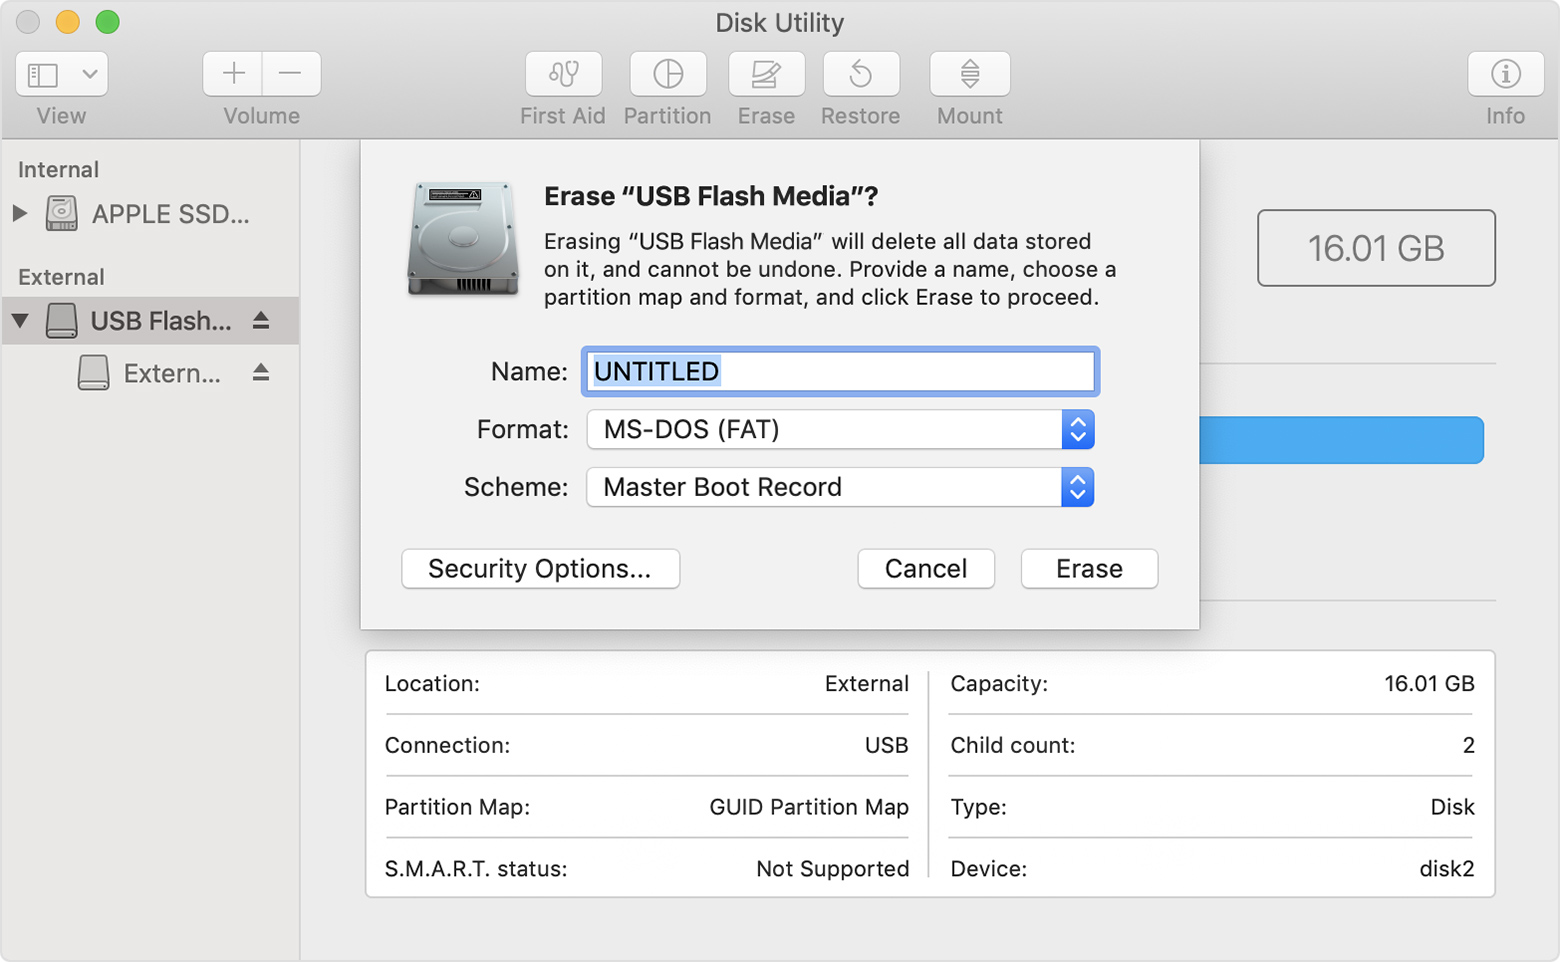
Format a USB flash drive
To install the latest Windows support software, you need a 16GB or larger USB flash drive formatted as MS-DOS (FAT).
- Start your Mac from macOS.
- Plug the USB flash drive into your Mac.
- Open Disk Utility, which is in the Utilities folder of your Applications folder.
- Choose View > Show All Devices from the menu bar.
- From the sidebar in Disk Utility, select your USB flash drive. (Select the drive name, not the volume name beneath it.)
- Click the Erase button or tab.
- Choose MS-DOS (FAT) as the format and Master Boot Record as the scheme.
- Click Erase to format the drive. When done, quit Disk Utility.
Download the Windows support software
- Make sure that your Mac is connected to the Internet.
- Open Boot Camp Assistant, which is in the Utilities folder of your Applications folder.
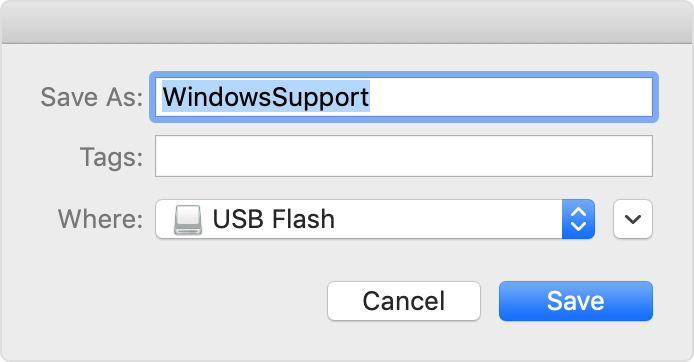
- From the menu bar at the top of your screen, choose Action > Download Windows Support Software, then choose your USB flash drive as the save destination. When the download completes, quit Boot Camp Assistant.
Install the Windows support software
After downloading the Windows support software to your flash drive, follow these steps to install the software. (If you’re attempting to resolve issues with a Bluetooth mouse or keyboard, it might be easier to use a USB mouse or keyboard until these steps are complete.)
- Make sure that the USB flash drive is plugged into your Mac.
- Start up your Mac in Windows.
- From File Explorer, open the USB flash drive, then open Setup or setup.exe, which is in the WindowsSupport folder or BootCamp folder. When you’re asked to allow Boot Camp to make changes to your device, click Yes.
- Click Repair to begin installation. If you get an alert that the software hasn’t passed Windows Logo testing, click Continue Anyway.
- After installation completes, click Finish, then click Yes when you’re asked to restart your Mac.
Learn more
If you can’t download or save the Windows support software:
- If the assistant says that the Windows support software could not be saved to the selected drive, or that the USB flash drive can’t be used, make sure that your USB flash drive has a storage capacity of at least 16GB and is formatted correctly.
- If the assistant doesn’t see your USB flash drive, click Go Back and make sure that the drive is connected directly to the USB port on your Mac—not to a display, hub, or keyboard. Disconnect and reconnect the drive, then click Continue.
- If the assistant says that it can’t download the software because of a network problem, make sure that your Mac is connected to the Internet.
- Make sure that your Mac meets the system requirements to install Windows using Boot Camp.
If a Mac feature still doesn’t work after updating the Windows support software, search for your symptom on the Apple support website or Microsoft support website. Some features of your Mac aren’t designed to work in Windows.
Information about products not manufactured by Apple, or independent websites not controlled or tested by Apple, is provided without recommendation or endorsement. Apple assumes no responsibility with regard to the selection, performance, or use of third-party websites or products. Apple makes no representations regarding third-party website accuracy or reliability. Contact the vendor for additional information.
Источник


