- Move your data from a Windows PC to your Mac
- Before you begin
- Move your data
- How to move your information from a PC to your Mac
- After you move your data
- If you have issues moving your data
- What data can I transfer?
- Set up and use iCloud for Windows
- Before you begin
- Set up iCloud for Windows
- Download and share your photos
- Share your photos
- See your files and folders with iCloud Drive
- Keep your apps up to date
- On your PC
- Использование программы Apple Software Update для Windows
- Запуск программы Apple Software Update
- Дополнительная информация
Move your data from a Windows PC to your Mac
Use Windows Migration Assistant to transfer your pictures, documents, and other data from a Windows PC to your Mac.
Windows Migration Assistant transfers your contacts, calendars, email accounts, and more from a PC. It migrates this data to the appropriate places on your Mac. After migrating data to your Mac, authorize your computer for iTunes Store purchases. It’s important to authorize before you sync or play content that you download from the iTunes Store.
If you’re migrating from one Mac to another Mac, follow the steps to move your content to a new Mac.
Before you begin
To prepare for a smooth migration:
- Make sure that Windows is up to date. Migration Assistant works with Windows 7 and later.
- Make sure that you know the name and password of an administrator account on your PC.
- Connect your Mac and PC to the same network, such as your home Wi-Fi network. Or connect an Ethernet cable between the ports on your Mac and PC to create a direct network connection. Some Mac models require an Ethernet adapter, such as the Belkin USB-C to Gigabit Ethernet Adapter or Apple Thunderbolt to Gigabit Ethernet Adapter.
- If you’re using Microsoft OneDrive on your PC, follow Microsoft’s instructions for uninstalling OneDrive before continuing. You can reinstall OneDrive after migration is complete.
Then use the check disk (chkdsk) utility on your PC to make sure that your Windows hard drive doesn’t have any issues:
- Right-click the Start button, then click Run.
- Type cmd and press Enter. Command Prompt opens.
- At the prompt, type chkdsk and press Enter.
- If the utility reports that it found problems, type the following, where drive is the letter that represents your Windows startup disk, such as D:
- Press Enter.
- At the prompt, type Y , then restart your PC.
- Repeat this process until the check disk utility reports no issues. If the utility can’t fix every issue that it finds, you might need to have your PC serviced. Then migrate your data to your Mac.
Move your data
This section guides you through migration, post-migration, and what to do if the steps don’t work for you.
How to move your information from a PC to your Mac
- On your PC, download and install the appropriate Windows Migration Assistant, based on the version of macOS on your Mac:
- Windows Migration Assistant for macOS Big Sur
- Windows Migration Assistant for macOS Mojave and macOS Catalina
- Windows Migration Assistant for macOS Sierra and High Sierra
- Windows Migration Assistant for OS X El Capitan or earlier
- Quit any open Windows apps.
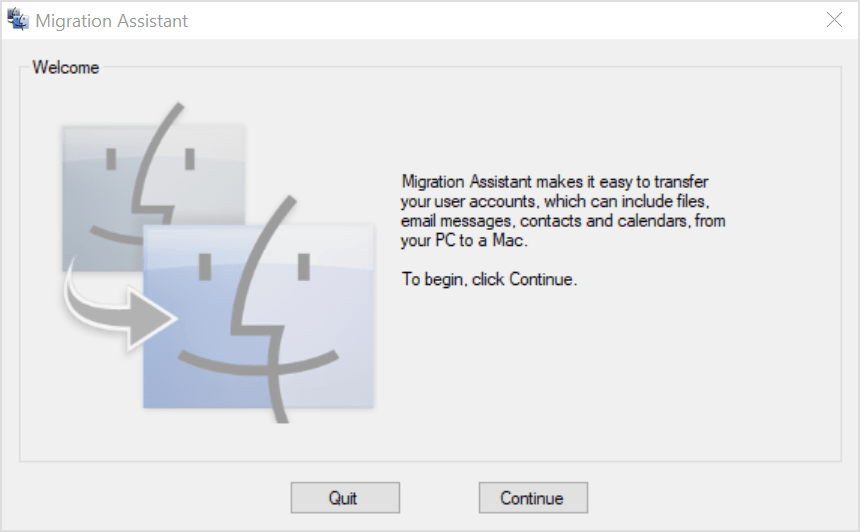
- Open Windows Migration Assistant, then click Continue.

- Start up your Mac. Setup Assistant automatically opens the first time you turn on your Mac. If you’ve already set up your Mac, open Migration Assistant, which is in the Utilities folder of your Applications folder.
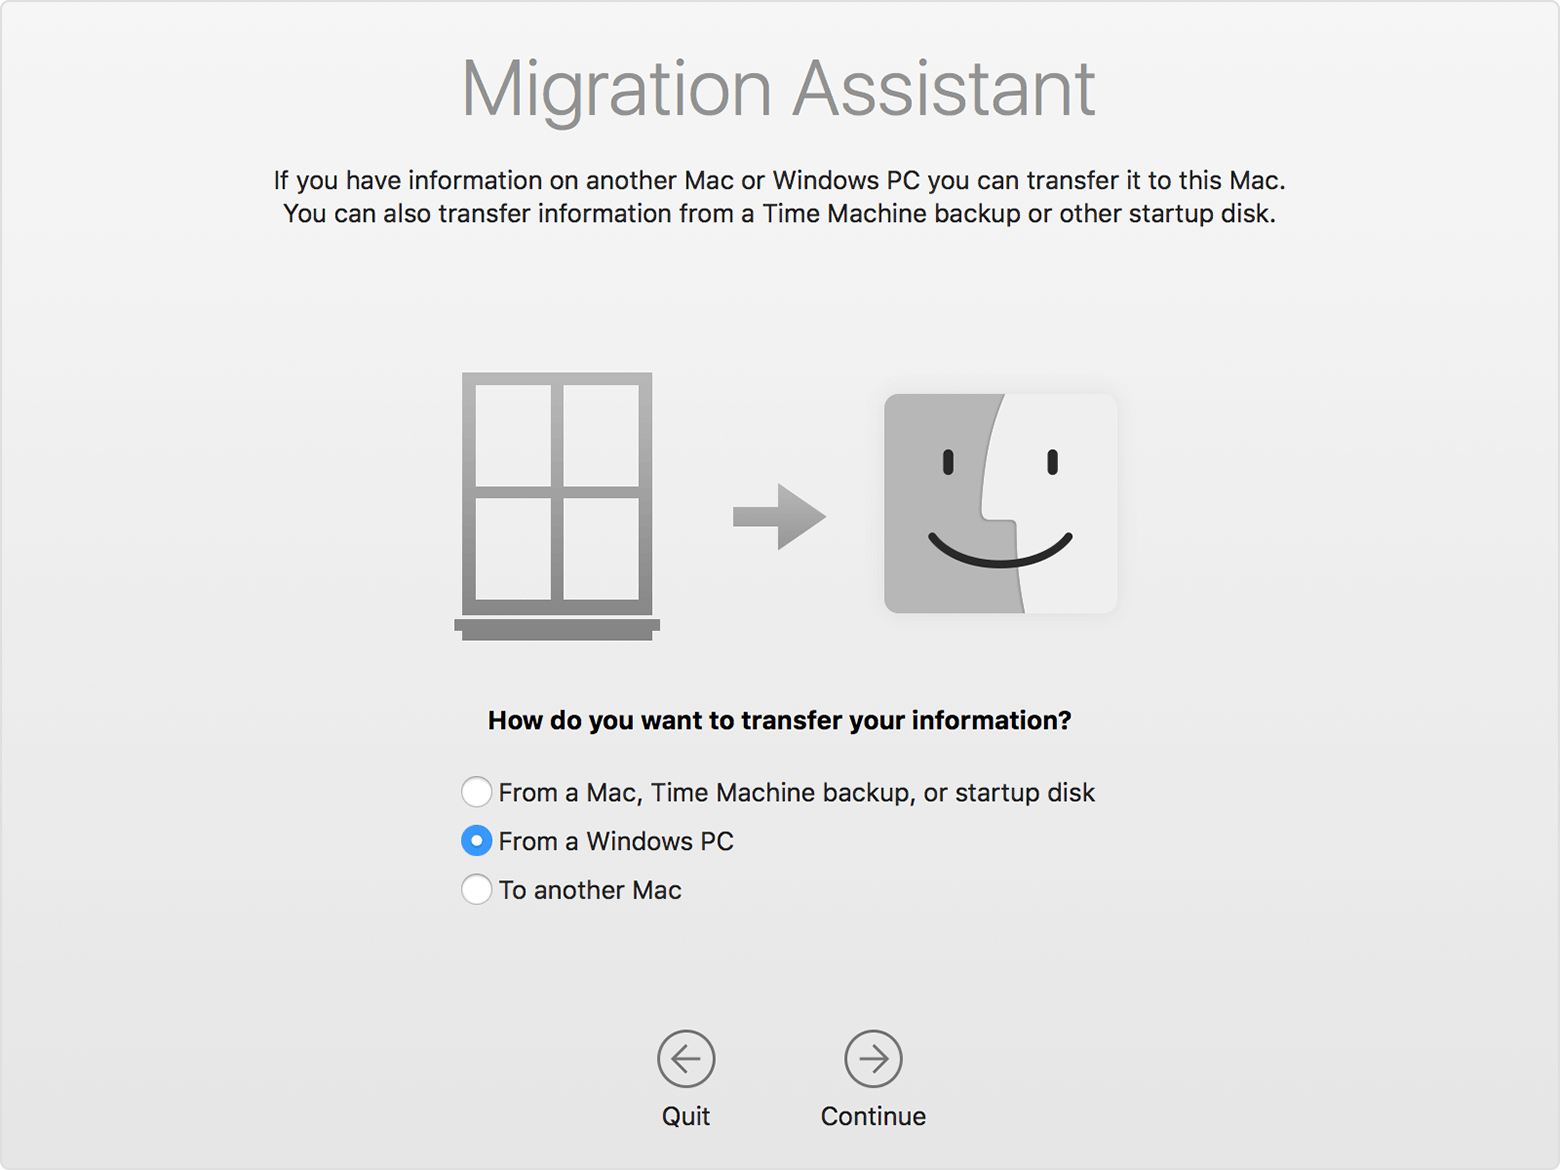
- On your Mac, follow the onscreen prompts until you get to the migration pane of the assistant. Select the option to transfer your information “From a Windows PC,” then click Continue.
- When prompted, enter an administrator name and password.
- Click Continue to close any other open apps.
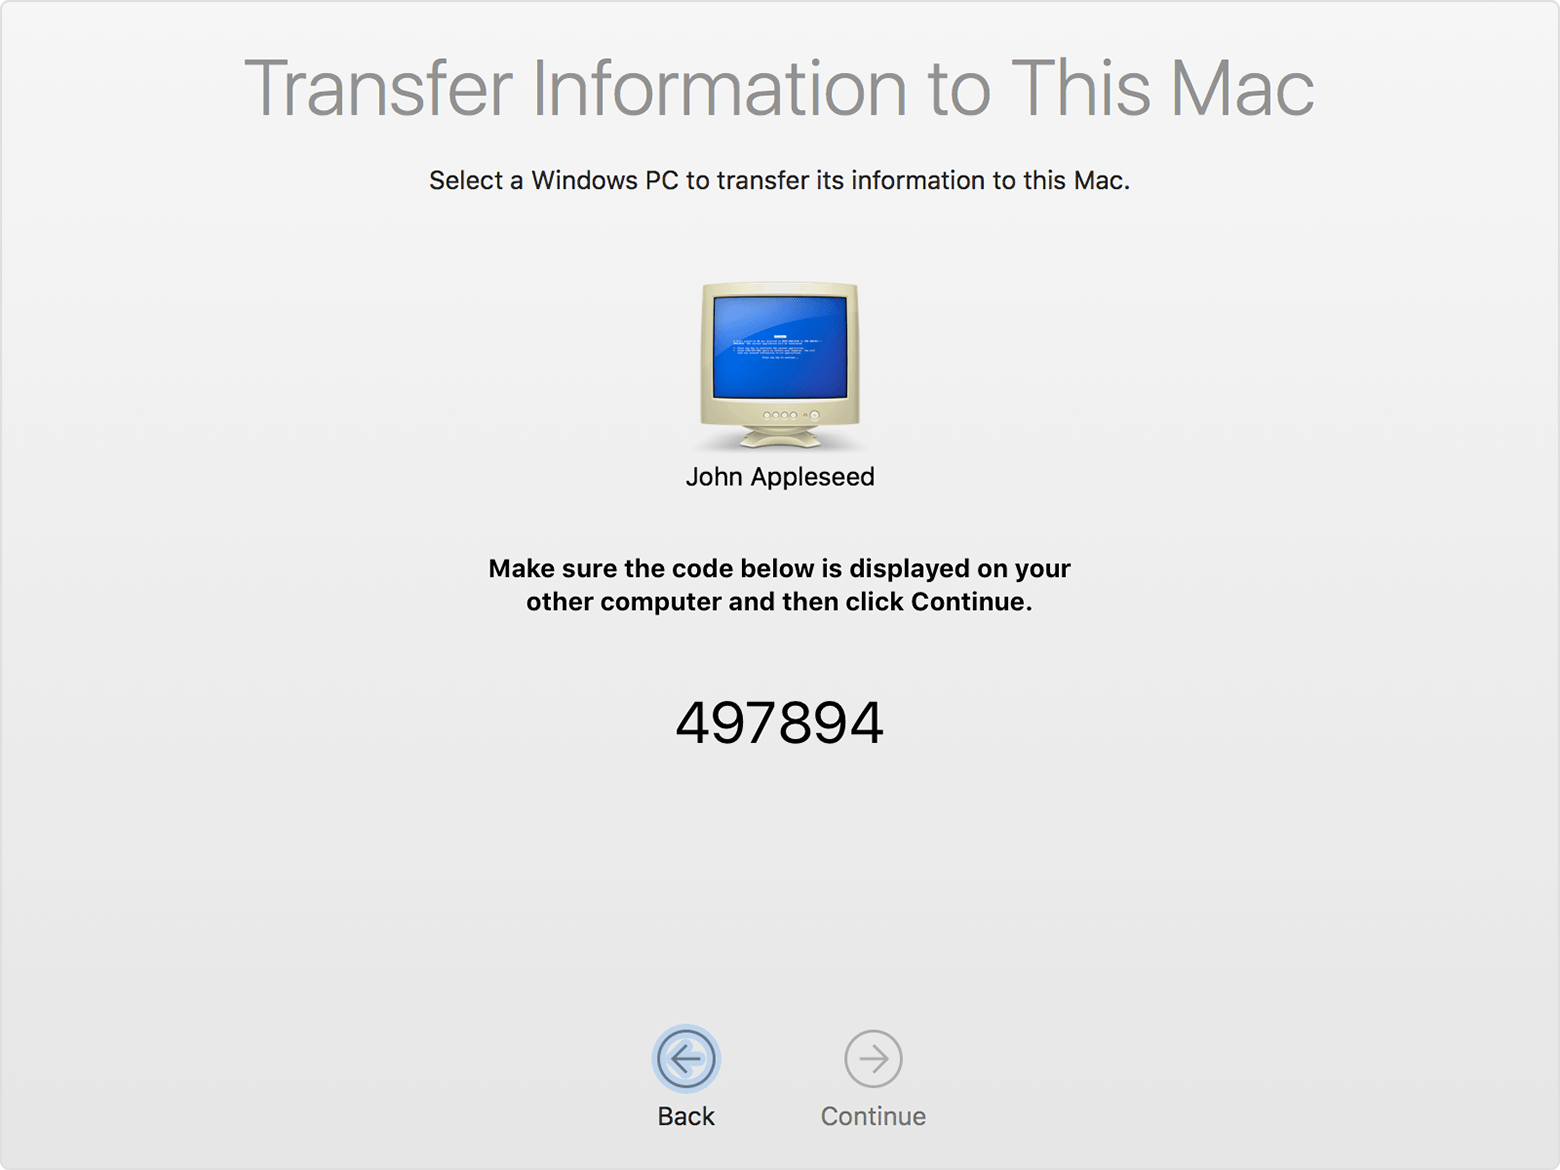
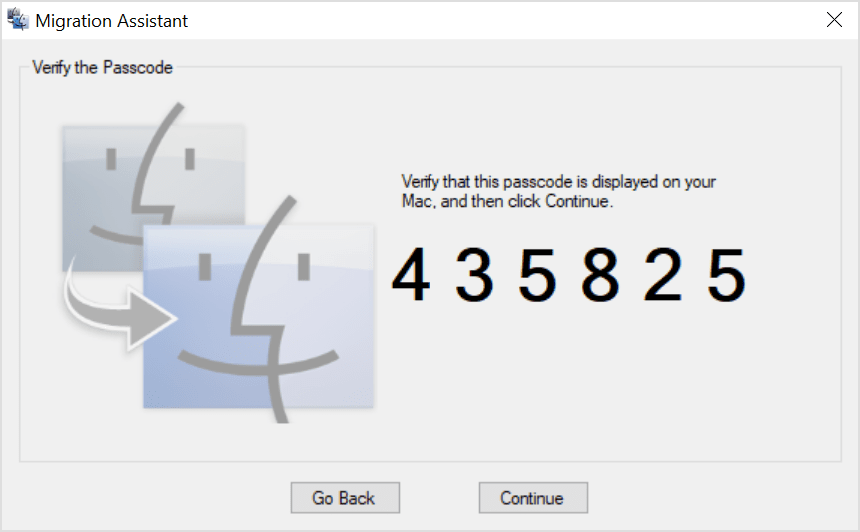
- In the migration window on your Mac, select your PC from the list of available computers. Then wait for the PC to show the same passcode that your Mac shows.
- When both computers display the same passcode, click Continue on your PC and Mac.
- Your Mac scans the drives on your PC to build a list of information to migrate. When the scan completes, select the information that you want to migrate to your Mac and click Continue. Learn about some of the data that you can transfer.
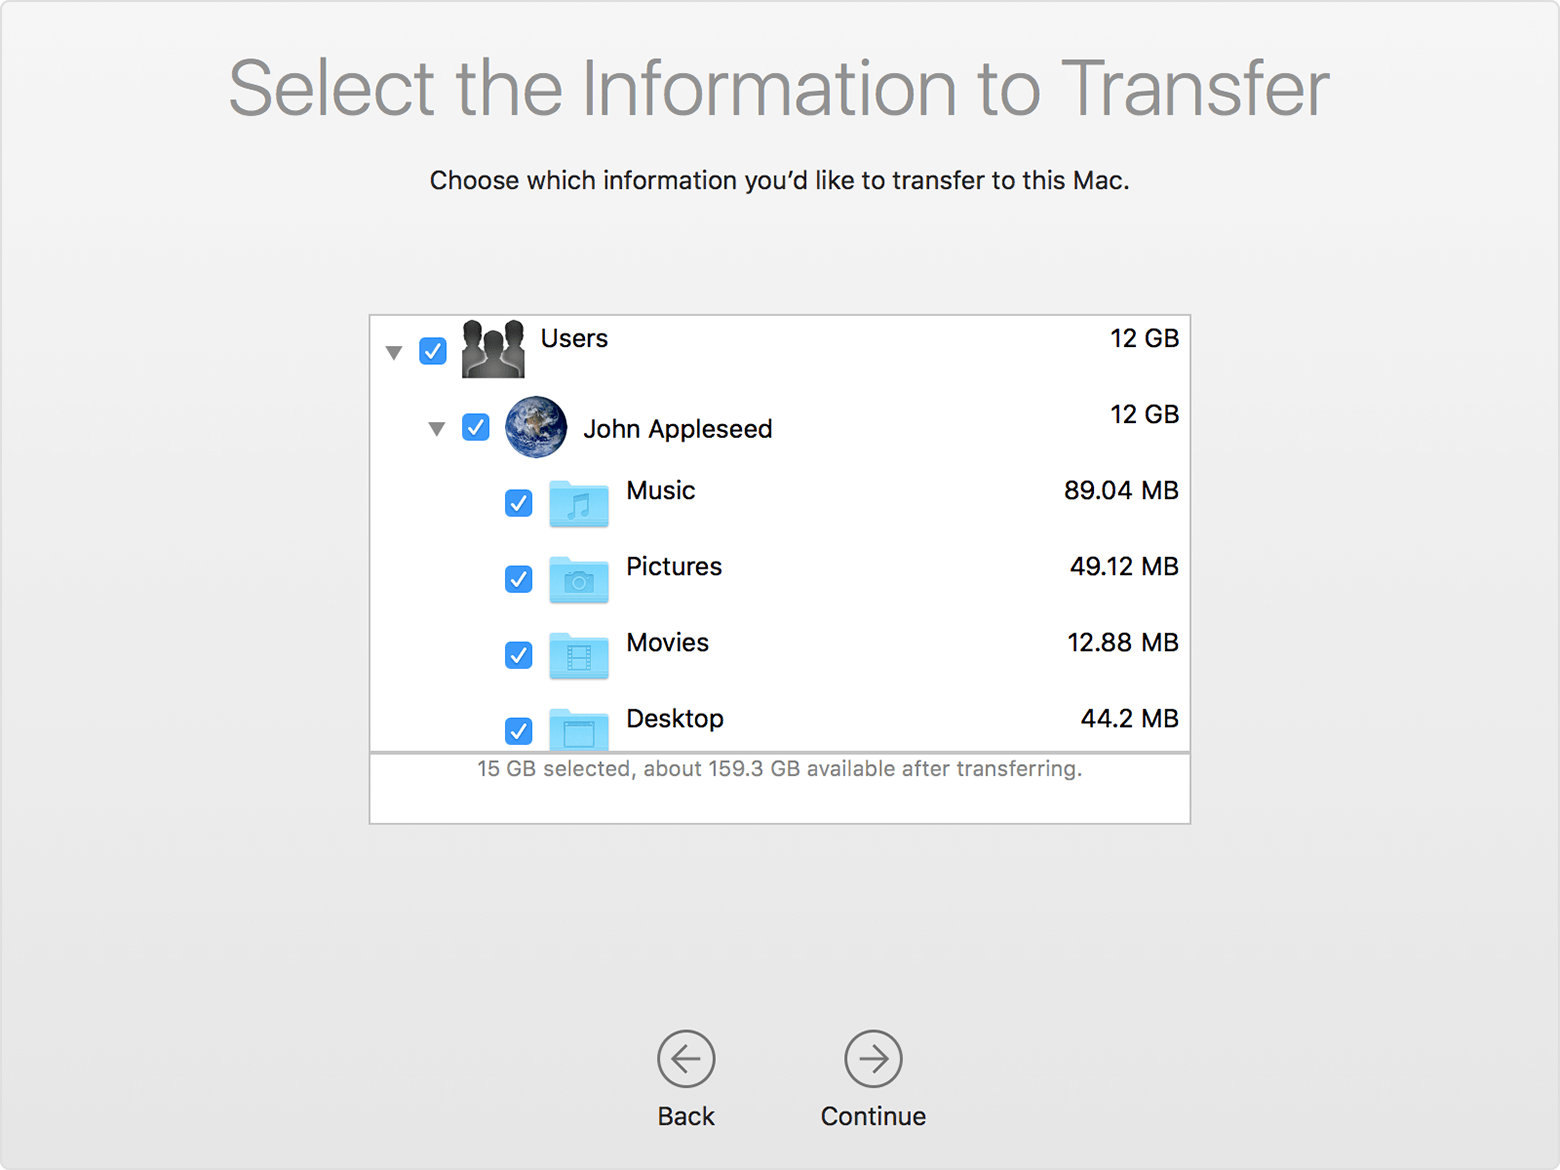
You can watch the progress and estimated time remaining on both the PC and your Mac. They tell you when migration is complete.
After you move your data
When migration completes, close Windows Migration Assistant on your PC. Then log in to the new user account on your Mac. The first time you log in to a user account migrated from your PC, you’re asked to set a password. You can use the same password that you used on your PC, or create a new password.
After logging in to the user account that you migrated, authorize your computer for iTunes Store purchases. It’s important to authorize before you sync or play content downloaded from the iTunes Store.
If you have issues moving your data
- Quit all open apps on your PC, then try migrating your content again. For example, you can press Alt-Tab to choose an open application, then press Alt-F4 to quit it.
- If your PC doesn’t appear in the Setup Assistant or Migration Assistant window on your Mac, make sure the computers are connected to the same network. You can create a network by connecting a single Ethernet cable between your Mac and PC. If that doesn’t help, check for firewall software on your PC and turn it off. After migration completes, you can turn firewall software on again.
- If Migration Assistant doesn’t open on your PC, turn off any antivirus software on your PC. Then try to open Migration Assistant again. After migration completes. You can turn that software on again.
- If you still can’t migrate your information successfully, you can use an external drive or file sharing to manually copy important data to your Mac.
What data can I transfer?
Migration Assistant lets you choose the data to move to your Mac. Here’s what moves over for specific apps and data types:
Email, contacts, and calendar information
Email messages, email-account settings, contacts, and appointments move based on which version of Windows you’re using and which accounts you have.
Outlook 1
Data from 32-bit versions of Outlook in Windows 7 and later move as follows:
- People move to Contacts 2
- Appointments move to the Calendar app
- IMAP and Exchange settings and messages move to the Mail app
- POP settings and messages move to Mail 2
Windows Live Mail
Data from Windows Live Mail in Windows 7 and later moves as follows:
- IMAP settings and messages move to Mail
- POP settings and messages move to Mail 2
Windows Mail
Data from Windows Mail in Windows 7 and later (excluding Windows 8) move as follows:
- IMAP settings and messages move to Mail
- POP settings and messages move to Mail 2
- People move to Contacts
Bookmarks
Bookmarks from Internet Explorer, Safari for Windows, and Firefox move to Safari.
System settings
Language and location settings, and custom desktop pictures move to System Preferences. Your web browser homepage moves to Safari preferences.
Pictures
Photos and other images move to your home folder. You can then add them to Photos, or open Photos and let it search your Mac for photos to import.
iTunes content
Migration Assistant transfers your iTunes media as follows: music to the Apple Music app, videos to the Apple TV app, podcasts to the Apple Podcasts app, and audiobooks to the Apple Books app.
Other files
Migration Assistant also moves these files:
- Files from the top-level folder of the currently logged-in user’s home directory
- Non-system files located in the Windows or Program Files folders
- Top-level folders located on the Windows system disk and other attached disks
1. Migration Assistant doesn’t support 64-bit versions of Outlook. You can manually migrate Mail, Contacts, or Calendars from Outlook 2013 or Outlook 2016 by signing in and entering the content on your Mac manually.
2. Migration Assistant transfers only the Mail or Contacts data that belongs to the logged-in Windows user. To transfer data from another user account, use Migration Assistant again while you’re logged in to another Windows account. Each time you migrate, your Mac creates a new user account.
Information about products not manufactured by Apple, or independent websites not controlled or tested by Apple, is provided without recommendation or endorsement. Apple assumes no responsibility with regard to the selection, performance, or use of third-party websites or products. Apple makes no representations regarding third-party website accuracy or reliability. Contact the vendor for additional information.
Set up and use iCloud for Windows
With iCloud for Windows, the photos, documents, and bookmarks on your PC are updated automatically on your Apple devices.
Before you begin
Make sure that you set up iCloud on your iPhone, iPad, or iPod touch or Mac and that you’re signed in with your Apple ID. Then follow the steps below to download and set up iCloud for Windows.
Want to access iCloud’s latest features? See the recommended system requirements. iCloud requires an Internet connection. iCloud might not be available in all areas and features vary. If you use a Managed Apple ID, iCloud for Windows isn’t supported.

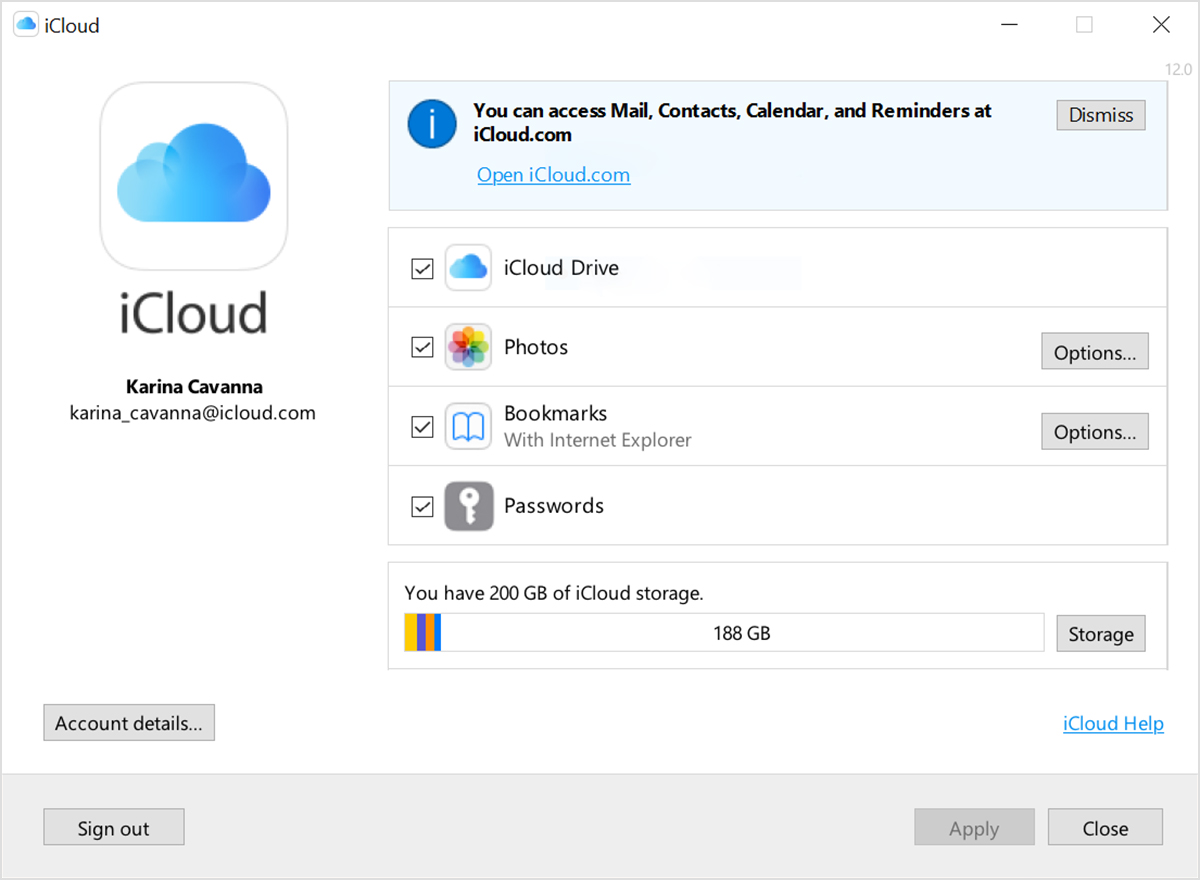
Set up iCloud for Windows
- Download iCloud for Windows on your PC.
- Windows 10: Go to the Microsoft Store to download iCloud for Windows.
- Earlier versions of Windows*: Download iCloud for Windows from apple.com.
- If it doesn’t install automatically, go to File Explorer and open iCloud Setup.
- Restart your computer.
- Make sure iCloud for Windows is open. If it doesn’t open automatically, go to Start, open Apps or Programs, and open iCloud for Windows.
- Enter your Apple ID to sign in to iCloud.
- Choose the features and content that you want to keep up to date across your devices.
- Click Apply.
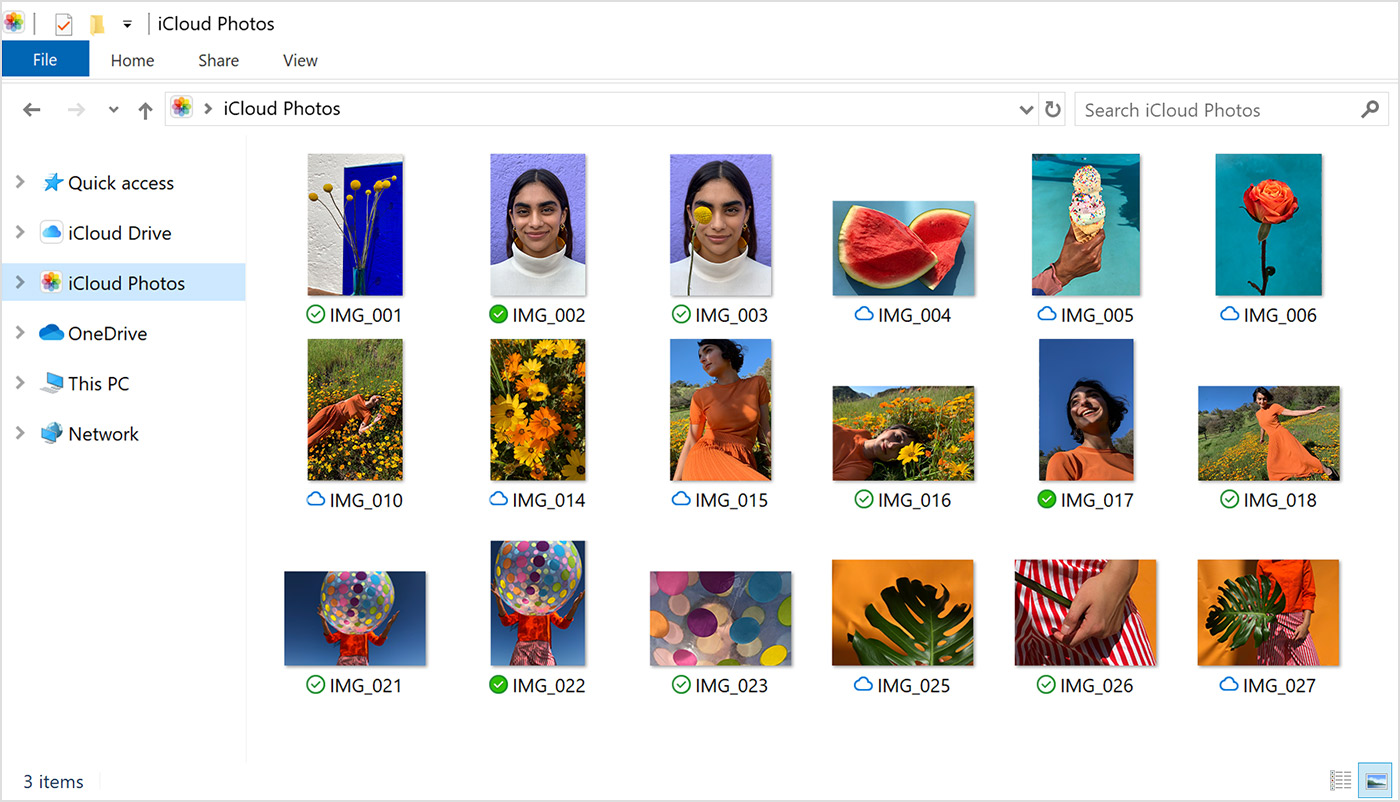
Download and share your photos
When you turn on Photos, iCloud for Windows creates a Photos folder in File Explorer called iCloud Photos. iCloud Photos uploads new photos and videos that you add to the iCloud Photos folder on your PC so you can see them in the Photos app on your iPhone, iPad, iPod touch, and Mac, and on iCloud.com. New photos and videos you take automatically download from iCloud Photos.
Share your photos
You can also share your photos. Shared Albums lets you view, share, and comment on the photos and videos you share with other people. And if you use the latest version of iCloud for Windows, you can pin photos to keep them local to your device. When you unpin them, they upload to iCloud instead.
See your files and folders with iCloud Drive
When you turn on iCloud Drive, iCloud for Windows creates an iCloud Drive folder in File Explorer. You can find documents that you’ve stored in iCloud in this folder. When you create a file on your PC and save it to the iCloud Drive folder, it also appears on your other devices.
If you want to work on files with friends or colleagues, you can share individual files or create a shared folder to share a group of files. You can also pin files and folders so you can use them offline, and easily check the status of a download or shared file. In iCloud for Windows 12, you can find and recover files deleted from iCloud Drive in the past 30 days in Recently Deleted in iOS, iPadOS, or iCloud.com, in Trash in macOS, and in Recycle Bin in Windows. If you use Delete or Delete All in Recently Deleted or empty the Trash in macOS, files aren’t recoverable. If you don’t see the files you wish to restore, you can recover files deleted within the last 30 days at iCloud.com.
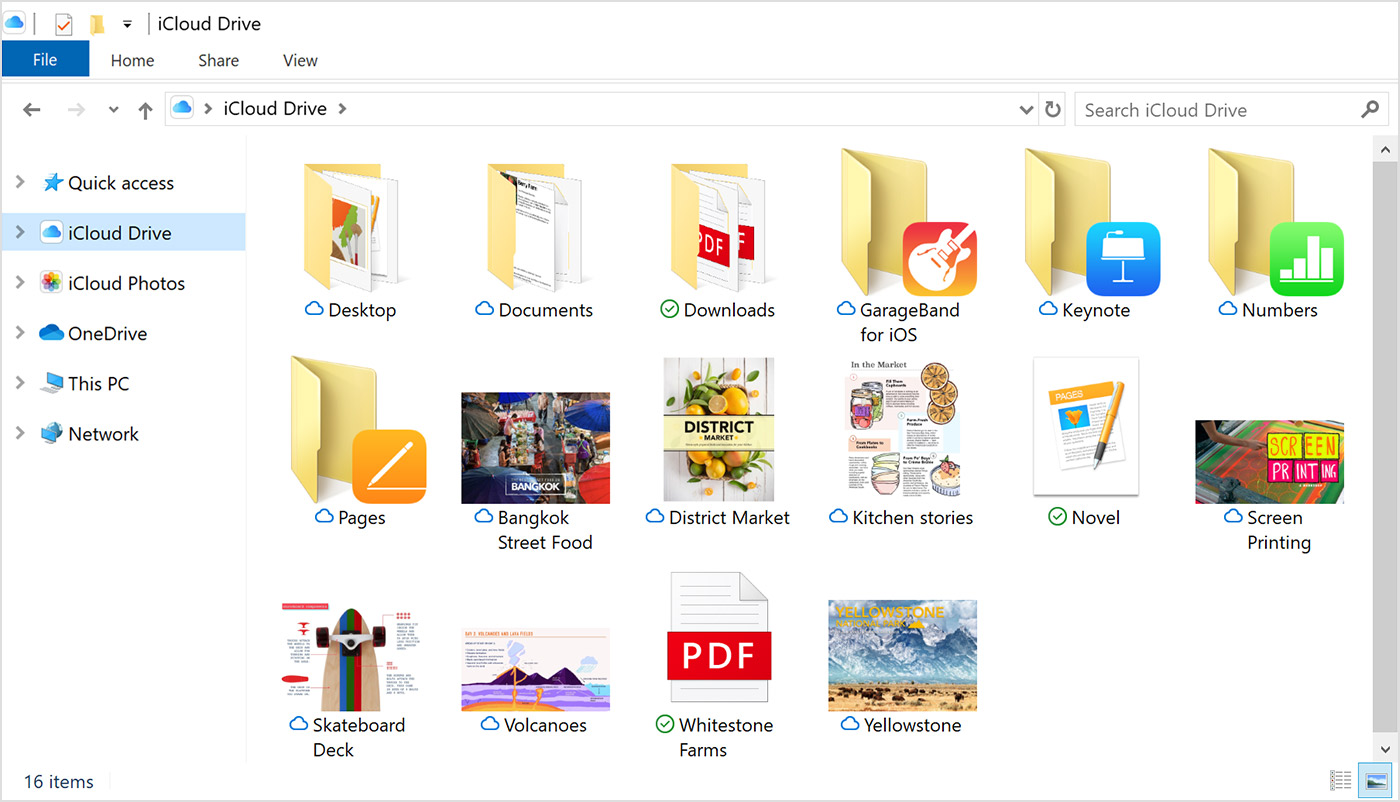
You can also access your iCloud Drive files and folders at iCloud.com.
If you receive an error when you try to move a file from iCloud for Windows, you might need to download the file to your Windows PC. After you download the file, try moving it again.
Keep your apps up to date
When you use iCloud on all of your devices, you can keep your Mail, Contacts, Calendars, and Tasks* updated no matter which device you’re using. Just make sure iCloud is set up on your PC, iPhone, iPad, iPod touch, or Mac using the steps below.
* On a Mac or iOS device, you see Reminders instead of Tasks.
On your PC
- Open iCloud for Windows.
- Select Mail, Contacts, Calendars, and Tasks then click Apply.
- You’ll see your iCloud Mail account in the folder pane on the left side of Microsoft Outlook 2007 through Outlook 2016.
If you sign in to iCloud using a third-party Mail app outside of iCloud for Windows, learn how to create an app-specific password to keep information up to date on your devices.
Использование программы Apple Software Update для Windows
Программа Apple Software Update помогает гарантировать, что в Windows используется актуальное программное обеспечение Apple.
При установке iTunes или iCloud для Windows на компьютер PC — или при использовании Ассистента Boot Camp для установки Windows на компьютер Mac — устанавливается также программа Apple Software Update для Windows.
Программа Apple Software Update следит за актуальностью программного обеспечения Apple на компьютере с ОС Windows. Также она загружает последние обновления безопасности и ПО Apple в ОС Windows, установленной на компьютере Mac.
Запуск программы Apple Software Update
- Щелкните значок Windows в левом нижнем углу экрана Windows.
- Введите Apple Software Update в поле поиска.
- Щелкните пункт Apple Software Update при его появлении в диалоговом окне результатов поиска.
Программа Apple Software Update проверяет наличие доступных обновлений. Установите флажки рядом с обновлениями, которые требуется установить, нажмите кнопку «Установить», а затем следуйте инструкциям на экране. 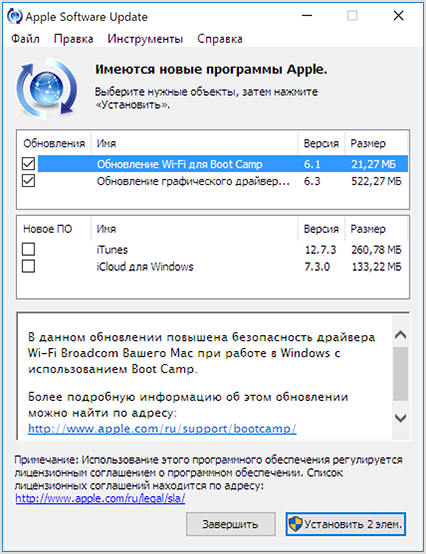
Программа Apple Software Update для Windows запускается один раз в неделю для проверки наличия обновлений. В настройках программы можно изменить частоту запуска на «Ежедневно», «Еженедельно», «Ежемесячно» или «Никогда». 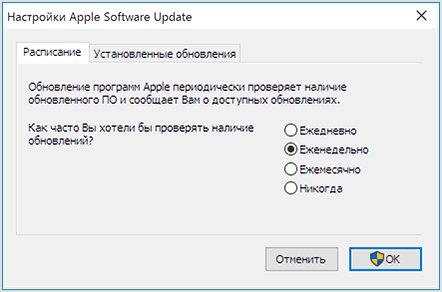
Дополнительная информация
Дополнительные сведения об использовании Boot Camp для установки Windows на компьютер Mac см. на странице поддержки Boot Camp.
Информация о продуктах, произведенных не компанией Apple, или о независимых веб-сайтах, неподконтрольных и не тестируемых компанией Apple, не носит рекомендательного или одобрительного характера. Компания Apple не несет никакой ответственности за выбор, функциональность и использование веб-сайтов или продукции сторонних производителей. Компания Apple также не несет ответственности за точность или достоверность данных, размещенных на веб-сайтах сторонних производителей. Обратитесь к поставщику за дополнительной информацией.


