- Использование программы Apple Software Update для Windows
- Запуск программы Apple Software Update
- Дополнительная информация
- Download and install Windows support software on your Mac
- Install the latest macOS updates
- Format a USB flash drive
- Download the Windows support software
- Install the Windows support software
- Learn more
- Загрузите и используйте iTunes для Windows
- Если не удается получить доступ к магазину Microsoft Store
- Знакомство с iTunes для Windows
- Управление данными на устройствах iPhone, iPad и iPod touch и синхронизация содержимого
- Изменение настроек и управление учетной записью
- Set up and use iCloud for Windows
- Before you begin
- Set up iCloud for Windows
- Download and share your photos
- Share your photos
- See your files and folders with iCloud Drive
- Keep your apps up to date
- On your PC
Использование программы Apple Software Update для Windows
Программа Apple Software Update помогает гарантировать, что в Windows используется актуальное программное обеспечение Apple.
При установке iTunes или iCloud для Windows на компьютер PC — или при использовании Ассистента Boot Camp для установки Windows на компьютер Mac — устанавливается также программа Apple Software Update для Windows.
Программа Apple Software Update следит за актуальностью программного обеспечения Apple на компьютере с ОС Windows. Также она загружает последние обновления безопасности и ПО Apple в ОС Windows, установленной на компьютере Mac.

Запуск программы Apple Software Update
- Щелкните значок Windows в левом нижнем углу экрана Windows.
- Введите Apple Software Update в поле поиска.
- Щелкните пункт Apple Software Update при его появлении в диалоговом окне результатов поиска.
Программа Apple Software Update проверяет наличие доступных обновлений. Установите флажки рядом с обновлениями, которые требуется установить, нажмите кнопку «Установить», а затем следуйте инструкциям на экране. 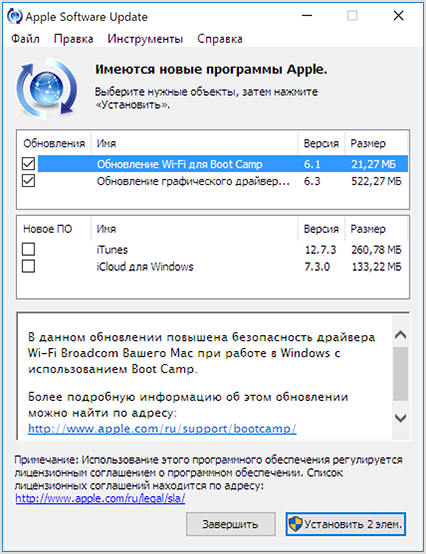
Программа Apple Software Update для Windows запускается один раз в неделю для проверки наличия обновлений. В настройках программы можно изменить частоту запуска на «Ежедневно», «Еженедельно», «Ежемесячно» или «Никогда». 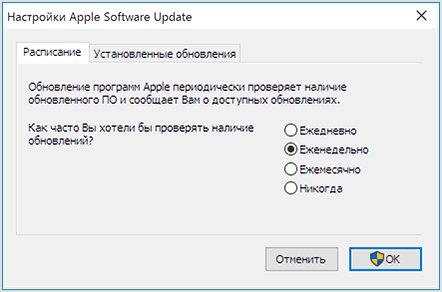
Дополнительная информация
Дополнительные сведения об использовании Boot Camp для установки Windows на компьютер Mac см. на странице поддержки Boot Camp.
Информация о продуктах, произведенных не компанией Apple, или о независимых веб-сайтах, неподконтрольных и не тестируемых компанией Apple, не носит рекомендательного или одобрительного характера. Компания Apple не несет никакой ответственности за выбор, функциональность и использование веб-сайтов или продукции сторонних производителей. Компания Apple также не несет ответственности за точность или достоверность данных, размещенных на веб-сайтах сторонних производителей. Обратитесь к поставщику за дополнительной информацией.
Download and install Windows support software on your Mac
After using Boot Camp Assistant to install or upgrade Microsoft Windows on your Mac, you might also need to install the latest Windows support software (drivers) from Apple.
When you install Microsoft Windows on your Mac, Boot Camp Assistant automatically opens the Boot Camp installer, which installs the latest Windows support software (drivers). If that doesn’t happen, or you experience any of the following issues while using Windows on your Mac, follow the steps in this article.
- Your Apple mouse, trackpad, or keyboard isn’t working in Windows.
Force Touch isn’t designed to work in Windows. - You don’t hear audio from the built-in speakers of your Mac in Windows.
- The built-in microphone or camera of your Mac isn’t recognized in Windows.
- One or more screen resolutions are unavailable for your display in Windows.
- You can’t adjust the brightness of your built-in display in Windows.
- You have issues with Bluetooth or Wi-Fi in Windows.
- You get an alert that Apple Software Update has stopped working.
- You get a message that your PC has a driver or service that isn’t ready for this version of Windows.
- Your Mac starts up to a black or blue screen after you install Windows.
If your Mac has an AMD video card and is having graphics issues in Windows, you might need to update your AMD graphics drivers instead.
Install the latest macOS updates
Before proceeding, install the latest macOS updates, which can include updates to Boot Camp.
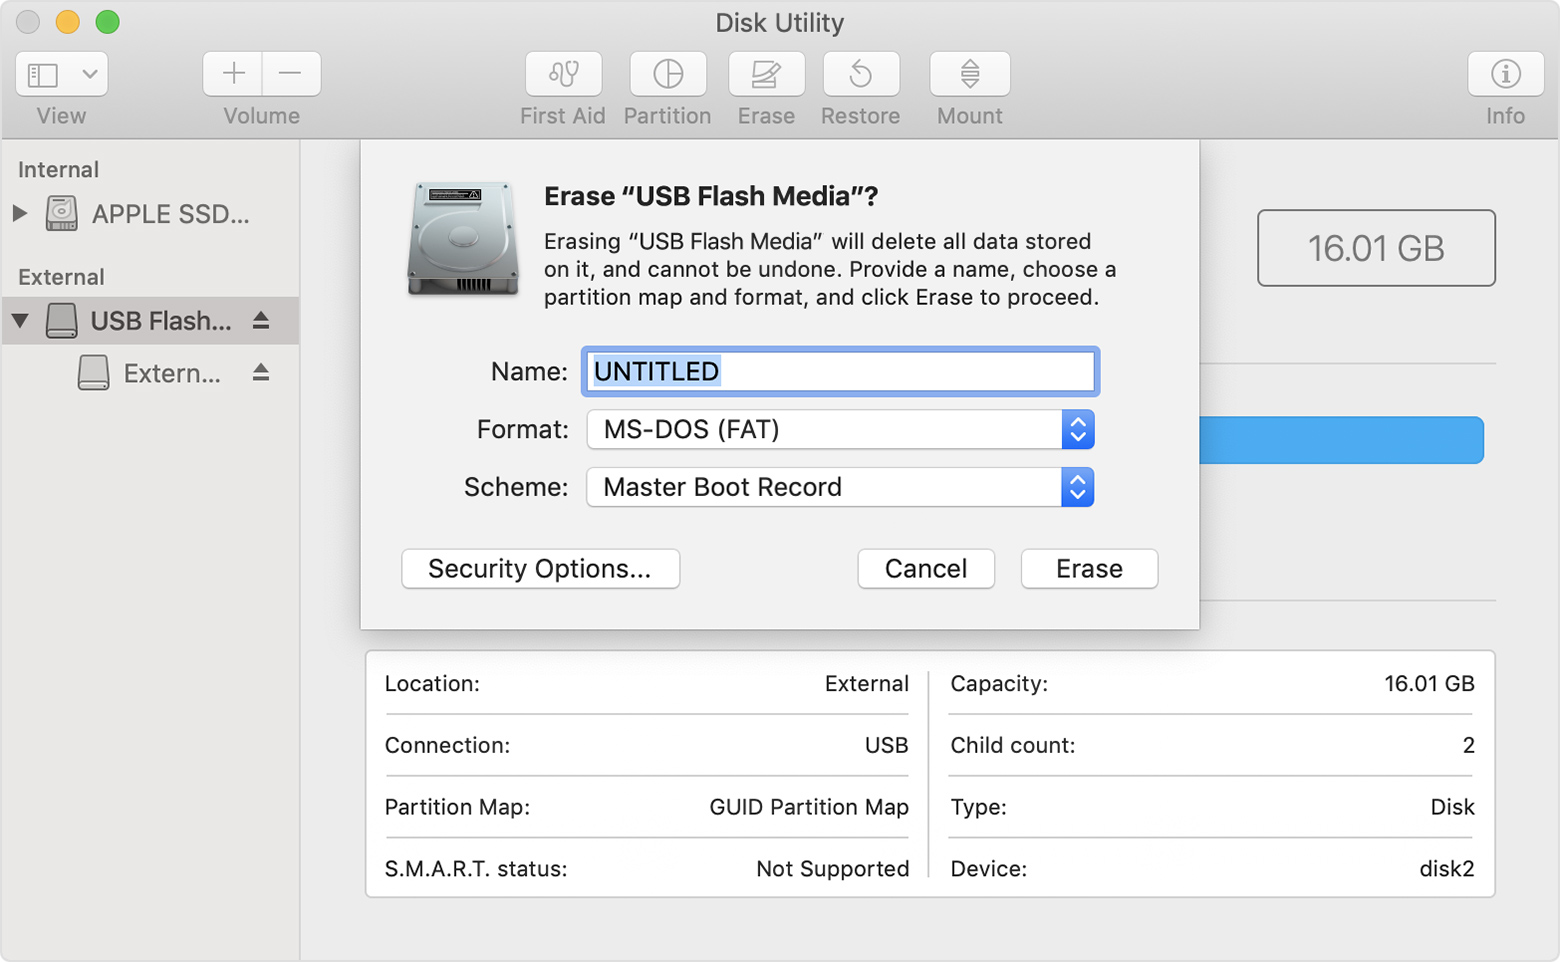
Format a USB flash drive
To install the latest Windows support software, you need a 16GB or larger USB flash drive formatted as MS-DOS (FAT).
- Start your Mac from macOS.
- Plug the USB flash drive into your Mac.
- Open Disk Utility, which is in the Utilities folder of your Applications folder.
- Choose View > Show All Devices from the menu bar.
- From the sidebar in Disk Utility, select your USB flash drive. (Select the drive name, not the volume name beneath it.)

- Click the Erase button or tab.
- Choose MS-DOS (FAT) as the format and Master Boot Record as the scheme.
- Click Erase to format the drive. When done, quit Disk Utility.
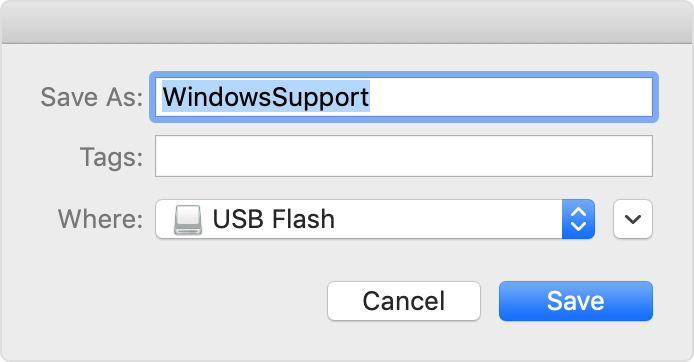
Download the Windows support software
- Make sure that your Mac is connected to the Internet.
- Open Boot Camp Assistant, which is in the Utilities folder of your Applications folder.
- From the menu bar at the top of your screen, choose Action > Download Windows Support Software, then choose your USB flash drive as the save destination. When the download completes, quit Boot Camp Assistant.
Install the Windows support software
After downloading the Windows support software to your flash drive, follow these steps to install the software. (If you’re attempting to resolve issues with a Bluetooth mouse or keyboard, it might be easier to use a USB mouse or keyboard until these steps are complete.)
- Make sure that the USB flash drive is plugged into your Mac.
- Start up your Mac in Windows.
- From File Explorer, open the USB flash drive, then open Setup or setup.exe, which is in the WindowsSupport folder or BootCamp folder. When you’re asked to allow Boot Camp to make changes to your device, click Yes.
- Click Repair to begin installation. If you get an alert that the software hasn’t passed Windows Logo testing, click Continue Anyway.
- After installation completes, click Finish, then click Yes when you’re asked to restart your Mac.
Learn more
If you can’t download or save the Windows support software:
- If the assistant says that the Windows support software could not be saved to the selected drive, or that the USB flash drive can’t be used, make sure that your USB flash drive has a storage capacity of at least 16GB and is formatted correctly.
- If the assistant doesn’t see your USB flash drive, click Go Back and make sure that the drive is connected directly to the USB port on your Mac—not to a display, hub, or keyboard. Disconnect and reconnect the drive, then click Continue.
- If the assistant says that it can’t download the software because of a network problem, make sure that your Mac is connected to the Internet.
- Make sure that your Mac meets the system requirements to install Windows using Boot Camp.
If a Mac feature still doesn’t work after updating the Windows support software, search for your symptom on the Apple support website or Microsoft support website. Some features of your Mac aren’t designed to work in Windows.
Information about products not manufactured by Apple, or independent websites not controlled or tested by Apple, is provided without recommendation or endorsement. Apple assumes no responsibility with regard to the selection, performance, or use of third-party websites or products. Apple makes no representations regarding third-party website accuracy or reliability. Contact the vendor for additional information.
Загрузите и используйте iTunes для Windows
С помощью iTunes для Windows вы можете централизованно управлять всей медиаколлекцией. Подпишитесь на Apple Music, чтобы получить доступ к миллионам композиций. Покупайте музыку и фильмы в iTunes Store. Синхронизируйте контент со своего компьютера на iPhone, iPad или iPod touch.
Если не удается получить доступ к магазину Microsoft Store
Знакомство с iTunes для Windows
Для навигации по iTunes используйте кнопки на панели навигации в верхней части окна iTunes. Чтобы изменить тип содержимого, выберите пункт «Музыка», «Фильмы», «Телешоу», «Подкасты» или «Аудиокниги» из всплывающего меню в левом верхнем углу.
Прослушивание музыки
Зарегистрируйтесь в Apple Music, чтобы получить доступ к миллионам композиций, покупать музыку в магазине iTunes Store, слушать радио или загружать и прослушивать музыку в iTunes.
Прослушивание подкастов Apple Podcasts
Находите развлекательные, информационные и вдохновляющие аудиоматериалы и подписывайтесь на понравившиеся подкасты. Находите бесплатные выпуски и передачи разнообразной тематики.
Просмотр фильмов и телешоу
Просматривайте категории, где предлагаются фильмы и телешоу для покупки, или берите фильмы напрокат.
Прослушивание аудиокниг
Просматривайте категории, чтобы найти аудиокниги для покупки.
Доступность и функции магазина могут различаться в зависимости от страны или региона. Узнайте, что можно приобрести в вашей стране или регионе.
Управление данными на устройствах iPhone, iPad и iPod touch и синхронизация содержимого
С помощью приложения iTunes для Windows создавайте резервные копии и обновляйте данные на iPhone, iPad или iPod touch, а также синхронизируйте содержимое между компьютером и устройством.
Чтобы просматривать фотографии, контакты, календари, файлы и другие данные с любого из ваших устройств, можно также использовать приложение iCloud для Windows.
Изменение настроек и управление учетной записью
- Выберите «Учетная запись» > «Просмотреть мою учетную запись», чтобы просматривать историю покупок, управлять подписками, а также изменять платежные и другие данные.
- Выберите «Учетная запись» > «Выйти», чтобы отменить вход в iTunes с использованием вашего идентификатора Apple ID и прекратить доступ к своему контенту в iTunes.
- Выберите «Правка» > «Настройки», чтобы изменить язык, настроить ограничения и другие параметры учетной записи.
При изменении языка может потребоваться выйти из iTunes и повторно выполнить вход.
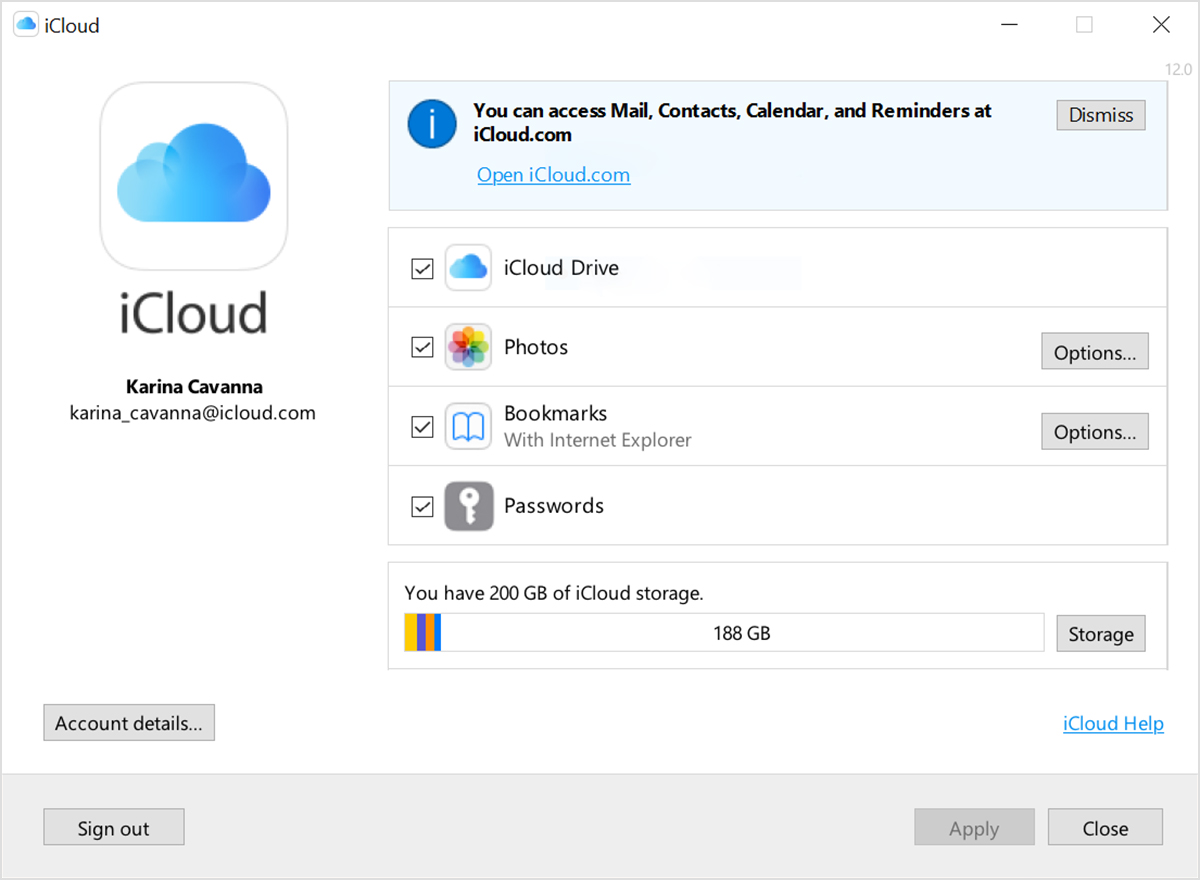
Set up and use iCloud for Windows
With iCloud for Windows, the photos, documents, and bookmarks on your PC are updated automatically on your Apple devices.
Before you begin
Make sure that you set up iCloud on your iPhone, iPad, or iPod touch or Mac and that you’re signed in with your Apple ID. Then follow the steps below to download and set up iCloud for Windows.
Want to access iCloud’s latest features? See the recommended system requirements. iCloud requires an Internet connection. iCloud might not be available in all areas and features vary. If you use a Managed Apple ID, iCloud for Windows isn’t supported.
Set up iCloud for Windows
- Download iCloud for Windows on your PC.
- Windows 10: Go to the Microsoft Store to download iCloud for Windows.
- Earlier versions of Windows*: Download iCloud for Windows from apple.com.
- If it doesn’t install automatically, go to File Explorer and open iCloud Setup.
- Restart your computer.
- Make sure iCloud for Windows is open. If it doesn’t open automatically, go to Start, open Apps or Programs, and open iCloud for Windows.
- Enter your Apple ID to sign in to iCloud.
- Choose the features and content that you want to keep up to date across your devices.
- Click Apply.
Download and share your photos
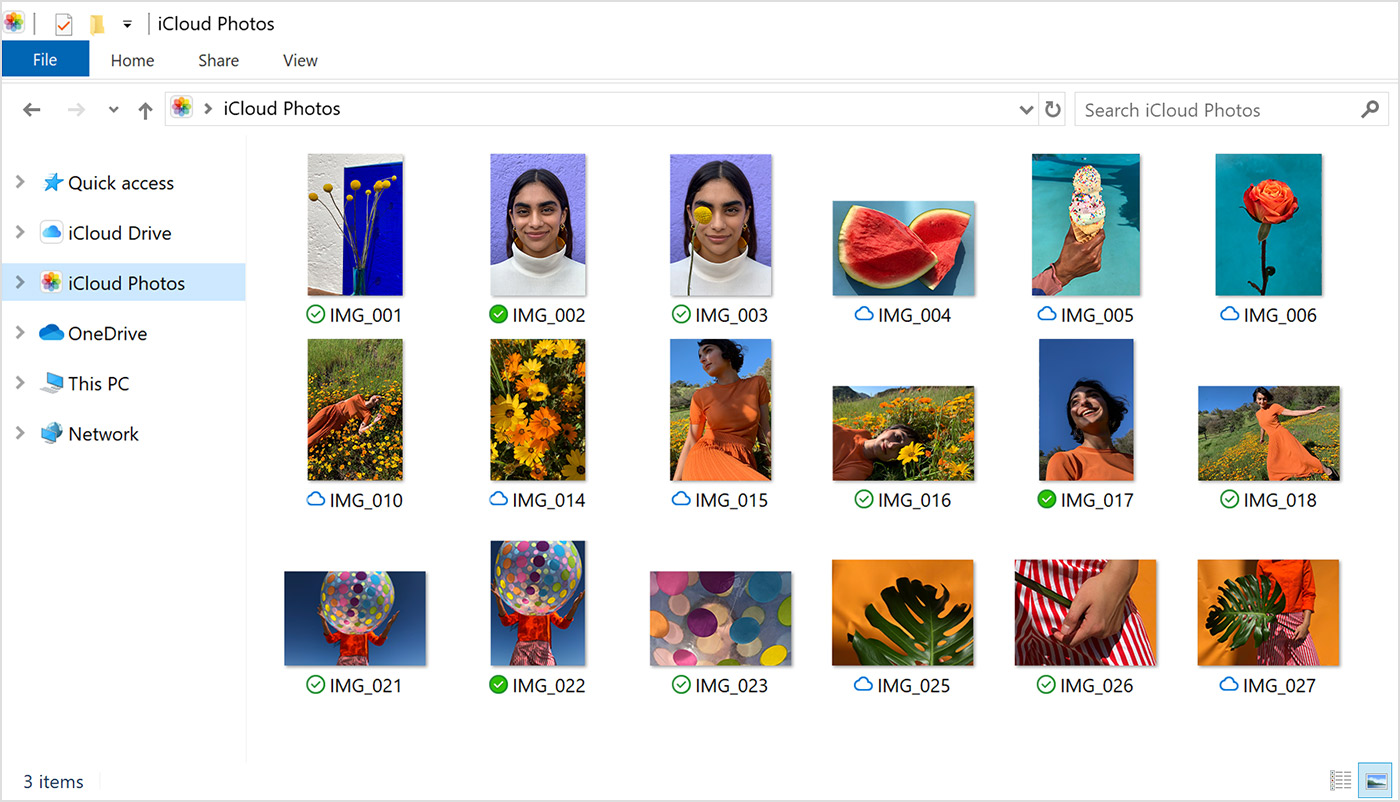
When you turn on Photos, iCloud for Windows creates a Photos folder in File Explorer called iCloud Photos. iCloud Photos uploads new photos and videos that you add to the iCloud Photos folder on your PC so you can see them in the Photos app on your iPhone, iPad, iPod touch, and Mac, and on iCloud.com. New photos and videos you take automatically download from iCloud Photos.
Share your photos
You can also share your photos. Shared Albums lets you view, share, and comment on the photos and videos you share with other people. And if you use the latest version of iCloud for Windows, you can pin photos to keep them local to your device. When you unpin them, they upload to iCloud instead.
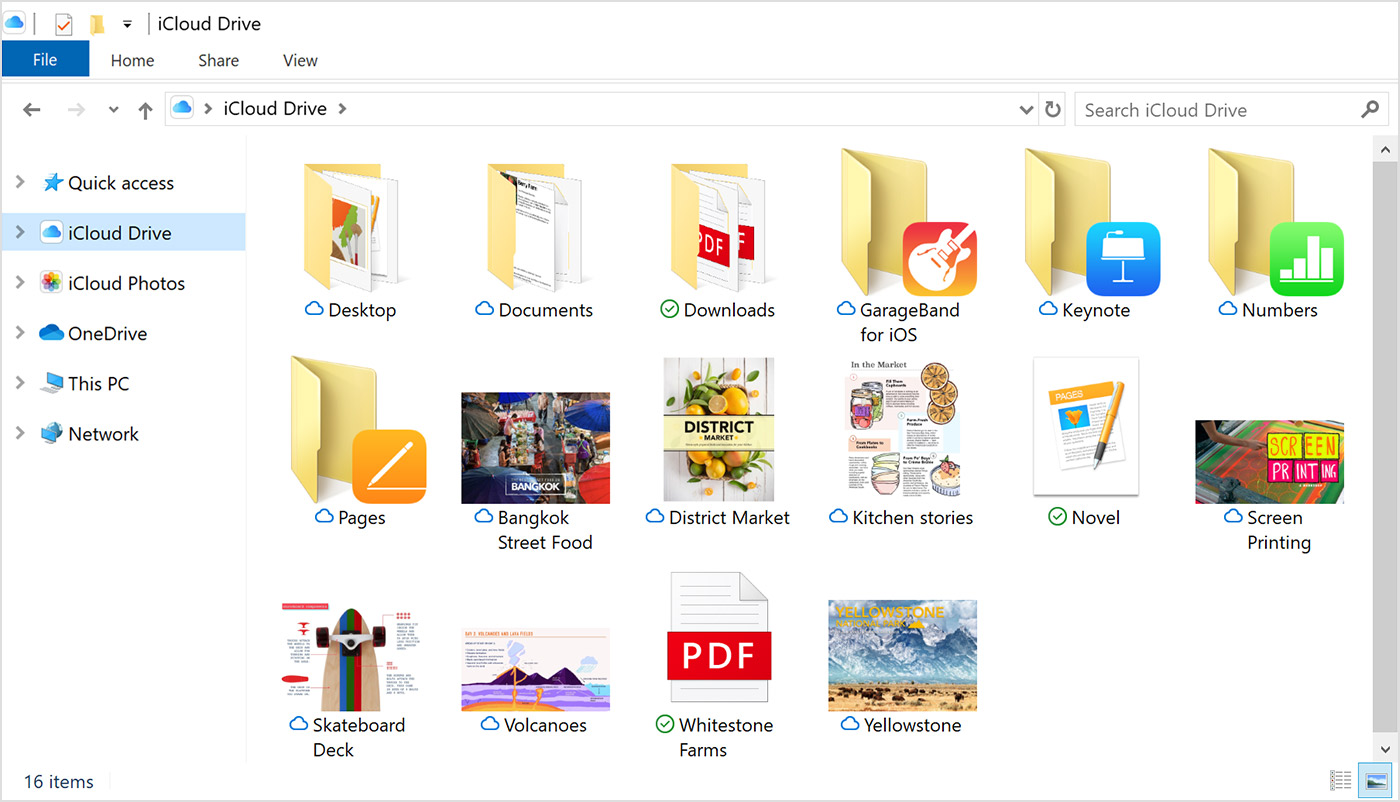
See your files and folders with iCloud Drive
When you turn on iCloud Drive, iCloud for Windows creates an iCloud Drive folder in File Explorer. You can find documents that you’ve stored in iCloud in this folder. When you create a file on your PC and save it to the iCloud Drive folder, it also appears on your other devices.
If you want to work on files with friends or colleagues, you can share individual files or create a shared folder to share a group of files. You can also pin files and folders so you can use them offline, and easily check the status of a download or shared file. In iCloud for Windows 12, you can find and recover files deleted from iCloud Drive in the past 30 days in Recently Deleted in iOS, iPadOS, or iCloud.com, in Trash in macOS, and in Recycle Bin in Windows. If you use Delete or Delete All in Recently Deleted or empty the Trash in macOS, files aren’t recoverable. If you don’t see the files you wish to restore, you can recover files deleted within the last 30 days at iCloud.com.
You can also access your iCloud Drive files and folders at iCloud.com.
If you receive an error when you try to move a file from iCloud for Windows, you might need to download the file to your Windows PC. After you download the file, try moving it again.
Keep your apps up to date
When you use iCloud on all of your devices, you can keep your Mail, Contacts, Calendars, and Tasks* updated no matter which device you’re using. Just make sure iCloud is set up on your PC, iPhone, iPad, iPod touch, or Mac using the steps below.
* On a Mac or iOS device, you see Reminders instead of Tasks.
On your PC
- Open iCloud for Windows.
- Select Mail, Contacts, Calendars, and Tasks then click Apply.
- You’ll see your iCloud Mail account in the folder pane on the left side of Microsoft Outlook 2007 through Outlook 2016.
If you sign in to iCloud using a third-party Mail app outside of iCloud for Windows, learn how to create an app-specific password to keep information up to date on your devices.


