- Prepare your development environment on Linux
- Prerequisites
- Installation methods
- Update your APT sources
- Script installation
- Manual installation
- Install and set up the Service Fabric SDK for a local cluster
- Ubuntu
- Update your Yum repositories
- Manual installation (RHEL)
- Install and set up the Service Fabric SDK for a local cluster (RHEL)
- Included packages
- Set up a local cluster
- Set up the Service Fabric CLI
- Set up Yeoman generators for containers and guest executables
- Set up .NET Core 3.1 development
- Set up Java development
- Install the Eclipse plug-in (optional)
- Update the SDK and runtime
- Remove the SDK
- Apt get install linux azure
Prepare your development environment on Linux
To deploy and run Azure Service Fabric applications on your Linux development machine, install the runtime and common SDK. You can also install optional SDKs for Java and .NET Core development.
The steps in this article assume that you install natively on Linux or use the Service Fabric OneBox container image, i.e. mcr.microsoft.com/service-fabric/onebox:u18 .
You can manage Service Fabric entities hosted in the cloud or on-premises with the Azure Service Fabric command-line interface (CLI). For information on how to install the CLI, see Set up the Service Fabric CLI.
Prerequisites
Ensure you are using a supported Linux version.
Install the apt-transport-https package:
Installation methods
Update your APT sources
To install the SDK and associated runtime package via the apt-get command-line tool, you must first update your Advanced Packaging Tool (APT) sources.
Script installation
For convenience, a script is provided to install the Service Fabric runtime and the Service Fabric common SDK along with the sfctl CLI. Running the script assumes you agree to the licenses for all the software that is being installed. Alternatively you may run the Manual installation steps in the next section which will present associated licenses as well as the components being installed.
After the script runs successfully, you can skip to Set up a local cluster.
Manual installation
For manual installation of the Service Fabric runtime and common SDK, follow the rest of this guide.
Open a terminal.
Add the dotnet repo to your sources list corresponding to your distribution.
Add the new MS Open Tech Gnu Privacy Guard (GnuPG or GPG) key to your APT keyring.
Add the official Docker GPG key to your APT keyring.
Set up the Docker repository.
Add Azul JDK Key to your APT keyring and setup its repository.
Refresh your package lists based on the newly added repositories.
Install and set up the Service Fabric SDK for a local cluster
After you update your sources, you can install the SDK. Install the Service Fabric SDK package, confirm the installation, and accept the license agreement.
Ubuntu
The following commands automate accepting the license for Service Fabric packages:
Update your Yum repositories
To install the SDK and associated runtime package via the yum command-line tool, you must first update your package sources.
Manual installation (RHEL)
For manual installation of the Service Fabric runtime and common SDK, follow the rest of this guide.
Open a terminal.
Download and install Extra Packages for Enterprise Linux (EPEL).
Add the EfficiOS RHEL7 package repository to your system.
Import the EfficiOS package signing key to the local GPG keyring.
Add the Microsoft RHEL repository to your system.
Install and set up the Service Fabric SDK for a local cluster (RHEL)
After you update your sources, you can install the SDK. Install the Service Fabric SDK package, confirm the installation, and accept the license agreement.
Included packages
The Service Fabric runtime that comes with the SDK installation includes the packages in the following table.
| DotNetCore | Java | Python | NodeJS | |
|---|---|---|---|---|
| Ubuntu | 2.0.7 | AzulJDK 1.8 | Implicit from npm | latest |
| RHEL | — | OpenJDK 1.8 | Implicit from npm | latest |
Set up a local cluster
- Start a local Service Fabric cluster for development.
Start a container-based Service Fabric Onebox cluster.
Install Moby to be able to deploy Docker containers.
Update the Docker daemon configuration on your host with the following settings and restart the Docker daemon. Details: Enable IPv6 support
Start the cluster.
Ubuntu 18.04 LTS:
Ubuntu 16.04 LTS:
By default, this will pull the image with the latest version of Service Fabric. For particular revisions, please visit the Docker Hub page.
After installing the SDK using steps above, start a local cluster.
Run the cluster setup script.
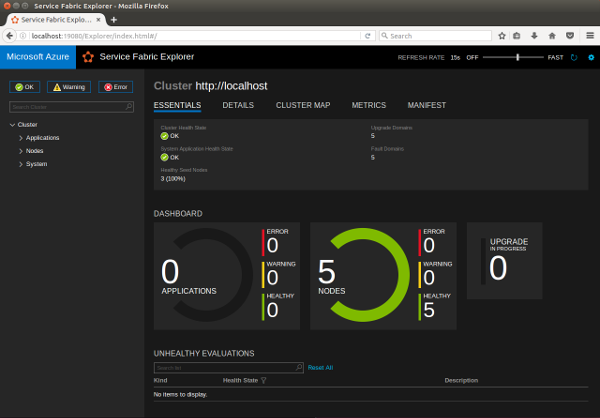
Open a web browser and go to Service Fabric Explorer ( http://localhost:19080/Explorer ). When the cluster starts, you see the Service Fabric Explorer dashboard. It might take several minutes for the cluster to be completely set up. If your browser fails to open the URL or if Service Fabric Explorer doesn’t show that the system is ready, wait a few minutes and try again.
Now you can deploy prebuilt Service Fabric application packages or new ones based on guest containers or guest executables. To build new services by using the Java or .NET Core SDKs, follow the optional setup steps that are provided in the next sections.
Standalone clusters aren’t supported in Linux.
If you have an SSD disk available, we recommend to pass an SSD folder path by using —clusterdataroot with devclustersetup.sh for superior performance.
Set up the Service Fabric CLI
The Service Fabric CLI has commands for interacting with Service Fabric entities, including clusters and applications. To install the CLI, follow the instructions at Service Fabric CLI.
Set up Yeoman generators for containers and guest executables
Service Fabric provides scaffolding tools that help you create Service Fabric applications from a terminal by using Yeoman template generators. Follow these steps to set up the Service Fabric Yeoman template generators:
Install Node.js and npm on your machine.
Install the Yeoman template generator from npm on your machine.
Install the Service Fabric Yeo container generator and guest executable generator from npm.
After you install the generators, create guest executable or container services by running yo azuresfguest or yo azuresfcontainer , respectively.
Set up .NET Core 3.1 development
Install the .NET Core 3.1 SDK for Ubuntu to start creating C# Service Fabric applications. Packages for .NET Core Service Fabric applications are hosted on NuGet.org.
Set up Java development
To build Service Fabric services using Java, install Gradle to run build tasks. Run the below command to install Gradle. The Service Fabric Java libraries are pulled from Maven.
Red Hat Enterprise Linux 7.4 (Service Fabric preview support)
You also need to install the Service Fabric Yeo generator for Java executables. Make sure you have Yeoman installed, and then run the following command:
Install the Eclipse plug-in (optional)
You can install the Eclipse plug-in for Service Fabric from within the Eclipse IDE for Java Developers or Java EE Developers. You can use Eclipse to create Service Fabric guest executable applications and container applications in addition to Service Fabric Java applications.
The Service Fabric plug-in requires Eclipse Neon or a later version. See the instructions that follow this note for how to check your version of Eclipse. If you have an earlier version of Eclipse installed, you can download more recent versions from the Eclipse site. We recommend that you do not install on top of (overwrite) an existing installation of Eclipse. Either remove it before running the installer, or install the newer version in a different directory.
On Ubuntu, we recommend installing directly from the Eclipse site rather than using a package installer ( apt or apt-get ). Doing so ensures that you get the most current version of Eclipse. You can install the Eclipse IDE for Java Developers or for Java EE Developers.
In Eclipse, make sure that you have installed Eclipse Neon or later and Buildship version 2.2.1 or later. Check the versions of installed components by selecting Help > About Eclipse > Installation Details. You can update Buildship by using the instructions at Eclipse Buildship: Eclipse Plug-ins for Gradle.
To install the Service Fabric plug-in, select Help > Install New Software.
In the Work with box, enter https://dl.microsoft.com/eclipse.
Select Add.
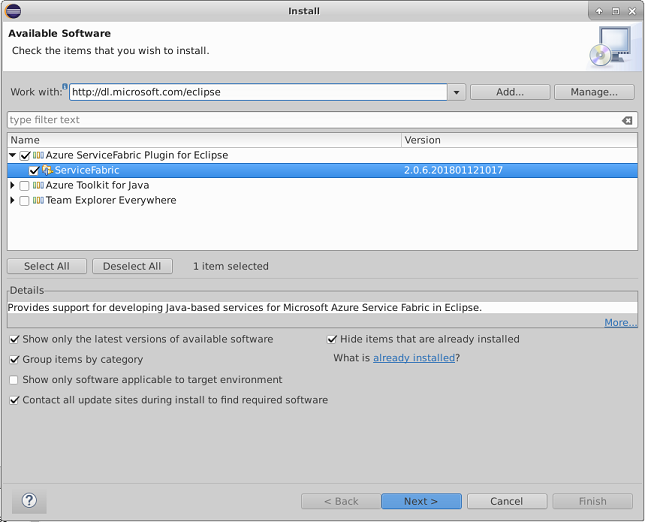
Select the ServiceFabric plug-in, and then select Next.
Perform the installation steps. Then accept the end-user license agreement.
If you already have the Service Fabric Eclipse plug-in installed, make sure that you have the latest version. Check by selecting Help > About Eclipse > Installation Details. Then search for Service Fabric in the list of installed plug-ins. Select Update if a newer version is available.
Update the SDK and runtime
To update to the latest version of the SDK and runtime, run the following commands.
To update the Java SDK binaries from Maven, you need to update the version details of the corresponding binary in the build.gradle file to point to the latest version. To know exactly where you need to update the version, refer to any build.gradle file in the Service Fabric getting-started samples.
Updating the packages might cause your local development cluster to stop running. Restart your local cluster after an upgrade by following the instructions in this article.
Remove the SDK
To remove the Service Fabric SDKs, run the following commands.
Red Hat Enterprise Linux 7.4 (Service Fabric preview support)
Источник
Apt get install linux azure
Prepare an Ubuntu virtual machine for Azure
Applies to: ✔️ Linux VMs ✔️ Flexible scale sets
Ubuntu now publishes official Azure VHDs for download at https://cloud-images.ubuntu.com/. If you need to build your own specialized Ubuntu image for Azure, rather than use the manual procedure below it is recommended to start with these known working VHDs and customize as needed. The latest image releases can always be found at the following locations:
This article assumes that you have already installed an Ubuntu Linux operating system to a virtual hard disk. Multiple tools exist to create .vhd files, for example a virtualization solution such as Hyper-V. For instructions, see Install the Hyper-V Role and Configure a Virtual Machine.
Ubuntu installation notes
- Please see also General Linux Installation Notes for more tips on preparing Linux for Azure.
- The VHDX format is not supported in Azure, only fixed VHD. You can convert the disk to VHD format using Hyper-V Manager or the Convert-VHD cmdlet.
- When installing the Linux system it is recommended that you use standard partitions rather than LVM (often the default for many installations). This will avoid LVM name conflicts with cloned VMs, particularly if an OS disk ever needs to be attached to another VM for troubleshooting. LVM or RAID may be used on data disks if preferred.
- Do not configure a swap partition or swapfile on the OS disk. The cloud-init provisioning agent can be configured to create a swap file or a swap partition on the temporary resource disk. More information about this can be found in the steps below.
- All VHDs on Azure must have a virtual size aligned to 1MB. When converting from a raw disk to VHD you must ensure that the raw disk size is a multiple of 1MB before conversion. See Linux Installation Notes for more information.
[!NOTE] Before attempting to create your own custom Ubuntu image for Azure, please consider using the pre-built and tested images from https://cloud-images.ubuntu.com/ instead.
In the center pane of Hyper-V Manager, select the virtual machine.
Click Connect to open the window for the virtual machine.
Replace the current repositories in the image to use Ubuntu’s Azure repository.
Before editing /etc/apt/sources.list , it is recommended to make a backup:
Ubuntu 18.04 and Ubuntu 20.04:
The Ubuntu Azure images are now using the Azure-tailored kernel. Update the operating system to the latest Azure-tailored kernel and install Azure Linux tools (including Hyper-V dependencies) by running the following commands:
Ubuntu 18.04 and Ubuntu 20.04:
Modify the kernel boot line for Grub to include additional kernel parameters for Azure. To do this open /etc/default/grub in a text editor, find the variable called GRUB_CMDLINE_LINUX_DEFAULT (or add it if needed) and edit it to include the following parameters:
Save and close this file, and then run sudo update-grub . This will ensure all console messages are sent to the first serial port, which can assist Azure technical support with debugging issues.
Ensure that the SSH server is installed and configured to start at boot time. This is usually the default.
Install cloud-init (the provisioning agent) and the Azure Linux Agent (the guest extensions handler). Cloud-init uses netplan to configure the system network configuration during provisioning and each subsequent boot.
[!Note] The walinuxagent package may remove the NetworkManager and NetworkManager-gnome packages, if they are installed.
Remove cloud-init default configs and leftover netplan artifacts that may conflict with cloud-init provisioning on Azure:
Configure cloud-init to provision the system using the Azure datasource:
Configure the Azure Linux agent to rely on cloud-init to perform provisioning. Have a look at the WALinuxAgent project for more information on these options.
Clean cloud-init and Azure Linux agent runtime artifacts and logs:
Run the following commands to deprovision the virtual machine and prepare it for provisioning on Azure:
[!NOTE] The sudo waagent -force -deprovision+user command generalizes the image by attempting to clean the system and make it suitable for re-provisioning. The +user option deletes the last provisioned user account and associated data.
[!WARNING] Deprovisioning using the command above does not guarantee that the image is cleared of all sensitive information and is suitable for redistribution.
Click Action -> Shut Down in Hyper-V Manager.
Azure only accepts fixed-size VHDs. If the VM’s OS disk is not a fixed-size VHD, use the Convert-VHD PowerShell cmdlet and specify the -VHDType Fixed option. Please have a look at the docs for Convert-VHD here: Convert-VHD.
You’re now ready to use your Ubuntu Linux virtual hard disk to create new virtual machines in Azure. If this is the first time that you’re uploading the .vhd file to Azure, see Create a Linux VM from a custom disk.
Источник


