- Как установить Arch Linux на Raspberry Pi
- Скачивание Arch Linux
- Подготовка SD-карты
- Копирование файлов ОС
- Загрузка Pi
- Выводы
- Arch Linux на Raspberry Pi
- Запуск getty на ttyAMA0 (необязательно)
- Настройка беспроводной сети (необязательно)
- Аппаратный генератор случайных чисел
- Часовой пояс и синхронизация времени
- Обновление системы
- Расширение корневого раздела
- Добавление непривилегированного пользователя
- Установка и настройка sudo
- Настройка ssh
- Заключение
- Raspberry Pi 4
- ARMv7 Installation
- AArch64 Installation
- Raspberry Pi
- Audio
- Caveats for Audio
- Bluetooth
- firmware
- wifi-coexistence
- Video
- CPU/GPU RAM split
- HDMI/Analogue TV-Out
- Camera
- Onboard Hardware Sensors
- Temperature
- Voltage
- Watchdog
- Hardware Random Number Generator
- I/O Pins
- 1-WIRE
- Non-Root GPIO
- See Also
Как установить Arch Linux на Raspberry Pi
Raspberry Pi — самый популярный одноплатный компьютер всех времен. Его можно использовать для различных целей, таких как настольный ПК, домашний медиацентр, интеллектуальный WiFi-маршрутизатор, система автоматизации и игровой сервер. Варианты использования бесконечны.
На Raspberry Pi можно запускать несколько различных операционных систем, включая различные дистрибутивы Linux, такие как Raspbian , Windows 10 IoT и FreeBSD.
В этом руководстве мы покажем вам, как настроить Arch Linux ARM на Raspberry Pi 3 и 4. Установить Arch Linux так же просто, как создать два раздела и скопировать файлы ОС на SD-карту.
Arch Linux — это непрерывный выпуск GNU / Linux, что означает, что вам нужно установить его только один раз и часто обновлять.
Скачивание Arch Linux
Посетите страницу загрузок Arch Linux ARM и загрузите последний файл ARM Arch Linux для своей версии Raspberry Pi.
Если вы предпочитаете командную строку, используйте следующую команду wget для загрузки пакета:
Подготовка SD-карты
Вставьте SD-карту в привод SD-карты и найдите имя карты с помощью команды lsblk :
Команда распечатает список всех доступных блочных устройств:
В приведенном выше примере имя SD-устройства — /dev/sdb , но это может отличаться в вашей системе. Лучший способ узнать имя — это проверить размер устройства.
Вы можете использовать графический инструмент, например GParted, или инструменты командной строки, такие как fdisk или parted для форматирования диска и создания необходимого раздела. Мы будем использовать parted утилиту.
Обратите внимание, что форматирование и создание новых разделов — это деструктивный процесс, и он стирает все существующие данные. Если у вас есть данные на SD-карте, сначала создайте их резервную копию.
Сначала создайте таблицу разделов, выполнив следующую команду:
Создайте две перегородки. Загрузочный раздел Fat32 объемом 128 МБ и корневой раздел ext4, который занимает остальное пространство SD:
Добавьте загрузочный флаг в загрузочный раздел:
После этого используйте команду ниже, чтобы распечатать таблицу разделов и убедиться, что все настроено правильно:
Результат должен выглядеть примерно так:
Отформатируйте загрузочный раздел в FAT32:
Отформатируйте корневой раздел в ext4:
Копирование файлов ОС
Теперь, когда SD-карта разбита на разделы, мы смонтируем разделы и скопируем данные из загруженного tar-файла.
Перед монтированием разделов SD создайте каталоги, которые будут служить точками монтирования:
Смонтируйте оба раздела, используя следующие команды:
Если вы загрузили файл с помощью веб-браузера, он должен храниться в папке «Загрузки» в вашей учетной записи. В противном случае, если вы использовали команду wget , файл находится в вашем текущем рабочем каталоге .
Используйте команду tar для извлечения содержимого файла tar.gz Arch Linux в /mnt/arch/root каталог /mnt/arch/root :
Затем переместите загрузочные файлы в смонтированный загрузочный раздел:
После этого размонтируйте оба раздела:
Это все! У вас есть загрузочная ОС Arch Linux на SD-карте.
Загрузка Pi
Вставьте SD-карту в плату Raspberry Pi, подключите монитор, клавиатуру и источник питания, и вы готовы к работе.
Имя пользователя по умолчанию — alarm , а пароль — alarm . У этого пользователя есть права sudo .
Вы также можете войти в систему как root с паролем root .
После входа в систему инициализируйте связку ключей pacman и заполните ключи подписи пакета:
Отсюда вы можете изменить пароль пользователя, настроить Wi-Fi и настроить новую установку Arch Linux.
Выводы
Установка Arch Linux на Raspberry Pi 3 / 34bis довольно простой процесс. Все, что вам нужно сделать, это подготовить SD-карту, скопировать файлы и загрузить Raspberry Pi.
Если вы столкнулись с проблемой или хотите оставить отзыв, оставьте комментарий ниже.
Источник
Arch Linux на Raspberry Pi
После довольно продолжительно использования Raspberry Pi совместно с Raspbian решил попробовать установить Arch Linux ARM. Что из этого получилось рассмотрено в статье.
Так как в месте установки RPi подключать что-либо к разъемам HDMI или RCA Video и LAN мне неудобно, я использую WiFi-подключение к сети и USB-UART для терминального доступа. Поэтому некоторые описанные шаги я отметил как необязательные.
Использованное оборудование: ноутбук с Windows, Raspberry Pi Model B, SD-карта объемом 4GB, WiFi-адаптер, UART-адаптер.
Загружаем и записываем на SD-карту образ операционной системы. В моем случае это был ArchLinuxARM-2014.01-rpi.img, запись выполнялась при помощи Win32DiskImager 0.9.5.
После установки войти в систему можно как root, пароль root. Это можно сделать как через локальный терминал так и через LAN, используя SSH.
Запуск getty на ttyAMA0 (необязательно)
Для вывода на последовательный порт загрузочных сообщений необходимо добавить в файл /boot/cmdline.txt параметр loglevel=5.
Разрешаем работу getty на последовательном порту командой:
Сигналы UART выведены на GPIO разъем Raspberry Pi:
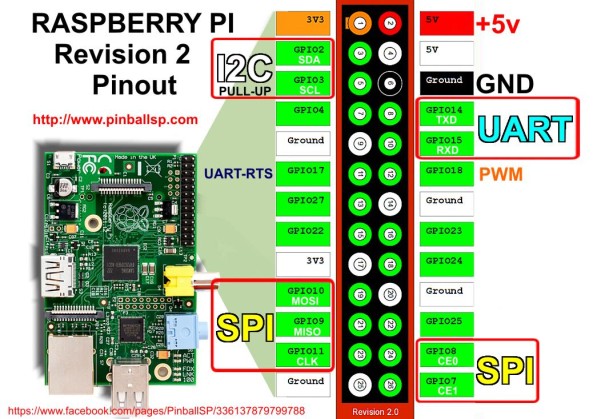
Нужно подключить к ним USB-UART конвертер и указать в терминальной программе следующие параметры подключения: скорость 115200, 8 бит данных, 1 стоп бит, без проверки четности, без управления потоком. Подробнее как использовать PuTTY для работы через последовательный порт здесь.
Настройка беспроводной сети (необязательно)
Копируем и редактируем нужный профиль, указав в нем имя сети и пароль:
Активируем созданный профиль и разрешаем его запуск при включении:
Аппаратный генератор случайных чисел
В ArchLinux для Raspberry Pi есть поддержка аппаратного генератора случайных чисел, но демону rngd нужно указать, как его найти. Для это необходимо отредактировать файл /etc/conf.d/rngd следующим образом:
И перезапустить rngd:
Часовой пояс и синхронизация времени
Удаляем часовой пояс, назначенный по умолчанию и устанавливаем нужный:
Запускаем ntpd и разрешаем его работу при включении:
Обновление системы
Просто запускаем команду:
Расширение корневого раздела
Запускаем fdisk и выводим существующую таблицу разделов:
На SD-карте, как видно, есть основной (mmcblk0p1) и дополнительный (mmcblk0p2) разделы. Дополнительный, в свою очередь, содержит один логический (mmcblk0p5) раздел. Раздел mmcblk0p1 имеет небольшой размер, монтируется как /boot и используется при загрузке. Его модифицировать не нужно. Расширить нужно раздел mmcblk0p5, который монтируется как /.
Удаляем раздел mmcblk0p2 (при этом раздел mmcblk0p5 также удалится):
Теперь нужно создать новый дополнительный раздел, занимающий все доступное свободное пространство:
После этого внутри дополнительного, нужно создать логический раздел, так же занимающий все доступное пространство:
Проверяем, что разделы созданы правильно:
Стартовые блоки созданных разделов должны быть такими же как до внесения изменений, а общее количество блоков увеличиться.
Сохраняем изменения и выполняем перезагрузку:
После перезагрузки нужно увеличить размер файловой системы на созданном логического разделе. Текущий размер:
Имеет смысл для уменьшения количества операций записи на SD-карту установить в файле /etc/fstab параметр noatime для корневого раздела:
Добавление непривилегированного пользователя
Добавляем пользователя и устанавливаем пароль:
Установка и настройка sudo
Открыв с помощью команды visudo конфигурацию раскомментируем следующую строку:
Добавляем созданного ранее пользователя pi в группу wheel:
Это позволит пользователю pi использовать sudo для выполнения команд, требующих повышенных полномочий.
Настройка ssh
Так как SSH-ключи у меня уже были, останавливаться на их создании я не буду. Как их создать можно прочитать здесь.
Копируем публичный ключ на RPi:
Открываем файл конфигурации sshd:
Устанавливаем в нем запрет входить по ssh пользователю root и отключаем аутентификацию по паролю:
Заключение
В результате выполнения перечисленных шагов получаем RPi подключенный к WiFi сети, синхронизирующий время через интернет. На RPi можно зайти через SSH как непривилегированный пользователь имея при этом возможность вызова системных команд через sudo.
Источник
Raspberry Pi 4
The Raspberry Pi 4 is the successor to the Raspberry Pi 3. It builds upon the Pi 3 by upgrading the ARM cores to Cortex-A72, offering up to 4GB RAM, USB 3.0, and gigabit ethernet.
The Raspberry Pi 4 measures the same 85.60mm x 53.98mm x 17mm, with a little overlap for the SD card and connectors which project over the edges. The SoC is a Broadcom BCM2711. This contains a quad-core Coretx-A72 running at 1.5GHz and a Videocore VI GPU.
Note: The Raspberry Pi 4 has higher power requirements than the Raspberry Pi 3. A power supply rated at 3A is the official recommendation. Using an insufficient power supply will result in random, inexplicable errors and filesystem corruption.
Note: The Raspberry Pi 4’s USB Type-C power port is not compliant with the USB Type-C specification, and it will not be able to be powered by supplies that are compliant.
ARMv7 Installation
Use this installation if you require any of the vendor’s kernel hacks, overlays, or closed-source GPU blobs and utilities.
Replace sdX in the following instructions with the device name for the SD card as it appears on your computer.
- Start fdisk to partition the SD card:
- At the fdisk prompt, delete old partitions and create a new one:
- Type o. This will clear out any partitions on the drive.
- Type p to list partitions. There should be no partitions left.
- Type n, then p for primary, 1 for the first partition on the drive, press ENTER to accept the default first sector, then type +200M for the last sector.
- Type t, then c to set the first partition to type W95 FAT32 (LBA).
- Type n, then p for primary, 2 for the second partition on the drive, and then press ENTER twice to accept the default first and last sector.
- Write the partition table and exit by typing w.
- Create and mount the FAT filesystem:
- Create and mount the ext4 filesystem:
- Download and extract the root filesystem (as root, not via sudo):
- Move boot files to the first partition:
- Unmount the two partitions:
- Insert the SD card into the Raspberry Pi, connect ethernet, and apply 5V power.
- Use the serial console or SSH to the IP address given to the board by your router.
- Login as the default user alarm with the password alarm.
- The default root password is root.
- Initialize the pacman keyring and populate the Arch Linux ARM package signing keys:
AArch64 Installation
This provides an installation using the mainline kernel and U-Boot. Use this installation only if you have no dependencies on the closed source vendor libraries shipped in the ARMv7 release. This installation has near full support for the device, including the VC4 graphics.
- Follow the above instructions, substituting with the following tarball:
- Before unmounting the partitions, update /etc/fstab for the different SD block device compared to the Raspberry Pi 3:
Copyright ©2009-2020 Arch Linux ARM
The registered trademark Linux® is used pursuant to a sublicense from LMI, the exclusive licensee of Linus Torvalds, owner of the mark on a world-wide basis.
The Arch Linux™ name and logo are used under permission of the Arch Linux Project Lead.
Источник
Raspberry Pi
The Raspberry Pi is a credit-card sized computer that plugs into your TV and a keyboard.
The board measures 85.60mm x 53.98mm x 17mm, with a little overlap for the SD card and connectors which project over the edges. The SoC is a Broadcom BCM2835. This contains an ARM1176JZFS with floating point running at 700Mhz, and a Videocore 4 GPU.
Replace sdX in the following instructions with the device name for the SD card as it appears on your computer.
- Start fdisk to partition the SD card:
- At the fdisk prompt, delete old partitions and create a new one:
- Type o. This will clear out any partitions on the drive.
- Type p to list partitions. There should be no partitions left.
- Type n, then p for primary, 1 for the first partition on the drive, press ENTER to accept the default first sector, then type +200M for the last sector.
- Type t, then c to set the first partition to type W95 FAT32 (LBA).
- Type n, then p for primary, 2 for the second partition on the drive, and then press ENTER twice to accept the default first and last sector.
- Write the partition table and exit by typing w.
- Create and mount the FAT filesystem:
- Create and mount the ext4 filesystem:
- Download and extract the root filesystem (as root, not via sudo):
- Move boot files to the first partition:
- Unmount the two partitions:
- Insert the SD card into the Raspberry Pi, connect ethernet, and apply 5V power.
- Use the serial console or SSH to the IP address given to the board by your router.
- Login as the default user alarm with the password alarm.
- The default root password is root.
- Initialize the pacman keyring and populate the Arch Linux ARM package signing keys:
Audio
alsa-utils should supply the needed programs to use onboard sound. Default volume can be adjusted using alsamixer.
A key change with Linux kernel version 4.4.x for ARM related to ALSA and to the needed sound module: in order to use tools such as alsamixer with the current kernel, users must modify /boot/config.txt to contain the following line:
Caveats for Audio
To force audio over HDMI, add this to /boot/config.txt :
If you experience distortion using the 3.5mm analogue output:
Bluetooth
firmware
To be able to talk to the bluetooth chip, you must install the services, firmware, and UDEV rules. The pi-bluetooth package from the AUR is available to do this.
wifi-coexistence
The BCM43* series chips are notorious for problems when both wifi and bluetooth are used at the same time. This coexistence issue comes in varying degrees of severity but for most users makes using the Pi in bluetooth A2DP mode while also using wifi impossible. Bluetooth buffer underruns are caused by sharing the UART device, resulting in skipping, popping, hissing, and generally unusable audio. For some users, this also effects peripherals such as mice and keyboards. A firmware fix was found for both the Pi3 and Pi ZeroW, discussion of this fix can be found in this github issue.
To deploy the fix to the current firmware in Arch add the following lines:
to the end of these firmware config files:
This fix can be found in this git commit. The fix is experimental and is not yet deployed to the upstream package
Video
The X.org driver for Raspberry Pi can be installed with the xf86-video-fbdev or xf86-video-fbturbo-git package.
CPU/GPU RAM split
Memory split between the CPU and GPU can be set in boot/config.txt by adjusting the parameter gpu_mem which stands for the amount of RAM in MB that is available to the GPU (minimum 16, default 64) and the rest is available to the ARM CPU.
HDMI/Analogue TV-Out
With the default configuration, the Raspberry Pi uses HDMI video if a HDMI monitor is connected. Otherwise, it uses analog TV-Out (also known as composite output or RCA) To turn the HDMI or analog TV-Out on or off, have a look at /opt/vc/bin/tvservice
Use the -s parameter to check the status; the -o parameter to turn the display off and -p parameter to power on HDMI with preferred settings.
Adjustments are likely required to correct proper overscan/underscan and are easily achieved in /boot/config.txt in which many tweaks are set. To fix, simply uncomment the corresponding lines and setup per the commented instructions:
Or simply disable overscan if the TV/monitor has a «fit to screen» option.
Users wishing to use the analog video out should consult this config file which contains options for non-NTSC outputs.
Camera
The commands for the camera module are included as part of the raspberrypi-firmware package: $ /opt/vc/bin/raspistill $ /opt/vc/bin/raspivid
Append to /boot/config.txt : gpu_mem=128 start_file=start_x.elf fixup_file=fixup_x.dat Optionally
The following is a common error:
which can be corrected by setting these values in /boot/config.txt : cma_lwm= cma_hwm= cma_offline_start=
Another common error: mmal: mmal_vc_component_create: failed to create component ‘vc.ril.camera’ (1:ENOMEM) mmal: mmal_component_create_core: could not create component ‘vc.ril.camera’ (1) mmal: Failed to create camera component mmal: main: Failed to create camera component mmal: Only 64M of gpu_mem is configured. Try running «sudo raspi-config» and ensure that «memory_split» has a value of 128 or greater
can be corrected by adding the following line to /etc/modprobe.d/blacklist.conf :
In order to use standard applications (those that look for /dev/video0 ) the V4L2 driver must be loaded. This can be done automatically at boot by creating an autoload file, /etc/modules-load.d/rpi-camera.conf :
The V4L2 driver by default only allows video recording up to 1280×720, else it glues together consecutive still screens resulting in videos of 4 fps or lower. Adding the following options removes this limitation, /etc/modprobe.d/rpi-camera.conf :
Onboard Hardware Sensors
Temperature
Temperatures sensors can be queried with utils in the raspberrypi-firmware package.
Voltage
Four different voltages can be monitored via /opt/vc/bin/vcgencmd :
- core for core voltage
- sdram_c for sdram Core voltage
- sdram_i for sdram I/O voltage
- sdram_p for sdram PHY voltage
Watchdog
BCM2708 has a hardware watchdog which can be utilized by enabling the bcm2708_wdog kernel module.
For proper operation the watchdog daemon also has to be installed, configured (by uncommenting the «watchdog-device» line in /etc/watchdog.conf ) and enabled.
This should also apply for Raspberry Pi 2 by using the bcm2709_wdog module and Raspberry Pi 3 by using the bcm2835_wdt module.
Hardware Random Number Generator
Arch Linux ARM for the Raspberry Pi had the bcm2708-rng module set to load at boot; starting with kernel 4.4.7 the bcm2835_rng module replaces the former on Raspberry Pi 2 and Raspberry Pi 3 units.
Install rng-tools and tell the Hardware RNG Entropy Gatherer Daemon ( rngd ) where to find the hardware random number generator. This can be done by editing /etc/conf.d/rngd :
and enabling and starting the rngd service.
If haveged is running, it should be stopped and disabled, as it might compete with rngd and is only preferred when there is no hardware random number generator available.
Once completed, this change ensures that data from the hardware random number generator is fed into the kernel’s entropy pool at /dev/random . To check the available entropy, run:
The number it reports should be around 3000, whereas before setting up rngd it would have been closer to 1000.
I/O Pins
To be able to use the GPIO pins from Python, use the RPi.GPIO library. Install the python-raspberry-gpio package from the AUR.
To enable the /dev/spidev* devices, uncomment the following line in /boot/config.txt :
Install i2c-tools and lm_sensors packages.
Configure the bootloader to enable the i2c hardware by appending to /boot/config.txt :
Configure the i2c-dev and i2c-bcm2708 (if not blacklisted for the camera) modules to be loaded at boot in /etc/modules-load.d/raspberrypi.conf :
Reboot the Raspberry Pi and issue the following command to get the hardware address:
Note: When using the I2C1 port instead of I2C0, one will need to run i2cdetect -y 1 instead and replace i2c-0 with i2c-1 in the following steps.
Now instantiate the device. Change the hardware address to the address found in the previous step with ‘0x’ as prefix (e.g. 0x48) and choose a device name:
Check dmesg for a new entry:
Finally, read the sensor output: sensors
1-WIRE
To enable the 1-wire interface add this line to /boot/config.txt and reboot. dtoverlay=w1-gpio
Non-Root GPIO
To use the GPIO/SPI pins as a regular non-root user (in group tty ), add the following lines to a new file /usr/lib/udev/rules.d/99-spi-permissions.rules
See Also
- Raspberry Pi — Official website
- RPi Config — Excellent source of info relating to under-the-hood tweaks.
- RPi vcgencmd usage — Overview of firmware command vcgencmd.
- Arch Linux ARM on Raspberry Pi — A FAQ style site with hints and tips for running Arch Linux on the RPi
Copyright ©2009-2020 Arch Linux ARM
The registered trademark Linux® is used pursuant to a sublicense from LMI, the exclusive licensee of Linus Torvalds, owner of the mark on a world-wide basis.
The Arch Linux™ name and logo are used under permission of the Arch Linux Project Lead.
Источник


