- How To Manually Install Arch Linux on a KVM VPS via VNC
- Step 1: Boot Your VPS from Arch Linux ISO
- Step 2: Connect To the Internet
- Step 3: Create Partitions
- Step 4: Installing Basic Stuff
- Step 5: Post-installation
- Arch linux in kvm
- Contents
- Checking support for KVM
- Hardware support
- Kernel support
- Para-virtualization with Virtio
- Kernel support
- List of para-virtualized devices
- How to use KVM
- Tips and tricks
- Nested virtualization
- Enabling huge pages
- Installing KVM/QEMU/virt-manager on Manjaro Linux(Arch Linux)
- 1. QEMU Installation #
- 2. Virt-Manager and libvirtd Service Install #
- 3. Start the Services #
- Lean Approach
- 4. Configure the KVM #
- 5. Creating an New Network Bridge for VM. #
- 5.1 Create the Bridge description file #
- 5.2. Register the Bridge Network: #
- 5.3. Start the Bridge #
- Lean Approach
- 6. Permissions for Current User #
- 7. Reboot #
- More Notes #
- Windows — Guest — Copy & Paste Clipboard #
- Remote Connection to Display of VM #
- Multiple Monitors for a VM #
- Adding more USB devices to a VM #
- CPU Pinning Video — Easy #
- CPU Pinning Detail #
- Wish you All the Best #
How To Manually Install Arch Linux on a KVM VPS via VNC
This tutorial explains how to manually install Arch Linux on a KVM VPS via VNC. This is useful when your hosting provider doesn’t offer Arch Linux in one-click install. Arch Linux will be used as a server operating system, so I will only install basic component for a server and skip installing GUI stuff.
If you want to be able to one-click install Arch Linux, I recommend Vultr, which is a hosting company providing low-cost, high-performance VPS. With Vultr, you don’t have to do the steps below.
Before following the steps below, I recommend you get the default gateway IP of your KVM VPS first because you will need to enter this IP in a network config file during the installation. It usually ends with 1 like 192.168.0.1. To find out the exact IP address, you can first install Ubuntu or CentOS on your VPS via the one-click install function in the VPS control panel, then boot it up and issue the following command:

The IP address after “default via” is the IP address of your gateway. You can also ask your VPS provider about the gateway IP.
Now proceed to the installation.
Step 1: Boot Your VPS from Arch Linux ISO
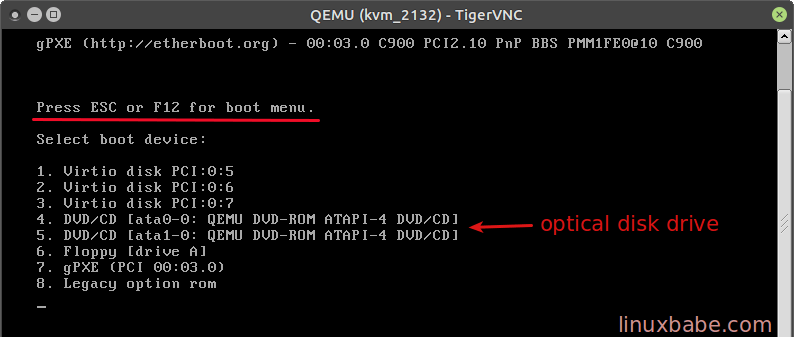
In your VPS control panel, find the virtual optical disk drive and insert Arch Linux ISO to it. Sometimes you may need to give the direct download link of Arch Linux to your hosting provider and ask them to mount it for you.
Then establish a VNC connection to your VPS. You can get VNC login info from your hosting provider. After that, click boot button in the control panel to boot up your VPS.
Normally you have to press a key like F12 in the VNC window. This allows you to select which device your VPS will boot from. Select optical disk drive so your VPS will boot the Arch Linux ISO image.
The default firmware for KVM virtual machines is called SeaBIOS.
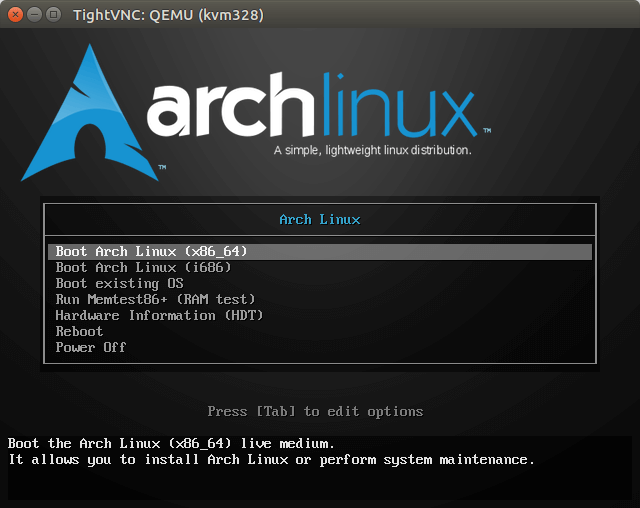
Now you are greeted by the Arch Linux boot menu. Select the first option to boot into Arch Linux live environment.
Step 2: Connect To the Internet
Once you are in Arch Linux live environment, check whether you can access the Internet.
Proceed to step 3 if you receive reply from google server. If there’s no Internet connection, then following the below steps.
In KVM environment, your hosting provider offers you a static IP address. Your KVM VPS establishes a static ethernet connection to the gateway (KVM host) and thus it can access external Internet.
First copy the example ethernet-static network profile to /etc/netctl/ directory.
Then edit this file.
Change this file to the following. You may need to adjust red texts.
Save and close the file. Next, bring down the ens3 interface.
Now load ethernet-static network profile.
You should have Internet connection now.
Step 3: Create Partitions
If you want to have a MBR partition table on /dev/sda , use this command:
This tutorial creates a GPT partition table:
Now create partitions on /dev/sda
If you created GPT partition table in the previous step, you need to create a bios_grub partition of 1MiB since the default firmware for KVM virtual machine is seaBIOS which is a free and open source BIOS implementation. Later the Grub 2 boot loader will be installed inside bios_grub partition.
Make ensure that bios_grub partition starts at least 31 KiB (63 sectors) from the start of the disk because the first 63 sectors is reserved for MBR boot code. However, it will give us performance benefit if we align partitions so the bios_grub partition might start at 1MiB from the start of the disk.
Create bios_grub partition with this command:
Set it as a bios_grub partition
Then create the second partition. 100% means it will use all the following space of the disk. This tutorial use a single root partition. If you need advanced setup, you can adjust it.
Exit out of parted.
Now format the second partition to ext4 file system.
Mount the second partition in /mnt directory.
Step 4: Installing Basic Stuff
First open the mirrorlist file to choose a good mirror for your software installation.
To choose a mirror, just copy the address of your preferred mirror to the beginning of the file then save and close this file.
Now use pacstrap to install the base system onto the second partition mounted under /mnt directory.
After that, generate a fstab file.
Chroot into the base system.
Find the en_US.UTF-8 UTF-8 line and remove the # sign from this line. Save this file.
Generate /etc/locale.conf file and set en_US.UTF-8 as the default locale.
Set your server’s time zone. I set it to New York.
The core, extra and community repository is good enough for an Arch Linux server and they are enabled by default, so normally you don’t have to configure repositories. If for any reason you have to configure it, use nano text editor to edit /etc/pacman.conf file.
After that, set a password for root user.
Install Grub and os-prober.
Install Grub boot loader to the first disk. Since we are using BIOS firmware, so the target should be i386-pc.
Generate Grub boot menu.
Exit out of chroot environment.
Reboot your KVM VPS.
Step 5: Post-installation
Now your KVM VPS is rebooted, connect to it again via VNC. Login as root. Run the following command:
Your new Arch Linux server is probably not connected to the Internet.
So we have to create a static Ethernet connection to the KVM host (gateway). Here, we have to make a little modification to the ethernet-static network profile.
First copy the example ethernet-static network profile to /etc/netctl/ directory.
Then edit this file.
Make the following changes.
The default Ethernet interface in Arch Linux is named ens3 , you can use ip address command to find out. Add /24 to your VPS public IP address. The /24 is equivalent to 255.255.255.0. You must use CIDR notation here.
Save and close the this file. Bring down the ens3 interface.
Load ethernet-static network profile.
To automatically load the profile at next boot, run:
You should now be able to access the Internet from your Arch Linux server.
Now create a user and add it to wheel, storage, power group.
Set password for this user.
Install sudo utility.
Edit /etc/suoders file.
Remove # sign and save the file. This means allowing members of the wheel group to use sudo.
Install SSH server
Edit sshd_config file.
Add these two lines at the end of this file. Adjust the username.
The first line means allowing your newly created user to ssh into Arch Linux server. The second disable root ssh login. This is a basic requirement of Linux server security. Save and close this file.
Start SSH server
Enable SSH server auto-start when Arch Linux is booted up
Now open a SSH client on your own computer, and try to SSH into your Arch Linux server. You should be able to ssh login as the normal user and should not be able to ssh login as root user.
Once you ssh into your server, update Arch Linux.
Here are some tools you may want to install.
Enable NTP network time synchronization.
Check NTP status
Congrats! You just installed an Arch Linux on KVM VPS. And lastly, it’s a good idea to subscribe to Arch Linux latest news feed because there might be some important changes and you need to follow those instructions in order to update software packages.
As always, if you found this post useful, then please subscribe to our free newsletter or follow us on Google+, Twitter or like our Facebook page. Thanks for visiting!
Источник
Arch linux in kvm
KVM, Kernel-based Virtual Machine, is a hypervisor built into the Linux kernel. It is similar to Xen in purpose but much simpler to get running. Unlike native QEMU, which uses emulation, KVM is a special operating mode of QEMU that uses CPU extensions (HVM) for virtualization via a kernel module.
Using KVM, one can run multiple virtual machines running unmodified GNU/Linux, Windows, or any other operating system. (See Guest Support Status for more information.) Each virtual machine has private virtualized hardware: a network card, disk, graphics card, etc.
Differences between KVM and Xen, VMware, or QEMU can be found at the KVM FAQ.
This article does not cover features common to multiple emulators using KVM as a backend. You should see related articles for such information.
Contents
Checking support for KVM
Hardware support
KVM requires that the virtual machine host’s processor has virtualization support (named VT-x for Intel processors and AMD-V for AMD processors). You can check whether your processor supports hardware virtualization with the following command:
If nothing is displayed after running either command, then your processor does not support hardware virtualization, and you will not be able to use KVM.
Kernel support
Arch Linux kernels provide the required kernel modules to support KVM.
- One can check if the necessary modules, kvm and either kvm_amd or kvm_intel , are available in the kernel with the following command:
The module is available only if it is set to either y or m .
- Then, ensure that the kernel modules are automatically loaded, with the command:
If the command returns nothing, the module needs to be loaded manually, see Kernel modules#Manual module handling.
Para-virtualization with Virtio
Para-virtualization provides a fast and efficient means of communication for guests to use devices on the host machine. KVM provides para-virtualized devices to virtual machines using the Virtio API as a layer between the hypervisor and guest.
All Virtio devices have two parts: the host device and the guest driver.
Kernel support
Use the following command to check if the VIRTIO modules are available in the kernel inside the virtual machine:
Then, check if the kernel modules are automatically loaded with the command:
In case the above commands return nothing, you need to load the kernel modules manually.
List of para-virtualized devices
- network device (virtio-net)
- block device (virtio-blk)
- controller device (virtio-scsi)
- serial device (virtio-serial)
- balloon device (virtio-balloon)
How to use KVM
See the main article: QEMU.
Tips and tricks
Nested virtualization
Nested virtualization enables existing virtual machines to be run on third-party hypervisors and on other clouds without any modifications to the original virtual machines or their networking.
On host, enable nested feature for kvm_intel :
Verify that feature is activated:
Enable the «host passthrough» mode to forward all CPU features to the guest system:
- If using QEMU, run the guest virtual machine with the following command: qemu-system-x86_64 -enable-kvm -cpu host .
- If using virt-manager, change the CPU model to host-passthrough .
- If using virsh, use virsh edit vm-name and change the CPU line to
Boot VM and check if vmx flag is present:
Enabling huge pages
 This article or section is a candidate for merging with QEMU.
You may also want to enable hugepages to improve the performance of your virtual machine. With an up to date Arch Linux and a running KVM you probably already have everything you need. Check if you have the directory /dev/hugepages . If not, create it. Now we need the right permissions to use this directory. The default permission is root’s uid and gid with 0755, but we want anyone in the kvm group to have access to hugepages.
Add to your /etc/fstab :
Of course the gid must match that of the kvm group or specify the group name directly with gid=kvm . The mode of 1770 allows anyone in the group to create files but not unlink or rename each other’s files. Make sure /dev/hugepages is mounted properly:
Now you can calculate how many hugepages you need. Check how large your hugepages are:
Normally that should be 2048 kB ≙ 2 MB. Let us say you want to run your virtual machine with 1024 MB. 1024 / 2 = 512. Add a few extra so we can round this up to 550. Now tell your machine how many hugepages you want:
If you had enough free memory you should see:
If the number is smaller, close some applications or start your virtual machine with less memory (number_of_pages x 2):
Note the -mem-path parameter. This will make use of the hugepages.
Now you can check, while your virtual machine is running, how many pages are used:
Источник
Installing KVM/QEMU/virt-manager on Manjaro Linux(Arch Linux)
08 Sep 2020, 10:01am TZ +05:30
KVM is an inherently better way to work with Virtual Machines. It sands for Kernel Virtual Machine.

After many tries, I finally managed to get it right.
UPDATED: 12th Oct 2020 — Bridge Network fix and added more details on remote viewing.
Let’s Look at what steps I followed.
1. QEMU Installation #
- ovmf helps to do the UEFI Bios and Secure Boot setups.
- bridge-utils for network bridge needed for VMs
- vde2 for QEMU distributed ethernet emulation
- dnsmasq the DNS forwarder and DHCP server
- openbsd-netcat network testing tool (Optional)
- ebtables and iptables to create packet routing and firewalls
2. Virt-Manager and libvirtd Service Install #
Virt-manager is a UI that helps to create and organize the VM’s. And virt-viewer is used to open remote window into the VM instance.
3. Start the Services #
To Autostart the services at boot:
In case you wish to see if the libvirtd.service has actually started or not:
Lean Approach
Note: In order to reduce the system Load you can skip the Autostart part. And do it every time you wish to use the service.
Just run, whenever you wish to work with KVM:
4. Configure the KVM #
Open the /etc/libvirt/libvirtd.conf for editing
The -cl in the nano would help you see line numbers and how many lines are actually remaining.
Here are the Lines to Edit:
- Uncomment the line 81 or so:
Make sure to save the file before you exit.
5. Creating an New Network Bridge for VM. #
A new network bridge is needed allow a separate IP subnet for Guest OS’s in VM.
5.1 Create the Bridge description file #
Create a new file like br10.xml :
And type the content in br10.xml :
This would help to register a new bridge network for the Guest OS’s. Here we are changing the default IP Address 192.168.72.X and also allowing the specific ports 1024-65535 to be forwarded over NAT. This helps to easily communicate with the Guest OS in the VM’s.
5.2. Register the Bridge Network: #
Now we have the network registered in the libvirtd .
5.3. Start the Bridge #
To Start this network bridge:
If you want to permanently enable the new network bridge, so that it Autostart at boot:
Lean Approach
Note: Permanently enabling this network would take resources. Hence the start command must be given every time before starting virt-manager .
6. Permissions for Current User #
In-order to be able to use the virt-manager as normal user, we need to add the user to the libvirt group.
Reboot the PC or Computer after changing the options.
7. Reboot #
Yes, for all this to take effect we need to reboot the computer.
More Notes #
Here are few insights that I found while using the virt-manager .
Windows — Guest — Copy & Paste Clipboard #
In order to make sure that the copy & paste works between the host and guest, we need to install Windows guest tools = spice-guest-tools .
Note This only works if your Display is set to spice Server .
Remote Connection to Display of VM #
Typically the VM’s in KVM are destined to run like head-less unit. Hence the remote viewer = virt-viewer is needed.
In order to connect to VM use the address
Thats the default port on which the virt-manager hosts the VM display output.
Multiple Monitors for a VM #
This is possible by adding few instances of Video QXL .
This can be done in the configuration mode of the VM’s (a.k.a i or show hardware details after opening the VM).
Adding more USB devices to a VM #
Some times we need to mount more than 1 USB device to our Guest OS. This can be easily achieved by adding more USB Redirector to the VM.
This can be done in the configuration mode of the VM’s (a.k.a i or show hardware details after opening the VM).
CPU Pinning Video — Easy #
Use this command to check the Topology and CPU numbers.
CPU Pinning Detail #
When thinking about CPUs, there are three concepts — socket, cores, and threads. 1
A socket (NUMA node) is a physical socket where the physical CPU capsules are placed. A normal PC only has one socket.
Cores are the number of CPU-cores per CPU. A modern standard CPU for a standard PC usually has two to four cores. Some CPUs can run more than one parallel thread per CPU-core. Intel has either one or two threads per core depending on the CPU model.
When lscpu says CPU(s) , it means Socket(s) * Core(s) per socket * Thread(s) per core . virt-manager ’s Logical host CPUs also means the same thing.
The default behavior of KVM guests is to run operations coming from the guest as a number of threads representing virtual processors. 2 Those threads are managed by the Linux scheduler.
CPU pinning limits which physical CPU cores the virtual CPUs are allowed to run on.
The ideal setup is one-to-one mapping such that virtual CPU cores match physical CPU cores while taking hyperthreading/SMT into account.
Hyperthreading/SMT is simply a very efficient way of running two threads on one CPU core at any given time.
The topology of the processor can be found out using lscpu -e . Column CORE shows the association of the physical/logical CPU cores.
In case of ThinkPad we have the following.
So CORE 0 has CPU 0, 2 and CORE 1 has CPU 1, 3.
So, if we want to allocate CORE 1 to the VM, we would have to do virsh edit vmname and do the following.
Wish you All the Best #
Hope this would helpful to get you stared on KVM using QEMU and virt-manager as the front-end.
As always, I look forward to your suggestion and comments. DM me on Mastodon .
Источник


