- Install Nginx, MariaDB, PHP7 (LEMP) on Arch Linux Server in 2019
- Step 1: Update Arch Linux Server
- Step 2: Install Nginx Web Server
- Step 3: Install MariaDB Database Server
- Step 4: Install PHP7
- Step 5: Test PHP Processing
- Enable PHP Extensions
- Wrapping Up
- Nginx and PHP-FastCGI on Arch Linux
- Set the Hostname
- Install Software
- Configure Virtual Hosting
- Test PHP with FastCGI
- More Information
- [Arch Linux] Настраиваем связку Apache, Nginx, PHP и Percona DB
- Итак, приступим.
- Вот так мы получили достаточно шустрый конфиг локального веб-сервера. Надеюсь, данный топик окажется кому-то полезным.
Install Nginx, MariaDB, PHP7 (LEMP) on Arch Linux Server in 2019
In a previous tutorial, I explained how to install Arch Linux on KVM VPS. Now this tutorial will show you how to Install Nginx, MariaDB, PHP7, aka LEMP stack, on Arch Linux server. You can also follow this guide to install LEMP stack on your Arch Linux home computer.
Step 1: Update Arch Linux Server
Before installing any packages on Arch Linux, it’s always a good idea to refresh repository and perform an update first. Enter the following command in terminal to upgrade software.
Step 2: Install Nginx Web Server
The Arch Linux repository contains two versions of Nginx Web server: nginx and nginx-mainline . nginx is the more stable and older version and nginx-mainline is the latest version. That doesn’t necessarily mean nginx-mainline is unstable. In fact, nginx.org recommends using nginx mainline if you don’t have a strong reason to use the older version.
To install the older version:
This tutorial installs the mainline version.
By default, the above two commands will also install geoip and geoip-database package. Once it’s installed, check Nginx status.
If it’s not running, start it with systemctl:
Enable Nginx to auto-start when Arch Linux server is booted up.
Check Nginx version.
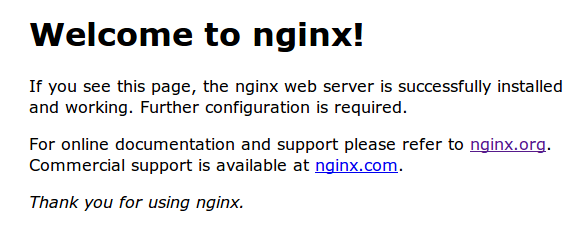
Enter the IP address of your Arch Linux server in the browser address bar, if you see the following text, that means Nginx is running correctly.
You can check your server’s public IP with the following command.
If you are installing Nginx on your Arch Linux home computer, just type 127.0.0.1 or localhost in the address bar.
Step 3: Install MariaDB Database Server
MariaDB is Arch Linux’s default implementation of MySQL since 2013. Oracle MySQL was dropped to AUR. So you see, Arch Linux really wants you to migrate from MySQL to MariaDB.
MariaDB is provided with the mariadb package.
You need to initialize the MariaDB data directory prior to starting the service. This can be done with mariadb-install-db command.
Now start MariaDB.
Check if it’s running:
Enable MariaDB to auto-start when Arch Linux is booted up.
Run the post-installation security script.
You will be asked to enter your MariaDB root password. Since you have not a MariaDB root password yet, press enter.
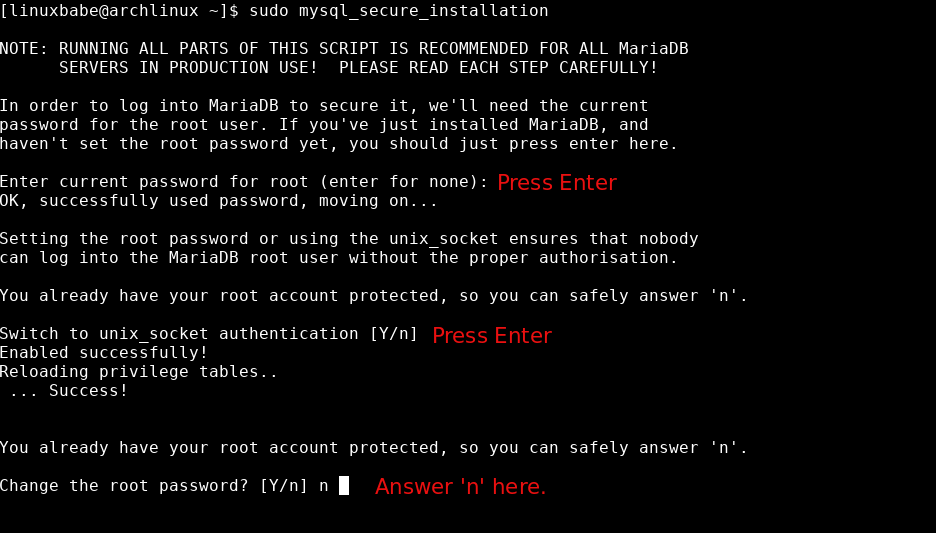
When asked if you wan to switch to unix_socket authentication, you can press Enter. (Note that Y is capitalized, which means it is the default answer.) When asked if you want to change root password, answer ‘n’, because unix_socket authentication doesn’t require the MariaDB root user to have a password. Then you can press Enter to answer all remaining questions, which will remove test database, anonymous user and disable root remote login.
To log into MariaDB console, simply run the following command.
The default main configuration file is located at /etc/my.cnf .
Step 4: Install PHP7
The latest version of PHP in Arch Linux repository is 7.3.6. To install it, run this command:
After it’s installed, we need to tell Nginx to run PHP using php-fpm. To achieve that, edit /etc/nginx/nginx.conf file.
Find the location
\.php$ section (line 65) and modify it to the following.
Save and close the file. Then test Nginx configurations.
If the test is successful, reload Nginx.
Then start and enable php-fpm service with the following commands:
Step 5: Test PHP Processing
Create a test.php file in the web root .
Add these lines to the file.
Save and close the file. Now in your browser address, type http://your-server-ip/test.php . You should see all your PHP info. If you are installing LEMP on your Arch Linux desktop or laptop, type 127.0.0.1/test.php or localhost/test.php .
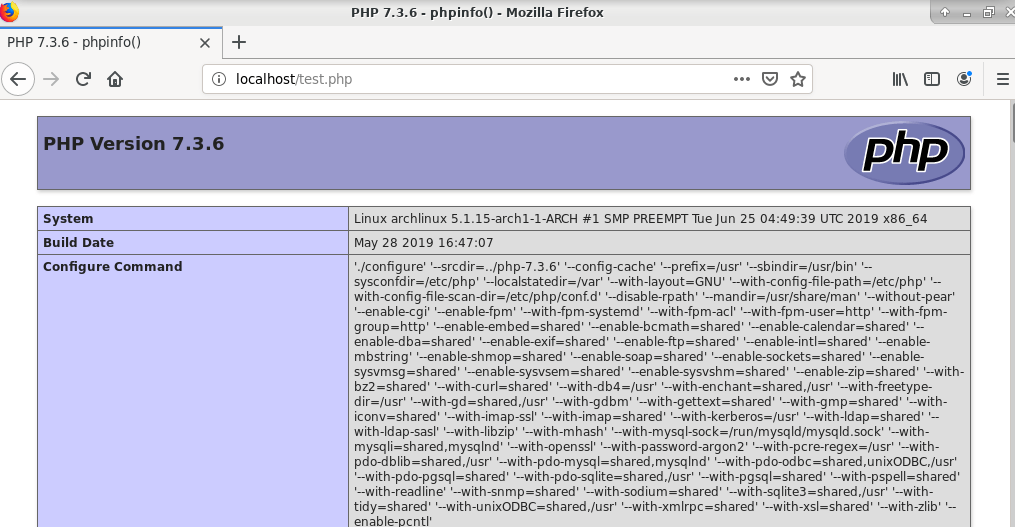
The test.php file is for testing purpose only. For security reasons you can now remove it.
Enable PHP Extensions
Edit /etc/php/php.ini config file.
Find the following two lines (line 922 and 926), remove semicolons to enable these two extensions.
You can also run the following 2 commands to enable mysqli and pdo_mysql extensions on Arch Linux, so you don’t have to open the file and find the 2 lines.
Reload php-fpm service for the changes to take effect.
mysqli.so is used to connect PHP with MariaDB/MySQL database. pdo_mysql.so is necessary to display Drupal sites. You may also need to enable imagemagick extension for PHP in order to crop and rotate images in CMS platforms such as WordPress.
Wrapping Up
Congrats! You have successfully installed Nginx, MariaDB and PHP7 on Arch Linux server! As always, if you found this post useful, then subscribe to our free newsletter to get more tips and tricks. Take care 🙂
Источник
Nginx and PHP-FastCGI on Arch Linux
This guide has been deprecated and is no longer being maintained.
The nginx web server is a fast, lightweight server designed to efficiently handle the needs of both low and high traffic websites. Although commonly used to serve static content, it’s quite capable of handling dynamic pages as well. This guide will help you get nginx up and running with PHP and FastCGI on your Arch Linux-powered Linode system.
It is assumed that you’ve already followed the steps outlined in our getting started guide. These steps should be performed via a root login to your Linode over SSH.
Set the Hostname
Before you begin installing and configuring the components described in this guide, please make sure you’ve followed our instructions for setting your hostname. Issue the following commands to make sure it is set properly:
The first command should show your short hostname, and the second should show your fully qualified domain name (FQDN).
Install Software
Issue the following commands to update your system and install the nginx web server, PHP, and compiler tools:
Edit the /etc/rc.conf file, adding “nginx” and “spawn-fcgi-php” to the “DEAMONS=” line as shown in the following excerpt:
Since you have built spawn-fcgi-php from source, you will want to monitor its page in the Arch User Repository (AUR) so that you’ll be able to recompile compile the spawn-fcgi-php package when updates are available.
Issue the following command to start the PHP FastCGI process:
In the default configuration, spawn-fcgi-php starts four php-cgi child processes. Test this configuration under normal load. If you find that you want to modify the number of child processes that are spawned, you can modify this value by editing the PHP_FCGI_CHILDREN value in the /etc/conf.d/spawn-fcgi-php.conf file.
Configure Virtual Hosting
Create directories for your web content and logs by issuing the following commands. Be sure to replace “example.com” with your domain name.
Issue the following commands to create nginx virtual host directories:
Next, define your site’s virtual host file:
Important security note: If you’re planning to run applications that support file uploads (images, for example), the above configuration may expose you to a security risk by allowing arbitrary code execution. The short explanation for this behavior is that a properly crafted URI which ends in “.php”, in combination with a malicious image file that actually contains valid PHP, can result in the image being processed as PHP. For more information on the specifics of this behavior, you may wish to review the information provided on Neal Poole’s blog.
To mitigate this issue, you may wish to modify your configuration to include a try_files directive. Please note that this fix requires nginx and the php-fcgi workers to reside on the same server.
Additionally, it’s a good idea to secure any upload directories your applications may use. The following configuration excerpt demonstrates securing an “/images” directory.
After reviewing your configuration for potential security issues, issue the following commands to enable the site:
Edit the file /etc/nginx/conf/nginx.conf , inserting the line include /etc/nginx/conf/sites-enabled/*; at the start of the http < block, as shown in the following file excerpt:
Issue the following command to start nginx:
Test PHP with FastCGI
Create a file called “test.php” in your site’s “public_html” directory with the following contents:
When you visit http://www.example.com/test.php in your browser, the standard “PHP info” output is shown. Congratulations, you’ve configured the nginx web server to use PHP-FastCGI for dynamic content!
More Information
You may wish to consult the following resources for additional information on this topic. While these are provided in the hope that they will be useful, please note that we cannot vouch for the accuracy or timeliness of externally hosted materials.
This page was originally published on Wednesday, February 2, 2011.
Источник
[Arch Linux] Настраиваем связку Apache, Nginx, PHP и Percona DB
После переезда с Ubuntu на Arch появилась необходимость настроить данную связку, однако, в отличие от Ubuntu, под Arch подобного мануала всё-в-одном не нашлось. Собрав идеи с разных руководств, включая те, что были написаны под Ubuntu, и решил написать на хабр такой цельный гайд.
Сразу хочу сказать, что это базовая установка, без виртуальных хостов в количестве n-штук, просто настройка для локальной разработки.
XAMPP мне не подошёл просто по идейным соображениям.
Итак, приступим.
Предполагается, что yaourt у вас уже установлен и вы хотя бы немного умеете им пользоваться, а также настроено выполнение root-команд от своего пользователя (ставим пакет sudo, потом раскомментируем строчку «%wheel ALL=(ALL) ALL» в файле /etc/sudoers и релогинимся; при выполнении команд с sudo пароль вводим от своего пользователя, а не от root’a).
Также перед непосредственно установкой, убедитесь, что у вас подключены extra- и community-репозитории.
Для этого:
sudo nano /etc/pacman.conf
И проверяем, чтобы секции этих репозиториев выглядели аналогично.
[extra]
#SigLevel = PackageOptional
Include = /etc/pacman.d/mirrorlist
[community]
#SigLevel = PackageOptional
Include = /etc/pacman.d/mirrorlist
И синхронизируем списки пакетов.
Вначале поставим Apache и PHP и, соответственно, немного поправим конфиги.
sudo pacman -S apache php-apache
yaourt mod-rpaf
Теперь нам надо отредактировать /etc/httpd/conf/httpd.conf: включить 2 модуля для апача — rpaf и php5, плюс для rpaf добавить конфигурацию и ещё по-мелочи.
sudo nano /etc/httpd/conf/httpd.conf
- Меняем «Listen 80» на «Listen 81», поскольку 80 порт будет слушать nginx.
- В секцию LoadModule добавляем 2 строчки.
LoadModule rpaf_module modules/mod_rpaf-2.0.so
LoadModule php5_module modules/libphp5.so - Можете поменять электропочту в строке «ServerAdmin», хотя это опциональный пункт. Я обычно по привычке меняю.
- Чуть ниже идёт закомментированная строчка «ServerName» — раскомментируем и заменяем на «ServerName 127.0.0.1:81»
- Проверяем, чтобы в секции » » не была закомментирована строчка «TypesConfig conf/mime.types»
- Также расскомментируем строчку «MIMEMagicFile conf/magic»
- В секции » » заменяем приводим строчку с параметром «DirectoryIndex» к такому виду:
DirectoryIndex index.php - И наконец в конце файла дописываем.
Include conf/extra/php5_module.conf
RPAFenable On
RPAFproxy_ips 127.0.0.1 10.0.0.1
RPAFsethostname On
RPAFheader X-Forwarded-For
Сохраняем файл (Ctrl + O) и выходим (Ctrl + X).
Теперь нам осталось второй конфигурационный файл Апача чуть-чуть изменить.
sudo nano /etc/httpd/conf/ports.conf
Меняем «Listen 80» на «Listen 81».
На этом с настройкой Apache мы закончили. Переходим к PHP.
sudo nano /etc/php/php.ini
- Настраиваем «post_max_size». Обычно, 60M хватает вполне, а то и много меньше — смотрите по ситуации. Аналогично настраиваем «upload_max_filesize» и «max_file_uploads».
- Включаем модули. Какого-то единственного решения тут не может быть, однако моего варианта под большинство нужд должно хватить (http://pastebin.com/cZwepL0T). Если какие-то дополнительные модули нужны, которых нет в списке — в первую очередь ищем в yaourt.
- Советую расскомментировать и настроить «date.timezone» (http://php.net/date.timezone).
- Раскомментируем строку «session.save_path = „/tmp“.
Сохраняем файл (Ctrl + O) и выходим (Ctrl + X).
Перезапускем apache.
sudo rc.d restart httpd
Далее для проверки создадим файл index.php. (Здесь вводим пароль не от своего пользователя, а от root’a.)
su -c «echo ‘ ‘ > /srv/http/index.php»
После этого, если вы зайдёте по адресу http://localhost:81/, вы должны увидеть страничку с полной информацией о PHP и Apache. Что-то типа такого.

Переходим к установке и настройке NGINX
Установим последнюю (dev-ветка) версию. Если же хотите стабильную — то просто вместо команды ниже напишите „sudo pacman -S nginx“.
И приведём вид конфига к следующему виду.
sudo nano /etc/nginx/conf/nginx.conf
Стираем всё и копируем всё отсюда — http://pastebin.com/2S8KnqkH.
И перезапускаем nginx.
sudo rc.d restart nginx
Теперь, можно заходить по 80 порту и вы тоже должны увидеть информацию о php, как это было раньше (http://localhost).
И последний этап — установка PerconaDB
Как известно, сама по себе MySQL далеко не самая шустрая БД, так что я обычно устанавливаю форк — PerconaDB. Поподробнее о фичах можете почитать на официальном сайте, от себя разве что скажу, что обратная совместимость с MySQL полная, так что неожиданных проблем не будет.
sudo pacman -S percona-server
И настроим пароль для административного пользователя PerconaDB.
Вот так мы получили достаточно шустрый конфиг локального веб-сервера. Надеюсь, данный топик окажется кому-то полезным.
p.s. если есть какие-то предложения по улучшению материала — пишем в комментариях.
p.p.s. не покидает меня ощущение, что секция „gzip_types“ в конфиге nginx’a не совсем оптимальна — так что тоже выслушаю предложения.
Забыл написать про автозагрузку служб при старте ОС
sudo nano /etc/rc.conf
И в самом низу файла в массив „DAEMONS“ дописываем:
Источник


