- Arduino
- Contents
- Installation
- AVR Boards
- Pinoccio Scout
- Intel Galileo
- On Arm7 devices
- RedBear Duo
- SparkFun
- Configuration
- Accessing serial
- Arduino-Builder
- Alternatives for IDE
- ArduIDE
- Arduino-CMake
- Makefile
- Arduino-mk
- Scons
- PlatformIO
- Installation
- Usage
- Emacs
- Troubleshooting
- Consistent naming of Arduino devices
- Error opening serial port
- Working with Uno/Mega2560
- Not recognizing USB port with Mega2560 cheap Chinese clones
- Application not resizing with WM, menus immediately closing
- Fails to upload: programmer is not responding
- Как установить Arduino IDE в Ubuntu Linux
- Установка Arduino IDE с помощью скрипта
- Шаг 1: Убедитесь, что ваши системные пакеты Ubuntu обновлены:
- Шаг 2: Загрузка Arduino IDE и его извлечение
- Шаг 3: Извлеките файл tar.xz.:
- Шаг 4: Установка Arduino с помощью скрипта установщика
- Добавление пользователя в группу использования порта Arduino
- Запуск Arduino IDE в первый раз
- Установка Arduino IDE с помощью Snap
- Установка Arduino IDE в Linux с помощью Apt
- Заключение
- Arduino board with linux
- Quick Start
- Download the Arduino Software (IDE)
- Extract the package
- Run the install script
- Proceed with board-specific instructions
- Please Read.
Arduino
Arduino is an open-source electronics prototyping platform based on flexible, easy-to-use hardware and software. It is intended for artists, designers, hobbyists, and anyone interested in creating interactive objects or environments.
Contents
Installation
- Install either arduino for the official IDE or arduino-cli for the official CLI. The offline documentation for the IDE can be installed via arduino-docs .
- Add your user to the uucp user group (more information in the #Accessing serial section).
- You may need to load the cdc_acm module.
AVR Boards
To use AVR boards such as the Arduino Uno you can install arduino-avr-core optionally to use archlinux upstream avr-gcc instead of the bundled older avr-core. If you still want to use the older arduino-core you need to install it in the board manager. You can always switch between the different cores in the «Tools>Board» menu.
Pinoccio Scout
Pinoccio Scouts can also be programmed using the Arduino IDE. Instructions can be found here. Alternative you can install arduino-pinoccio AUR from the AUR.
Intel Galileo
To use the Intel Galileo boards with Archlinux install the Arduino IDE and download the Galileo tools package via «Tools->Board->Boards Manager». To fix the installation you can follow this github post.
On Arm7 devices
See here for a work around.
RedBear Duo
You might need to install perl-archive-zip or you will get an error about missing crc32.
SparkFun
To use SparkFun boards such as the Pro Micro you need to download their board definitions. More information here and here.
Configuration
Accessing serial
The arduino board communicates with the computer via a serial connection or a serial-over-USB connection, so the user needs read/write access to the serial device file. Udev creates files such as /dev/ttyUSB0 owned by group uucp so adding the user to the uucp group gives the required read/write access. See Users and groups#Group management for details.
Before uploading to the Arduino, be sure to set the correct serial port, board, and processor from the Tools menu.
Sending commands through Terminal without new line after command
Reading what your Arduino has to tell you
Arduino-Builder
You can also build Arduino sketches with the arduino-builder command line tool. In order to use the provided arduino-avr-core with upstream avr-gcc and avrdude you need to create a small settings file:
Compile a sketch with:
Or pass all options via command line:
Alternatives for IDE
ArduIDE
ArduIDE is a Qt-based IDE for Arduino. arduide-git AUR is available in the AUR.
Arduino-CMake
Using Arduino-CMake-Toolchain and CMake you can build Arduino firmware from the command line using multiple build systems. CMake lets you generate the build system that fits your needs, using the tools you like. It can generate any type of build system, from simple Makefiles, to complete projects for Eclipse, Visual Studio, XCode, etc.
Makefile
Instead of using the Arduino IDE it is possible to use another editor and a Makefile.
Set up a directory to program your Arduino and copy the Makefile into this directory. A copy of the Makefile can be obtained from /usr/share/arduino/hardware/cores/arduino/Makefile
You will have to modify this a little bit to reflect your settings. The makefile should be pretty self explanatory. Here are some lines you may have to edit.
Depending on which library functions you call in your sketch, you may need to compile parts of the library. To do that you need to edit your SRC and CXXSRC to include the required libraries.
Now you should be able to make && make upload to your board to execute your sketch.
Arduino-mk
arduino-mk AUR is another alternative Makefile approach. It allows users to have a local Makefile that includes Arduino.mk. See project page for usage.
For Arduino 1.5, try the following local Makefile (because Arduino 1.5’s library directory structure is slightly different):
In some cases you could need to install avr-libc and avrdude .
Scons
Using scons together with arscons it is very easy to use to compile and upload Arduino projects from the command line. Scons is based on python and you will need python-pyserial to use the serial interface. Install python-pyserial and scons .
That will get the dependencies you need too. You will also need Arduino itself so install it as described above. Create project directory (eg. test), then create a arduino project file in your new directory. Use the same name as the directory and add .ino (eg. test.ino). Get the SConstruct script from arscons and put it in your directory. Have a peek in it and, if necessary, edit it. It is a python script. Edit your project as you please, then run
PlatformIO
PlatformIO is a python tool to build and upload sketches for multiple Hardware Platforms, at the moment of writing these are Arduino/AVR based boards, TI MSP430 and TI TM4C12x Boards. In the near future the author plans to add a library function that allows to search and include libraries directly from GitHub.
Installation
Usage
Emacs
It is possible to configure Emacs as IDE.
Install the package emacs-arduino-mode-git AUR from the AUR in order to enable the arduino-mode in emacs.
Add to the init script:
You can compile and upload the sketches using Arduino-mk (see above) with M-x compile make upload .
Troubleshooting
Consistent naming of Arduino devices
If you have more than one Arduino you may have noticed that they names /dev/ttyUSB6 are assigned in the order of connection. In the IDE this is not so much of a problem, but when you have programmed your own software to communicate with an Arduino project in the background this can be annoying. Use the following udev rules to assign static symlinks to your Arduino’s:
Your Arduino’s will be available under names like /dev/sensors/ftdi_A700dzaF . If you want you can also assign more meaningfull names to several devices like this:
which will create a symlink in /dev/arduino/nano to the device with the specified serialnumber. You do need to unplug and replug your Arduino for this to take effect or run
Common idVendor / idProduct pairs can be found in /usr/share/arduino/hardware/archlinux-arduino/avr/boards.txt in the distribution package. Note that some of them (notably FTDI ones) are not unique to the Arduino platform. Using serial attribute is a good way to distinguish between various devices.
Error opening serial port
You may see the serial port initially when the IDE starts, but the TX/RX leds do nothing when uploading. You may have previously changed the baudrate in the serial monitor to something it does not like. Edit
/.arduino/preferences.txt so that serial.debug_rate is a different speed, like 115200.
Working with Uno/Mega2560
The Arduino Uno and Mega2560 have an onboard USB interface (an Atmel 8U2) that accepts serial data, so they are accessed through /dev/ttyACM0 created by the cdc-acm kernel module when it is plugged in.
The 8U2 firmware may need an update to ease serial communications. See [1] for more details and reply #11 for a fix. The original arduino bbs, where you can find an image explaining how to get your Uno into DFU, is now in a read-only state. If you do not have an account to view the image, see [2].
You can perform a general function test of the Uno by putting it in loopback mode and typing characters into the arduino serial monitor at 115200 baud. It should echo the characters back to you. To put it in loopback, short pins 0 -> 1 on the digital side and either hold the reset button or short the GND -> RESET pins while you type.
Not recognizing USB port with Mega2560 cheap Chinese clones
Application not resizing with WM, menus immediately closing
Fails to upload: programmer is not responding
Changing processor setting from ATmega328P to ATmega328P (Old Bootloader) (See Tools->Processor in Arduino IDE) may help with upload failures.
Источник
Как установить Arduino IDE в Ubuntu Linux
Arduino IDE — это приложение с открытым исходным кодом предназначена для написания и загрузки кода на платы Arduino. Так же это кросс-платформенное приложение, которое работает на Windows, macOS и Linux. Arduino — это аппаратный язык программирования, в основном написанный на C и C++.
Эта статья покажет вам, как установить Arduino IDE на Ubuntu 20.04. Существует три различных способа установки Arduino на Ubuntu – с помощью официального сценария установки, с помощью пакета snap и apt.
Установка Arduino IDE с помощью скрипта
Это самый простой и рекомендуемый способ установки Arduino IDE в Ubuntu Linux.
Шаг 1: Убедитесь, что ваши системные пакеты Ubuntu обновлены:
$ sudo apt-get update
$ sudo apt-get upgrade
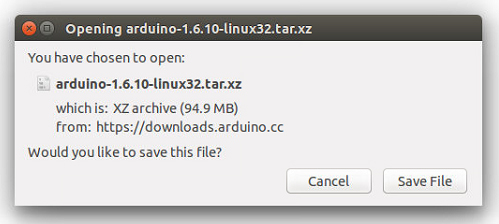
Шаг 2: Загрузка Arduino IDE и его извлечение
Загрузите последнюю версию Arduino IDE для Linux 64bit со страницы загрузки. Очень важно, чтобы вы выбрали правильную версию для своего дистрибутива Linux, которым в нашем случае является Ubuntu Linux 64bit.
Следующие команды загружают файл Arduino IDE версии 1.8.15 tar.xz во временный каталог с именем ‘arduino’:
$ mkdir arduino
$ cd arduino/
$ wget https://downloads.arduino.cc/arduino-1.8.15-linux64.tar.xz
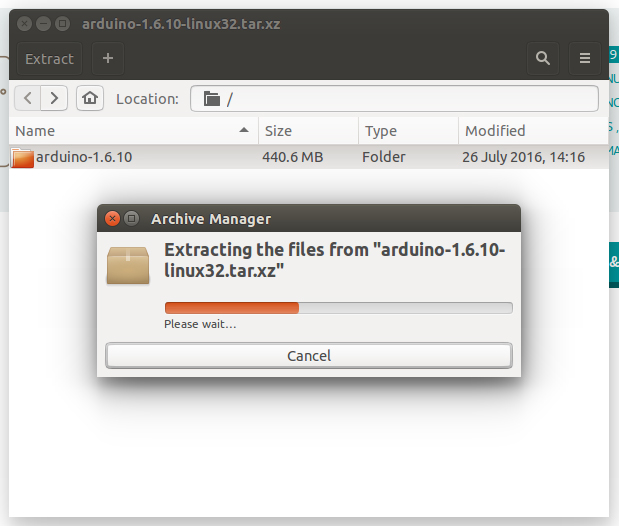
Шаг 3: Извлеките файл tar.xz.:
Делается это командой
Шаг 4: Установка Arduino с помощью скрипта установщика
Измените каталог, а затем запустите установленный скрипт:
По умолчанию Arduino устанавливается в /usr/local/bin/arduino.
Вы должны найти новый значок на рабочем столе и в списке приложений:
 Arduino IDE – Иконка на рабочем столе
Добавление пользователя в группу использования порта Arduino
Чтобы избежать возможных проблем при использовании Arduino IDE, добавьте системного пользователя в группу dialout.
Это процедура доступа к последовательному порту из программного обеспечения Arduino (IDE), если вы получаете ошибку.
Может случиться так, что при загрузке эскиза вы получите следующую ошибку:
“Error opening serial port …” (Ошибка открытия последовательного порта …)
Если вы получаете эту ошибку, вам необходимо установить разрешения последовательного порта.
Введите в терминале следующую команду:
вы получите что-то вроде:
crw-rw— – 1 root dialout 188, 0 5 apr 23.01 ttyACM0
Данные, которые нам нужны, — это “dialout” (это владелец группы файла).
Теперь нам просто нужно добавить нашего системного пользователя в группу:
где ваше имя пользователя Linux. Вам нужно будет выйти из системы и снова войти в систему, чтобы это вступило в силу.
В моем случае это так:
$ sudo usermod -a -G dialout smilojkovic
После этой команды вы сможете нормально запустить IDE и загрузить код на свою плату или использовать последовательный монитор.
Запуск Arduino IDE в первый раз
Перед запуском IDE подключите плату Arduino к компьютеру с помощью USB-кабеля.
Arduino должен быть доступен в списке приложений – если нет, то его можно запустить из командной строки, написав команду arduino .
Если все было установлено и настроено правильно, мы должны увидеть главное окно редактора IDE.
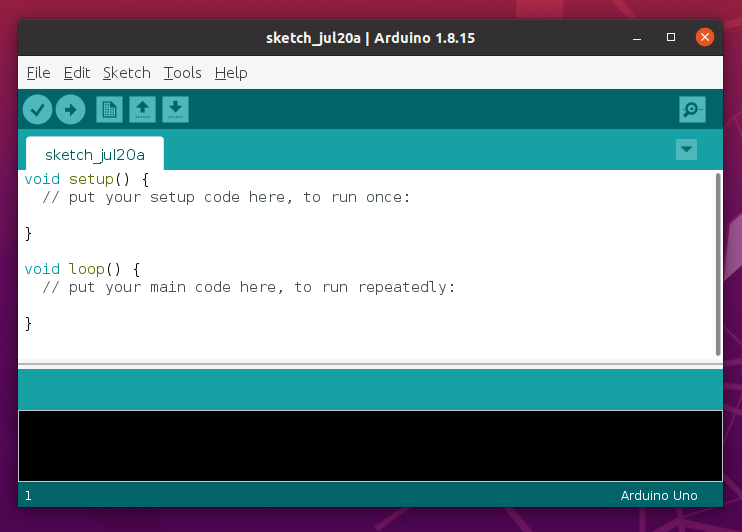 Окно редактора Arduino в Linux
Установка Arduino IDE с помощью Snap
Arduino IDE также доступна из пакетов Snap. Мы можем установить его с помощью следующей команды:
Ответ в терминале:
arduino 1.8.15 from Merlijn Sebrechts installed
Из этого мы видим, что пакет Snap — имеет самую последнюю версию Arduino IDE.
Установка Arduino IDE в Linux с помощью Apt
Arduino IDE доступен в репозиториях Ubuntu, вы можете установить его с помощью apt.
Репозиторию может потребоваться некоторое время, чтобы получить последнюю версию. Поэтому проверьте версию, доступную перед установкой.
arduino/focal,focal 2:1.0.5+dfsg2-4.1 all
AVR development board IDE and built-in libraries
Заключение
Из этой статьи вы узнали, как установить Arduino IDE на Ubuntu 20.04 LTS.
Для получения дополнительной помощи или полезной информации, мы рекомендуем вам проверить официальный сайт Arduino.
Источник
Arduino board with linux
This document explains how to install the Arduino Software (IDE) on Linux machines.
Quick Start
The Linux build of the Arduino Software (IDE) is now a package that doesn’t require any specific procedure for the various distributions availabe of Linux. The only relevant information is the 32 or 64 bit version of the OS.
Download the Arduino Software (IDE)
Get the latest version from the download page. You can choose between the 32, 64 and ARM versions. It is very important that you choose the right version for your Linux distro. Clicking on the chosen version brings you to the donation page and then you can either open or save the file. Please save it on your computer.
Extract the package
The file is compressed and you have to extract it in a suitable folder, remembering that it will be executed from there.
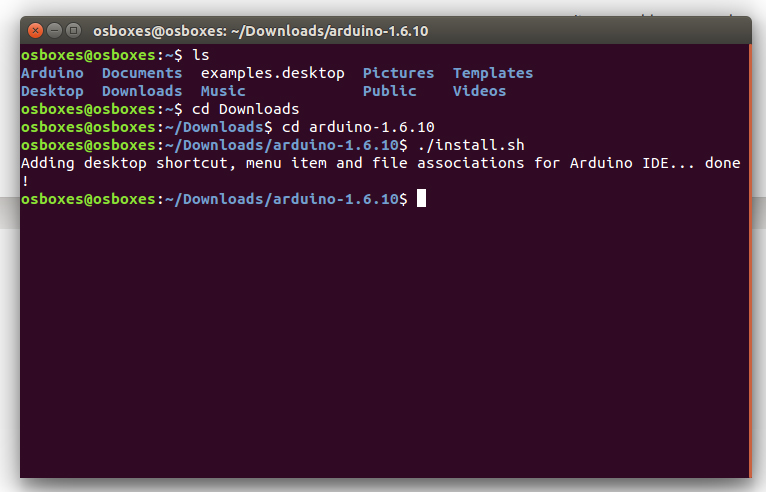
Run the install script
Open the arduino-1.6.x folder just created by the extraction process and spot the install.sh file. Right click on it and choose Run in Terminal from the contextual menu. The installation process will quickly end and you should find a new icon on your desktop.
If you don’t find the option to run the script from the contextual menu, you have to open a Terminal window and move into the arduino-1.6.x folder. Type the command ./install.sh and wait for the process to finish. You should find a new icon on your desktop.
Proceed with board-specific instructions
When the Arduino Software (IDE) is properly installed you can go back to the Getting Started Home and choose your board from the list on the right of the page.
Please Read.
It might happen that when you upload a sketch — after you have selected your board and the serial port -, you get an error Error opening serial port . If you get this error, you need to set serial port permission.
Open Terminal and type:
you will get something like:
crw-rw—- 1 root dialout 188, 0 5 apr 23.01 ttyACM0
The «0» at the end of ACM might be a different number, or multiple entries might be returned. The data we need is «dialout» (is the group owner of the file).
Now we just need to add our user to the group:
sudo usermod -a -G dialout
where is your Linux user name. You will need to log out and log in again for this change to take effect.
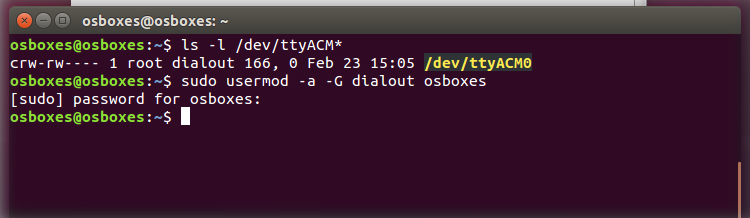
This is the procedure to access the serial port from the Arduino Software (IDE) if you get an error
After this procedure, you should be able to proceed normally and upload the sketch to your board or use the Serial Monitor.
Last revision 2016/08/10 by SM
The text of the Arduino getting started guide is licensed under a Creative Commons Attribution-ShareAlike 3.0 License. Code samples in the guide are released into the public domain.
Источник


