- Arduino.ru
- Начало работы с Arduino в Windows
- Arduino cc en guide windows
- 1 | Get an Arduino board
- 2 | Download the Arduino environment
- 3 | Install the USB drivers
- 4 | Connect the board
- 5 | Upload a program
- Getting Started with Arduino UNO
- Use your Arduino Uno on the Arduino Web IDE
- Use your Arduino Uno on the Arduino Desktop IDE
- Install the board drivers
- Open your first sketch
- Select your board type and port
- Upload the program
- Learn more on the Desktop IDE
- Tutorials
Arduino.ru
Начало работы с Arduino в Windows
Данный документ разъясняет, как подключить плату Arduino к компьютеру и загрузить ваш первый скетч.
Необходимое железо — Arduino и USB-кабель
В этом руководстве предполагается, что вы используете Arduino Uno, Arduino Duemilanove, Nano или Diecimila.
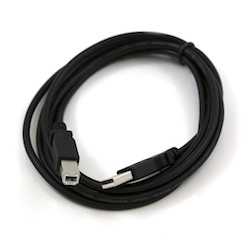
Вам потребуется также кабель стандарта USB (с разъемами типа USB-A и USB-B): такой, каким, к примеру, подключается USB-принтер. (Для Arduino Nano вам потребуется вместо этого кабель с разъемами А и мини-В).


Программа – среда разработки для Arduino
Найдите последнюю версию на странице скачивания.
После окончания загрузки распакуйте скачанный файл. Убедитесь, что не нарушена структура папок. Откройте папку двойным кликом на ней. В ней должны быть несколько файлов и подкаталогов.
Подсоедините плату
Arduino Uno, Mega, Duemilanove и Arduino Nano получают питание автоматически от любого USB-подключения к компьютеру или другому источнику питания. При использовании Arduino Diecimila убедитесь, что плата сконфигурирована для получения питания через USB-подключение. Источник питания выбирается с помощью маленького пластикового джампера, надетого на два из трех штырьков между разъемами USB и питания. Проверьте, чтобы он был установлен на два штырька, ближайших к разъему USB.
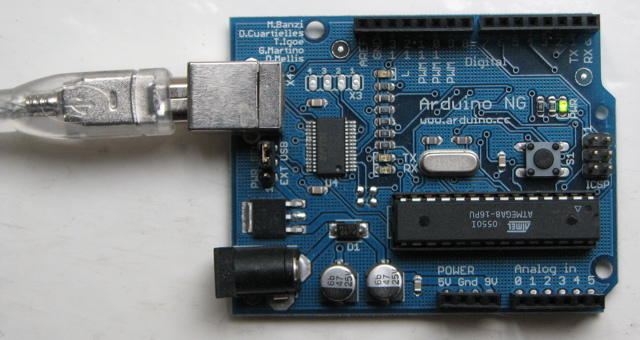
Подсоедините плату Arduino к вашему компьютеру, используя USB-кабель. Должен загореться зеленый светодиод питания, помеченный PWR.
Установите драйвера
Установка драйверов для Arduino Uno на Windows7, Vista или XP:
- Подключите вашу плату и подождите, пока Windows начнет процесс установки драйвера. Через некоторое время, несмотря на все её попытки, процесс закончится безрезультатно.
- Нажмите на кнопку ПУСК и откройте Панель управления.
- В панели управления перейдите на вкладку Система и безопасность (System and Security). Затем выберите Система. Когда откроется окно Система, выберите Диспетчер устройств (Device Manager).
- Обратите внимание на порты (COM и LPT). Вы увидите открытый порт под названием «Arduino UNO (COMxx)».
- Щелкните на названии «Arduino UNO (COMxx)» правой кнопкой мышки и выберите опцию «Обновить драйвер» (Update Driver Software).
- Кликните «Browse my computer for Driver software».
- Для завершения найдите и выберите файл драйвера для Uno – «ArduinoUNO.inf», расположенный в папке Drivers программного обеспечения для Arduino (не в подкаталоге «FTDI USB Drivers»).
- На этом Windows закончит установку драйвера.
Установка драйверов для Arduino Duemilanove, Nano или Diecimila в Windows7, Vista или XP:
Когда вы подключите плату к компьютеру, Windows запустит процесс установки драйвера (если до этого вы не подключали к компьютеру плату Arduino).
В Windows Vista драйвер скачается и установится автоматически (это действительно работает!)
В Windows XP откроется Мастер установки нового оборудования (Add New Hardware wizard).
- На вопрос «Подключиться к узлу Windows Update для поиска программного обеспечения? (Can Windows connect to search for software?)» выберите ответ «Нет, не в этот раз (No, not this time)». Нажмите «Далее».
- Выберите «Установить из списка или указать местонахождение (Advanced) (Install from a list or specified location (Advanced))» и нажмите «Далее».
- Убедитесь, что выбрано «Искать наиболее подходящий драйвер в указанном месте (Search for the best driver in these locations)»; снимите флажок «Искать на съемных носителях (Search removable media)»; выберите «Добавить область поиска (Include this location in the search)» и укажите папку drivers/FTDI USB Drivers в дистрибутиве Arduino. (Последнюю версию драйвера можно найти на FTDI веб-сайте). Нажмите «Далее».
- Мастер начнет поиск и затем сообщит вам, что обнаружен «USB Serial Converter». Нажмите «Готово (Finish)».
- Снова появится мастер установки нового оборудования. Выполните все те же шаги с теми же опциями и указанием того же пути для поиска. На этот раз будет обнаружен «USB Serial Port».
Проверить, что драйвера действительно установлены можно, открыв Диспетчер устройств (Windows Device Mananger) (он находится во вкладке Оборудование(Hardware) панели Свойства системы(System)). Найдите «USB Serial Port» в разделе «Порты (Ports)» – это и есть плата Arduino.
Запустите среду разработки Arduino
Дважды щелкните на приложении для Arduino.
Откройте готовый пример
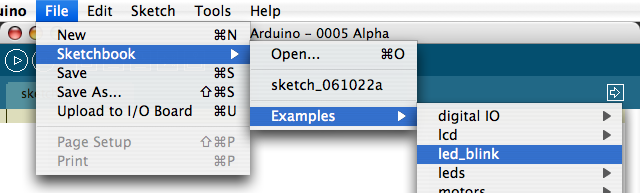
Откройте мгновенный пример скетча «LED» по адресу: File > Examples > 1.Basics > Blink.

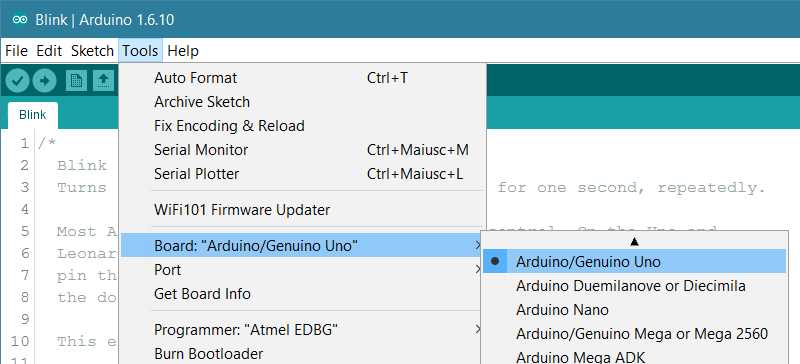
Выберите вашу плату
Вам нужно выбрать пункт в меню Tools > Board menu, соответствующий вашей плате Arduino.

Выбор Arduino Uno
Для Duemilanove Arduinoплат с ATmega328 (проверьте на плате надпись на микросхеме) выберите Arduino Duemilanove или Nano с ATmega328. Вначале платы Arduino выпускались с ATmega168; для них выберите Arduino Diecimila, Duemilanove, или Nano с ATmega168. Подробно о пунктах меню платы можно прочитать на странице «Среда разработки».
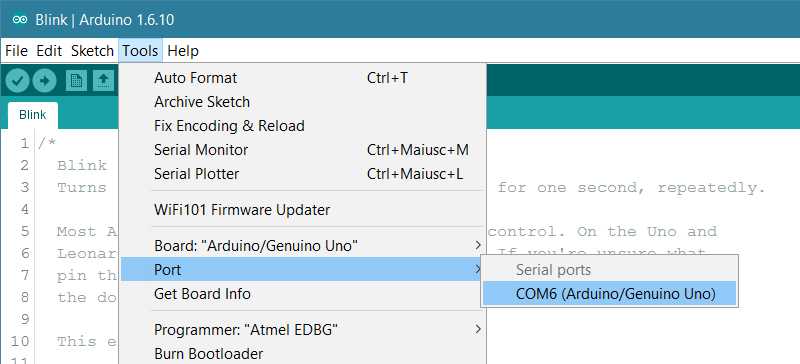
Выберите ваш последовательный порт
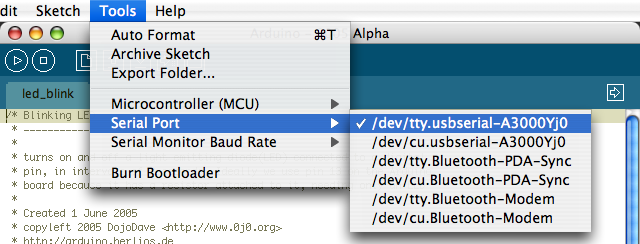
Выберите устройство последовательной передачи платы Arduino из меню Tools | Serial Port. Вероятно, это будет COM3 или выше (COM1 и COM2 обычно резервируются для аппаратных COM-портов). Чтобы найти нужный порт, вы можете отсоединить плату Arduino и повторно открыть меню; пункт, который исчез, и будет портом платы Arduino. Вновь подсоедините плату и выберите последовательный порт.
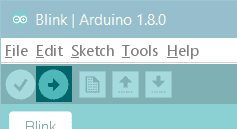
Загрузите скетч в Arduino
Теперь просто нажмите кнопку «Upload» в программе – среде разработки. Подождите несколько секунд – вы увидите мигание светодиодов RX и TX на плате. В случае успешной загрузки в строке состояния появится сообщение «Done uploading (Загрузка выполнена)».
(Замечание. Если у вас Arduino Mini, NG или другая плата, вам необходимо физически кнопкой подать команду reset непосредственно перед нажатием кнопки «Upload»).
Несколько секунд спустя после окончания загрузки вы увидите как светодиод вывода 13 (L) на плате начнет мигать оранжевым цветом. Поздравляю, если это так! Вы получили готовый к работе Arduino!
Arduino cc en guide windows
This page is obsolete. You should instead see the Windows Howto or the Mac OS X howto (both in the Arduino guide).
These are the steps you need to follow in order to be up and running:
- Get an Arduino board
- Download the Arduino environment
- Install the USB drivers
- Connect the board
- Upload a program
1 | Get an Arduino board
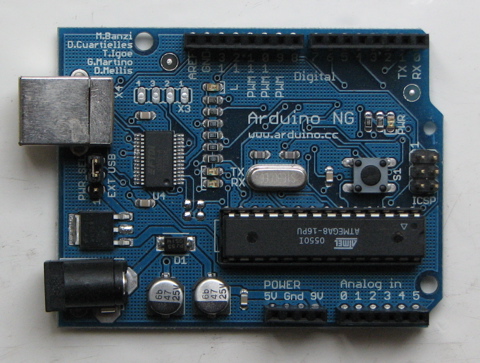
The Arduino i/o board is a simple circuit featuring the ATmega8 processor from Atmel. The board is composed of a printed circuit board (PCB) and electronic parts.
There are a few ways to get an Arduino board:
- buy a ready made board. See how you can buy a board or just the PCB.
- European distributor
- US distributor
- build your own board. If you want you can build your own PCB just by downloading the CAD files from the Hardware page. Extract the .brd file and send it to a PCB manufacturer. Be aware that manufacturing a single pcb will be very expensive. It’s better to get together with other people and make 20 or 30 at a time. Since you get the full CAD files you can make your own customised version of Arduino. if you make modifications or fix bugs please send us your changes!
- purchase parts. purchase the parts from any electronics store. The Serial version in particular has been designed to use the most basic parts that can be found anywhere in the world. The USB version on the other hand requires some advanced soldering skills because of the FTDI chip that is an smd part. Here is a list of parts for the serial board.
- assemble the board. We put together a step by step guide on how to build an arduino board. Newbies: never soldered before? afraid of trashing thousands of boards before getting one properly soldered? fear not 🙂 learn to master the art of soldering.
- program the bootloader. In order for the development environment to be able to program the chip, this has to be programmed with a piece of code called bootloader. See the bootloader page on how to program it on your chip.
2 | Download the Arduino environment
To program the Arduino board you need the Arduino environment.
Download Arduino: From the software page.
Linux note: For help getting the Arduino IDE running on Debian, please see the FAQ («How can I run the Arduino IDE under Linux?»).
Mac OS X note: After downloading the IDE, run the macosx_setup.command . It corrects permission on a few files for use with the serial port and will prompt you for your password. You may need to reboot after running this script.

3 | Install the USB drivers
If you are using a USB Arduino, you will need to install the drivers for the FTDI chip on the board. These can be found in the drivers directory of the Arduino distribution.
On Windows, you will need to unzip FTDI USB Drivers.zip . Then, when you plug in the Arduino board, point the Windows Add Hardware wizard to the FTDI USB Drivers directory.
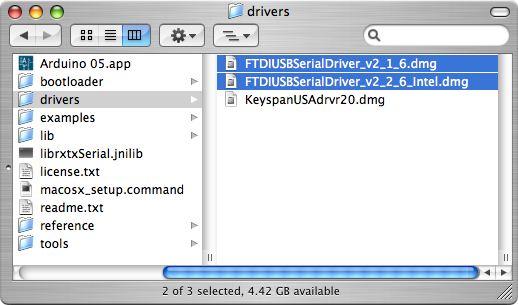
On the Mac, mount the FTDIUSBSerialDriver _v2_1_6.dmg (on PPC machines) or the FTDIUSBSerialDriver _v2_2_6_Intel.dmg (on Intel machines) disk image and run the included FTDIUSBSerialDriver .pkg .
The latest version of the drivers can be found on the FTDI website.
4 | Connect the board
If you’re using a serial board, power the board with an external power supply (6 to 25 volts DC, with the core of the connector positive). Connect the board to a serial port on your computer.
On the USB boards, the power source is selected by the jumper between the USB and power plugs. To power the board from the USB port (good for controlling low power devices like LEDs ), place the jumper on the two pins closest to the USB plug. To power the board from an external power supply (needed for motors and other high current devices), place the jumper on the two pins closest to the power plug. Either way, connect the board to a USB port on your computer. On Windows, the Add New Hardware wizard will open; tell it you want to specify the location to search for drivers and point to the folder containing the USB drivers you unzipped in the previous step.
The power LED should go on.
5 | Upload a program
Open the LED blink example sketch: File > Sketchbook > Examples > led_blink.
Here’s what the code for the LED blink example looks like.
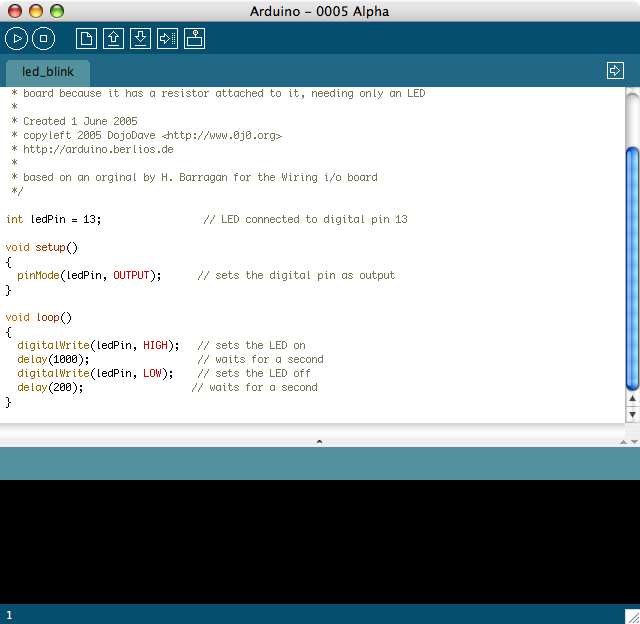
Select the serial device of the Arduino board from the Tools | Serial Port menu. On Windows, this should be COM1 or COM2 for a serial Arduino board, or COM3 , COM4 , or COM5 for a USB board. On the Mac, this should be something like /dev/cu.usbserial-1B1 for a USB board, or something like /dev/ cu.USA19QW1b1P1 .1 if using a Keyspan adapter with a serial board (other USB-to-serial adapters use different names).
Push the reset button on the board then click the Upload button in the IDE. Wait a few seconds. If successful, the message «Done uploading.» will appear in the status bar.

If the Arduino board doesn’t show up in the Tools | Serial Port menu, or you get an error while uploading, please see the FAQ for troubleshooting suggestions.
A few seconds after the upload finishes, you should see the amber (yellow) LED on the board start to blink.
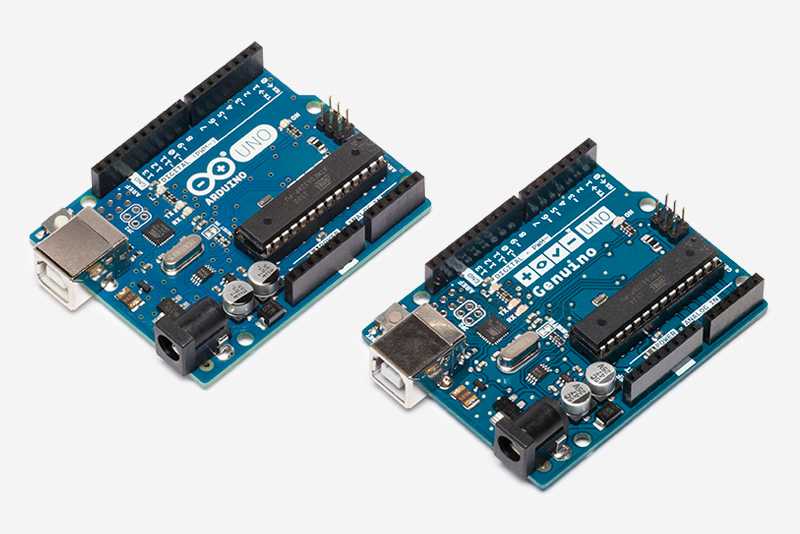
Getting Started with Arduino UNO
This document explains how to connect your Uno board to the computer and upload your first sketch. The Arduino Uno is programmed using the Arduino Software (IDE), our Integrated Development Environment common to all our boards and running both online and offline. For more information on how to get started with the Arduino Software visit the Getting Started page.
Use your Arduino Uno on the Arduino Web IDE

All Arduino boards, including this one, work out-of-the-box on the Arduino Web Editor, you only need to install Arduino Create Agent to get started.
The Arduino Web Editor is hosted online, therefore it will always be up-to-date with the latest features and support for all boards. Follow this simple guide to start coding on the browser and upload your sketches onto your board.
Use your Arduino Uno on the Arduino Desktop IDE
If you want to program your Arduino Uno while offline you need to install the Arduino Desktop IDE The Uno is programmed using the Arduino Software (IDE), our Integrated Development Environment common to all our boards. Before you can move on, you must have installed the Arduino Software (IDE) on your PC, as explained in the home page of our Getting Started.
Connect your Uno board with an A B USB cable; sometimes this cable is called a USB printer cable
The USB connection with the PC is necessary to program the board and not just to power it up. The Uno automatically draw power from either the USB or an external power supply. Connect the board to your computer using the USB cable. The green power LED (labelled PWR) should go on.
Install the board drivers
If you used the Installer, Windows — from XP up to 10 — will install drivers automatically as soon as you connect your board.
If you downloaded and expanded the Zip package or, for some reason, the board wasn’t properly recognized, please follow the procedure below.
Click on the Start Menu, and open up the Control Panel.
While in the Control Panel, navigate to System and Security. Next, click on System. Once the System window is up, open the Device Manager.
Look under Ports (COM & LPT). You should see an open port named «Arduino UNO (COMxx)». If there is no COM & LPT section, look under «Other Devices» for «Unknown Device».
Right click on the «Arduino UNO (COmxx)» port and choose the «Update Driver Software» option.
Next, choose the «Browse my computer for Driver software» option.
Finally, navigate to and select the driver file named «arduino.inf», located in the «Drivers» folder of the Arduino Software download (not the «FTDI USB Drivers» sub-directory). If you are using an old version of the IDE (1.0.3 or older), choose the Uno driver file named «Arduino UNO.inf»
Windows will finish up the driver installation from there.
Open your first sketch
Open the LED blink example sketch: File > Examples >01.Basics > Blink.

Select your board type and port
You’ll need to select the entry in the Tools > Board menu that corresponds to your Arduino board.
Select the serial device of the board from the Tools | Serial Port menu. This is likely to be COM3 or higher (COM1 and COM2 are usually reserved for hardware serial ports). To find out, you can disconnect your board and re-open the menu; the entry that disappears should be the Arduino board. Reconnect the board and select that serial port.
Upload the program
Now, simply click the «Upload» button in the environment. Wait a few seconds — you should see the RX and TX leds on the board flashing. If the upload is successful, the message «Done uploading.» will appear in the status bar.
A few seconds after the upload finishes, you should see the pin 13 (L) LED on the board start to blink (in orange). If it does, congratulations! You’ve gotten Arduino up-and-running. If you have problems, please see the troubleshooting suggestions.
Learn more on the Desktop IDE
See this tutorial for a generic guide on the Arduino IDE with a few more infos on the Preferences, the Board Manager, and the Library Manager.
Tutorials
Now that you have set up and programmed your Uno board, you may find inspiration in our Project Hub tutorial platform
or have a look to the tutorial pages that explain how to use the various features of your board.
examples for using various sensors and actuators


