- Как установить Arduino IDE в Ubuntu Linux
- Установка Arduino IDE с помощью скрипта
- Шаг 1: Убедитесь, что ваши системные пакеты Ubuntu обновлены:
- Шаг 2: Загрузка Arduino IDE и его извлечение
- Шаг 3: Извлеките файл tar.xz.:
- Шаг 4: Установка Arduino с помощью скрипта установщика
- Добавление пользователя в группу использования порта Arduino
- Запуск Arduino IDE в первый раз
- Установка Arduino IDE с помощью Snap
- Установка Arduino IDE в Linux с помощью Apt
- Заключение
- 👝 Как установить программное обеспечение Arduino (IDE) на Linux
- Установка Arduino IDE в системах Linux
- Скачайте программное обеспечение Arduino (IDE)
- Запустите скрипт установки Arduino IDE
- Среда разработки Arduino IDE
- Скачать для Windows
- Скачать для macOS
- Скачать для Linux
- Как переключить язык
- Бета-версия 2.0
- Поддерживаемые платы
- Install the Arduino Software (IDE) on Linux
- Quick Start
- Download the Arduino Software (IDE)
- Extract the package
- Run the install script
- Proceed with board-specific instructions
- Please Read.
- How to Install Arduino IDE on Linux Mint 20
- Installing Arduino IDE
- Method 1: Downloading Arduino Software
- Method 2: Using Software Manager
- Accessing the application
- Uninstalling Arduino IDE
- Conclusion
- Karim Buzdar
Как установить Arduino IDE в Ubuntu Linux
Arduino IDE — это приложение с открытым исходным кодом предназначена для написания и загрузки кода на платы Arduino. Так же это кросс-платформенное приложение, которое работает на Windows, macOS и Linux. Arduino — это аппаратный язык программирования, в основном написанный на C и C++.
Эта статья покажет вам, как установить Arduino IDE на Ubuntu 20.04. Существует три различных способа установки Arduino на Ubuntu – с помощью официального сценария установки, с помощью пакета snap и apt.
Установка Arduino IDE с помощью скрипта
Это самый простой и рекомендуемый способ установки Arduino IDE в Ubuntu Linux.
Шаг 1: Убедитесь, что ваши системные пакеты Ubuntu обновлены:
$ sudo apt-get update
$ sudo apt-get upgrade
Шаг 2: Загрузка Arduino IDE и его извлечение
Загрузите последнюю версию Arduino IDE для Linux 64bit со страницы загрузки. Очень важно, чтобы вы выбрали правильную версию для своего дистрибутива Linux, которым в нашем случае является Ubuntu Linux 64bit.
Следующие команды загружают файл Arduino IDE версии 1.8.15 tar.xz во временный каталог с именем ‘arduino’:
$ mkdir arduino
$ cd arduino/
$ wget https://downloads.arduino.cc/arduino-1.8.15-linux64.tar.xz
Шаг 3: Извлеките файл tar.xz.:
Делается это командой
Шаг 4: Установка Arduino с помощью скрипта установщика
Измените каталог, а затем запустите установленный скрипт:
По умолчанию Arduino устанавливается в /usr/local/bin/arduino.
Вы должны найти новый значок на рабочем столе и в списке приложений:
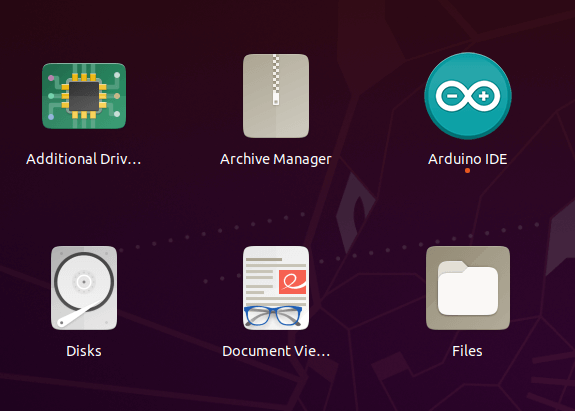 Arduino IDE – Иконка на рабочем столе
Добавление пользователя в группу использования порта Arduino
Чтобы избежать возможных проблем при использовании Arduino IDE, добавьте системного пользователя в группу dialout.
Это процедура доступа к последовательному порту из программного обеспечения Arduino (IDE), если вы получаете ошибку.
Может случиться так, что при загрузке эскиза вы получите следующую ошибку:
“Error opening serial port …” (Ошибка открытия последовательного порта …)
Если вы получаете эту ошибку, вам необходимо установить разрешения последовательного порта.
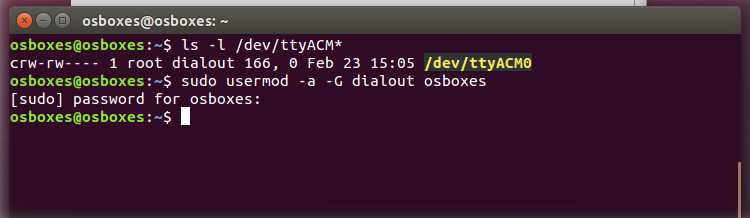
Введите в терминале следующую команду:
вы получите что-то вроде:
crw-rw— – 1 root dialout 188, 0 5 apr 23.01 ttyACM0
Данные, которые нам нужны, — это “dialout” (это владелец группы файла).
Теперь нам просто нужно добавить нашего системного пользователя в группу:
где ваше имя пользователя Linux. Вам нужно будет выйти из системы и снова войти в систему, чтобы это вступило в силу.
В моем случае это так:
$ sudo usermod -a -G dialout smilojkovic
После этой команды вы сможете нормально запустить IDE и загрузить код на свою плату или использовать последовательный монитор.
Запуск Arduino IDE в первый раз
Перед запуском IDE подключите плату Arduino к компьютеру с помощью USB-кабеля.
Arduino должен быть доступен в списке приложений – если нет, то его можно запустить из командной строки, написав команду arduino .
Если все было установлено и настроено правильно, мы должны увидеть главное окно редактора IDE.
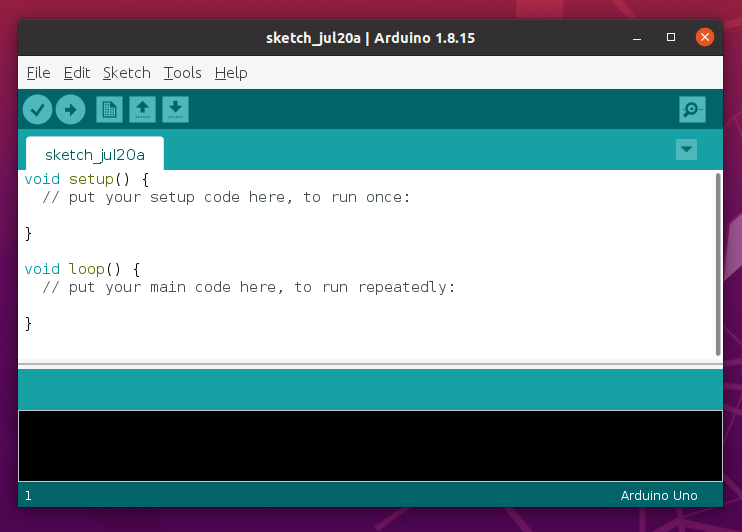 Окно редактора Arduino в Linux
Установка Arduino IDE с помощью Snap
Arduino IDE также доступна из пакетов Snap. Мы можем установить его с помощью следующей команды:
Ответ в терминале:
arduino 1.8.15 from Merlijn Sebrechts installed
Из этого мы видим, что пакет Snap — имеет самую последнюю версию Arduino IDE.
Установка Arduino IDE в Linux с помощью Apt
Arduino IDE доступен в репозиториях Ubuntu, вы можете установить его с помощью apt.
Репозиторию может потребоваться некоторое время, чтобы получить последнюю версию. Поэтому проверьте версию, доступную перед установкой.
arduino/focal,focal 2:1.0.5+dfsg2-4.1 all
AVR development board IDE and built-in libraries
Заключение
Из этой статьи вы узнали, как установить Arduino IDE на Ubuntu 20.04 LTS.
Для получения дополнительной помощи или полезной информации, мы рекомендуем вам проверить официальный сайт Arduino.
Источник
👝 Как установить программное обеспечение Arduino (IDE) на Linux

Arduino – это широко используемая электронная платформа с открытым исходным кодом, используемая для создания устройств, которые взаимодействуют с окружающей средой с помощью датчиков и исполнительных механизмов.
Она состоит из программируемой аппаратной платы и программного обеспечения (интегрированная среда разработки (IDE)) для написания и загрузки программ на плату.
Прежде чем вы сможете начать создавать проекты с использованием Arduino, вам нужно настроить IDE для программирования своих плат.
Arduino (IDE) – это бесплатное кроссплатформенное настольное приложение с открытым исходным кодом, которое позволяет писать код и загружать его на плату.
Оно работает на Linux, Windows, Mac OS X и Linux.
В этой статье мы расскажем, как установить последнюю версию программного обеспечения Arduino (IDE) на компьютеры с Linux.
Установка Arduino IDE в системах Linux
Программное обеспечение Arduino (IDE) – это пакет, который не требует какого-либо конкретного процесса для различных дистрибутивов Linux.
Единственное необходимое требование – это 32-битная или 64-битная версия операционной системы.
Скачайте программное обеспечение Arduino (IDE)
Перейдите на страницу загрузки и загрузите последнюю версию (1.8.12 на момент написания) программного обеспечения Arduino (IDE) для поддерживаемой архитектуры системы.
Вы можете выбрать между 32-битной, 64-битной и ARM-версиями, поскольку очень важно выбрать правильную версию для вашего дистрибутива Linux.
Кроме того, вы можете использовать следующую команду wget для загрузки пакета программного обеспечения Arduino (IDE) непосредственно на терминал.
Затем распакуйте загруженный архив с помощью команды tar.
Запустите скрипт установки Arduino IDE
Теперь перейдите в извлеченный каталог arduino-1.8.12 и запустите скрипт установки с привилегиями root, как показано далее:
После завершения установки на рабочем столе будет создан значок.
Чтобы запустить среду IDE, дважды щелкните ее.
Источник
Среда разработки Arduino IDE
Мы решили сэкономить вам пару кликов и разместить у себя свежие версии среды Arduino IDE, потому что на официальном сайте порой чёрт ногу сломит, пока найдёт нужную ссылку. Где скачать Arduino IDE — ваш выбор: файлы дистрибутивов абсолютно идентичны. Сейчас представлена стабильная версия Arduino IDE 1.8.16 (релиз от 06.09.2021) и бета-версия 2.0.0 (релиз beta.11 от 25.08.2021).

Скачать для Windows
- Инсталлятор для Windows — Windows XP, Windows 7, Windows 8, Windows 10 и выше.
- Архив ZIP для Windows — установка без прав админа, портативная версия для флешки.
- Приложение для Windows 8.1/10 в Microsoft Store
Скачать для macOS
- App для macOS — macOS X 10.8 Mountain Lion или новее.
Скачать для Linux
Для установки из архива в общем случае нужно выполнить следующие команды.
В отдельных дистрибутивах Linux проще воспользоваться командой установки из пакетов.
Как переключить язык
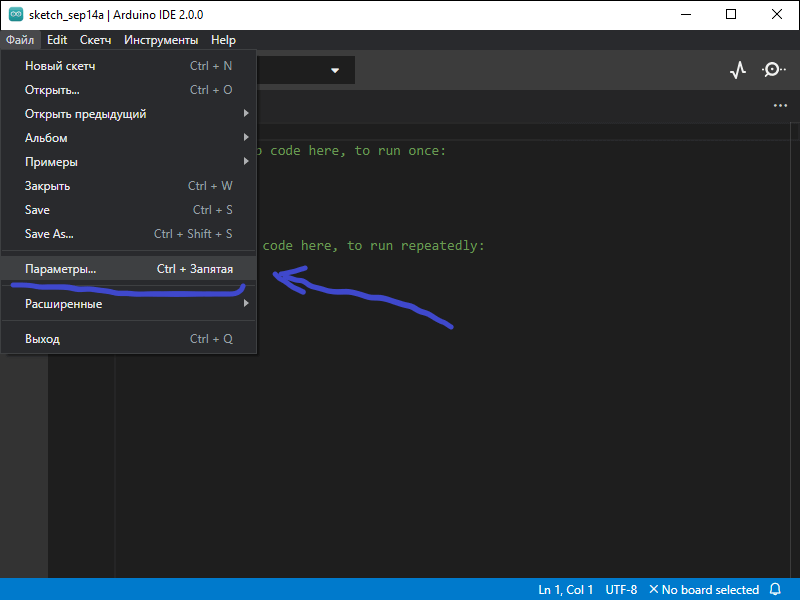
Arduino IDE при установке выбирает язык системы по умолчанию. Если вам понадобится переключить интерфейс на другой язык, это можно сделать в общих настройках программы.
- Заходим в главном меню в пункт «Файл → Настройки».
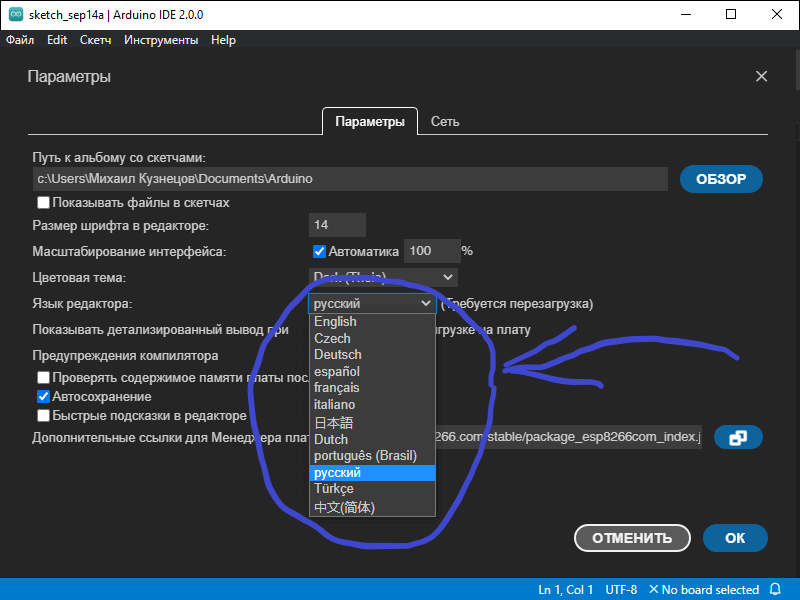
- Выбираем нужный язык в выпадающем списке «Язык редактора».
- Перезапускаем среду.
Бета-версия 2.0
- Инсталлятор для Windows (64 бита) — Windows 10 (x86-64) и новее.
- Архив ZIP для Windows (64 бита) — установка из архива.
- Архив Linux (64 бита) — версия для Linux-систем с архитектурой x86-64.
- Приложение для macOS — macOS X 10.14 Mojave (64 бита) или новее.
Поддерживаемые платы
Arduino IDE из коробки работает со всеми оригинальными платами AVR-архитектуры и их прямыми аналогами.
Также поддерживаются сторонние платы и контроллеры на других архитектурах: SAM, SAMD, Cortex-M. Они добавляются в среду отдельными пакетами. Ниже перечислены примеры установки некоторых таких плат.
Источник
Install the Arduino Software (IDE) on Linux
This document explains how to install the Arduino Software (IDE) on Linux machines.
Quick Start
The Linux build of the Arduino Software (IDE) comes in different packages depending on your system architecture. There are no specific instructions needed for the different distributions of Linux (e.g. Ubuntu).
Download the Arduino Software (IDE)
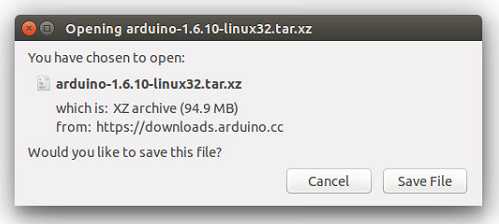
Get the latest version from the download page. You can choose between the 32, 64 and ARM versions. It is very important that you choose the right version for your Linux distro. Clicking on the chosen version brings you to the donation page and then you can either open or save the file. Please save it on your computer.
Extract the package
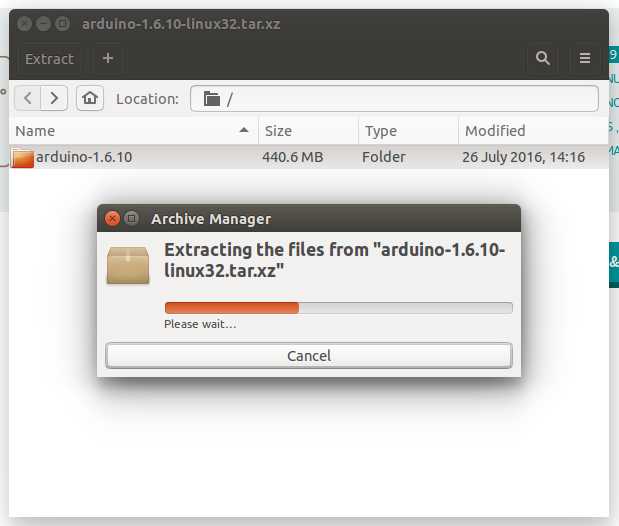
The file is compressed and you have to extract it in a suitable folder, remembering that it will be executed from there.
Run the install script
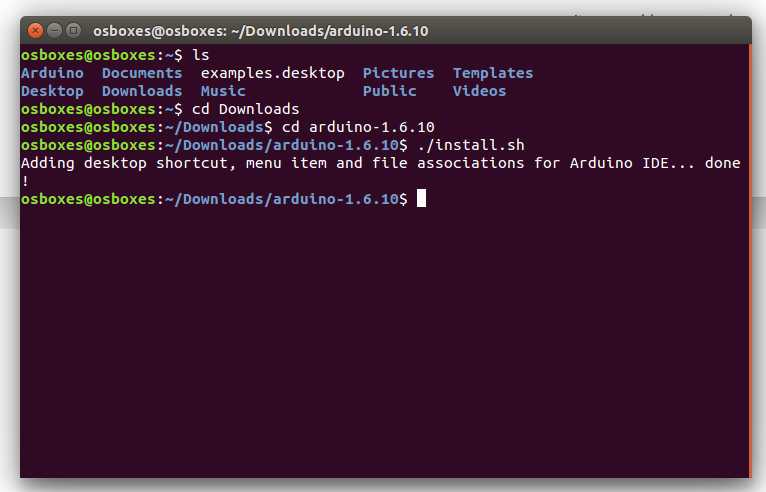
Open the arduino-1.6.x folder just created by the extraction process and spot the install.sh file. Right click on it and choose Run in Terminal from the contextual menu. The installation process will quickly end and you should find a new icon on your desktop.
If you don’t find the option to run the script from the contextual menu, you have to open a Terminal window and move into the arduino-1.6.x folder. Type the command ./install.sh and wait for the process to finish. You should find a new icon on your desktop.
Proceed with board-specific instructions
When the Arduino Software (IDE) is properly installed you can go back to the Getting Started Home and choose your board from the list on the right of the page.
Please Read.
It might happen that when you upload a sketch — after you have selected your board and the serial port -, you get an error Error opening serial port . If you get this error, you need to set serial port permission.
Open Terminal and type:
you will get something like:
crw-rw—- 1 root dialout 188, 0 5 apr 23.01 ttyACM0
The «0» at the end of ACM might be a different number, or multiple entries might be returned. The data we need is «dialout» (is the group owner of the file).
Now we just need to add our user to the group:
sudo usermod -a -G dialout
where is your Linux user name. You will need to log out and log in again for this change to take effect.
This is the procedure to access the serial port from the Arduino Software (IDE) if you get an error
After this procedure, you should be able to proceed normally and upload the sketch to your board or use the Serial Monitor.
The text of the Arduino getting started guide is licensed under a Creative Commons Attribution-ShareAlike 3.0 License. Code samples in the guide are released into the public domain.
Источник
How to Install Arduino IDE on Linux Mint 20
The Arduino IDE software is an integrated development environment for Arduino that includes a text editor for writing code and a compiler for compiling the code for uploading to your Arduino. The Arduino IDE is supported on many operating systems, and the Linux system is no exception. Many Linux users worldwide can use this tutorial to use the Arduino IDE environment for their embedded experiments. It is available for 32-bit and 64-bit operating systems. In this tutorial, we will use Linux Mint 20 to install Arduino. Even if you do not have this latest version of Linux Mint, you can still apply these steps to your systems.
Installing Arduino IDE
We will be discussing two methods to install Arduino IDE in Linux Mint 20.
Method 1: Downloading Arduino Software
At first, download the Arduino IDE package for Arduino from their website. Click on this link for downloading the software from their official page. Once, users have selected the correct Arduino, then they can further proceed with downloading the software.

When you select the version to be downloaded, the system will prompt. Select the Save File option to save the setup into the system.

Once downloaded, you need to install the Arduino IDE in the system. For that, go to your Downloads directory. There will be a zipped file, you need to uncompress this downloaded Arduino file. First, we will launch the Terminal by using the Ctrl+Alt+T shortcut from the keyboard, then access the downloads directory using:

Once done, try to uncompress the file using the following command:

Now, you need to access the uncompressed file using the cd command:

Once you are in the correct directory, list all of the files inside the Arduino folder, use the following command: Advertisement

You need to find out the install.sh installation file. This is the file that is to be installed. The next step is to install Arduino. Use the following command to do so:

Provide the password in the allocated space. The installation will begin. Wait for the completion of the process.

The installation process will be completed.
Method 2: Using Software Manager
Access the Software Manager from the Applications of Linux Mint 20 system, and then search for Arduino IDE in the search bar.

Click on the Install button against the Arduino IDE name in the Software Manager.

As soon users click on the Install button, the system will ask for the password of the user. Authenticate it to move forward. 
The system might prompt and ask for relevant packages. Select the Continue button to proceed. The installation process will begin similar to the one displayed:

Accessing the application
To access the application, simply go to the main menu and then search Arduino IDE. The applications will appear in the suggestions listed below.

Double click on it to access the editor.

Users can edit the codes and connect to the hardware directly using this IDE editor.
Uninstalling Arduino IDE
To uninstall Arduino IDE, directly go to the Applications of the system and click on the application. Go to the dropdown menu, it has an Uninstall option. Click on it.

Provide the password before proceeding with the uninstallation process.

Conclusion
Arduino is one most useful kits used by embedded engineers across the world. The ease of access and communication to the hardware directly by means of the software setup for Arduino IDE. It is supported on many operating systems including Linux. Therefore, in this tutorial, we saw the methods for its installation in Linux Mint 20 system.
Karim Buzdar
About the Author: Karim Buzdar holds a degree in telecommunication engineering and holds several sysadmin certifications. As an IT engineer and technical author, he writes for various web sites. You can reach Karim on LinkedIn
Источник


