- Getting Started With ESP32 on a Mac: Blink and LED
- Introduction: Getting Started With ESP32 on a Mac: Blink and LED
- Step 1: Tools and Materials
- Step 2: Installing the ESP32-Arduino-ACore Firmware
- Step 3: Install the SiLabs Driver
- Step 4: Plugging in the ESP32 Development Board
- Step 5: Wiring the Circuit
- Step 6: Coding
- Step 7: LED Blinking Demonstration
- Be the First to Share
- Recommendations
- Micro:bit Contest
- Lamps and Lighting Contest
- Retro Tech Challenge
- 7 Comments
- Установка, прошивка платы ESP32 в Arduino IDE (Windows, Mac OS X, Linux)
- Подписывайтесь на наш канал на Youtube и вступайте в группы в Вконтакте и Facebook.
- Всем Пока-Пока. И до встречи в следующей статье.
- ESP32. Getting started with ESP32-Arduino on IDE Arduino, macOS, Windows, Linux
- Install the ESP32-Arduino Framework for ESP32 on the Arduino IDE
- Check that the ESP32 boards are correctly installed
- Check that everything is working by flashing an LED
- Install ESP-IDF command line tools
- Install ESP-IDF on Windows
- Install on macOS and Linux
- Common mistakes
- ESP32 tutorials and projects
- Updates
Getting Started With ESP32 on a Mac: Blink and LED

Introduction: Getting Started With ESP32 on a Mac: Blink and LED


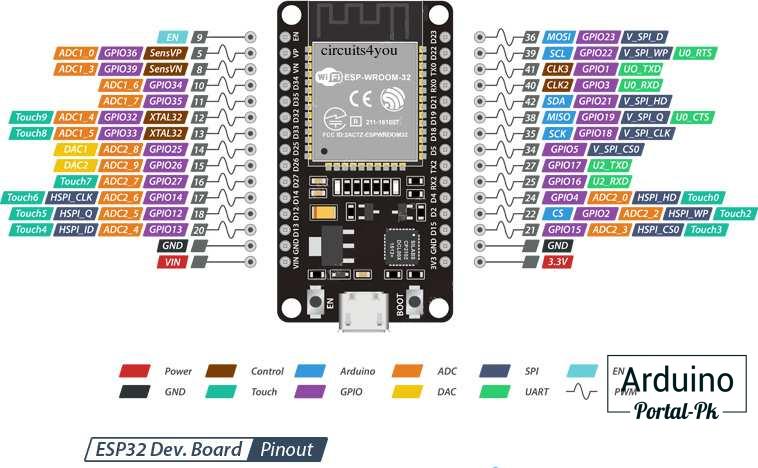
The ESP32 development board is super-charged version of the popular ESP8266. It is a WiFi-compatible microcontroller, in addition to having Bluetooth low-energy (BLE4.0) and 27 I/O pins. It also has a very small form factor relative to the Arduino and is also very cheap, approximately $5, making it the ultimate prototyping micro control. Since it has both WiFi and Bluetooth it is a great device to be used for Internet of Things (IoT) devices and projects.
This project is an introductory lesson in the use of the ESP32 in a series of tutorials for a variety of use cases and projects for the ESP32 development board, ranging from simple sensor interfacing to IoT devices.
I am inspired to write this instructable since I could not find a decent guides regarding how to get started with the use of the ESP32 Development Board. It is such a powerful board for it’s size and price that I believe people should be more aware of it’s existence and use.
Step 1: Tools and Materials
- 2 Breadboards
- ESP32 Development Board
- 5mm Red LED
- 100Ω Resistor
- USB to micro-usb cable
Step 2: Installing the ESP32-Arduino-ACore Firmware
Natively, the Arduino IDE does not support the ESP32 Development board. Thus, the option to use the ESP32 will not be visible until the firmware is properly installed and that the Arduino IDE has been restarted.
- Open the Terminal and enter the following lines of code.
2. Press enter and let the code run.
3. Restart the Arduino IDE and the you will see the ESP32 appear in the Tools>>Board
Step 3: Install the SiLabs Driver
The ESP32 Development board’s ports will not be recognized by the Arduino IDE since there are several drivers that are missing on a Mac.
- Download the drivers through the SiLabs website: https://www.silabs.com/Support%20Documents/Softwar.
- Install the drivers onto the computer
- Plug in the ESP32 through the micro-usb cable to the computer, and the port will appear on the Arduino IDE under Tools>>Ports.
Step 4: Plugging in the ESP32 Development Board
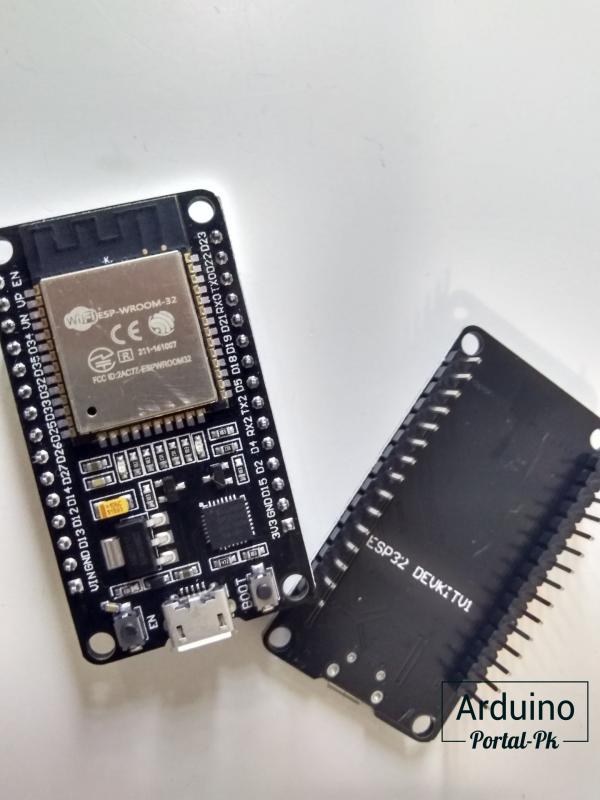
The ESP32 board is larger than its predecessor the ESP8266 as such it has to fit in between two breadboard to be usable.
- Tape two breadboards together.
- Plug in the ESP32 Development board in between the two breadboards.
Step 5: Wiring the Circuit
- Connect the 100Ωresistor to the pin called D6 on the ESP32.
- Connect the Anode of the LED to the end of the 100Ωresistor.
- Connect the Cathode of the LED to the pin called GND on the ESP32.
Step 6: Coding
The code is relatively similar to that of the Arduino and are both written in C. However, there are differences in the baud rate as shown below.
Step 7: LED Blinking Demonstration
The LED blinking demonstration is the same result as the Arduino, but with the use of a much smaller form factor.

Be the First to Share
Did you make this project? Share it with us!
Recommendations


Micro:bit Contest
Lamps and Lighting Contest

Retro Tech Challenge
7 Comments

I have tried just about everything, but can NOT get a ‘COM’ port to appear in the menu. I am using Arduino IDE 1.8.9 on a Mac Mojave 10.14.6 (USB 3.0) and a HiLetgo ESP-WROOM-32 ESP32 ESP-32S Development Board. Everything in this instructable was run without error. Any help would be greatly appreciated.
Источник
Установка, прошивка платы ESP32 в Arduino IDE (Windows, Mac OS X, Linux)
Существует надстройка для Arduino IDE, которая позволяет программировать ESP32 с использованием Arduino IDE и его языка программирования. В этой статье мы покажем вам, как установить плату ESP32 в Arduino IDE, не зависимо от используемой вами операционной системы: Windows, Mac OS X или Linux.
Если у вас возникли какие-либо проблемы во время процедуры установки, сообщите об этом на форуме.
Необходимые условия: Arduino IDE последней версии.
Перед началом установки убедитесь,что на вашем компьютере установлена последняя версия Arduino IDE. Если у вас стоит не последняя версия, сперва удалите текущую версию и затем установите более новую версию. В противном случае, данная инструкция может не сработать.
Имея последнюю версию Arduino IDE, установленную с официального сайта, продолжайте установку по данной инструкции.
Установка дополнения ESP32 в Arduino IDE
Чтобы установить плату ESP32 в Arduino IDE, выполните следующие действия:
1. В вашем Arduino IDE перейдите в Файл> Настройки
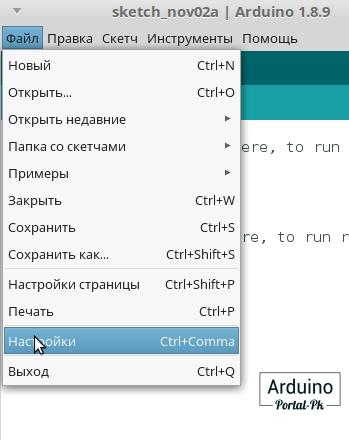
2. Войдите https://dl.espressif.com/dl/package_esp32_index.json. в поле «Дополнительные ссылки для менеджера платы», как показано на рисунке ниже. Затем нажмите кнопку OK.
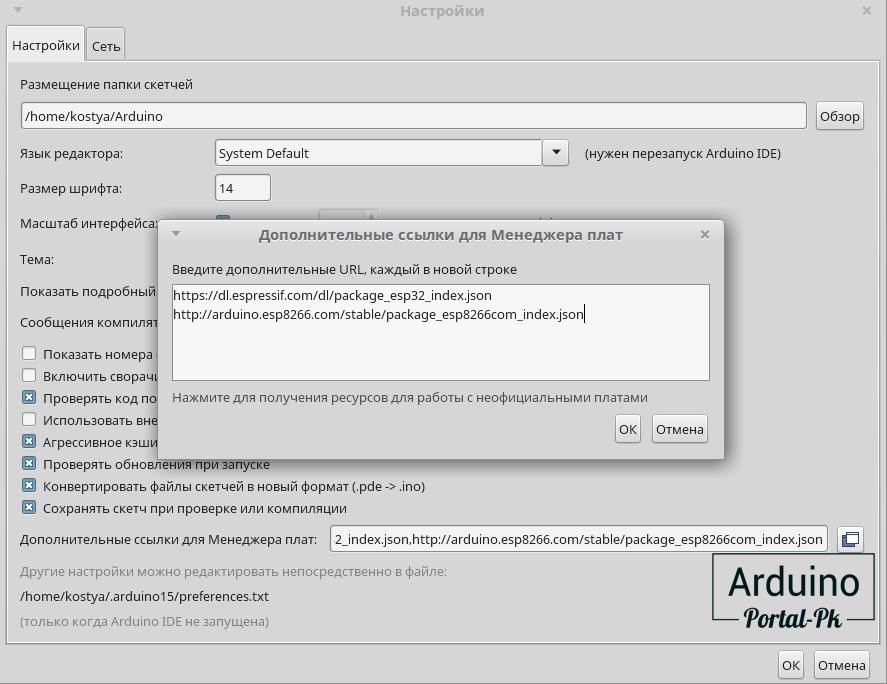
Внимание: Если вы у вас установлена в Arduino IDE ESP8266 то добавьте 2 строки или через запятую:
3. Откройте Менеджер плат. Перейдите в меню Инструменты > Платы > Менеджер плат
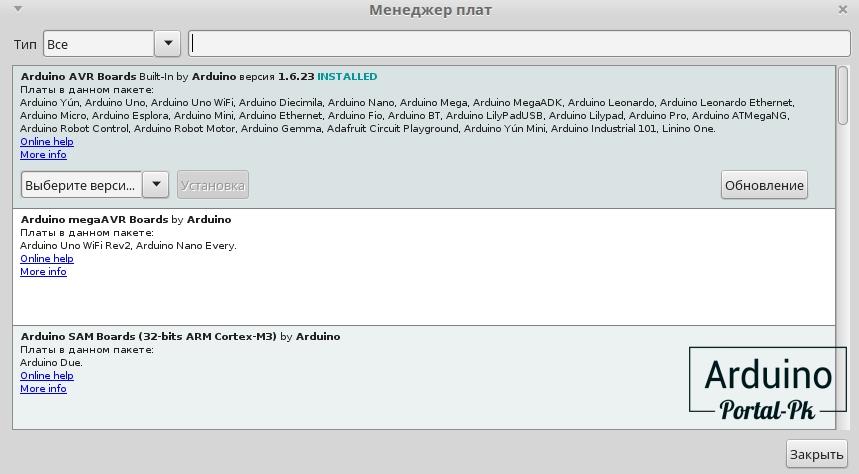
4. Ищем ESP32. И нажимаем кнопку Установка.
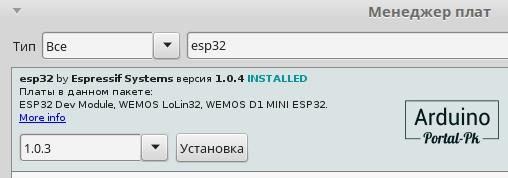
5. Вот и все. Через пару минут у вас все установиться.
Первая загрузка скетча в ESP32.
Подключите плату ESP32 к компьютеру. Открываем Arduino IDE и выполним следующие действия:
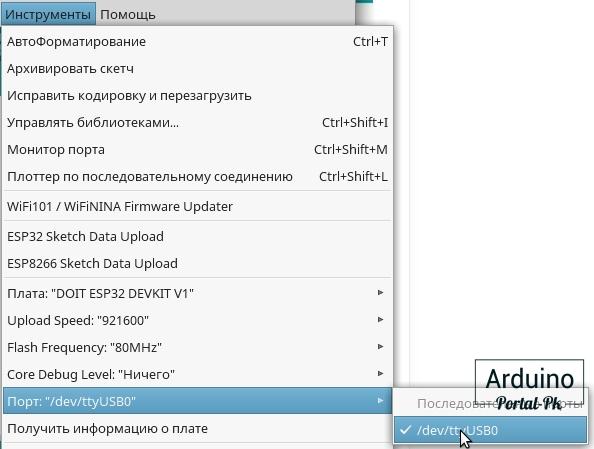
1. Выберите доску в меню Инструменты > Плата (в моем случае это DOIT ESP32 DEVKIT V1 )

Плата (в моем случае это DOIT ESP32 DEVKIT V1)» width=»382″ height=»240″ style=»display: block; margin: auto; width: 382px; height: 240px;» rel=»display: block; margin: auto; width: 382px; height: 240px;»>
2. Выберите порт (если вы не видите COM-порт в Arduino IDE, вам необходимо установить драйверы CP210x USB to UART Bridge VCP). В моем случае ком порт отображается по другому. Это связанно с тем что я использую OS Linux.
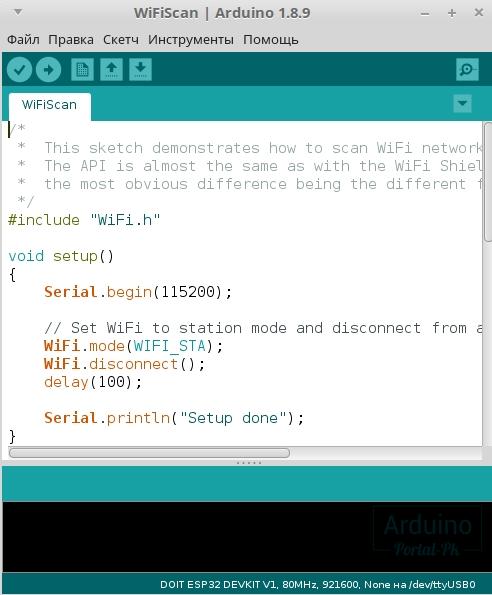
3. Открыть в следующем примере в Файл > Примеры > WiFi > WiFiScan
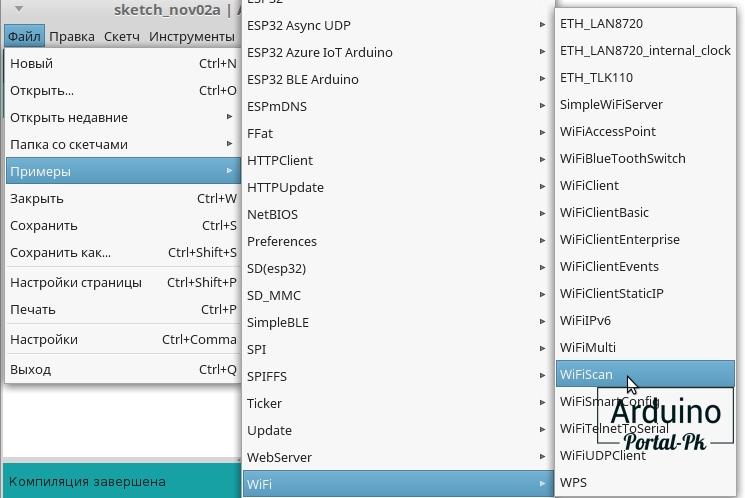
4. В вашей среде Arduino IDE откроется новый скетч.
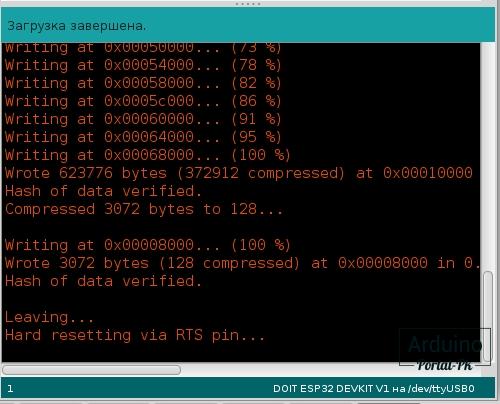
5. Нажмите кнопку Загрузить в Arduino IDE. Подождите несколько секунд, пока код компилируется и загружается на вашу плату.
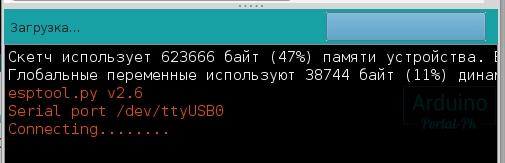
Внимание! Если у вас бежит строка с повторяющимися точками и линиями. Нажмите кнопку Boot на плате и удерживайте ее пока не побегут проценты загрузки. После чего кнопку можно отпустить.
6. Откройте последовательный монитор Arduino IDE со скоростью передачи данных 115200.
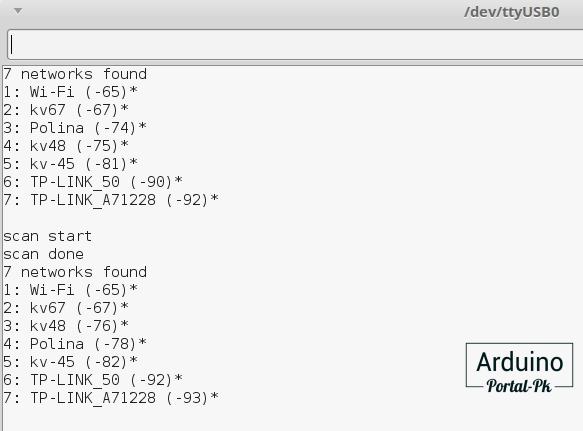
7. Нажмите кнопку EN на борту ESP32 , и вы увидите список сетей, доступных для вашей ESP32.
Подведение итогов.
Это краткое руководство, которое иллюстрирует, как подготовить ваш Arduino IDE для ESP32 на компьютере с ОС Windows, Mac OS X или Linux. Если во время установки возникнут какие-либо проблемы, пишите на форум.
Теперь вы можете начать создавать свои собственные проекты IoT с ESP32.
Подписывайтесь на наш канал на Youtube и вступайте в группы в Вконтакте и Facebook.
Всем Пока-Пока. И до встречи в следующей статье.
Понравилась статья? Поделитесь ею с друзьями:
Источник
ESP32. Getting started with ESP32-Arduino on IDE Arduino, macOS, Windows, Linux
![]()
The ESP-Arduino development kit (for Espressif IoT Development Framework) for the Arduino IDE allows to develop code for all development boards based on ESP32. It provides access to most of the functions of the ESP-IDF library. It is very easy to install from the library manager of the Arduino IDE. It is also possible to use the ESP-IDF framework from the command line from the Terminal (macOS or Linux) and PowerShell (Windows).
The Espresso Development Kit (SDK) for ESP32 boards is available on GitHub . It is compatible with the Arduino IDE for macOS, Windows, Linux 32-bit, 64-bit and ARM chips (Raspberry Pi, Orange Pi, etc …). Very detailed documentation is available here .
Install the ESP32-Arduino Framework for ESP32 on the Arduino IDE
Now that the ESP-IDF framework for ESP32 development boards is directly available from the board manager of the Arduino IDE, the installation procedure is the same whatever the operating system (Windows 10, macOS, Linux, Raspberry Pi OS , Armbian…)
1 Open the preferences panel from the Arduino menu

2 click the button to the right of the Additional board manager URL option .

3 In the dialog box that opens, add the link below and click OK

There is also a link to the version under development (release). This version is not recommended for production. It makes it possible to evaluate the new functionalities under development.
4 The link to the repository is added to the list. Close the settings by clicking on OK

5 Open the board manager from the Tools menu then Card type

6 Search for the SDK with the keyword ESP32. Choose the board package named ESP32 by Espressif Systems then click on install.
Wait for the framework to be downloaded and installed from the internet. The installation process is fully automated. There is absolutely nothing more can be done.

Check that the ESP32 boards are correctly installed
The framework supports development boards built around the following chips.
(MB)
Once the installation is complete, there is no need to restart the Arduino IDE.
Open the Tools menu and then the Card type submenu. Scroll down, if the installation was successful you should be able to select your ESP32 development board from the list.
If you can’t find your board in the list, you can try a generic configuration, for example:
- ESP32 Dev Module
- ESP32 Wrover Module
- NodeMCU-32S

The list of boards changes with each update, however here is a small overview of the boards currently supported:
- Adafruit ESP32 Feather
- AI Thinker ESP32-CAM
- ALKS ESP32
- BPI-BIT
- D-duino-32
- MUST ESP32 DEVKIT V1
- Dongsen Tech Pocket 32
- Electronic SweetPeas – ESP320
- ESP32 Dev Module
- ESP32 FM DevKit
- ESP32 Pico Kit
- ESP32 Wrover Module
- ESP32vn IoT One
- ESPea32
- Spectrum32
- FireBeetle-ESP32
- Frog Board ESP32
- Heltec WiFi Kit 32
- Heltec WiFi LoRa 32
- Heltec WiFi LoRa 32(V2)
- Heltec Wireless Stick
- Hornbill ESP32 Dev
- Hornbill ESP32 Minima
- IntoRobot Fig
- LOLIN D32
- LOLIN D32 PRO
- LoPy
- LoPy4
- M5Stack-Core-ESP32
- M5Stack-FIRE
- M5Stick-C
- MH AND LIVE ESP32DevKIT
- Microduino-CoreESP32
- Nano32
- Node32s
- NodeMCU-32S
- As Noduino
- ODROID ESP32
- OLIMEX ESP32-EVB
- OLIMEX ESP32-GATEWAY
- OLIMEX ESP32-PoE
- Onehorse ESP32 Dev Module
- OROCA EduBot
- Silicognition wESP32
- SparkFun ESP32 Thing
- T-Beam
- ThaiEasyElec’s ESPino32
- TTGO LoRa32-OLED V1
- Cake IoT Node
- u-blox NINA-W10 series
- WEMOS LOLIN32
- Widora AIR
- WiPy 3.0
- XinaBox CW02
Check that everything is working by flashing an LED
The ESP32 is programmed exactly like an ESP8266 . Here we will simply check that everything is correctly installed. Create a new project and paste the following code which flashes an Led connected on pin 15.
From the list of adapters, select ESP32 Dev Module. The modules generally support a download speed of 921600 baud which is very appreciable.

Install ESP-IDF command line tools
The development framework is also available in the form of a toolchain, command line compilation, configuration and debugging tools accessible from the Terminal (macOS and Linux) or PowerShell (Windows).
Install ESP-IDF on Windows
An installation utility named ESP-IDF Tools Installer is available on Windows.
The installer includes the compilers, OpenOCD , cmake, and Ninja build tool . The installer can also download and run installers for Python 3.7 and Git for Windows if they are not already installed on the computer.
Install on macOS and Linux
By default, the tools should be installed in the
Open a Terminal and run these commands to download the repository
then start the installation
Once the installation is complete, it is necessary to declare the paths in the environment variables
Common mistakes
The path to the ESP-IDF directory has not been correctly declared
Run the following command depending on the environment
| PowerShell Windows | macOS or Linux terminal |
ESP32 tutorials and projects
Ready to get started, here are other tutorials and projects based on ESP32
Updates
2/10/2020 How to install ESP-IDF command line tools
06/3/2019 New SDK installation procedure compatible with all operating systems from the Arduino IDE board manager
Источник


