- Установка Arduino на Linux
- Скачать Arduino IDE для Линукс
- Установка Arduino на Ubuntu
- How to Install Arduino Software (IDE) on Linux
- Installing Arduino IDE on Linux Systems
- Download the Arduino Software (IDE)
- Run Arduino IDE Install Script
- If You Appreciate What We Do Here On TecMint, You Should Consider:
- 👝 Как установить программное обеспечение Arduino (IDE) на Linux
- Установка Arduino IDE в системах Linux
- Скачайте программное обеспечение Arduino (IDE)
- Запустите скрипт установки Arduino IDE
- How to Install Arduino IDE on Linux Mint 20
- Installing Arduino IDE
- Method 1: Downloading Arduino Software
- Method 2: Using Software Manager
- Accessing the application
- Uninstalling Arduino IDE
- Conclusion
- Karim Buzdar
- Downloading and installing the Arduino IDE 2.0
- Requirements
- The Arduino IDE 2.0
- Download the editor
- Installation
- Windows
- Mac OS X
- Linux
- More tutorials
Установка Arduino на Linux
Скачать Arduino IDE для Линукс
Установка Arduino на Ubuntu
Первый способ достаточно прост, с него и начнем:
- По прямой ссылке с нашего сайта скачиваем дистрибутив программного обеспечения (это безопасно и быстро), выбрав подходящую для себя версию и разрядность. Разархивируем его и переходим в каталог:
$ tar xvf arduino-latest-*.tar.xz $ cd arduino-1.* - Запускаем установку для текущего пользователя:
$ ./install.sh - Добавляем права что бы использовать USB порты: $ sudo usermod -a -G dialout $USER
Запускаем программу. В разделе «Инструменты > Порт» ставим галочку напротив /dev/ttyUSB0.После этого утилита будет готова к работе — соответствующий ярлык добавится в главное меню.
Важно! При наличии ошибки может потребоваться редакция некоторых строк скрипта установки (каких именно, будет зависеть от версии приложения). По сути один пункт будет заменяться на другой, например:
RESOURCE_NAME = cc.arduino-arduinoide
Если вы предпочитаете работать с центром приложений Ubuntu, для вас будет предпочтительным иной вариант инсталляции. Пробуем установить Arduino IDE на Linux по-другому. В строке поиска вводим слово «Ардуино» (латиницей), кликаем «Установить»: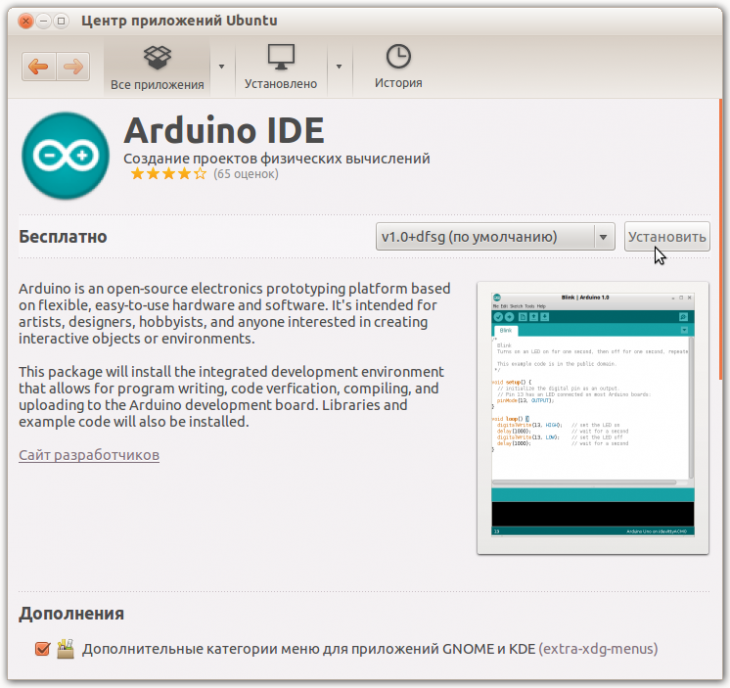
Нас попросят добавиться в группу dialout для доступа к USB-интерфейсу, потому выбираем «Add» и дожидаемся завершения процесса. Тут важен один момент – отсутствие русифицированного интерфейса, потому учитывайте свои предпочтения.
Не забываем — для нормального функционирования среды потребуется скачать и положить в папку с утилитой специализированные библиотеки:
sudo apt-get install gcc-avr avr-libc openjdk-6-jre
Они существуют как в авторском исполнении, так и стандартные (первые ищем в Инете).
О других важнейших этапах настройки мы расскажем в отдельной статье.
Источник
How to Install Arduino Software (IDE) on Linux
Arduino is a widely-used, open-source electronics platform used to create devices that interact with their environment using sensors and actuators. It consists of a programmable hardware board and a software (Integrated Development Environment(IDE)) for writing and uploading programs to the board.
Before you can start building projects using Arduino, you need to set up the IDE to program your boards. The Arduino (IDE) is a free open-source and cross-platform desktop application that allows you to write code and upload it to the board. It runs on Linux, Windows, and Mac OS X, and Linux.
In this article, we will explain how to install the latest version of the Arduino Software (IDE) on Linux machines.
Installing Arduino IDE on Linux Systems
The Arduino Software (IDE) is a package that does not require any particular process for the various Linux distributions. The only needed requirement is the 32-bit or 64-bit version of the operating system.
Download the Arduino Software (IDE)
Go to the download page and grab the latest version (1.8.12 at the time of writing) of Arduino Software (IDE) for your supported system architecture. You can choose between the 32-bit, 64-bit, and ARM versions, as it is very crucial to select the right version for your Linux distribution.
Alternatively, you can use the following wget command to download the Arduino Software (IDE) package directly on the terminal.
![]() Download Arduino IDE in Linux
Download Arduino IDE in Linux
Next, extract the downloaded archive file using the tar command.
![]() Extract Arduino IDE in Linux
Extract Arduino IDE in Linux
Run Arduino IDE Install Script
Now move into the extracted arduino-1.8.12 directory and run the installation script with root privileges as shown.
![]() Install Arduino IDE in Linux
Install Arduino IDE in Linux
Once the installation is done, a desktop icon will be created on your desktop, to launch the IDE, double click on it.
![]() Running Arduino IDE in Linux
Running Arduino IDE in Linux
It might happen that, you will get an error “Error opening serial port” while uploading a sketch after you have selected your board and the serial port. To fix this error, run the following command (replace tecmint with your username).
Besides, if you have a good internet connection, you can use the Arduino Web Editor (which has an up-to-date version of the IDE). The advantage with it is that it allows you to save your sketches in the cloud, and have them backed up, making them accessible from any device.
That’s it for now! For more information and advanced usage instructions, see the Arduino documentation. To reach us, use the feedback form below.
If You Appreciate What We Do Here On TecMint, You Should Consider:
TecMint is the fastest growing and most trusted community site for any kind of Linux Articles, Guides and Books on the web. Millions of people visit TecMint! to search or browse the thousands of published articles available FREELY to all.
If you like what you are reading, please consider buying us a coffee ( or 2 ) as a token of appreciation.

We are thankful for your never ending support.
Источник
👝 Как установить программное обеспечение Arduino (IDE) на Linux

Arduino – это широко используемая электронная платформа с открытым исходным кодом, используемая для создания устройств, которые взаимодействуют с окружающей средой с помощью датчиков и исполнительных механизмов.
Она состоит из программируемой аппаратной платы и программного обеспечения (интегрированная среда разработки (IDE)) для написания и загрузки программ на плату.
Прежде чем вы сможете начать создавать проекты с использованием Arduino, вам нужно настроить IDE для программирования своих плат.
Arduino (IDE) – это бесплатное кроссплатформенное настольное приложение с открытым исходным кодом, которое позволяет писать код и загружать его на плату.
Оно работает на Linux, Windows, Mac OS X и Linux.
В этой статье мы расскажем, как установить последнюю версию программного обеспечения Arduino (IDE) на компьютеры с Linux.
Установка Arduino IDE в системах Linux
Программное обеспечение Arduino (IDE) – это пакет, который не требует какого-либо конкретного процесса для различных дистрибутивов Linux.
Единственное необходимое требование – это 32-битная или 64-битная версия операционной системы.
Скачайте программное обеспечение Arduino (IDE)
Перейдите на страницу загрузки и загрузите последнюю версию (1.8.12 на момент написания) программного обеспечения Arduino (IDE) для поддерживаемой архитектуры системы.
Вы можете выбрать между 32-битной, 64-битной и ARM-версиями, поскольку очень важно выбрать правильную версию для вашего дистрибутива Linux.
Кроме того, вы можете использовать следующую команду wget для загрузки пакета программного обеспечения Arduino (IDE) непосредственно на терминал.
Затем распакуйте загруженный архив с помощью команды tar.
Запустите скрипт установки Arduino IDE
Теперь перейдите в извлеченный каталог arduino-1.8.12 и запустите скрипт установки с привилегиями root, как показано далее:
После завершения установки на рабочем столе будет создан значок.
Чтобы запустить среду IDE, дважды щелкните ее.
Источник
How to Install Arduino IDE on Linux Mint 20
The Arduino IDE software is an integrated development environment for Arduino that includes a text editor for writing code and a compiler for compiling the code for uploading to your Arduino. The Arduino IDE is supported on many operating systems, and the Linux system is no exception. Many Linux users worldwide can use this tutorial to use the Arduino IDE environment for their embedded experiments. It is available for 32-bit and 64-bit operating systems. In this tutorial, we will use Linux Mint 20 to install Arduino. Even if you do not have this latest version of Linux Mint, you can still apply these steps to your systems.
Installing Arduino IDE
We will be discussing two methods to install Arduino IDE in Linux Mint 20.
Method 1: Downloading Arduino Software
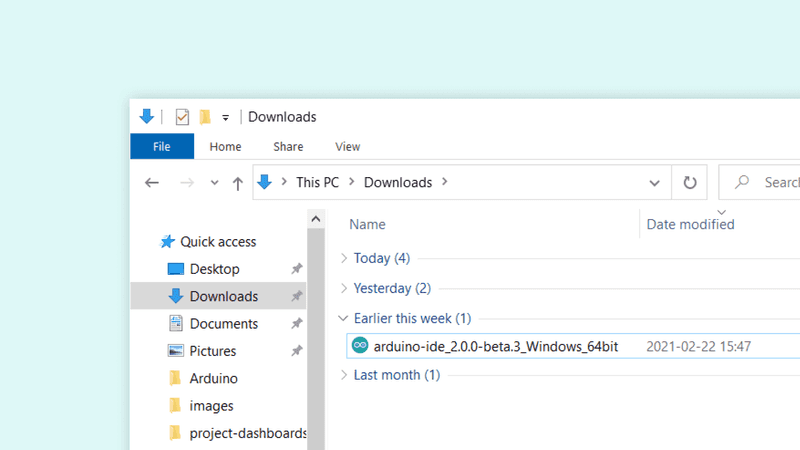
At first, download the Arduino IDE package for Arduino from their website. Click on this link for downloading the software from their official page. Once, users have selected the correct Arduino, then they can further proceed with downloading the software.

When you select the version to be downloaded, the system will prompt. Select the Save File option to save the setup into the system.

Once downloaded, you need to install the Arduino IDE in the system. For that, go to your Downloads directory. There will be a zipped file, you need to uncompress this downloaded Arduino file. First, we will launch the Terminal by using the Ctrl+Alt+T shortcut from the keyboard, then access the downloads directory using:

Once done, try to uncompress the file using the following command:

Now, you need to access the uncompressed file using the cd command:

Once you are in the correct directory, list all of the files inside the Arduino folder, use the following command:

You need to find out the install.sh installation file. This is the file that is to be installed. The next step is to install Arduino. Use the following command to do so:

Provide the password in the allocated space. The installation will begin. Wait for the completion of the process.

The installation process will be completed.
Method 2: Using Software Manager
Access the Software Manager from the Applications of Linux Mint 20 system, and then search for Arduino IDE in the search bar.

Click on the Install button against the Arduino IDE name in the Software Manager.

As soon users click on the Install button, the system will ask for the password of the user. Authenticate it to move forward. 
The system might prompt and ask for relevant packages. Select the Continue button to proceed. The installation process will begin similar to the one displayed:

Accessing the application
To access the application, simply go to the main menu and then search Arduino IDE. The applications will appear in the suggestions listed below.

Double click on it to access the editor.

Users can edit the codes and connect to the hardware directly using this IDE editor.
Uninstalling Arduino IDE
To uninstall Arduino IDE, directly go to the Applications of the system and click on the application. Go to the dropdown menu, it has an Uninstall option. Click on it.

Provide the password before proceeding with the uninstallation process.

Conclusion
Arduino is one most useful kits used by embedded engineers across the world. The ease of access and communication to the hardware directly by means of the software setup for Arduino IDE. It is supported on many operating systems including Linux. Therefore, in this tutorial, we saw the methods for its installation in Linux Mint 20 system.
Karim Buzdar
About the Author: Karim Buzdar holds a degree in telecommunication engineering and holds several sysadmin certifications. As an IT engineer and technical author, he writes for various web sites. You can reach Karim on LinkedIn
Источник
Downloading and installing the Arduino IDE 2.0
In this tutorial, we will show how to download and installing the Arduino IDE 2.0 on your Windows or Mac computer.
You can easily download the editor from the Arduino Software page.
Requirements
- Windows — Win 10 and newer, 64 bits
- Linux — 64 bits
- Mac OS X — Version 10.14: «Mojave» or newer, 64 bits
The Arduino IDE 2.0
The Arduino IDE 2.0 is an open-source project, currently in its beta-phase. It is a big step from it’s sturdy predecessor, Arduino IDE (1.8.13), and comes with revamped UI, improved board & library manger, autocomplete feature and much more.
In this tutorial, we will go through step by step, how to download and install the software.
Download the editor
Downloading the Arduino IDE 2.0 is done through the Arduino Software page. Here you will also find information on the other editors available to use.
Installation
Windows
To install the Arduino IDE 2.0 on a Windows computer, simply run the file downloaded from the software page.
Follow the instructions in the installation guide. The installation may take several minutes.
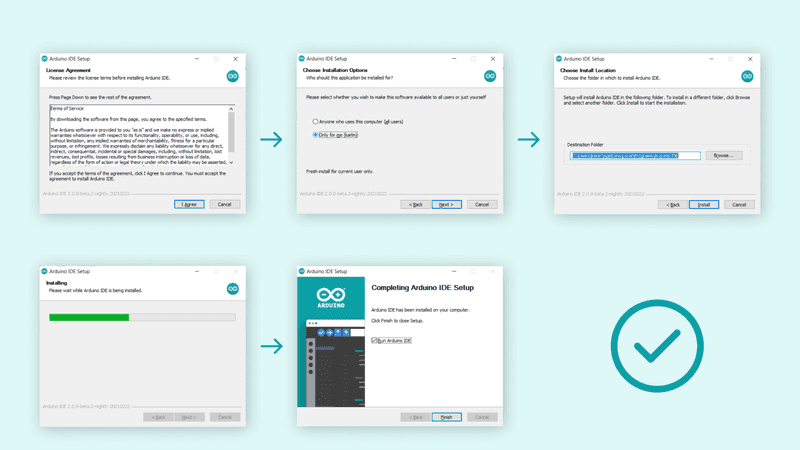
You can now use the Arduino IDE 2.0 on your Windows computer!
Mac OS X
To install the Arduino IDE 2.0 on a Mac OS X computer, simply copy the downloaded file into your application folder.
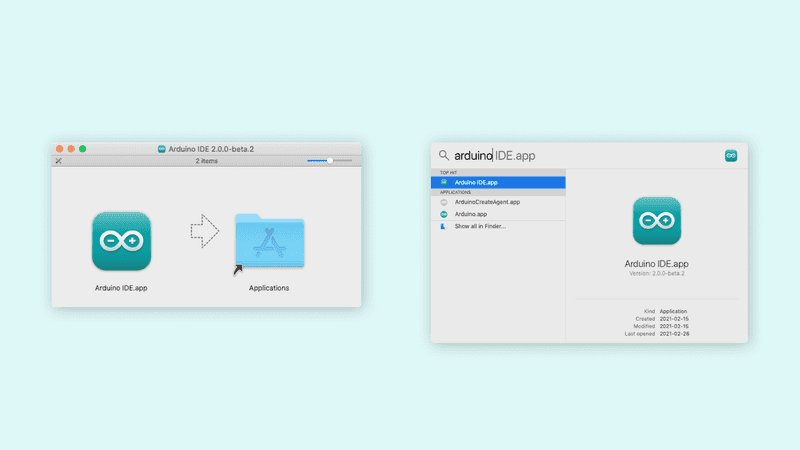
You can now use the Arduino IDE 2.0 on your Mac OS X computer!
Linux
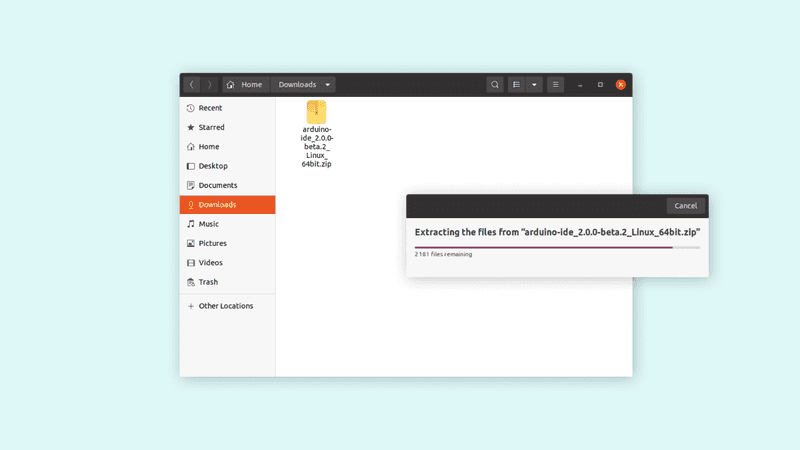
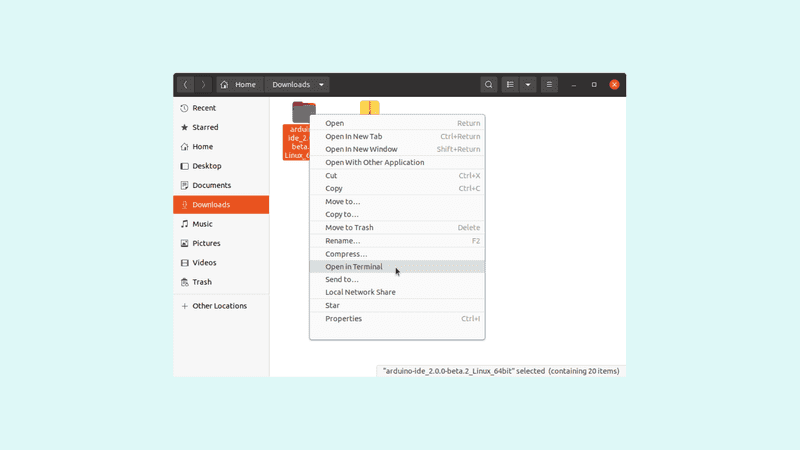
To install the Arduino IDE 2.0 on a Linux machine, simply extract the downloaded file to a suitable folder.
Now, go to the folder where you extracted the contents to, and look for the arduino-ide file, which will launch the IDE.
You can also run the file directly in the terminal, navigate to the folder, right click on it and select run in terminal.
To launch the editor through the terminal, simply type:
More tutorials
Once you are finished with the download & installation, you can start using the Arduino IDE 2.0. Below are a collection of tutorials that will show you how to use the different features.
Источник


