- Error opening serial port (Linux)
- Overview
- How to set serial port permissions
- Reading data from an Arduino’s USB/serial port using Debian Linux
- Published: 3 December 2013
- Getting the Arduino to send some data
- Gathering the data on the Linux box
- Using minicom
- Using a simple cat command
- Using a PERL script — my preferred solution
- Using the data to create graphplots with MRTG
- Live Plotted Output
- Another Approach
- Arduino linux serial port
- Quick Start
- Download the Arduino Software (IDE)
- Extract the package
- Run the install script
- Proceed with board-specific instructions
- Please Read.
- Linux Serial Ports Using C/C++
- Overview
- Everything Is A File
- Basic Setup In C
- Configuration Setup
- Control Modes (c_cflags)
- PARENB (Parity)
- CSTOPB (Num. Stop Bits)
- Number Of Bits Per Byte
- Flow Control (CRTSCTS)
- CREAD and CLOCAL
- Local Modes (c_lflag)
- Disabling Canonical Mode
- Disable Signal Chars
- Input Modes (c_iflag)
- Software Flow Control (IXOFF, IXON, IXANY)
- Disabling Special Handling Of Bytes On Receive
- Output Modes (c_oflag)
- VMIN and VTIME (c_cc)
- Baud Rate
- Custom Baud Rates
- Saving termios
- Reading And Writing
- Writing
- Reading
- Closing
- Full Example (Standard Baud Rates)
- Issues With Getty
- Exclusive Access
- Changing Terminal Settings Are System Wide
Error opening serial port (Linux)
Overview
When uploading a sketch you may get the following error
or, when opening the serial Monitor
Note: The number in ttyACM* may be different.
If this happens, start by ensuring that you are using the correct port:
- Arduino IDE:Tools > Port > [select port]
- Web Editor: Select port using the dropdown.
If the problem persists there may be an issue with permissions for the serial port. See below for step-by-step instructions on how to set the correct permissions.
How to set serial port permissions
Open Terminal and type
Press enter. Terminal will return something like
What we are interested in is the group name, which is probably called dialout .
Note: The number at the end of ttyACM may be different, or multiple entries might be returned.
Now we want to add your user to that group. Input the following command in the terminal, replacing with the group name from above, and with your username, both without brackets.
Press enter. Input password if prompted.
Lastly, for the new permissions to take effect, you need to log out and in to your user account.
You can verify the changes by typing
into the Terminal and pressing Enter. The group you added should appear in the list.
Источник
Reading data from an Arduino’s USB/serial port using Debian Linux
Published: 3 December 2013
Reading data from an Arduino’s USB/serial port using Debian Linux
Here is a later approach using Minicom, from a reader. Thanks Martin, I’ve learned something new!
In case you don’t know, the Arduino is a family of micro-controllers, of open source design, ideal for interfacing environmental sensors, etc. They are also very cheap, popular, easy to connect to external sensors and easy to program. But how do I connect one to a computer to read the data it gets from sensors?
As the Arduino has a built in USB port this ought to be the easiest way (other ways are to add Ethernet hardware, or even wireless networking, but both add cost, and complexity in the programming side). The USB’s +5volt supply from the computer can also provide all the power the Arduino needs.
Here is how I got it all working with a home server running Linux Mint 17.1 (or any Linux based on Debian, such as Ubuntu and Mint):-
Getting the Arduino to send some data
I wanted to read a temperature and humidity sensor (and later, 3 of the same), using the cheap DHT11 or DHT22 chips. Here is the «sketch» (Arduino-speak for source code) I adapted from samples I found on the web. I compiled it and uploaded it via USB to the Arduino Nano clone I bought off eBay for $12.
The blinking of the on-board LED is just so that I know it is working.
Here is a sample of the data the Nano sends out:-
the «^M» is a carriage return (CR) character (ASCII 13) that the Arduino adds to each line. Linux/UNIX only uses a line feed (LF — ASCII 10) for line termination, but the scripts here can handle the CR without error.)
Gathering the data on the Linux box
Using minicom
I tried using the terminal program minicom , setting its serial port to the one used by the Nano, typically /dev/ttyUSB0, with the speed set to 9600 bits per second. This worked, and I could capture the output to a file, but was messy to run in the background, rather than on-screen. Still, it was a good first step to verify that the Nano was in fact sending data. To install minicom, log in as the root (superuser) account and
Using a simple cat command
I then tried just putting a «cat» command into a shell script and running it in background
but getting the serial port settings to stick, say through a reboot of the server, was tricky. Might be possible using the «stty» command, but it was not obvious.
Using a PERL script — my preferred solution
Having used a PERL script for a similar function (reading the USB/serial port of a CurrentCost ENVI power monitor) I made a variant of it to read the Nano as well. The PERL script has been very reliable. Here it is
You will need the PERL serial module to run this script, so as root #apt-get install libdevice-serialport-perl
You will probably need to set the serial port device to read-write for all users (unless you run the script as root). To do this, as root,
chmod a+rw /dev/ttyUSB0 (or whatever your port is)
You might want to run this at each reboot of the server, so put the command in /etc/rc.local, or wherever your variant of Linux puts it.
To find out what port you have, look in the output of the dmesg command, for the «FTDI» device, the Nano’s USB to serial convertor.
Note: I pass the port device to the script as an argument, since I have more than one USB serial device, and cannot be sure which will get assigned at boot time to the Nano. If you prefer to hard code it, remove the comment character «#» from the line «#my $PORT = «/dev/ttyUSB0″;» and comment out the line that follows instead.
You also need to make the PERL script executable
You will not see any output to screen, but if you open a second terminal session and look at «arduino.dat» you should see some data. Try this:-
tail -f arduino.dat (CTRL-C to exit it)
Using the data to create graphplots with MRTG
Here is my bash shell script that runs every 10 minutes to create plots using MRTG. My brief guide to BASH might help if you are not familiar with BASH
The script stores the latest data in a file latestArduino.dat
Here is the MRTG config file, «arduino.cfg»
Here is the script that the mrtg calls to get the subfloor temperature and humidity:-
Finally, here is the crontab entry that runs the whole thing every 10 minutes.
Live Plotted Output
Another Approach
Martin contacted me about this — his Debian box uses ACM0 as the USB port, and he was having problems with port permissions using «cat» to get data. Here is how he solved it:-
«I finally got it working and with plotting of the temperature values.
I ended up using the minicom utility.
If you’re interested or want to add this to your webpage, here are the steps I did.
1) I did not run the Arduino Serial Monitor. 2) I ran minicom utility:
sudo minicom -D /dev/ttyACM0 -b 9600 -C aaa.txt
3) run the Linux gnuplot utility:
set xdata time set timefmt «%H:%M:%S» plot ‘aaa.txt’ using 1:2
1:2 — display the data from the file found in columns 1 (time lapse) and 2 (temperature reading from DHT)
4) click the refresh button on the plotter page every now and again to display all the new data values that were added to the aaa.txt file since the last plotter page refresh.
I’ve attached the aaa.txt data file that the minicom utility captured and outputed to the aaa.txt file. I’ve also attached a copy of the gnu plotter page charting the data points.
The ardunio sketch is attached as well.»
//This is neat — I had not realised you could use minicom in this way — I’d only ever used it as an interactive, menu-driven program.
Here are Martin’s files, mentioned above:-//
Источник
Arduino linux serial port
This document explains how to install the Arduino Software (IDE) on Linux machines.
Quick Start
The Linux build of the Arduino Software (IDE) is now a package that doesn’t require any specific procedure for the various distributions availabe of Linux. The only relevant information is the 32 or 64 bit version of the OS.
Download the Arduino Software (IDE)
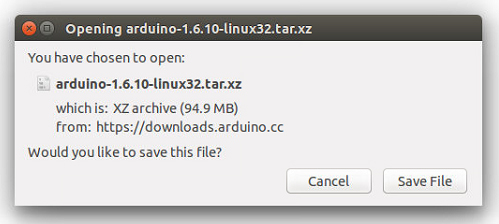
Get the latest version from the download page. You can choose between the 32, 64 and ARM versions. It is very important that you choose the right version for your Linux distro. Clicking on the chosen version brings you to the donation page and then you can either open or save the file. Please save it on your computer.
Extract the package
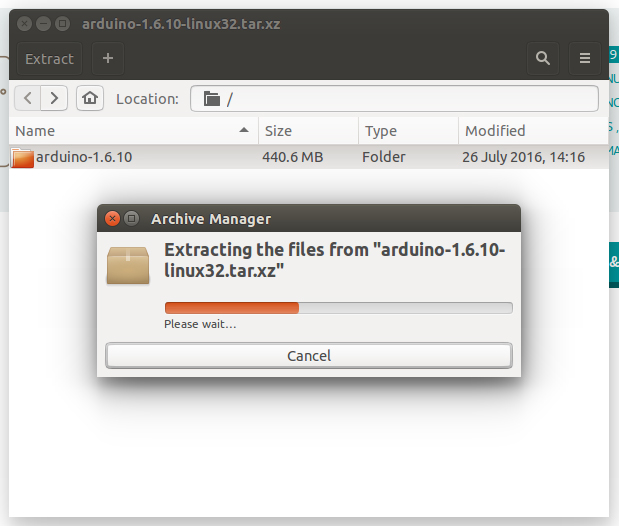
The file is compressed and you have to extract it in a suitable folder, remembering that it will be executed from there.
Run the install script
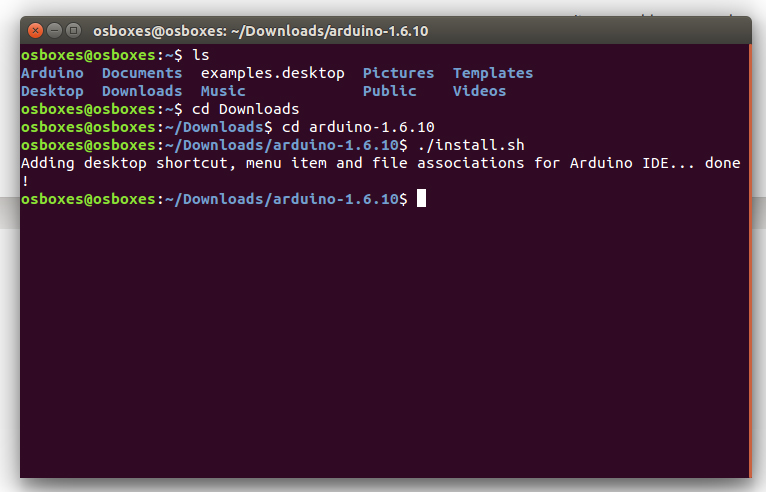
Open the arduino-1.6.x folder just created by the extraction process and spot the install.sh file. Right click on it and choose Run in Terminal from the contextual menu. The installation process will quickly end and you should find a new icon on your desktop.
If you don’t find the option to run the script from the contextual menu, you have to open a Terminal window and move into the arduino-1.6.x folder. Type the command ./install.sh and wait for the process to finish. You should find a new icon on your desktop.
Proceed with board-specific instructions
When the Arduino Software (IDE) is properly installed you can go back to the Getting Started Home and choose your board from the list on the right of the page.
Please Read.
It might happen that when you upload a sketch — after you have selected your board and the serial port -, you get an error Error opening serial port . If you get this error, you need to set serial port permission.
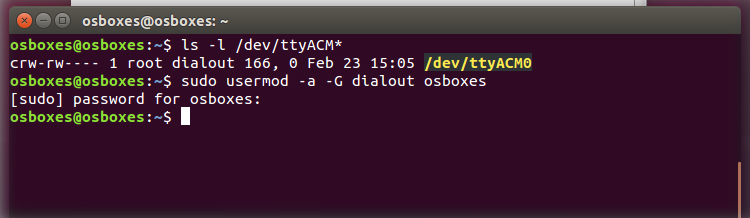
Open Terminal and type:
you will get something like:
crw-rw—- 1 root dialout 188, 0 5 apr 23.01 ttyACM0
The «0» at the end of ACM might be a different number, or multiple entries might be returned. The data we need is «dialout» (is the group owner of the file).
Now we just need to add our user to the group:
sudo usermod -a -G dialout
where is your Linux user name. You will need to log out and log in again for this change to take effect.
This is the procedure to access the serial port from the Arduino Software (IDE) if you get an error
After this procedure, you should be able to proceed normally and upload the sketch to your board or use the Serial Monitor.
Last revision 2016/08/10 by SM
The text of the Arduino getting started guide is licensed under a Creative Commons Attribution-ShareAlike 3.0 License. Code samples in the guide are released into the public domain.
Источник
Linux Serial Ports Using C/C++
Article by:Geoffrey Hunter
| Date Published: | June 24, 2017 |
| Last Modified: | November 24, 2020 |
Overview
Unluckily, using serial ports in Linux is not the easiest thing in the world. When dealing with the termios.h header, there are many finicky settings buried within multiple bytes worth of bitfields. This page is an attempt to help explain these settings and show you how to configure a serial port in Linux correctly.
Everything Is A File
In typical UNIX style, serial ports are represented by files within the operating system. These files usually pop-up in /dev/ , and begin with the name tty* .
Common names are:
- /dev/ttyACM0 — ACM stands for the ACM modem on the USB bus. Arduino UNOs (and similar) will appear using this name.
- /dev/ttyPS0 — Xilinx Zynq FPGAs running a Yocto-based Linux build will use this name for the default serial port that Getty connects to.
- /dev/ttyS0 — Standard COM ports will have this name. These are less common these days with newer desktops and laptops not having actual COM ports.
- /dev/ttyUSB0 — Most USB-to-serial cables will show up using a file named like this.
- /dev/pts/0 — A pseudo terminal. These can be generated with socat .

A listing of the /dev/ directory in Linux with a connected Arduino. The Arduino serial port is present as /dev/ttyACM0.
To write to a serial port, you write to the file. To read from a serial port, you read from the file. Of course, this allows you to send/receive data, but how do you set the serial port parameters such as baud rate, parity, e.t.c? This is set by a special tty configuration struct .
Basic Setup In C
First we want to include a few things:
Then we want to open the serial port device (which appears as a file under /dev/ ), saving the file descriptor that is returned by open() :
One of the common errors you might see here is errno = 2 , and strerror(errno) returns No such file or directory . Make sure you have the right path to the device and that the device exists!
Another common error you might get here is errno = 13 , which is Permission denied . This usually happens because the current user is not part of the dialout group. Add the current user to the dialout group with:
You must log out and back in before these group changes come into effect.
At this point we could technically read and write to the serial port, but it will likely not work, because the default configuration settings are not designed for serial port use. So now we will set the configuration correctly.
When modifying any configuration value, it is best practice to only modify the bit you are interested in, and leave all other bits of the field untouched. This is why you will see below the use of &= or |= , and never = when setting bits.
Configuration Setup
We need access to the termios struct in order to configure the serial port. We will create a new termios struct, and then write the existing configuration of the serial port to it using tcgetattr() , before modifying the parameters as needed and saving the settings with tcsetattr() .
We can now change tty ’s settings as needed, as shown in the following sections. Before we get onto that, here is the definition of the termios struct if you’re interested (pulled from termbits.h ):
Control Modes (c_cflags)
The c_cflag member of the termios struct contains control parameter fields.
PARENB (Parity)
If this bit is set, generation and detection of the parity bit is enabled. Most serial communications do not use a parity bit, so if you are unsure, clear this bit.
CSTOPB (Num. Stop Bits)
If this bit is set, two stop bits are used. If this is cleared, only one stop bit is used. Most serial communications only use one stop bit.
Number Of Bits Per Byte
The CS fields set how many data bits are transmitted per byte across the serial port. The most common setting here is 8 ( CS8 ). Definitely use this if you are unsure, I have never used a serial port before which didn’t use 8 (but they do exist). You must clear all of the size bits before setting any of them with &=
Flow Control (CRTSCTS)
If the CRTSCTS field is set, hardware RTS/CTS flow control is enabled. The most common setting here is to disable it. Enabling this when it should be disabled can result in your serial port receiving no data, as the sender will buffer it indefinitely, waiting for you to be “ready”.
CREAD and CLOCAL
Setting CLOCAL disables modem-specific signal lines such as carrier detect. It also prevents the controlling process from getting sent a SIGHUP signal when a modem disconnect is detected, which is usually a good thing here. Setting CLOCAL allows us to read data (we definitely want that!).
Local Modes (c_lflag)
Disabling Canonical Mode
UNIX systems provide two basic modes of input, canonical and non-canonical mode. In canonical mode, input is processed when a new line character is received. The receiving application receives that data line-by-line. This is usually undesirable when dealing with a serial port, and so we normally want to disable canonical mode.
Canonical mode is disabled with:
Also, in canonical mode, some characters such as backspace are treated specially, and are used to edit the current line of text (erase). Again, we don’t want this feature if processing raw serial data, as it will cause particular bytes to go missing!
If this bit is set, sent characters will be echoed back. Because we disabled canonical mode, I don’t think these bits actually do anything, but it doesn’t harm to disable them just in case!
Disable Signal Chars
When the ISIG bit is set, INTR , QUIT and SUSP characters are interpreted. We don’t want this with a serial port, so clear this bit:
Input Modes (c_iflag)
The c_iflag member of the termios struct contains low-level settings for input processing. The c_iflag member is an int .
Software Flow Control (IXOFF, IXON, IXANY)
Clearing IXOFF , IXON and IXANY disables software flow control, which we don’t want:
Disabling Special Handling Of Bytes On Receive
Clearing all of the following bits disables any special handling of the bytes as they are received by the serial port, before they are passed to the application. We just want the raw data thanks!
Output Modes (c_oflag)
The c_oflag member of the termios struct contains low-level settings for output processing. When configuring a serial port, we want to disable any special handling of output chars/bytes, so do the following:
Both OXTABS and ONOEOT are not defined in Linux. Linux however does have the XTABS field which seems to be related. When compiling for Linux, I just exclude these two fields and the serial port still works fine.
VMIN and VTIME (c_cc)
VMIN and VTIME are a source of confusion for many programmers when trying to configure a serial port in Linux.
An important point to note is that VTIME means slightly different things depending on what VMIN is. When VMIN is 0, VTIME specifies a time-out from the start of the read() call. But when VMIN is > 0, VTIME specifies the time-out from the start of the first received character.
Let’s explore the different combinations:
VMIN = 0, VTIME = 0: No blocking, return immediately with what is available
VMIN > 0, VTIME = 0: This will make read() always wait for bytes (exactly how many is determined by VMIN ), so read() could block indefinitely.
VMIN = 0, VTIME > 0: This is a blocking read of any number of chars with a maximum timeout (given by VTIME ). read() will block until either any amount of data is available, or the timeout occurs. This happens to be my favourite mode (and the one I use the most).
VMIN > 0, VTIME > 0: Block until either VMIN characters have been received, or VTIME after first character has elapsed. Note that the timeout for VTIME does not begin until the first character is received.
VMIN and VTIME are both defined as the type cc_t , which I have always seen be an alias for unsigned char (1 byte). This puts an upper limit on the number of VMIN characters to be 255 and the maximum timeout of 25.5 seconds (255 deciseconds).
“Returning as soon as any data is received” does not mean you will only get 1 byte at a time. Depending on the OS latency, serial port speed, hardware buffers and many other things you have no direct control over, you may receive any number of bytes.
For example, if we wanted to wait for up to 1s, returning as soon as any data was received, we could use:
Baud Rate
Rather than use bit fields as with all the other settings, the serial port baud rate is set by calling the functions cfsetispeed() and cfsetospeed() , passing in a pointer to your tty struct and a enum :
If you want to remain UNIX compliant, the baud rate must be chosen from one of the following:
Some implementation of Linux provide a helper function cfsetspeed() which sets both the input and output speeds at the same time:
Custom Baud Rates
As you are now fully aware that configuring a Linux serial port is no trivial matter, you’re probably unfazed to learn that setting custom baud rates is just as difficult. There is no portable way of doing this, so be prepared to experiment with the following code examples to find out what works on your target system.
GNU/Linux Method
If you are compiling with the GNU C library, you can forgo the standard enumerations above just specify an integer baud rate directly to cfsetispeed() and cfsetospeed() , e.g.:
termios2 Method
This method relied on using a termios2 struct, which is like a termios struct but with sightly more functionality. I’m unsure on exactly what UNIX systems termios2 is defined on, but if it is, it is usually defined in termbits.h (it was on the Xubuntu 18.04 with GCC system I was doing these tests on):
Which is very similar to plain old termios , except with the addition of the c_ispeed and c_ospeed . We can use these to directly set a custom baud rate! We can pretty much set everything other than the baud rate in exactly the same manner as we could for termios , except for the reading/writing of the terminal attributes to and from the file descriptor — instead of using tcgetattr() and tcsetattr() we have to use ioctl() .
Let’s first update our includes, we have to remove termios.h and add the following:
Please read the comment above about BOTHER . Perhaps on your system this method will work!
Saving termios
After changing these settings, we can save the tty termios struct with tcsetattr() :
Reading And Writing
Now that we have opened and configured the serial port, we can read and write to it!
Writing
Writing to the Linux serial port is done through the write() function. We use the serial_port file descriptor which was returned from the call to open() above.
Reading
Reading is done through the read() function. You have to provide a buffer for Linux to write the data into.
Closing
This is a simple as:
Full Example (Standard Baud Rates)
Issues With Getty
Getty can cause issues with serial communication if it is trying to manage the same tty device that you are attempting to perform serial communications with.
To Stop Getty:
Getty can be hard to stop, as by default if you try and kill the process, a new process will start up immediately.
These instructions apply to older versions of Linux, and/or embedded Linux.
- Load /etc/inittab in your favourite text editor.
- Comment out any lines involving getty and your tty device.
- Save and close the file.
- Run the command
$ init q to reload the /etc/inittab file.
Exclusive Access
It can be prudent to try and prevent other processes from reading/writing to the serial port at the same time you are.
One way to accomplish this is with the flock() system call:
Changing Terminal Settings Are System Wide
Although getting and setting terminal settings are done with a file descriptor, the settings apply to the terminal device itself and will effect all other system applications that are using or going to use the terminal. This also means that terminal setting changes are persistant after the file descriptor is closed, and even after the application that changed the settings is terminated 1 .
Источник


