- Установка драйвера CH340 для китайского ардуина UNO
- Драйвера чипа CH340 для разных операционных систем:
- Инструкция по установке драйвера CH340 на Windows
- Инструкция по установке драйвера CH340 на Linux
- Драйвер чипа CH340 USB-Serial
- Список поддерживаемых плат
- Зачем нужен драйвер?
- Установка драйвера
- Getting started with the Arduino Nano Every
- Use your Arduino Nano Every on the Arduino Web IDE
- Use your Arduino Nano Every on the Arduino Desktop IDE
- Installing Drivers for the Arduino Nano Every
- Open your first sketch
- Select your board type and port
- Upload the program
- Learn more on the Desktop IDE
- Tutorials
- Please Read.
- Features
- Firmware for SAMD11D14A
- Установка драйверов
Установка драйвера CH340 для китайского ардуина UNO
Подробная инструкция по установке драйвер CH340 для для китайского клона Arduino UNO/Nano на Windows XP, Windows 7, Windows 10, Linux, Mac OS.
Китайская ардуина отличается от оригинальной тем, что в ней для программирования основного микроконтроллера используется чип CH340 вместо МК Atmega16. Этот недорогой чип позволяет снизить итоговую стоимость платы ардуины (например, ардуина UNO на CH340 будет стоить около $3 вместо $5). Китайская Arduino UNO с чипом CH340 выглядит так:
Соответственно для зашивки программы в такую ардуино на компьютере должен быть установлен драйвер для чипа CH340. В остальном работа с такими платами ничем не отличается от оригинальных.
Драйвера чипа CH340 для разных операционных систем:
Эти драйвера подходят не только для китайских ардуино UNO, но и для любой другой ардуине на базе CH340 — NANO, MEGA и т.п.
Инструкция по установке драйвера CH340 на Windows
Этот метод проверялся на Windows XP и Windows 7, но должен также работать на Windows 10 и т.п.
Если драйвер для CH340 не был предварительно установлен на Windows, то сразу после подключения вашей платы Arduino UNO с чипом CH340 к компьютеру/ноутбуку через USB-кабель в списке устройств (Device manager) будет обнаружено новое USB-устройство USB2.0-Serial (как показано на рисунке). Восклицательный знак указывает на то, что драйвер для устройства не установлен.
Поэтому скачиваем драйвер CH340 для Windows отсюда , если вы это еще не сделали, и распаковываем архив куда-нибудь.
В распакованном архиве находим файл CH341SER.EXE и запускаем его. Появится такое окошко:
Здесь, естественно, нажимаем INSTALL , чтобы установить драйвер на компьютер (или UNINSTALL, если наоборот нужно удалить драйвер с компьютера).
После установки драйвера в списке устройств, а точнее в разделе порты COM & LPT вы увидет устройство USB-SERIAL CH340 (COM19) — это и есть ваша плата ардуина, подключенная через USB-порт, но работать она будет в режиме виртуального (последовательного) COM-порта.
То есть теперь вы можете использовать разные программы для работы с COM-портами, чтобы обмениваться сообщениями с вашей ардуиной. Это удобно, так как программировать USB-порт гораздо сложнее. Номер COM-порта в нашем случае определился как 19, но, вообще говоря, он может быть любым (из сводобных). Так что если номер COM-порта будет другим, то ничего страшного — всё должно работать.
Если устройство не было ображено, то возможно надо перезагрузить винду.
Инструкция по установке драйвера CH340 на Linux
На свежих линуксах ничего устанавливать не надо, всё работает из коробки. Тем не менее драйвер также имеется и его можно скачать здесь .
Источник
Драйвер чипа CH340 USB-Serial
При подключении платформ разработки на базе Arduino к компьютеру, вы связываете между собой два мира: микроконтроллерный и микропроцессорный.
Стандартным интерфейсом плат Arduino на микроконтроллерах ATmega328P является UART, а у современных компьютеров используется USB. Чип USB-UART CH340G служит мостом между микроконтроллером и USB-портом компьютера, который позволяет загружать прошивку в плату, а также передавать между собой данные.
Список поддерживаемых плат
Зачем нужен драйвер?
При подключении любого устройства к USB-порту компьютера необходимо подсказать операционной системе, как с ним общаться. На стороне компьютера таким переводчиком является специальная программа, называемая драйвером. Например, драйвер преобразователя USB-UART работает в режиме эмуляции последовательного COM-порта. Т. е. при подключении вашей платы к компьютеру чип моста с помощью драйвера попросит операционную систему открыть виртуальный COM-порт, через который начнётся общение между платой и ПК.
Каждый производитель делает свои чипы с соответствующими драйверами. К сожалению, не все драйверы предустановлены в операционных системах по умолчанию. Когда нужного драйвера нет, ОС пытается найти его для нового подключённого устройства, не находит, и вместо виртуального COM-порта вы видите надпись «USB 2.0 SERIAL» или «Неизвестное устройство». Для решения проблемы скачайте и установите драйвер для вашей операционной системы.
Установка драйвера
Рассмотрим установку драйвера на примере платы Iskra Uno в операционной системе Windows. С остальными платами ситуация будет аналогичная.
Источник
Getting started with the Arduino Nano Every
Arduino Nano Every board has been designed to offer a practical and cost effective solution for all those projects that need a small and robust board, fully compatible with the iconic Arduino Nano form factor and pinout. Learn how to set up the programming environment and get the hardware up and running, ready for your projects, in minutes.
The Arduino Nano Every is programmed using the Arduino Software (IDE), our Integrated Development Environment common to all our boards and running both online and offline. For more information on how to get started with the Arduino Software visit the Getting Started page.
Use your Arduino Nano Every on the Arduino Web IDE

All Arduino boards, including this one, work out-of-the-box on the Arduino Web Editor, you only need to install Arduino Create Agent to get started.
The Arduino Web Editor is hosted online, therefore it will always be up-to-date with the latest features and support for all boards. Follow this simple guide to start coding on the browser and upload your sketches onto your board.
Use your Arduino Nano Every on the Arduino Desktop IDE
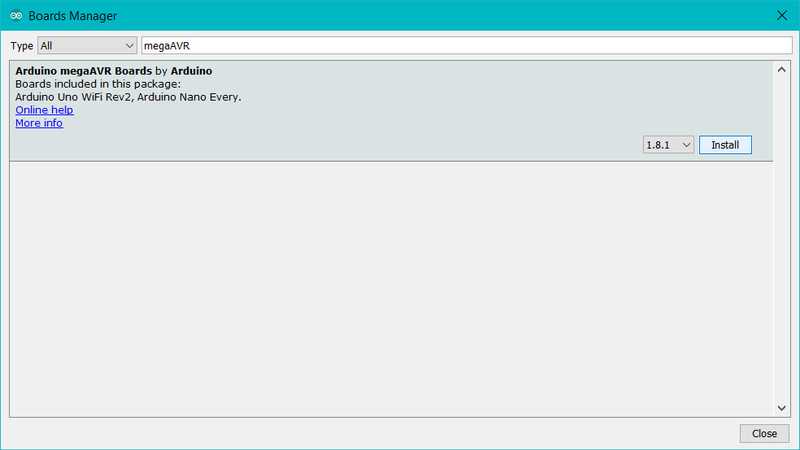
If you want to program your Arduino Nano Every while offline you need to install the Arduino Desktop IDE and add the Arduino megaAVR Core to it. This simple procedure is done selecting Tools menu, then Boards and last Boards Manager, as documented in the Arduino Boards Manager page.
Installing Drivers for the Arduino Nano Every
With the megaAVR core installed, you now proceed with the driver installation.
OSX No driver installation is necessary on OSX. Depending on the version of the OS you’re running, you may get a dialog box asking you if you wish to open the «Network Preferences». Click the «Network Preferences. » button, then click «Apply». The Arduino Nano Every will show up as «Not Configured», but it is still working. You can quit the System Preferences.
Windows (tested on 7, 8 and 10) If you properly installed the megaAVR Core, just connect the Arduino Nano Every to your computer with a USB cable. Windows should initiate its driver installation process once the board is plugged in.
Linux No driver installation is necessary for Linux.
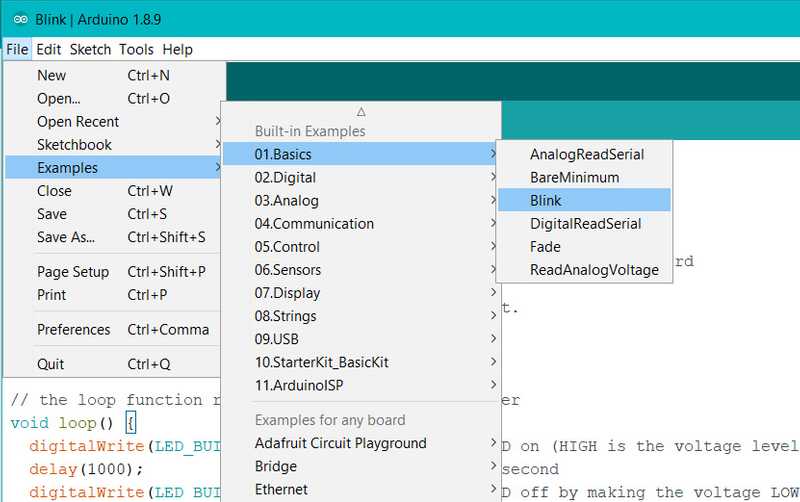
Open your first sketch
Open the LED blink example sketch: File > Examples >01.Basics > Blink.
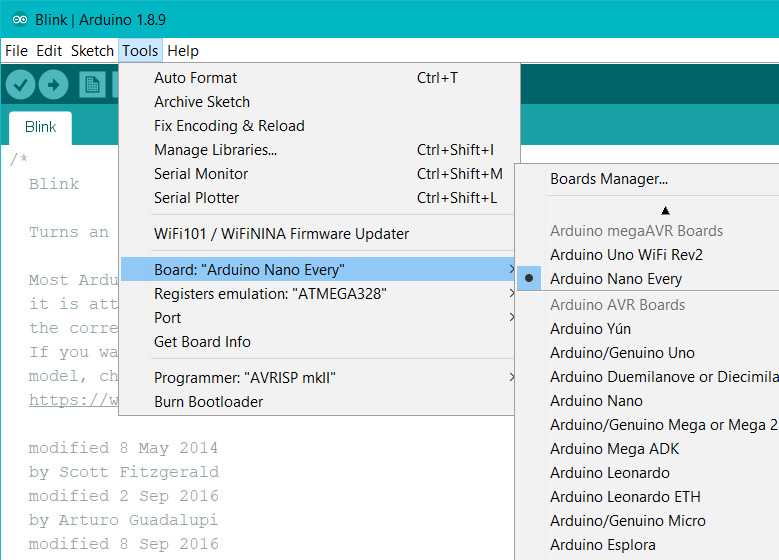
Select your board type and port
You’ll need to select the entry in the Tools > Board menu that corresponds to your Arduino board.
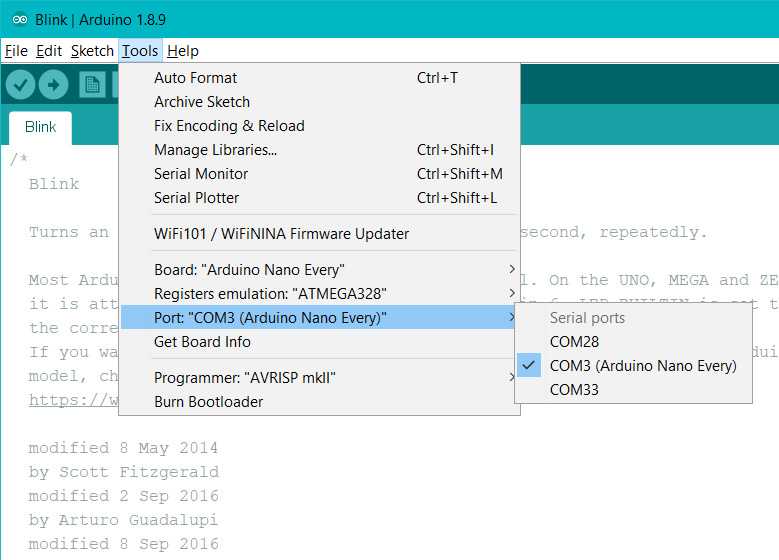
Select the serial device of the board from the Tools | Serial Port menu. This is likely to be COM3 or higher (COM1 is usually reserved for hardware serial ports). To find out, you can disconnect your board and re-open the menu; the entry that disappears should be the Arduino board. Reconnect the board and select that serial port.
Upload the program
Now, simply click the «Upload» button in the environment. Wait a few seconds — you should see the green progress bar on the right of the status bar. If the upload is successful, the message «Done uploading.» will appear on the left in the status bar.
A few seconds after the upload finishes, you should see the on-board LED start to blink (in orange). If it does, congratulations! You’ve gotten your Arduino Nano Every up-and-running. If you have problems, please see the troubleshooting suggestions.
Learn more on the Desktop IDE
See this tutorial for a generic guide on the Arduino IDE with a few more infos on the Preferences, the Board Manager, and the Library Manager.
Tutorials
Now that you have set up and programmed your Arduino Nano Every board, you may find inspiration in our Project Hub tutorial platform or have a look to the tutorial pages that explain how to use the various features of your board.
Please Read.
The microcontroller on the Arduino Nano Every runs at 5V and it is fully electrically compatible with the original Arduino Nano designs. The headers are mapped in the same way and it is possible to substitute any Arduino Nano board with the new Arduino Nano Every.
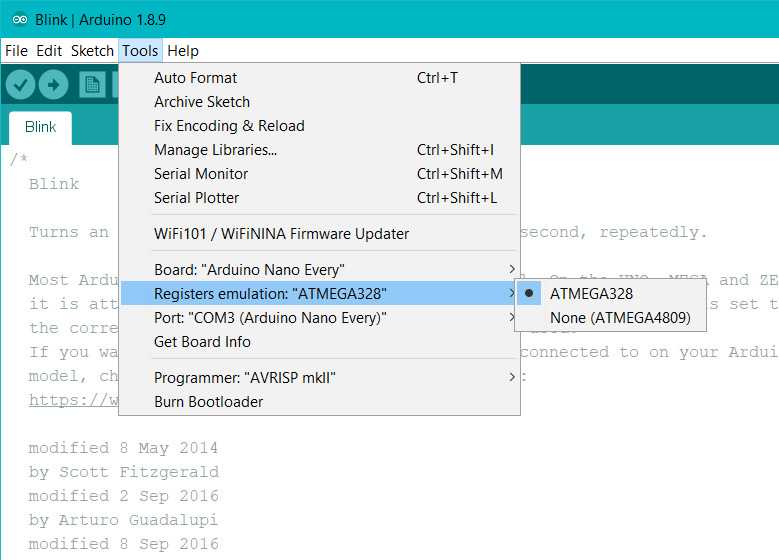
On the software side there might be some issue with third party libraries that don’t manage the pin mapping of the microcontroller; if the sketch has assembly parts inside, you should turn on the «Register Emulation» mode to emulate ATmega328P registers in the 4809 while compiling.
Features
Batteries, Pins and board LEDs Batteries: the Nano Every has no battery connector, nor charger. You can connect any external battery of your liking as long as you respect the voltage limits of the board. Vin: This pin can be used to power the board with a DC voltage source. If the power is fed through this pin, the USB power source is disconnected. This pin is an INPUT. Respect the voltage limits of 7-21V to assure the proper functionality of the board. 5V: This pin outputs 5V from the board when powered from the USB connector or from the VIN pin of the board. 3.3V: This pin outputs 3.3V through the on-board voltage regulator. LED ON: This LED is connected to the 5V input from either USB or VIN.
Serial ports on the Arduino Nano Every
The USB connector of the board is connected to the pins 11 and 12 of the SAMD11. The firmware loaded on this microcontroller supports the standard features of the USB to Serial interface common to the Arduino boards, but allows high performance transfers up to 1Mbit/s. The firmware is open source and can be modified to implement new functions. The interface to the SAMD11 / USB is Serial and the the one available on pins RX0 and TX1 is Serial1.
ADC and PWM resolutions
The Arduino Nano Every has the standard ADC and PWM resolutions of 10-bits and 8-bits, respectively. This board doesn’t have PWM on D11 and therefore it supports only 5 PWM outputs, as on the Arduino UNO WiFi Rev.2.
Firmware for SAMD11D14A
The USB interface is managed by a dedicated SAMD11 that is factory loaded with the proper firmware to program the ATMega4809 microcontroller and let the Arduino NANO Every behave as it should when connected to a host computer for programming and serial communication.
Since we don’t officially support SAMD11 in our SAMD core, the core to be used is the awesome fork by MattairTech. Once you install it you’ll be able to compile a basic firmware for MuxTO. To get the whole firmware you’ll need to replace some files with our own fork and select «Arduino MuxTO» variant target.
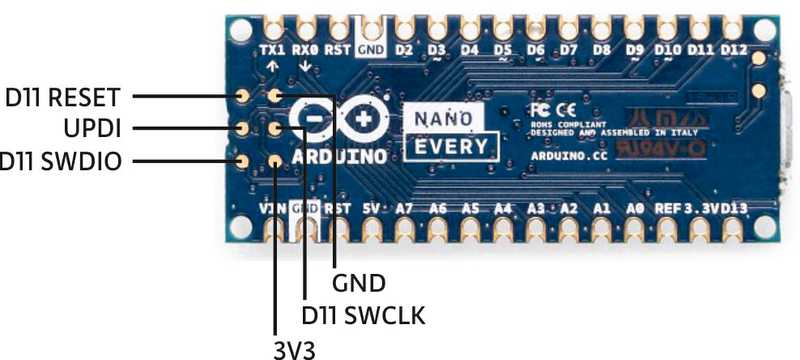
To reprogram the D11, simply power it while shorting SWDIO to GND pins.
The board will appear as «MuxTo bootloader» and can be reprogammed using bossac or the IDE Upload button if you selected «Arduino MuxTO» target.
For more details on the Arduino Nano Every, see the product page.
The text of the Arduino getting started guide is licensed under a Creative Commons Attribution-ShareAlike 3.0 License. Code samples in the guide are released into the public domain.
Источник
Установка драйверов
В набор входит “китайская” Ардуино-совместимая плата, у которой для подключения по USB используется контроллер CH340/CH341. Чтобы он распознавался компьютером, нужно установить драйвер.
Скачать драйвер можно по ссылке:
Распаковываем архив и запускаем файл
- SETUP.EXE (для 32-х разрядной системы)
- DRVSETUP64/SETUP64.EXE (для 64-х разрядной системы).
В появившемся окошке нажимаем INSTALL. Готово!

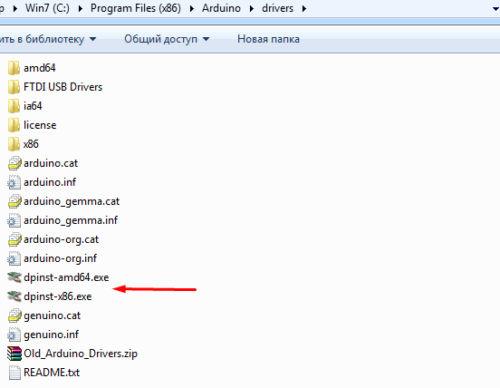
Если во время установки Arduino IDE вы по какой-то причине пропустили установку драйверов, то их можно установить вручную из папки с программой, расположенной по пути
- C/Program Files/Arduino/drivers (для 32-х разрядной системы)
- C/Program Files (x86)/Arduino/drivers (для 64-х разрядной системы).
- dpinst-x86.exe (для 32-х разрядной системы)
- dpinst-amd64.exe (для 64-х разрядной системы)
Драйвер CH341 для Mac можно скачать по ссылке с моего сайта , либо со страницы источника . Если у вас будут какие-то проблемы с OSX Sierra и выше, читайте вот эту статью .
В Linux уже встроен необходимый драйвер, но Arduino IDE может отказаться с ним работать: Linux определяет ардуинку как устройство ttyUSB*, обычно это ttyUSB0 (это можно узнать командой dmesg в терминале), то есть в системе появляется интерфейс /dev/ttyUSB0. Чтобы с ним работать, нужны права доступа. Читать и писать на устройство /dev/ttyUSB0 имеет пользователь root и пользователи группы dialout. Работы с правами суперпользователя лучше избегать, поэтому следует занести своего пользователя в группу dialout. Это можно сделать следующей командой (обратите внимание, команда whoami в обратных кавычках)
sudo usermod -a -G dialout `whoami`
После этого нужно перелогиниться. Дальше запускаем Arduino IDE и в меню «Инструменты/Порт» ставим галочку напротив /dev/ttyUSB0.
Вся информация по работе с IDE на данной ОСи есть вот в этой статье
Источник


