- Error opening serial port (Linux)
- Overview
- How to set serial port permissions
- Программирование Arduino из Linux, gentoo-way, быстрый старт
- Установить в ядро поддержку USB конвертера
- Установка или обновление пакета rxtx
- Установка java виртуальной машины sun
- Установка окружения toolchain для компиляции
- Установка собственно самой IDE для программирования
- Запускаем arduino
- Проблемы:
- Вместо заключения
- Reading data from an Arduino’s USB/serial port using Debian Linux
- Published: 3 December 2013
- Getting the Arduino to send some data
- Gathering the data on the Linux box
- Using minicom
- Using a simple cat command
- Using a PERL script — my preferred solution
- Using the data to create graphplots with MRTG
- Live Plotted Output
- Another Approach
- Arduino uno linux serial
- Quick Start
- Download the Arduino Software (IDE)
- Extract the package
- Run the install script
- Proceed with board-specific instructions
- Please Read.
Error opening serial port (Linux)
Overview
When uploading a sketch you may get the following error
or, when opening the serial Monitor
Note: The number in ttyACM* may be different.
If this happens, start by ensuring that you are using the correct port:
- Arduino IDE:Tools > Port > [select port]
- Web Editor: Select port using the dropdown.
If the problem persists there may be an issue with permissions for the serial port. See below for step-by-step instructions on how to set the correct permissions.
How to set serial port permissions
Open Terminal and type
Press enter. Terminal will return something like
What we are interested in is the group name, which is probably called dialout .
Note: The number at the end of ttyACM may be different, or multiple entries might be returned.
Now we want to add your user to that group. Input the following command in the terminal, replacing with the group name from above, and with your username, both without brackets.
Press enter. Input password if prompted.
Lastly, for the new permissions to take effect, you need to log out and in to your user account.
You can verify the changes by typing
into the Terminal and pressing Enter. The group you added should appear in the list.
Источник
Программирование Arduino из Linux, gentoo-way, быстрый старт
К сожалению, информация, необходимая для подключения Arduino к компьютеру, оказалась разрозненна по разным источникам на разных языках. Как известно, gentoo — это дистрибутив linux с непрерывной разработкой, фактически в нем и понятия такого быть не может, как «дистрибутив». Из-за этого решение проблемы, найденное в интернете, может оказаться неработоспособным просто потому, что на целевой системе другой набор пакетов и настроек.
Кроме того, авторы, как правило, приводят команды и решения специфичные для конкретной системы в конкретный момент времени. Проходит некоторое время, версии продуктов изменяются, меняются некоторые пути и файлы. Данная статься попытка не только консолидировать информацию, но и изложить так, чтобы информация устаревала как можно в меньшей степени, и было легко модифицировать команды под вашу систему. Возможно это будет полезно и в других дистрибутивах.
Установить в ядро поддержку USB конвертера
После подключения конвертера к USB порту видим следующее:
Для этого конвертера нужен драйвер ftdi_sio, предпочитаю не добавлять в ядро то, что не нужно при загрузке системы, а компилировать в виде модуля. Genkernel я не использую, а вы можете компилировать ядро удобным для вас способом.
Компилируем модуль и загружаем:
У нас появился интерфейс:
Обратите внимание на права. Необходимо добавить вашего пользователя в группу uucp
Если вы используете другой конвертер, то добавьте в ядро его поддержку, в остальном все должно быть аналогично.
Установка или обновление пакета rxtx
Актуально только для 64-битных систем:
В момент написания статьи стабильная версия пакета , но прошивка Arduino с ней работать не будет, необходимо поставить . Вероятно когда появится новая стабильная версия проблема будет устранена.
Установка java виртуальной машины sun
Можно использовать SDK или JRE, если не знаете, нужен ли вам SDK, то он вам не нужен, и выбирайте sun-jre-bin:
Из-за лицензионных ограничений вам придется вручную скачать соответствующий исходный файл и скопировать его в /usr/portage/distfiles. Кроме того, VM распространяется под отдельной лицензией, поэтому ее небходимо добавить в файл make.conf:
Убедитесь, что нужная VM выбрана:
Установка окружения toolchain для компиляции
Добавьте в файл /etc/make.conf строку, если ее еще нет, и создайте каталог:
Компилируем toolchain, опции по умолчанию соответствуют stage4 и использованию стабильных пакетов:
Установка собственно самой IDE для программирования
Постольку нет ни одной стабилизированной версии, то скорее всего она появится не скоро. Поэтому просто устанавливаем последнюю версию. Необходимо разблокировать следующие пакеты, добавив в файл /etc/portage/package.keywords следующие строчки:
Можно добавить флаги для установки примеров и документации:
Запускаем arduino
Выбираем в меню Сервис -> Плата ваш вариант Arduino и Сервис -> Последовательный порт – порт, который появился после подключения конвертера, обычно это /dev/ttyUSB0. Самый простой скетч Blink уже был загружен в мою плату производителем, поэтому чтобы проверить, как все работает, я его модифицировал: теперь светодиод моргает попеременно короткой и длинной вспышкой:
Нажимаете галочку «Проверить» и стрелочку «Загрузить» и будет вам счастье. На самом деле может и не будет, потому что необходимо устранить еще некоторые проблемы и об этом ниже.
Проблемы:
Если пункт выбора последовательного порта деактивирован, то вам снова нужно вернуться к началу статьи и
- проверить поддержку конвертера ядром:
- наличие модуля в памяти:
- можно попробовать его перезагрузить:
- проверить версию rxtx:
Если все проверили, попробуйте перезагрузить систему, в одном из случаев мне это помогло.
При компиляции выводится ошибка:
причина в том, что пути по которым установлен toolchain не соответствуют путям где его ищет arduino. Находим сначала где нужный файл:
затем создаем символическую ссылку:
При компиляции выводится ошибка:
Для вашей платы имя файла может быть другим, а решение то-же, необходимо создать соответствующую символическую ссылку. Ищем файл:
Существует проблема с binutils версии выше 2.19
Проблема выражается в том, что все вышеописанное работает, все компилируется, собирается и загружается в плату без малейшей ошибки. Но прошивка не работает. В моем случае плата просто моргает светодиодом, секунда горит, на секунду гаснет, то есть классический Blink.
Решение описано здесь, баг зарегистрирован на Gentoo’s Bugzilla.
Чтобы решить проблему следует переустановить toolchain следующим образом:
crossdev -C avr
USE=«multilib -cxx» crossdev —b 2.19.1-r1 -S -s1 —target avr
USE=«multilib cxx» crossdev —b 2.19.1-r1 -S -s4 —target avr
Все написанное выше по поводу некорректных путей остается в силе.
Для систем с hardened ядром:
USE=«multilib -cxx nopie nossp -hardened -pic -openmp» crossdev —b 2.19.1-r1 -S -s1 —target avr
USE=«multilib cxx nopie nossp -hardened -pic -openmp» crossdev —b 2.19.1-r1 -S -s4 —target avr
Вместо заключения
Сама плата и способы ее использования меня заинтересовали в контексте построения системы «Умный дом». Сейчас у меня капитальный ремонт квартиры в самом разгаре, и я могу проложить любые кабели, разместить любые коммутационные коробки и т. д.
Источник
Reading data from an Arduino’s USB/serial port using Debian Linux
Published: 3 December 2013
Reading data from an Arduino’s USB/serial port using Debian Linux
Here is a later approach using Minicom, from a reader. Thanks Martin, I’ve learned something new!
In case you don’t know, the Arduino is a family of micro-controllers, of open source design, ideal for interfacing environmental sensors, etc. They are also very cheap, popular, easy to connect to external sensors and easy to program. But how do I connect one to a computer to read the data it gets from sensors?
As the Arduino has a built in USB port this ought to be the easiest way (other ways are to add Ethernet hardware, or even wireless networking, but both add cost, and complexity in the programming side). The USB’s +5volt supply from the computer can also provide all the power the Arduino needs.
Here is how I got it all working with a home server running Linux Mint 17.1 (or any Linux based on Debian, such as Ubuntu and Mint):-
Getting the Arduino to send some data
I wanted to read a temperature and humidity sensor (and later, 3 of the same), using the cheap DHT11 or DHT22 chips. Here is the «sketch» (Arduino-speak for source code) I adapted from samples I found on the web. I compiled it and uploaded it via USB to the Arduino Nano clone I bought off eBay for $12.
The blinking of the on-board LED is just so that I know it is working.
Here is a sample of the data the Nano sends out:-
the «^M» is a carriage return (CR) character (ASCII 13) that the Arduino adds to each line. Linux/UNIX only uses a line feed (LF — ASCII 10) for line termination, but the scripts here can handle the CR without error.)
Gathering the data on the Linux box
Using minicom
I tried using the terminal program minicom , setting its serial port to the one used by the Nano, typically /dev/ttyUSB0, with the speed set to 9600 bits per second. This worked, and I could capture the output to a file, but was messy to run in the background, rather than on-screen. Still, it was a good first step to verify that the Nano was in fact sending data. To install minicom, log in as the root (superuser) account and
Using a simple cat command
I then tried just putting a «cat» command into a shell script and running it in background
but getting the serial port settings to stick, say through a reboot of the server, was tricky. Might be possible using the «stty» command, but it was not obvious.
Using a PERL script — my preferred solution
Having used a PERL script for a similar function (reading the USB/serial port of a CurrentCost ENVI power monitor) I made a variant of it to read the Nano as well. The PERL script has been very reliable. Here it is
You will need the PERL serial module to run this script, so as root #apt-get install libdevice-serialport-perl
You will probably need to set the serial port device to read-write for all users (unless you run the script as root). To do this, as root,
chmod a+rw /dev/ttyUSB0 (or whatever your port is)
You might want to run this at each reboot of the server, so put the command in /etc/rc.local, or wherever your variant of Linux puts it.
To find out what port you have, look in the output of the dmesg command, for the «FTDI» device, the Nano’s USB to serial convertor.
Note: I pass the port device to the script as an argument, since I have more than one USB serial device, and cannot be sure which will get assigned at boot time to the Nano. If you prefer to hard code it, remove the comment character «#» from the line «#my $PORT = «/dev/ttyUSB0″;» and comment out the line that follows instead.
You also need to make the PERL script executable
You will not see any output to screen, but if you open a second terminal session and look at «arduino.dat» you should see some data. Try this:-
tail -f arduino.dat (CTRL-C to exit it)
Using the data to create graphplots with MRTG
Here is my bash shell script that runs every 10 minutes to create plots using MRTG. My brief guide to BASH might help if you are not familiar with BASH
The script stores the latest data in a file latestArduino.dat
Here is the MRTG config file, «arduino.cfg»
Here is the script that the mrtg calls to get the subfloor temperature and humidity:-
Finally, here is the crontab entry that runs the whole thing every 10 minutes.
Live Plotted Output
Another Approach
Martin contacted me about this — his Debian box uses ACM0 as the USB port, and he was having problems with port permissions using «cat» to get data. Here is how he solved it:-
«I finally got it working and with plotting of the temperature values.
I ended up using the minicom utility.
If you’re interested or want to add this to your webpage, here are the steps I did.
1) I did not run the Arduino Serial Monitor. 2) I ran minicom utility:
sudo minicom -D /dev/ttyACM0 -b 9600 -C aaa.txt
3) run the Linux gnuplot utility:
set xdata time set timefmt «%H:%M:%S» plot ‘aaa.txt’ using 1:2
1:2 — display the data from the file found in columns 1 (time lapse) and 2 (temperature reading from DHT)
4) click the refresh button on the plotter page every now and again to display all the new data values that were added to the aaa.txt file since the last plotter page refresh.
I’ve attached the aaa.txt data file that the minicom utility captured and outputed to the aaa.txt file. I’ve also attached a copy of the gnu plotter page charting the data points.
The ardunio sketch is attached as well.»
//This is neat — I had not realised you could use minicom in this way — I’d only ever used it as an interactive, menu-driven program.
Here are Martin’s files, mentioned above:-//
Источник
Arduino uno linux serial
This document explains how to install the Arduino Software (IDE) on Linux machines.
Quick Start
The Linux build of the Arduino Software (IDE) is now a package that doesn’t require any specific procedure for the various distributions availabe of Linux. The only relevant information is the 32 or 64 bit version of the OS.
Download the Arduino Software (IDE)
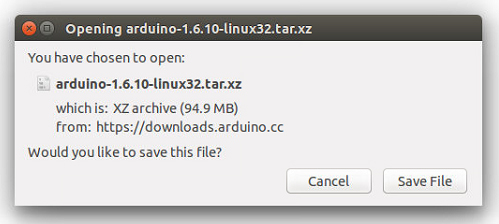
Get the latest version from the download page. You can choose between the 32, 64 and ARM versions. It is very important that you choose the right version for your Linux distro. Clicking on the chosen version brings you to the donation page and then you can either open or save the file. Please save it on your computer.
Extract the package
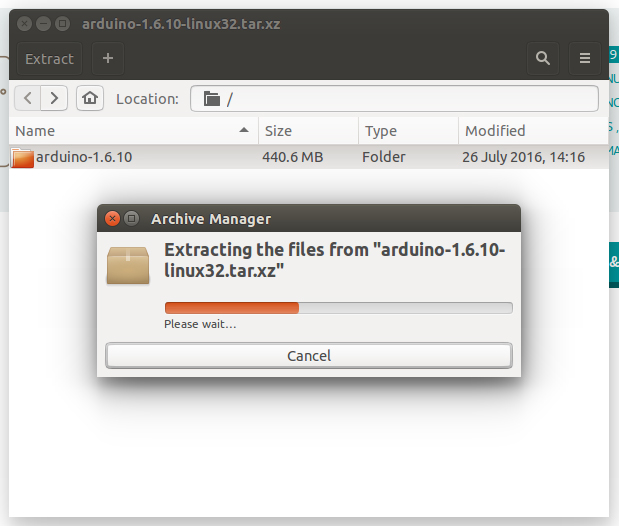
The file is compressed and you have to extract it in a suitable folder, remembering that it will be executed from there.
Run the install script
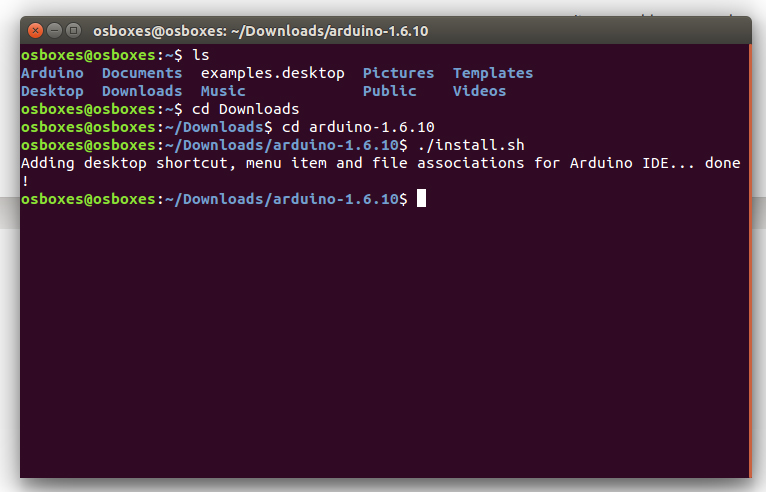
Open the arduino-1.6.x folder just created by the extraction process and spot the install.sh file. Right click on it and choose Run in Terminal from the contextual menu. The installation process will quickly end and you should find a new icon on your desktop.
If you don’t find the option to run the script from the contextual menu, you have to open a Terminal window and move into the arduino-1.6.x folder. Type the command ./install.sh and wait for the process to finish. You should find a new icon on your desktop.
Proceed with board-specific instructions
When the Arduino Software (IDE) is properly installed you can go back to the Getting Started Home and choose your board from the list on the right of the page.
Please Read.
It might happen that when you upload a sketch — after you have selected your board and the serial port -, you get an error Error opening serial port . If you get this error, you need to set serial port permission.
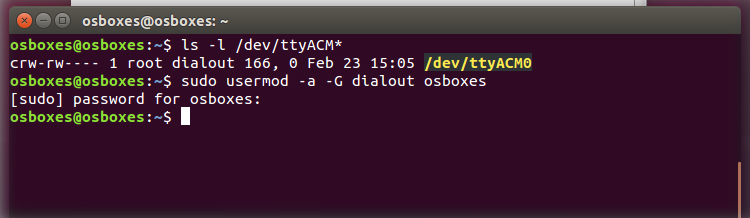
Open Terminal and type:
you will get something like:
crw-rw—- 1 root dialout 188, 0 5 apr 23.01 ttyACM0
The «0» at the end of ACM might be a different number, or multiple entries might be returned. The data we need is «dialout» (is the group owner of the file).
Now we just need to add our user to the group:
sudo usermod -a -G dialout
where is your Linux user name. You will need to log out and log in again for this change to take effect.
This is the procedure to access the serial port from the Arduino Software (IDE) if you get an error
After this procedure, you should be able to proceed normally and upload the sketch to your board or use the Serial Monitor.
Last revision 2016/08/10 by SM
The text of the Arduino getting started guide is licensed under a Creative Commons Attribution-ShareAlike 3.0 License. Code samples in the guide are released into the public domain.
Источник


