- DOWNLOADS: Developer Tools
- Tools
- Odroid Ubuntu 14.04 hostapd
- Arduino code to test an airspeed sensor
- Arduino 1.0.3 with modifications required for ArduPilot (Mac OS X)В
- ArduPilot-Arduino-1.0.3-windows.zip
- CrossTrack demo (flash version)В
- Data dump of three attitude solutions
- Declination Lookup — Test EMMВ
- mavproxybeta1.msi
- mavproxyBetaNoNeworkTest.msi
- Serial port test program
- License
- Safety
- Building Mission Planner with Visual Studio
- Introduction
- System Requirements
- Install Visual Studio
- After your VS installation is complete:В
- Getting the Mission Planner source code from Github into your computer
- Open the Mission Planner solution in Visual Studio
- Building the MissionPlanner
- Building the SimpleExample
- Editing and Debugging Mission Planner (and Other Tips)В
- Using your modified Mission Planner
- Submitting your changes for inclusion in Master
DOWNLOADS: Developer Tools
Not all of these tools are “up to date”. For example, vehicle binaries and GCS software should be downloaded from their respective locations in the firmware server.
The rest of the article provides an overview of some of the files and the tool licensing.
Tools
Odroid Ubuntu 14.04 hostapd
VERSION dev DATE POSTED January 20, 2015
This replaces the hostapd distributed with the Odroid U3 board’s Ubuntu 14.04. This newer version resolves issues creating a wifi access point.
Arduino code to test an airspeed sensor
DATE POSTED April 25, 2013
Arduino code to test an airspeed sensor
Arduino 1.0.3 with modifications required for ArduPilot (Mac OS X)В
DATE POSTED May 1, 2013
ArduPilot-Arduino-1.0.3-windows.zip
VERSION 1.0.3 DATE POSTED May 1, 2013
Arduino 1.0.3 with modifications required for ArduPilot
CrossTrack demo (flash version)В
DATE POSTED April 29, 2013
Data dump of three attitude solutions
DATE POSTED April 29, 2013
Data dump of 3 attitude solutions running in parallel. Includes README file.
– DCM – Madgwick filter_mag – MPU6000 sensor fusion
Declination Lookup — Test EMMВ
DATE POSTED April 29, 2013
This is a small zip file that contains 1 executable that is meant to be executed via the command line. When you run it you will see a menu with 4 options. The only option that will work is the declination lookup option. It is using the exact same lookup method as the AP_Declination library I wrote except that the lookup tables were generated using the EMM (Enhanced) instead of the WMM.
mavproxybeta1.msi
DATE POSTED May 1, 2013
mavproxyBetaNoNeworkTest.msi
DATE POSTED May 1, 2013
Serial port test program
DATE POSTED April 29, 2013
A little program that shows that Port 0 (USB) and Port 3 (Xbee) are working
License
This program is free software: you can redistribute it and/or modify it under the terms of the GNU General Public License as published by the Free Software Foundation, either version 3 of the License, or (at your option) any later version.
This program is distributed in the hope that it will be useful, but WITHOUT ANY WARRANTY; without even the implied warranty of MERCHANTABILITY or FITNESS FOR A PARTICULAR PURPOSE. See the GNU General Public License for more details.
Safety
Operating a powered vehicle of any kind can be a lot of fun. However, nothing will ruin your day at the park more quickly than an accident or running afoul of the law. Since we want you to have a great experience, please make sure that you do all of the following:
- Operate within all local laws and regulations. For example, in the United States, current regulations require you to operate most UAVs under 400 foot above ground level, within line of site, and away from obstructions and populated areas. Since these regulations vary from place to place, even within the same country, ensure that you understand what you need to do to stay compliant.
- Never operate the vehicle or software in a way that could be dangerous to you, other people, or property. Propellers, while rotating, could easily cut you; if a UAV fell on a person or object, it could cause injury; a UAV caught in power lines could cause an outage. As Ben Franklin said, “An ounce of prevention is worth a pound of cure.”
- Always keep in mind that software and hardware failures happen. Although we design our products to minimize such issues, you should always operate with the understanding that a failure could occur at any point of time and without warning. As such, you should take the appropriate precautions to minimize danger in case of failure.
- Never use the software or hardware for manned vehicles. The software and hardware we provide is only for use in unmanned vehicles.
 © Copyright 2021, ArduPilot Dev Team.
Источник
Building Mission Planner with Visual Studio
This page is outdated and instructions should be adapted to make it work.
Introduction
Mission Planner (MP) is an open source ground station developed in C# primarily for use on Windows/linux computers (although it can be run on Mac using mono). This is the most commonly used ground station as it provides the most complete functionality for vehicle setup as well as pre-flight mission planner, in-flight monitoring and post flight log file analysis.
This page provides instructions on how you can build the Mission Planner software on your own machine using MS Visual Studio 2019 which may be useful if you wish to make changes for your own use or improvements for the community. Building the mission planner may also help as a guide in case you plan to build your own custom ground station development.
Some warnings before you dive in:
- Use your modified / complied version of Mission Planner at your own risk.
- Mission Planner is a very complex including and making changes is not for the faint of heart. Here are the basic skills you will need to make reasonable progress with MP changes:
- C# programming skills and experience (at least or C++ experience).
- Experience with Microsoft Visual Studio (VS) development environment. MP is not the application to begin learning VS.
- Experience using Windows API (Application programming Interface) — including understanding of streams, processes, threads.
- Support for Visual Studio, programming in C# and Windows API may not be forthcoming from the DIY Drones community. You will need to get that support from other sources.
System Requirements
Here is what you will need.
- Windows 10. Sorry earlier versions no longer work. Windows 7 etc will NOT work.
- Sufficient disk space, memory, processor power to comfortably run Visual Studio (details below)
- An Internet connection.
- Visual Studio 2019 community edition (You must use version 16.8.x older versions have problems building/editing)
Install Visual Studio
The first step is to get Microsoft Visual Studio Community 2019installed and working in your Windows system.
- Download and install MS Visual Studio 2019 Community Edition which can be found here.
- During the install Process, you will be prompted to install optional “workloads”, at this stage, you must select:
- “.NET desktop development”
- “ASP.NET and web development”
- “Universal Windows Platform developement”
- “Mobile development with .NET”
- “.NET Core cross-platform developement”
- Reboot your PC
- Start Visual Studio from the Start Menu
After your VS installation is complete:В
- Navigate to “Tools” Menu -> “Get Tools and Features” -> (wait for page load) -> Workloads -> Summary ( right of screen) -> then tick the tickbox labeled “.NET desktop development” “ASP.NET and web development” “Universal Windows Platform developement” “Mobile development with .NET” “.NET Core cross-platofrm developement” ( leaving other tickboxes as-is) -> then click “Modify” button at bottom. wait for download/install to complete.
- You might like to test your installation on a simple “Hello World” application, or the “SimpleExample” described below.
- TIP: By default it is installed here: “C:\Program Files (x86)\Microsoft Visual Studio\2019\Community»
Getting the Mission Planner source code from Github into your computer
The Mission Planner source code is stored in GitHub. In general you can follow the instructions for the ardupilot flight code except that you should use the https://github.com/ArduPilot/MissionPlanner repository in place of the ardupilot repository. You could clone the git repo to (for example) c:\MissionPlanner\ but the exact folder is not critical. After cloned the repo, don’t forget to update submodules. Go to the folder where you cloned the repo and issue a git submodule update –init –recursive command.
Open the Mission Planner solution in Visual Studio
Building the MissionPlanner
Goto Build > Build Solution and to debug Goto Debug > Start Debugging
By default visual studio will compile all projects and their dependencies as part of a build.
Building the SimpleExample
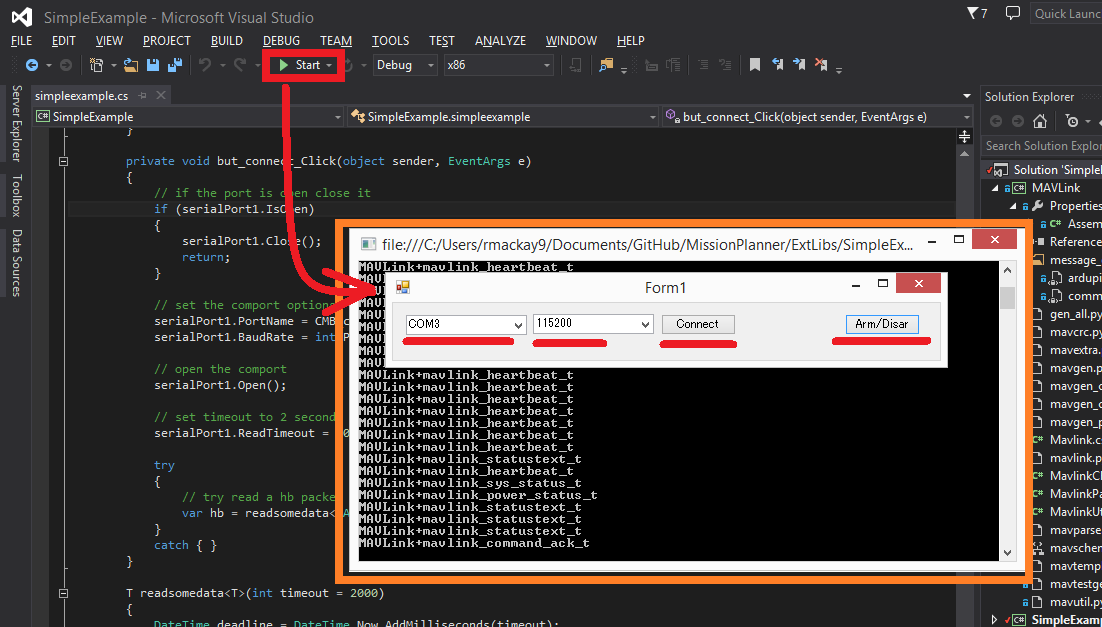
The “SimpleExample” solution is available as a near minimal application to demonstrate how a C# program can connect to a vehicle and cause it to arm or disarm. This example has many fewer dependencies than the full Mission Planner and is simpler to build and understand.
Open the solution from Visual Studio by selecting File >> Open >> Project/Solution, and in the MissionPlanner code directory select ExtLibs / SimpleExample.sln ( close the MissionPlanner solution first if you have that open )
Ensure the program can be build successfully by selecting Build >> Build Solution.
After first checking that you can connect to your flight controller and arm it with the regular mission planner, disconnect the regular Mission Planner and then press “Start” to run the application in debug mode. When the “Form1” pops up, select the COM port, the baud rate (probably 115200) and press Connect. If it successfully connects, press Arm/Disarm to attempt to arm the vehicle.
Note: there is no error checking in the application so if it fails to connect it
Editing and Debugging Mission Planner (and Other Tips)В
Editing and debugging details are beyond the scope of this Wiki. Debugging may result in some warnings. You should learn what they mean and take the necessary steps to resolve them if that is the case. Here is a simple debugging example to get you started.
Do not (yet) connect your AutoPilot Hardware ( Pixhawk, etc ) to the compiled version of MP. You must first copy some .xml files to the bin/debug folder. See details below.
First be sure VS is configured for debug (versus release) Set this in the top menu tools area or the configuration manager.
Select menu DEBUG, Start Debugging. (Or, press F5). Mission Planner should run as you normally see it. However, some important configuration files are missing so connection to the AutoPilot Hardware ( eg Pixhawk, etc ) is not recommended at this time.
If after “Start Debugging” the program loading hangs in the splash screen and you see this message: “Managed Debugging Assistant вЂLoaderLock’ has detected a problem …… “’ and/or the debugger has paused at the line Application.Run(new MainV2()); in ArduPilotMega.Program then do this:
Select [Debug], [Exceptions]. Expand the [Managed Debugging Assistants]. Uncheck the вЂLoader Lock’ check box
Close MP. (Or, select menu DEBUG, Stop Debugging in VS).
Next you can try setting a break point.
- Expand the MissionPlanner project in the VS Solution Explorer so you see the objects included.
- Scroll down to MainV2.cs, right click that object and select View Code.
- In the code window for MainV2.cs, scroll down to the line “public MainV2” then to one of the first code lines after that ( currently it is a log.Info(“…”); line ) .
- Click in front of that line (In the dark gray bar on the left) to set a break point (red circle).
- Start Debugging (press F5).
- You will see the normal MP start up windows up to the Splash window but then it will stop running. You have hit the break point. Visual Studio will show the code and the break point will be highlighted. Note that you cannot move the splash screen so you may need to relocate the VS window to see the break point.
- Move your mouse over different variables and objects in the code. You will see the current values of many or the items.
- Press F5 and Mission Planner will continue loading.
Further details on editing and debugging are left to the user.
Using your modified Mission Planner
If you make changes to Mission Planner, you will probably want to make use of your version. Here we will give you some preliminary information to do that. You can use your local compiled version but the compiled output files are located in different places in VS and some additional steps are required. There are configuration files specific to your installation of Mission Planner that are not included in the Git hub download that are only provided in the Mission Planner installation package. You will need to copy these to the correct area in the folder you are using for the Visual Studio project. Here are the steps that will get you started.
Use your modified complied version of Mission Planner at your own risk.
These steps assume VS is in the debug configuration. [editors]
Details when in Release mode could be added [/editors]
In order for your VS version of MP to function with the APM connected, you will need to copy several files from the folder where MP is installed (C:\Program Files (x86)\APM Planner or C:\Program Files\APM Planner) to the folder where your VS project compiled output is located.
editors: This needs to be made more accurate which files are needed, why etc.
- Copy (don’t move) all xml files (I.E. files with the extension .xml) from the root folder of the MP installation (C:\Program Files\APM Planner) to the bin/Debug folder in the folder where your Visual Studio Mission Planner solution is stored. (the Git hub clone folder). This will setup your compiled version to match the current configuration of your AutoPilot (copter versus plane, other options, etc)
- I.E, if you solution is in folder MPGitClone, then copy the .xml files to MPGitClone\bin\Debug. Some will copy without notice, but some will ask you if you want to replace the existing file. Replacing all seems to work but you should investigate further to be sure you can use MP for real life situations before you do so.
- If you build Mission Planner in Release mode, then the files should be copied to the bin/Release folder. This has not been tested at this time.
Here are some other tips:
- Location of Logs saved when using your version will be in the /bin/Debug or bin/Release folder. This can be changed with Mission Planner 1.2.63 and later versions.
- If you want to make a shortcut to run your version of Mission Planner without running Visual Studio, create the shortcut to point to the program ArduPilotMegaPlanner10.exe in the bin/Debug or bin/Release sub folders.
At this point your local version of MP should be working. You should be able to connect to your APM, Flight Data including status should work, Configuration should bring up you APM parameters, Terminal should work including saveing and browsing logs. Flight Planner should also work. As mentioned before, use your modified version at your own risk.
Submitting your changes for inclusion in Master
Generally the advice is the same as for the ardupilot flight code ( instructions here ) but here is a very short summary of the steps:
- Sign up a member of Git hub
- Create a personal Fork of the Mission Planner by going to https://github.com/ArduPilot/MissionPlanner and click on Fork (Upper right corner area) This creates a copy (fork) of Mission Planner files in your Git Hub account.
- Clone your personal repo (created with the Fork above) to your PC
- Create a new branch in your repo and commit your changes and push these back to GitHub (these will only go into your repo on GitHub).
- Use the GitHub web page to create a Pull Request from your branch
- The owner of Mission Planner (Michael Oborne) will receive an email notifying him of your Pull Request. He will most likely review, provide feedback and if he accepts the commit it will be added to master.
© Copyright 2021, ArduPilot Dev Team.
Источник


