- How to Create Bootable Partition from ISO in Windows 10/8/7?
- Scenario
- How to create a bootable(USB) partition from ISO in Windows 10/8/7?
- How to create bootable (USB) partition from ISO for Windows installation?
- Conclusion
- Windows 7 ISO [All Editions]
- Overview
- What’s New
- Specs
- Download Windows 7 ISO [All Editions]
- Windows 7 Editions
- Windows 7 Download
- Windows 7 Starter Free Download
- Windows 7 Home Basic Free Download
- Windows 7 Home Premium Free Download
- Windows 7 Professional Free Download
- Windows 7 Enterprise Free Download
- Windows 7 Ultimate Free Download
- How to install Windows 7 from ISO?
- Why DVD/USB must boot?
- Installation Types
- How to create bootable Windows 7 USB drive?
- Download Windows 7 Service Pack 2 (SP2)
- How do I create a bootable usb drive with an iso image of Windows 7?
How to Create Bootable Partition from ISO in Windows 10/8/7?
Need to create a bootable partition from ISO? This article will teach you how to easily boot your Windows from ISO file in Windows 10/8/7.

By Dylan  / Last Updated May 28, 2020
Scenario
Case one : “Hi, I want create a bootable partition from ISO for Windows 10, because I need to Windows 10 on other computer. Not DUAL-SYSTWM, I don’t want to install system. Anyone knows how to do that?”
-Question from Tenforums.com
Case two : “I have a valid Microsoft license for Windows 7 Home Premium for my computer. And I want to upgrade to Windows 8, someone tell me I can download Windows 8 ISO file and burn it to HDD to boot computer and install Windows 8. But I don’t know the detailed steps and I stuck at burning ISO file.»
«Any ideas what I can do?”
-Question from Microsoft.com
Nowadays, more and more people want to create a bootable hard drive from ISO to satisfy their different demands. Here, according to the two scenarios, we are going to teach you how to use a USB to create bootable partition from ISO for portable OS and make a bootable partition for installation in Windows 10/8/7.
How to create a bootable(USB) partition from ISO in Windows 10/8/7?
Making a hard drive bootable allows you to boot other computers from your familiar system. Here, we recommend a tool called AOMEI Partition Assistant Professional , whose “Windows To Go Creator” can make a Windows system USB like Windows 10/8/7, Windows XP, Windows Vista. In this way, wherever you go, you can use windows system on any computer.
Plugin a USB drive, and you can download the Demo version and follow this tutorial to see how to create a bootable partition (USB) from ISO with AOMEI Partition Assistant.
Preparations
A working computer with AOMEI Partition Assistant installed.
A USB or other external devices like HDD/SDD with at least 13GB (the larger, the better).
Back up your USB drive if there are important data on it, as it will be formatted.
Step 1. Install and open AOMEI Partition Assistant Professional. In the main interface, click “All Tools” > “Windows To Go Creator” in the left panel.

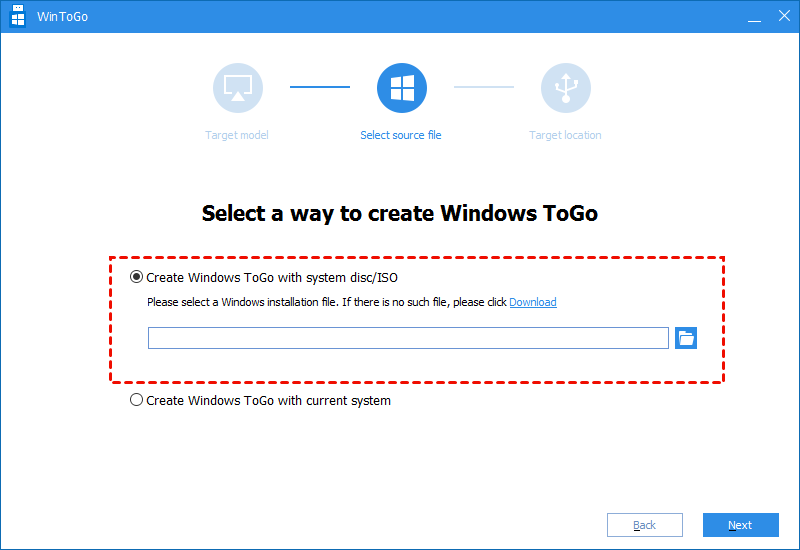
Step 2. In this window, we choose “Create Windows ToGo with system disc/ISO”, if you don’t have ISO file, you can also create it with the current system, and click “Next”.
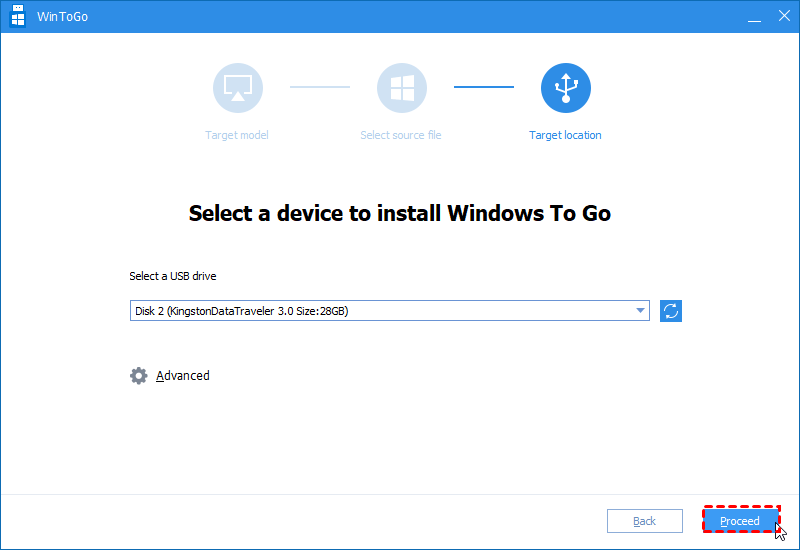
Step 3. In this window, AOMEI Partition Assistant will detect your USB drive automatically, if it doesn’t press “Refresh”. And select the ISO file, and click “OK”.

Step 4. It will pop up a window prompt that this operation will erase all data on the USB, ensure you have backed up important data, and click “Yes”.

Step 6. Press “Proceed” to start creating bootable partition from ISO with a USB drive.
AOMEI Partition Assistant is a powerful computer and disk management tool. If you encounter a boot issue, you can also create Windows PE bootable USB or CD to repair your computer. Besides, it can help you to clone system to SSD , resize/create/shrink system drive, etc.
How to create bootable (USB) partition from ISO for Windows installation?
If you want to install Windows system on other computers, but you don’t have an installation CD, then you can follow this tutorial and use a USB or HDD/SSD to create a bootable partition from ISO to install system.
To create a bootable partition from ISO for installation in Windows 10/8/7, firstly, you need to make hard drive or USB flash drive bootable. Secondly, you need to burn ISO file to the bootable USB or HDD/SSD.
Step 1. Press “Win + R” to open Run box, and input “cmd” in it and hit Enter to open Command Prompt.
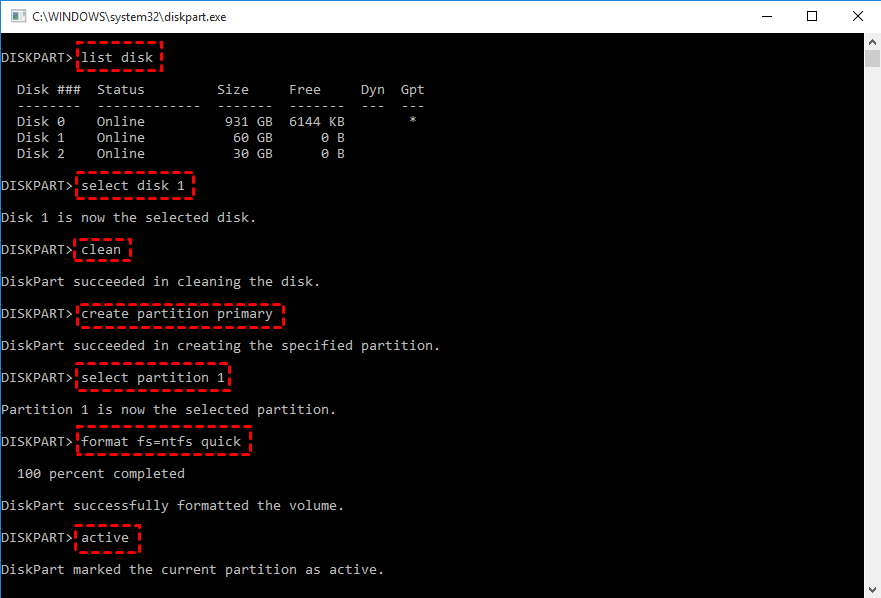
Step 2. Type “disk part” and press Enter to open the Diskpart tool. Then execute the following commands one by one:
list disk
select disk n (n is the number of your external storage device)
clean
create partition primary
select partition 1
format fs=ntfs quick (if you want to create UEFI bootable USB, type “format fs=fat32 quick”)
active
Step 3. Then the partition of your USB is bootable, type “exit” and press Enter to close Diskpart. Use the following Commands and burn ISO to your USB drive
xcopy A:\*.* B: /s/e/f (replace A with the ISO file drive letter, and replace B with your USB drive letter)
D:\Boot\Bootsect /NT60 B: /force /mbr (B means the drive of your USB)
These two commands will copy ISO file to USB drive and write a bootloader to it.
Conclusion
This is how to create bootable partition from ISO in Windows 10/8/7. You are supposed to choose a method according to your need, the first method is to create a bootable USB to have a portable system, and the other one is to have a bootable USB for installing system on computer.
Windows 7 ISO [All Editions]
Download Windows 7 ISO [all editions] bootable USB/DVD images. Choose your desired edition from Starter, Home Basic, Home Premium, Professional, Enterprise and Ultimate. Official ISO files with fastest download speed and pause/resume download links. use IDM or any download manager for best download speed.
Overview
What’s New
Specs
Download Windows 7 genuine ISO files [All editions] bootable disc images. These are original Windows 7 ISO images from MSDN (Microsoft Development Network).
Microsoft does not offer direct link to download Windows 7 ISO (OEM) on Windows OS. There are tools but it is an extra step which is not easy.
You will not need Windows 7 DVD when you have ISO image file. All you need is download Windows 7 original bootable ISO, make a bootable USB or DVD and install Win7 from that DVD or bootable USB flash disk. Use genuine product keys to activate Windows 7.
Download Windows 7 ISO [All Editions]
Microsoft has offered many editions of Windows 7. Each edition has its own specifications. The core OS of all editions is same powerful Win7.
Windows 7 Editions
Set of features is different for each Win7 edition. These are designed according to user requirements. Name of edition describes for whom it is suitable. Here is the list of all of them:
- Starter
- Home Basic
- Home Premium
- Professional
- Enterprise
- Ultimate
Starter is the core edition which covers all core elements for basic computer usage. Home basic is suitable for basic computing at home level. Home Premium offers some useful features and nice for home entertainment.
Windows 7 Professional is designed for professionals. It offers most of features which are enough to meet small business requirements.
Windows 7 Enterprise edition is great for large business such as companies, organizations and well established national and international firms.
Windows 7 Ultimate edition is the best and fullest edition of Windows 7. It covers all features of other editions and much more of its own. Win7 Ultimate is best edition if you want to enjoy the best Windows 7 experience.
Windows 7 Download
Choose the best edition according to your needs. Both 32 Bit and 64 Bit Windows 7 DVD are available as ISO image files. You can burn a DVD if you like or boot a flash disk. USB flash is recommended for faster install. But it is all up to your choice.
Windows 7 Starter Free Download
Core Win7 operating system built for 32-bit CPU architecture PC. Affordable for core operations. It offers very limited features. Not recommended for normal usage.
Windows 7 Home Basic Free Download
Good for basic home usage. Multimedia support to enjoy videos and music. No Aero theme and Aero visual graphic support.
Windows 7 Home Premium Free Download
Nice edition to enjoy multimedia entertainment and premium games. Beautiful Aero theme support for clear glassy look. It is a media center edition.
Windows 7 Professional Free Download
Best for professionals and small business. It is the best value edition and suitable for most users. Win7 Pro has all premium features including networking.
Windows 7 Enterprise Free Download
Win7 Enterprise has all features of Windows 7 Pro with additional security features. Enterprise edition is best for large business.
Windows 7 Ultimate Free Download
Win7 Ultimate is the most complete and full edition. It contains all features of Home, Pro and Enterprise plus every feature ever offered for Windows 7.
How to install Windows 7 from ISO?
Before installation you need to prepare installation disc (DVD) or bootable USB disk.
Why DVD/USB must boot?
DVD or USB disk must be bootable if you want a fresh installation on a system which already has no operating system installed. If DVD or USB media is not bootable, the first screen saying something like “press any key to start” will not display and installation process will not start.
Installation Types
There are two types of installation:
Fresh Install Windows 7
A fresh and total installation. The partition (C: mostly) needs a format and erase all data to perform a fresh Win7 installation. The previous operating system or any data on that drive partition will be erased in format operation. A fresh installation will begin after format is complete.
Upgrade Windows 7
If you already have an old version of Windows (like Windows 98, Windows XP or Windows Vista) you can upgrade to Windows 7. You might not need to format the older version and you can save your personal documents, pictures and video. The previous operating system will be replaced in favor of fresh Windows 7.
How to create bootable Windows 7 USB drive?
You need an ISO to USB creating tool for making Windows 7 bootable USB drive. Such tools extract the contents of ISO file to DVD or USB flash disk. There are lots of ISO to USB tools but a few of these software are able to create bootable Windows media.
Most of ISO to disk burn tools claim best technology but we have picked only the best ISO tools for you. These are actually usable and easy to understand for users.
You are recommended to use any of following tool:
- Microsoft Windows 7 USB DVD Download Tool (Highly recommended)
- Rufus (very flexible)
- Power ISO
- Ultra ISO
Download Windows 7 Service Pack 2 (SP2)
Service Pack 2 (SP2)is the most recent update of Windows 7 download. It includes all Windows 7 updates released by Microsoft. You can download Service Pack 2 for Windows 7 separately from Microsoft Windows download website if not already installed.
Disclaimer: Windowstan does not allow any scam just like serial number, patches, crack, keygen or activator for Windows 7. Files hosted on third party servers have been there for long time, however, if you find any problem or virus etc, Let us know immediately. The link will be removed or replaced if found infected. This page contains link to download Windows 7 [All Editions] Free and Full ISO.
How do I create a bootable usb drive with an iso image of Windows 7?
Which web site is this?
You need to convert those three files into a bootable .ISO file, the following article will show you how:
After you have converted it to a .ISO file, you need to burn it to a blank DVD disc as a disc image, then proceed to install:
ImgBurn — In addtion to supporting the creation of CD’s from .ISO files,
it supports a wide range of other image file formats, and it’s free.
(BIN, CUE, DI, DVD, GI, IMG, MDS, NRG, PDI and ISO)
Download and install Gear ISO burn (Free):
Note: Always use the slowest burn speed (4x or 2x) if offered a choice.
You should have the option to download the .ISO file from the Microsoft Store and simply burn it to a blank DVD as a disc image. Much easier to work with than the box files.
If you downloaded your copy of Windows 7 from the Microsoft Store, try redownloading it again:
1. Login to your Microsoft Store account ( http://store.microsoft.com ) to view your purchase history
2. Look for your Windows 7 purchase.
3. Next to Windows 7, there is an «Additional download options» drop-down menu.
4. In the drop-down menu, select «32 or 64-bit ISO.»
Download the ISO Image of Windows 7
Windows 7 Professional x64 (64-bit)
Windows 7 Professional x86 (32-bit)
Windows 7 Home Premium x64 (64-bit)
ImgBurn — In addtion to supporting the creation of CD’s from .ISO files,
it supports a wide range of other image file formats, and it’s free.
(BIN, CUE, DI, DVD, GI, IMG, MDS, NRG, PDI and ISO)
http://www.imgburn.com/
Note: Always use the slowest burn speed (4x or 2x) if offered a choice.
How to make a bootable USB thumb drive:
you will have to use a tool such as the Windows 7 USB/DVD Download Tool (http://store.microsoft.com/Help/ISO-Tool)
This simple tool will help you convert the same image file into to a USB thumb drive. For installation purposes, you should get a thumb drive that’s at least 4 GBs in size to store the installation files. Browse to where the Windows 7 Image is stored, open it.
Select the USB device where you want to have the backup stored to for installation.
Once the USB device has been identified, click the Begin copying button.
And that’s it, the next step now is to boot your computer, from the thumb drive, make sure the thumb drive you will be installing Windows 7 from is plugged into the USB port. This might vary by manufacturer, but the usual one to try is F12, start your computer and press F12 repeatedly until a screen is displayed giving you the option to boot from a USB Memory device, select that and press Enter on your keyboard.


