- Arch Linux User Repository
- Search Criteria
- Package Details: arm-linux-gnueabihf-gdb 11.1-1
- Package Actions
- Dependencies (2)
- Required by (0)
- Sources (1)
- Latest Comments
- Binabik commented on 2017-05-03 09:02
- potatoe commented on 2017-02-15 05:19
- Arm linux gnueabihf gdb
- arm-linux-gnueabihf-gdb versus gdb-multiarch
- 2 Answers 2
- Кросскомпиляция под ARM
- Вводная
- Инструменты
- Элементарная технология кросскомпиляции
- Develop and Debug C++ for ARM Linux Boards on Windows With Eclipse
- Learn more about developing and debugging ARM Linux Boards on Windows.
- What Experience Do You Get
- System Preparation
- Software Requirement on the ARM Linux Device
- Software Requirement on the Windows PC:
- Prepare the Windows PC
- Prepare the ARM Linux Board
- Develop a Program
- Deploy and Debug the Program
Arch Linux User Repository
Search Criteria
Package Details: arm-linux-gnueabihf-gdb 11.1-1
Package Actions
| Git Clone URL: | https://aur.archlinux.org/arm-linux-gnueabihf-gdb.git (read-only, click to copy) |
|---|---|
| Package Base: | arm-linux-gnueabihf-gdb |
| Description: | The GNU Debugger for the ARM hard float target |
| Upstream URL: | http://www.gnu.org/software/gdb/ |
| Licenses: | GPL3 |
| Submitter: | lipnitsk |
| Maintainer: | tapajos |
| Last Packager: | tapajos |
| Votes: | 10 |
| Popularity: | 0.002150 |
| First Submitted: | 2015-09-18 21:45 |
| Last Updated: | 2021-09-16 12:18 |
Dependencies (2)
Required by (0)
Sources (1)
Latest Comments
Binabik commented on 2017-05-03 09:02
Guile was updated to version 2.2.x around march 2017. It seems to me that building gdb from source still requires guile 2.0.x (which is also done in the official package in extra/gdb).
I could successfully build arm-linux-gnueabihf-gdb with the following changes in the PKGBUILD:
1. Change line 11 to: depends=(xz ncurses expat python2 guile2.0)
2. In the configure step in line 22, add: —with-guile=guile-2.0 \
potatoe commented on 2017-02-15 05:19
GDB 7.12 seems to compile fine with just a version bump and new sha256sums.
Would it be worth considering switching to python 3 instead of 2? That would bring it inline with the system gdb, and it would make it easier to share gdbinit configs between them (e.g. installing gef or voltron). Seems to work fine with just a change in the dependencies and pointing at python3 in the configure command.
Copyright © 2004-2021 aurweb Development Team.
AUR packages are user produced content. Any use of the provided files is at your own risk.
Источник
Arm linux gnueabihf gdb
GDB (GNU symbolic debugger) is simply a debugging tool. It is a free software protected by the General Public License, GPL.
Like all debuggers, GDB allows you to debug a program, including stopping the program where you want, at which time you can view variables, registers, memory, and stack. Furthermore, you can modify variables and memory values. GDB is a very powerful debugger, it can debug multiple languages. Here we only deal with the debugging of C and C++, not other languages. Another point to note is that GDB is a debugger, not an integrated environment like VC. You can use some front-end tools such as XXGDB, DDD, etc. They all have a graphical interface, so it is more convenient to use, but they are only a shell of GDB. Therefore, you should still be familiar with GDB commands. In fact, when you use these graphical interfaces for a long time, you will find the importance of being familiar with GDB commands.
The GDB debugging environment of embedded Linux consists of two parts: Host (PC) and Target (ARM). Host uses the arm-linux-gdb debugging tool, and Target needs to run gdbserver. The two can be connected through serial port or The network port is connected, and the execution of the ARM application on the Target side is returned to the Host. The debug trace command is issued from the arm-linux-gdb on the Host side. Therefore, you need GDB cross-debugging.
You can download the corresponding version of GDB from http://ftp.gnu.org/gnu/gdb/. The latest version is gdb-9.1.tar.xz. I use 8.2 more, so the compiled version is 8.2

To compile the source code, we also need to install MSYS
Open the msys.bat file, and then enter the gdb directory, the specific compilation and#linux# gdb cross compile arm-linux-gnueabihf-gdbThere is almost no difference. —host is not filled in, it will be prompted by default
Use default configuration ./configure View current —host=i686-pc-mingw32
Join —host=i686-pc-mingw32
Источник
arm-linux-gnueabihf-gdb versus gdb-multiarch
I’m trying to perform cross platform remote debugging from my x86 computer to a remote ARM device. (ex: Beagle Bone Black)
I’m using Ubuntu 14.04 and Eclipse CDT.
I installed the package gcc-arm-linux-gnueabihf but the gdb debugger is not in that package. (http://packages.ubuntu.com/precise/gcc-arm-linux-gnueabihf)
Therefore, I’m wondering if I should use the Linaro toolchain (which include arm-linux-gnueabihf-gdb) or if I should install the gdb-multiarch package.
What is the difference between gdb-multiarch and arm-linux-gnueabihf-gdb ? Is it better to use gdb-multiarch ?
2 Answers 2
I received an answer from the linaro mailing list:
For Ubuntu hosts from 12.04 onwards, gdb-multiarch is used as gdb client for debugging. As name indicates it is a common client to any architecture and not restricted to ARM.
Generally, all gdb clients are architecture independent because architecture specific part is handled in gdbserver itself. So, other than the name arm-linux-gnueabihf-gdb, I am guessing it is same as gdb-multiarch.

I received another answer from the linaro mailing list:
The Linaro gdb release will generally be more up to date than the Ubuntu one. For example our latest release is 7.8, and that is only available in utopic, not trusty so if you plan to use an Ubuntu LTS release it might be better to use the Linaro shipped gdb. Linaro gdb also contains fixes and improvements that aren’t in the upstream stable branch. Historically Ubuntu has often picked these changes up too but that may not always be the case.
gdb-multiarch obviously supports a range of other architectures besides ARM, so if that is something that would be useful for you then it might make sense to use that.
Источник
Кросскомпиляция под ARM
Достаточно давно хотел освоить сабж, но всё были другие более приоритетные дела. И вот настала очередь кросскомпиляции.
В данном посте будут описаны:
- Инструменты
- Элементарная технология кросскомпиляции
- И, собственно, HOW2
Кому это интересно, прошу под кат.
Вводная
Одно из развивающихся направлений в современном IT это IoT. Развивается это направление достаточно быстро, всё время выходят всякие крутые штуки (типа кроссовок со встроенным трекером или кроссовки, которые могут указывать направление, куда идти (специально для слепых людей)). Основная масса этих устройств представляют собой что-то типа «блютуз лампочки», но оставшаяся часть являет собой сложные процессорные системы, которые собирают данные и управляют этим огромным разнообразием всяких умных штучек. Эти сложные системы, как правило, представляют собой одноплатные компьютеры, такие как Raspberry Pi, Odroid, Orange Pi и т.п. На них запускается Linux и пишется прикладной софт. В основном, используют скриптовые языки и Java. Но бывают приложения, когда необходима высокая производительность, и здесь, естественно, требуются C и C++. К примеру, может потребоваться добавить что-то специфичное в ядро или, как можно быстрее, высчитать БПФ. Вот тут-то и нужна кросскомпиляция.
Если проект не очень большой, то его можно собирать и отлаживать прямо на целевой платформе. А если проект достаточно велик, то компиляция на целевой платформе будет затруднительна из-за временных издержек. К примеру, попробуйте собрать Boost на Raspberry Pi. Думаю, ожидание сборки будет продолжительным, а если ещё и ошибки какие всплывут, то это может занять ох как много времени.
Поэтому лучше собирать на хосте. В моём случае, это i5 с 4ГБ ОЗУ, Fedora 24.
Инструменты
Для кросскомпиляции под ARM требуются toolchain и эмулятор платформы либо реальная целевая платформа.
Т.к. меня интересует компиляция для ARM, то использоваться будет и соответствующий toolchain.
Toolchain’ы делятся на несколько типов или триплетов. Триплет обычно состоит из трёх частей: целевой процессор, vendor и OS, vendor зачастую опускается.
- *-none-eabi — это toolchain для компиляции проекта работающего в bare metal.
- *eabi — это toolchain для компиляции проекта работающего в какой-либо ОС. В моём случае, это Linux.
- *eabihf — это почти то же самое, что и eabi, с разницей в реализации ABI вызова функций с плавающей точкой. hf — расшифровывается как hard float.
Описанное выше справедливо для gcc и сделанных на его базе toolchain’ах.
Сперва я пытался использовать toolchain’ы, которые лежат в репах Fedora 24. Но был неприятно удивлён этим:
Поискав, наткнулся на toolchain от компании Linaro. И он меня вполне устроил.
Второй инструмент- это QEMU. Я буду использовать его, т.к. мой Odroid-C1+ пал смертью храбрых (нагнулся контроллер SD карты). Но я таки успел с ним чуток поработать, что не может не радовать.
Элементарная технология кросскомпиляции
Собственно, ничего необычного в этом нет. Просто используется toolchain в роли компилятора. А стандартные библиотеки поставляются вместе с toolchain’ом.
Выглядит это так:
Какие ключи у toolchain’а можно посмотреть на сайте gnu, в соответствующем разделе.
Для начала нужно запустить эмуляцию с интересующей платформой. Я решил съэмулировать Cortex-A9.
После нескольких неудачных попыток наткнулся на этот how2, который оказался вполне вменяемым, на мой взгляд.
Ну сперва, само собою, нужно заиметь QEMU. Установил я его из стандартных репов Fedor’ы.
Далее создаём образ жёсткого диска, на который будет установлен Debian.
По этой ссылке скачал vmlinuz и initrd и запустил их в эмуляции.
Далее просто устанавливаем Debian на наш образ жёсткого диска (у меня ушло
После установки нужно вынуть из образа жёсткого диска vmlinuz и initrd. Делал я это по описанию отсюда.
Сперва узнаём смещение, где расположен раздел с нужными нам файлами:
Теперь по этому смещению примонтируем нужный нам раздел.
Копируем файлы vmlinuz и initrd и размонтируем жёсткий диск.
Теперь можно запустить эмуляцию.
И вот заветное приглашение:

Теперь с хоста по SSH можно подцепиться к симуляции.
Теперь можно и собрать программку. По Makefile’у ясно, что будет калькулятор. Простенький.
Собираем на хосте исполняемый файл.
Отмечу, что проще собрать с ключом -static, если нет особого желания предаваться плотским утехам с библиотеками на целевой платформе.
Копируем исполняемый файл на таргет и проверяем.
Собственно, вот такая она, эта кросскомпиляция.
UPD: Подправил информацию по toolchain’ам по комментарию grossws.
Источник
Develop and Debug C++ for ARM Linux Boards on Windows With Eclipse
Learn more about developing and debugging ARM Linux Boards on Windows.
Join the DZone community and get the full member experience.
Learn more about developing and debugging ARM Linux Boards on Windows
You can have a complete development environment on a Windows PC to create and debug C++ programs for Raspberry Pi, BeagleBone, and other Linux devices.
All activities happen within Eclipse: build the executable, deploy it to your ARM device, and remotely debug it. In this post, we look at how to do all three, so without further ado, let’s get started!
What Experience Do You Get
- Code can be written in Eclipse
- Compilation and linking for the ARM Linux target happen when building the project.
- When a debug session is started, the executable is deployed to the Linux device and the remote debugger is automatically started. Source code is loaded in the editor and the execution halts at main() .
- You can step over and into the code, show assembly, watch variables and expressions, and set breakpoints.
- You see the standard output generated by your executable in Eclipse.
- When debugging is finished, the remote debug server on the ARM device closes.
System Preparation
Software Requirement on the ARM Linux Device
- A working SSH connection
- gdbserver installed
Software Requirement on the Windows PC:
- Eclipse IDE (the version for C/C++ Developers)
- Arm cross-compile toolchain.
There are no specific hardware requirements. Deploy and debug happen over the network.
Prepare the Windows PC
Download and install the arm-linux cross-compile toolchain. The package is available as a compressed archive. You can extract it to a location of choice.
Check your board documentation for the right one. I selected gcc-linaro-5.3-2016.02-i686-mingw32_arm-linux-gnueabihf to work with BeagleBone, Raspberry Pi and Hartung Mica
When you unpack it, take care that you start the unzip utility (I use 7-Zip) with administrator rights. That’s needed to get the correct symbolic links created during the extract.
If you use 7-zip, you can do this by looking for the 7-Zip File Manager entry in Windows’ start menu, right-click on it, and then select Execute as Administrator. Then, you navigate to the archive and extract it. This will give you a working cross-compilation toolset.
Then download and install the latest Eclipse. This also comes as an archive. Unpack that one (admin rights are not needed), also to a location of choice.
The setup on Windows is now complete.
Prepare the ARM Linux Board
Log on to Linux and check if the debug server is installed:
If not, install it:
apt-get install gdbserver
Create a working directory where Eclipse can deploy and run your developments. I prefer to have it in my home folder. You are free to choose the name for that directory. I called it
The setup on your ARM Linux device is now complete.
Develop a Program
Open Eclipse by double-clicking eclipse.exe in the folder where you installed it.
Accept or change the suggested Working Folder location. Your projects will be stored there.
File -> New -> Project
Search for C++ Project and select it.
Project Name: helloworld
Use default location
Project type: Hello World C++ Project
Toolchain: Cross GCC
Next -> Next-> Next
Cross-compiler path: Browse the bin subdirectory of the location where you unpacked the toolchain
Cross compiler prefix: arm-linux-gnueabihf-
The prefix is the fixed begin of the filename for most programs in the toolchain’s bin directory (e.g.: arm-linux-gnueabihf-gcc.exe)
Finish
If asked to ‘Open Perspective,’ do that (normally, this is only asked the first time you create this type of project).
You may get two errors in the ‘Problems’ view. We don’t need those.
Right Click on the Errors label -> Select All
Right Click on the Errors label Again -> Delete
Right-click on the project name -> Properties -> C/C++ Build -> Builder Settings
Builder type: Internal builder
Apply and Close
Right-click on the project name -> Build Project
Your console should show output similar to this:
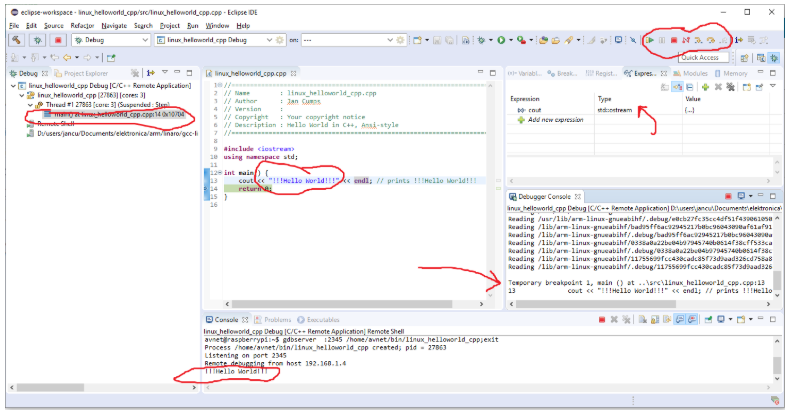
Deploy and Debug the Program
Run -> Debug Configurations
Right-click on C/C++ Remote Application -> New configuration
name: helloworld Debug
Main tab
Project -> Browse -> helloworld
Connection -> New -> SSH -> OK
Connection Name: how you name your Linux board, e.g. raspberrypi
Host: network address or IP of the Linux device
User: your Linux account
Password-based authentication -> Password
Finish
Remote Absolute File Path for C/C++ Applications -> Browse
This opens your home folder on the Linux device.
Select the development folder you created and confirm (the one I called bin in the preparation steps). If the application name is not shown in the entry field, add /helloworld
Debugger tab -> Debugger Options -> Main
GDB debugger: Browse the bin subdirectory of the location where you unpacked the toolchain, then select the program that ends with gdb.exe (in my case: arm-linux-gnueabihf-gdb.exe)
Apply -> Debug
You are now debugging your application. It runs on the Linux device but you control it from your Windows machine. Enjoy!
Источник


