- ASA VPN User Authentication against Windows 2008 NPS Server (Active Directory) with RADIUS Configuration Example
- Available Languages
- Download Options
- Contents
- Introduction
- Prerequisites
- Requirements
- Components Used
- Configure
- Network Diagram
- Configurations
- ASDM Configuration
- CLI Configuration
- Windows 2008 Server with NPS Configuration
- Verify
- ASA Debugs
- Troubleshoot
- ASA 8. x: Доступ к VPN с помощью VPN-клиента AnyConnect, для которого используется пример конфигурации с недоверительным сертификатом
- Параметры загрузки
- Об этом переводе
- Содержание
- Введение
- Предварительные условия
- Требования
- Используемые компоненты
- Условные обозначения
- Общие сведения
- Настройка
ASA VPN User Authentication against Windows 2008 NPS Server (Active Directory) with RADIUS Configuration Example
Available Languages
Download Options
Contents
Introduction
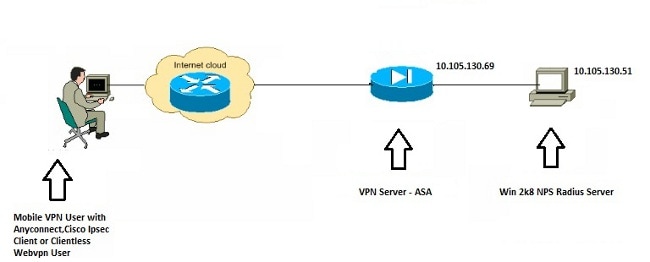
This document explains how to configure an Adaptive Security Appliance (ASA) to communicate with a Microsoft Windows 2008 Network Policy Server (NPS) with the RADIUS protocol so that the legacy Cisco VPN Client/AnyConnect/Clientless WebVPN users are authenticated against Active Directory. NPS is one of the server roles offered by Windows 2008 Server. It is equivalent to Windows 2003 Server, IAS (Internet Authentication Service), which is the implementation of a RADIUS server to provide remote dial-in user authentication. Similarly, in Windows 2008 Server, NPS is the implementation of a RADIUS server. Basically, the ASA is a RADIUS client to an NPS RADIUS server. ASA sends RADIUS authentication requests on behalf of VPN users and NPS authenticates them against Active Directory.
Prerequisites
Requirements
There are no specific requirements for this document.
Components Used
The information in this document is based on these software and hardware versions:
- ASA that runs Version 9.1(4)
- Windows 2008 R2 Server with Active Directory services and NPS role installed
The information in this document was created from the devices in a specific lab environment. All of the devices used in this document started with a cleared (default) configuration. If your network is live, make sure that you understand the potential impact of any command.
Configure
Note: Use the Command Lookup Tool (registered customers only) in order to obtain more information on the commands used in this section.
Network Diagram
Configurations
ASDM Configuration
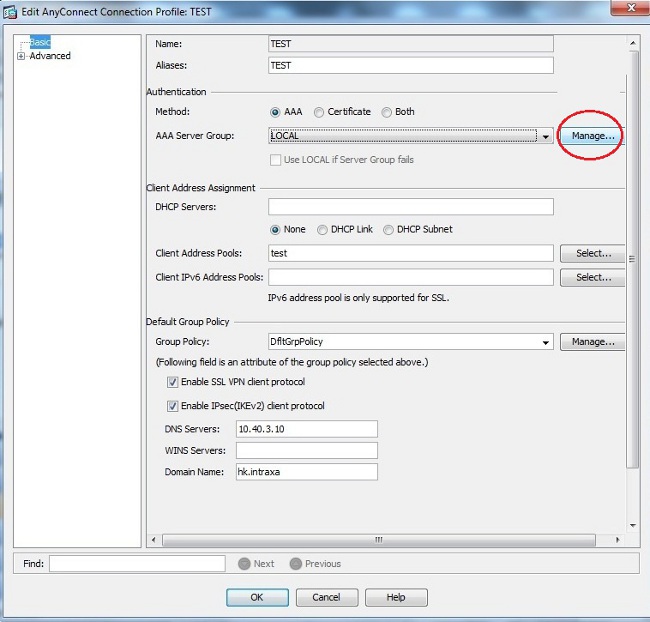
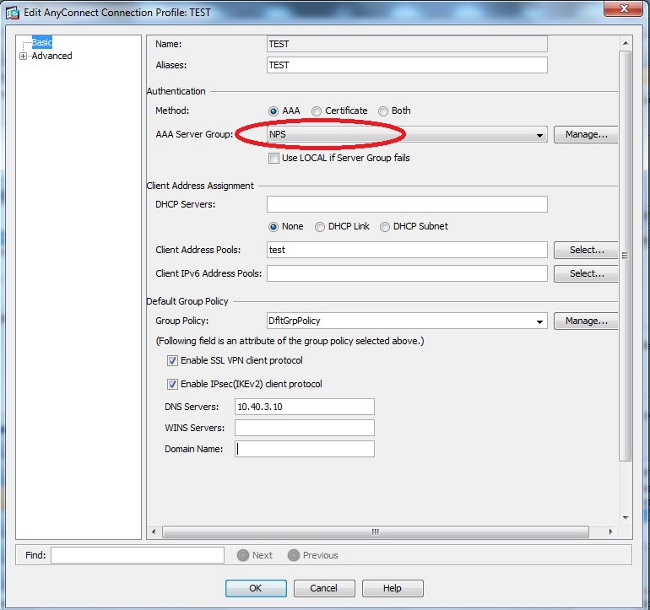
- Choose the tunnel-group for which NPS authentication is required.
- Click Edit and choose Basic.
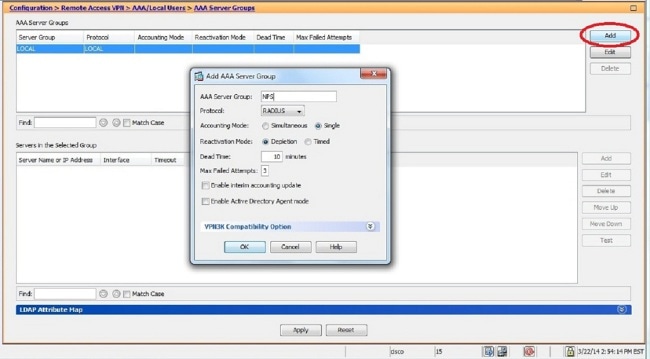
- In the Authentication section, click Manage.
CLI Configuration
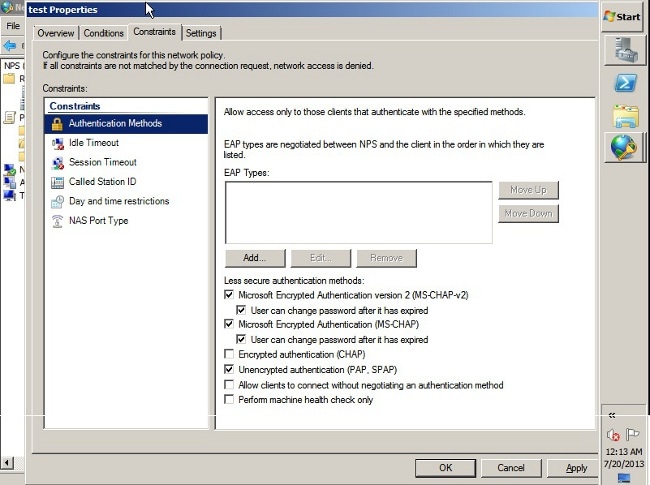
By default, the ASA uses the unencrypted Password Authentication Protocol (PAP) authentication type. This does not mean that the ASA sends the password in plain text when it sends the RADIUS REQUEST packet. Rather, the plaintext password is encrypted with the RADIUS shared secret.
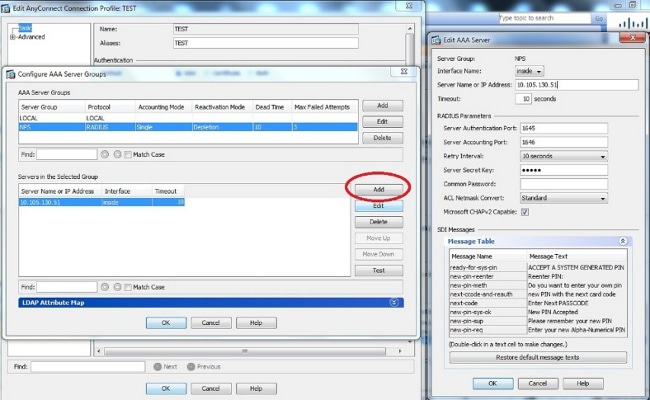
If password management is enabled under the tunnel-group, then ASA uses the MSCHAP-v2 authentication type in order to encrypt the plaintext password. In such a case, ensure that the Microsoft CHAPv2 Capable check box is checked in the Edit AAA Server window configured in the ASDM configuration section.
Note: The test aaa-server authentication command always uses PAP. Only when a user initiates a connection to tunnel-group with password-management enabled does the ASA use MSCHAP-v2. Also, the ‘password-management [password-expire-in-days days]’ option is only supported with Lightweight Directory Access Protocol (LDAP). RADIUS does not provide this feature. You will see the password expire option when the password is already expired in Active Directory.
Windows 2008 Server with NPS Configuration
The NPS Server Role should be installed and running on the Windows 2008 server. If not, choose Start > Administrative Tools > Server Roles > Add Role Services. Choose the Network Policy Server and install the software. Once the NPS Server Role is installed, complete these steps in order to configure the NPS to accept and process RADIUS authentication requests from the ASA:
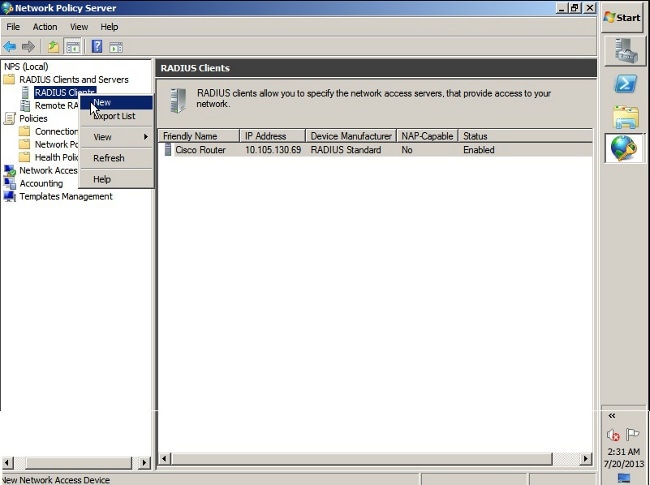
- Add the ASA as a RADIUS client in the NPS server.
- Choose Administrative Tools > Network Policy Server.
- Right-click RADIUS Clients and choose New.

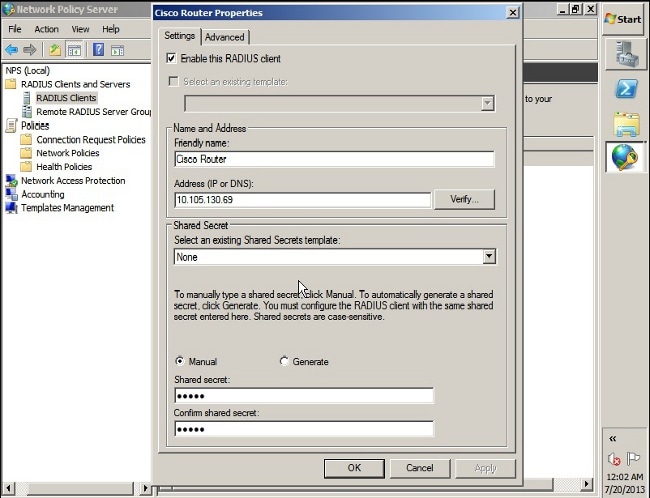
Enter a Friendly name, Address (IP or DNS), and Shared Secret configured on the ASA.
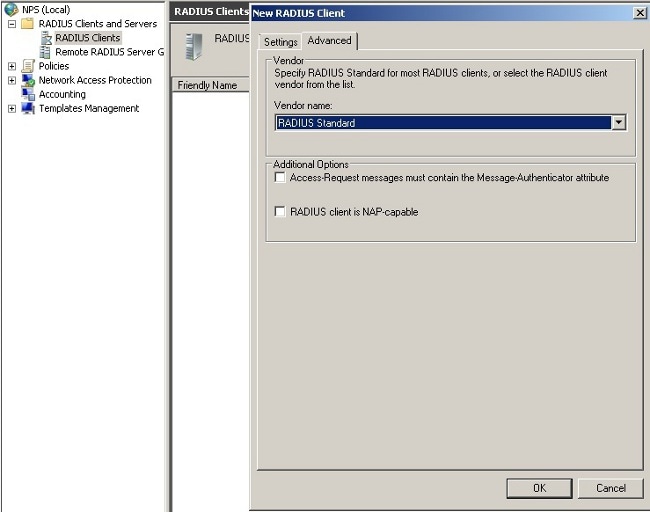
- Click the Advanced tab.
- From the Vendor name drop-down list, choose RADIUS Standard.
- Click OK.
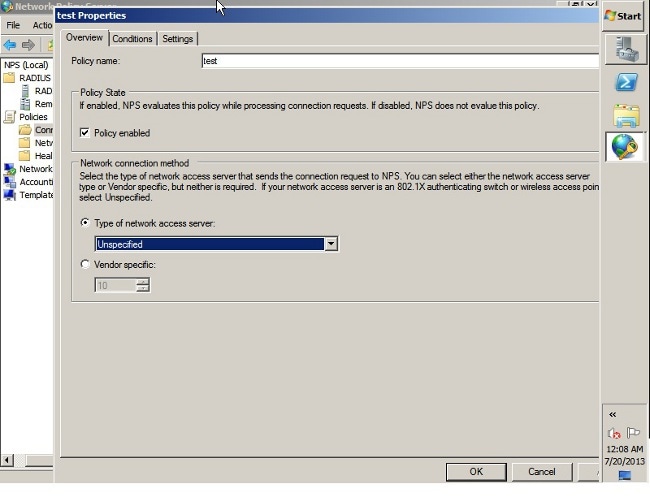
- Under NPS > Policies, right-click Connection Request Policies and create a new policy.
- From the Type of network access server drop-down list, choose Unspecified.
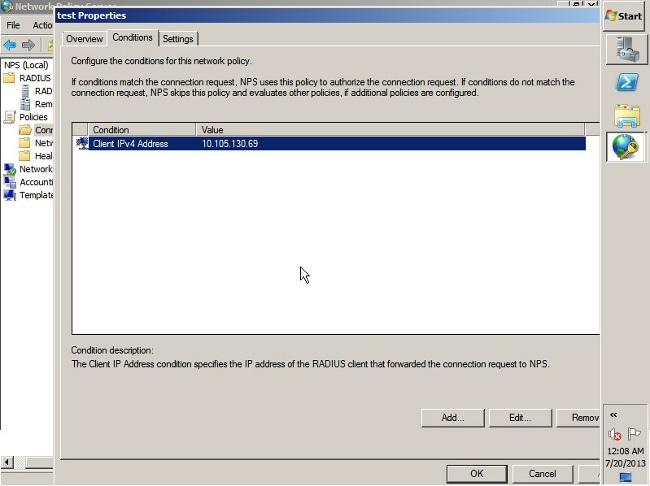
- Click the Conditions tab.
- Click Add.
- Enter the ASA’s IP address as a ‘Client IPv4 Address’ condition.
- Click the Settings tab.
- Under Forwarding Connection Request, choose Authentication. Ensure the Authenticate requests on this server radio button is chosen.
- Click OK.

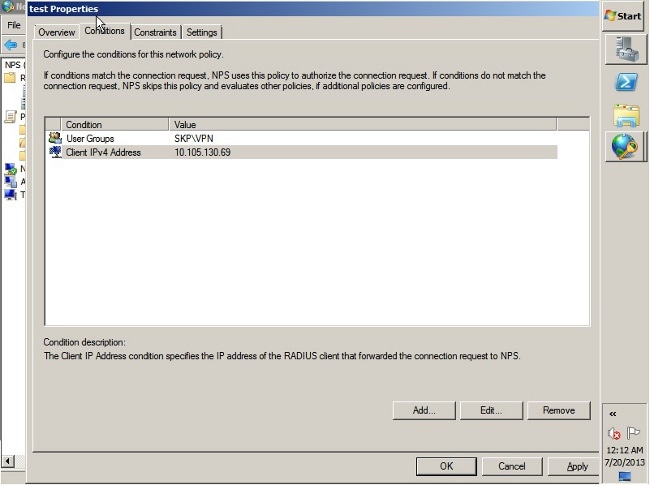
Add a Network Policy where you can specify which users are allowed to authenticate.
For example, you can add Active Directory user groups as a condition. Only those users who belong to a specified Windows group are authenticated under this policy.
- Under NPS, choose Policies.
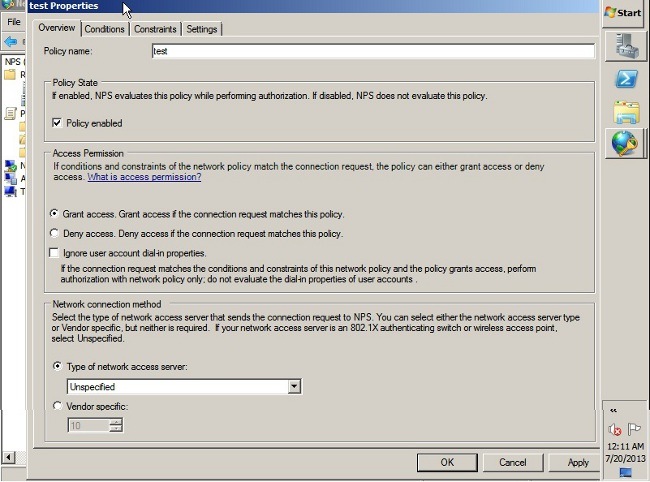
- Right-click Network Policy and create a new policy.
- Ensure the Grant access radio button is chosen.
- From the Type of network access server drop-down list, choose Unspecified.
Pass Group-policy Attribute (Attribute 25) from the NPS RADIUS Server
If the group-policy needs to be assigned to the user dynamically with the NPS RADIUS server, the group-policy RADIUS attribute (attribute 25) can be used.
Complete these steps in order to send the RADIUS attribute 25 for dynamic assignment of a group-policy to the user.
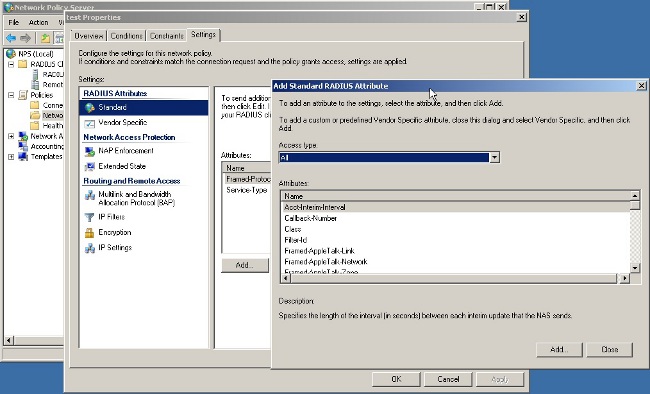
- After the Network Policy is added, right -click the required Network Policy and click the Settings tab.

Choose RADIUS Attributes > Standard. Click Add. Leave the Access type as All.
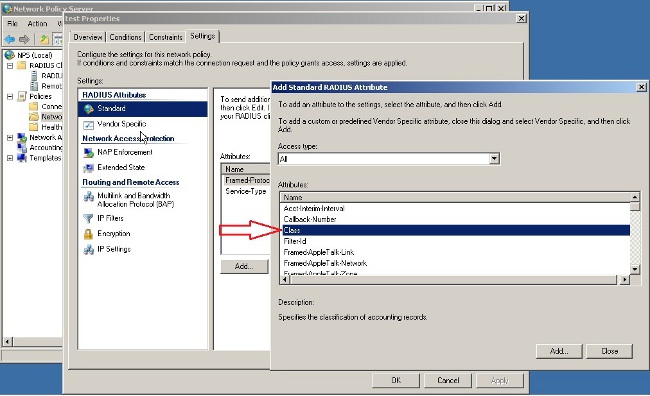
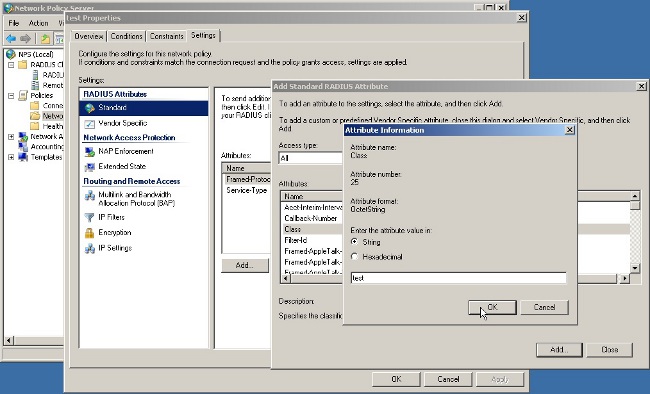
In the Attributes box, choose Class and click Add. Enter the attribute value, that is, the name of the group-policy as a string. Remember that a group-policy with this name has to be configured in the ASA. This is so that the ASA assigns it to the VPN session after it receives this attribute in the RADIUS response.
Verify
Use this section to confirm that your configuration works properly.
Note: Refer to Important Information on Debug Commands before you use debug commands.
ASA Debugs
Enable debug radius all on the ASA.
Troubleshoot
This section provides information you can use to troubleshoot your configuration.
- Ensure the connectivity between the ASA and the NPS server is good.
Apply packet captures to ensure the authentication request leaves the ASA interface (from where the server is reachable). Confirm that the devices in the path do not block the UDP port 1645 (default RADIUS authentication port) in order to ensure it reaches the NPS server. More information on packet captures on the ASA can be found in ASA/PIX/FWSM: Packet Capturing using CLI and ASDM Configuration Example.
If the authentication still fails, look in the event viewer on the windows NPS. Under Event Viewer > Windows Logs, choose Security. Look for events associated with NPS around the time of the authentication request.
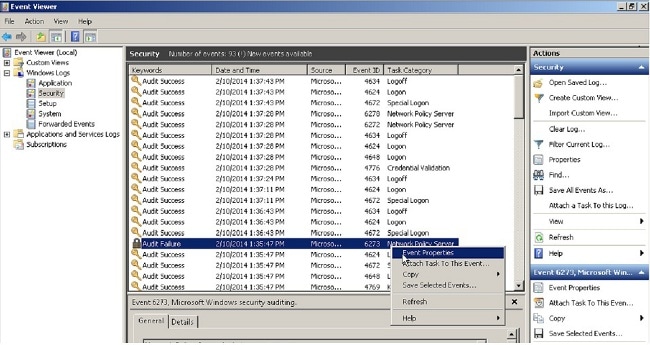
Once you open Event Properties, you should be able to see the reason for failure as shown in the example. In this example, PAP was not chosen as the authentication type under Network policy. Hence, the authentication request fails.
ASA 8. x: Доступ к VPN с помощью VPN-клиента AnyConnect, для которого используется пример конфигурации с недоверительным сертификатом
Параметры загрузки
Об этом переводе
Этот документ был переведен Cisco с помощью машинного перевода, при ограниченном участии переводчика, чтобы сделать материалы и ресурсы поддержки доступными пользователям на их родном языке. Обратите внимание: даже лучший машинный перевод не может быть настолько точным и правильным, как перевод, выполненный профессиональным переводчиком. Компания Cisco Systems, Inc. не несет ответственности за точность этих переводов и рекомендует обращаться к английской версии документа (ссылка предоставлена) для уточнения.
Содержание
Введение
В этом документе описывается способ применения самостоятельно подписанных сертификатов, разрешающих удаленный доступ подключений SSL VPN к ASA из клиента Cisco AnyConnect 2.0.
Предварительные условия
Требования
Убедитесь, что вы обеспечили выполнение следующих требований, прежде чем попробовать эту конфигурацию:
Базовая ASA конфигурация, где запущено ПО версии 8.0
Используемые компоненты
Сведения, содержащиеся в данном документе, касаются следующих версий программного обеспечения и оборудования:
Cisco ASA 8.0(2), ASDM 6.0 (2)
Cisco AnyConnect 2.0
Условные обозначения
Общие сведения
Клиент Cisco AnyConnect 2.0 — это клиент VPN, работающий на базе SSL. AnyConnect Клиент можно использовать и устанавливать в самых разных операционных системах (таких как Windows 2000, XP, Vista, Linux (разные дистрибутивы) и MAC OS X). Системный администратор может установить клиент AnyConnect вручную на удаленный компьютер. Его также можно загрузить в устройство обеспечения безопасности и подготовить для загрузки удаленными пользователями. После загрузки приложение можно автоматически удалить вслед за разрывом подключения либо оставить на удаленном компьютере для будущих подключений VPN SSL. В этом примере клиент AnyConnect подготавливается к загрузке после успешной аутентификации SSL на основе браузера.
Примечание: Сервисы терминалов MS не поддерживаются в сочетании с клиентом AnyConnect. Невозможно подключиться по протоколу удаленного рабочего стола (RDP) к компьютеру, а затем запустить сеанс AnyConnect. К клиенту, подключенному с помощью AnyConnect, невозможно подключиться с помощью RDP.
Примечание: Для первой установки AnyConnect требуется, чтобы пользователь имел права администратора (независимо от того, используете ли вы автономный msi-пакет AnyConnect или получаете файл pkg от ASA). Если у пользователя нет прав администратора, появляется диалоговое окно с соответствующим требованием. Последующие обновления не потребуют наличия прав администратора у пользователя, ранее установившего AnyConnect.
Настройка
Чтобы ASA настроить для доступа через VPN с помощью любого клиента AnyConnect, выполните следующие действия:


