- Publishing and running your ASP.NET Core project on Linux
- Setting up a Linux host
- Configuring Apache as a reverse proxy
- Publishing from Visual Studio Code
- Host ASP.NET Core on Linux with Apache
- Prerequisites
- Publish and copy over the app
- Configure a proxy server
- Install Apache
- Configure Apache
- Monitor the app
- Create the service file
- View logs
- Data protection
- Secure the app
- Configure firewall
- HTTPS configuration
- Additional Apache suggestions
- Restart apps with shared framework updates
- Additional headers
- Secure Apache from clickjacking attacks
- MIME-type sniffing
- Load Balancing
- Rate Limits
- Long request header fields
Publishing and running your ASP.NET Core project on Linux
Given that .NET Core, as a runtime, is a both open source and multiplatform it’s easy to understand the desire to run your ASP.NET Core project on a Linux host. Practically always you can find a Linux webhost cheaper than a Windows webserver. So .NET Core gives us developers the opportunity to build a web application in the language with probably the widest reach (yes, that’s C#) and host that on virtually any server platform.
For the purpose of this article, we are creating a ASP.NET Core website with Visual Studio Code, setting up a Linux host with Apache webserver, and deploying the site with Deploy, a VS Code Extension for deploying files in a workspace to a multitude of destinations.
Setting up a Linux host
There are many service providing offering a cheap Linux based VPS (virtual private server). Amazon offers a free tier, where you can run a single core, 1GB RAM instance for up to 12 months for free. After that, it’s about 9 USD/month. The instance we select is an Ubuntu Server 16.04 LTS (HVM) with 8GB of storage (SSD). Note that we connect to this instance through SSH, and the AWS console allows you to create a public/private key pair to connect securely to the instance. On a Windows machine, you can use mRemoteNG to connect to a Linux machine. However, connecting to Linux instances that run on AWS requires a bit more than just SSH client. Linux EC2 instances have password authentication disabled by default to prevent brute-force attacks and want you to supply your private key instead. But there is no such field in mRemoteNG configuration pane! Here is a detailed instruction on setting up your connection using mRemoteNG.
To install .NET Core on linux, we are using the same steps as described in this article.
We can install .NET Core using Ubuntu’s package manager, apt. The instruction can be found here, but make sure you are using the commands for Ubuntu 16.04 / Linux Mint 18.
We use the following command to list the available releases of .NET Core.
At the time of writing the last entry in the list is this one.
We can install it using this command.
Since we are using a sudo command, these operations get executed with root privileges. It will ask you for your regular user’s password to verify your intentions.
Configuring Apache as a reverse proxy
Kestrel is the web server that is included by default in ASP.NET Core new project templates. It is a cross-platform web server for ASP.NET Core based on libuv, a cross-platform asynchronous I/O library. If your application accepts requests only from an internal network, you can use Kestrel by itself.

However, if you expose your application to the Internet, you must use IIS, Nginx, or Apache as a reverse proxy server. A reverse proxy server receives HTTP requests from the Internet and forwards them to Kestrel after some preliminary handling.

In our example, we are going to setup and configure Apache to handle the requests and forward them to Kestrel.
To install Apache on Ubuntu, use the following command.
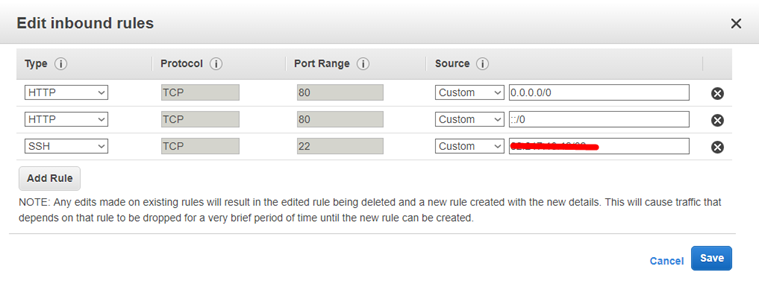
By default, your AWS instance has a network security setting to prohibit inbound traffic on port 80. You need to configure the security group in AWS. To do this, navigate to your instance in the AWS console, scroll to the right and click on the name of the security group. This way, you are sure to edit the security group for the instance, and not some other security group.
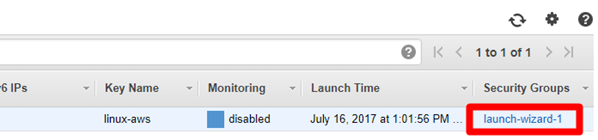
On the inbound tab, click Edit.

You can now add a rule for HTTP traffic. This will actually create two rules, one for IPv4 and one for IPv6.
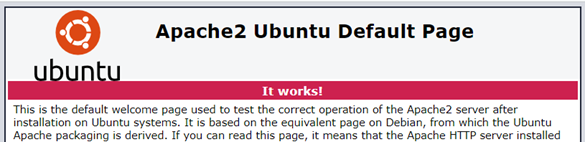
If you now navigate to the IP address of your host, you should see the default Apache page.
Now, we need enable the modproxy modules to in Apache server to make it work as a reverse proxy. modproxy is the Apache module for redirecting connections (i.e. a gateway, passing them through). It is enabled for use just like any other module and configuration is pretty basic (or standard), in line with others. modproxy is not just a single module but a collection of them, with each bringing a new set of functionality. You enable the modules with this command.
Configuration files for Apache are located within the /etc/apache2/conf-enabled/ directory. Any file with the .conf extension will be processed in alphabetical order in addition to the module configuration files in /etc/apache2/mods-enabled/, which contains any configuration files necessary to load modules.
To create a configuration file, use the following command
This is content of the the configuration file.
The VirtualHost node, of which there can be multiple in a file or on a server in many files, is set to listen on any IP address using port 80. The next two lines are set to pass all requests received at the root to the machine 127.0.0.1 port 5000 and in reverse. For there to be bi-directional communication, both settings ProxyPass and ProxyPassReverse are required.
Logging can be configured per VirtualHost using ErrorLog and CustomLog directives. ErrorLog is the location where the server will log errors and CustomLog sets the filename and format of log file. In our case this is where request information will be logged. There will be one line for each request.
Press CTRL-X and Y to save and exit the editor.
Now restart Apache using this command.
If you want to check logging on the startup sequence, type the following command.
Apache is now configured to forward requests made to http://localhost:80 on to the ASP.NET Core application running on Kestrel at http://127.0.0.1:5000. If you want to try it out, and see that it is working, we first need to have a ASP.NET Core website. There are several options here. You can deploy one from your local machine, if you have one available. Or you can create a basic website with the dotnet new command. Since we will deploying a locally developed site later in this article, and we want to know if our configuration is ready to accept and run that site, we are going forward with a boilerplate website. First, make sure that you are still in your home folder. You can always navigate to your home folder with the command cd
. In this folder, we are creating a site using the following commands.
When the last command is finished, you will have a basic MVC website. We are not going to run this website from your home folder, but rather deploy it to a subfolder of /var. This is not a requirement, but more of a convention. Ubuntu uses the folder /var/www/html as the default root for Apache. Publishing the MVC website is done like this.
While, Apache is not set up to manage the Kestrel process. We will use systemd and create a service file to start and monitor the underlying web app. systemd is an init system that provides many powerful features for starting, stopping and managing processes.
We can create a configuration file using the following command
The content of the .sevice file is as follows.
The various locations configured in this file obviously matter, and if the site fails to run, it’s very likely related to these settings. It seems that the location of the dotnet command differs between Linux-distributions, so use the whereis dotnet command to find out where it is on your machine.
If you completed the configuration and save the .service file, you need to enable it, and start it.
If all went well, you should be able to navigate to the IP address of your host and see the default start page of an ASP.NET Core MVC project.

Publishing from Visual Studio Code
There are many options for publishing your locally developed web application to a webserver. While professional development teams rely on continuous deployment tools like Octopus Deploy, Electric Flow, or Jenkins it’s still valid to simply deploy an application from your own machine using (s)FTP or copy. Deploy is an extension for Visual Studio Code that provides commands to deploy files of a workspace to a destination. Install this extension in VS Code by pressing CTRL-Shift-P and the Extensions: Install Extensions command. Since we have set up our webserver to run ASP.NET Core 2.0 Preview, it makes sense to create a .NET Core 2.0 project in Visual Studio Code. If you have not done so already, download and install the preview from https://www.microsoft.com/net/core/preview#windowscmd. This is assuming you are running VS Code on a Windows machine, but you can use Linux or MacOS as well.
Once installed, create a new ASP.NET MVC project through these commands in the terminal window of VS Code.
The deployment configuration is Workspace dependent (usually, since you probably have more than one project on your development machine). To create a workspace specific setting, press CTRL-, and go to the Workspace Settings tab. Here, you can enter the following deployment settings.
Since we are already using SSH to connect to our webserver at Amazon, it’s quite convenient to use SFTP (SSH FTP) for deployment. Make sure you know where your SSH private key file is located.
When you are ready to deploy, run the dotnet publish command first. Then, press CTRL-Shift-P and type Deploy:. Choose Deploy Workspace from the list of commands.
If all went well, you should see

Use a browser to navigate to your webhost, and you should see the site based on your local version.
It’s possible that the site is no longer running. This can be due to several issues:
You may have a .NET Core 2.0 Preview 2 version running locally, whereas the server still runs Preview 1. To update the version on the server, run these commands.
Источник
Host ASP.NET Core on Linux with Apache
Using this guide, learn how to set up Apache as a reverse proxy server on CentOS 7 to redirect HTTP traffic to an ASP.NET Core web app running on Kestrel server. The mod_proxy extension and related modules create the server’s reverse proxy.
Prerequisites
- Server running CentOS 7 with a standard user account with sudo privilege.
- Install the .NET Core runtime on the server.
- Visit the Download .NET Core page.
- Select the latest non-preview .NET Core version.
- Download the latest non-preview runtime in the table under Run apps — Runtime.
- Select the Linux Package manager instructions link and follow the CentOS instructions.
- An existing ASP.NET Core app.
At any point in the future after upgrading the shared framework, restart the ASP.NET Core apps hosted by the server.
Publish and copy over the app
If the app is run locally and isn’t configured to make secure connections (HTTPS), adopt either of the following approaches:
- Configure the app to handle secure local connections. For more information, see the HTTPS configuration section.
- Remove https://localhost:5001 (if present) from the applicationUrl property in the Properties/launchSettings.json file.
Run dotnet publish from the development environment to package an app into a directory (for example, bin/Release/ /publish) that can run on the server:
The app can also be published as a self-contained deployment if you prefer not to maintain the .NET Core runtime on the server.
Copy the ASP.NET Core app to the server using a tool that integrates into the organization’s workflow (for example, SCP, SFTP). It’s common to locate web apps under the var directory (for example, var/www/helloapp).
Under a production deployment scenario, a continuous integration workflow does the work of publishing the app and copying the assets to the server.
Configure a proxy server
A reverse proxy is a common setup for serving dynamic web apps. The reverse proxy terminates the HTTP request and forwards it to the ASP.NET app.
A proxy server forwards client requests to another server instead of fulfilling requests itself. A reverse proxy forwards to a fixed destination, typically on behalf of arbitrary clients. In this guide, Apache is configured as the reverse proxy running on the same server that Kestrel is serving the ASP.NET Core app.
Because requests are forwarded by reverse proxy, use the Forwarded Headers Middleware from the Microsoft.AspNetCore.HttpOverrides package. The middleware updates the Request.Scheme , using the X-Forwarded-Proto header, so that redirect URIs and other security policies work correctly.
Any component that depends on the scheme, such as authentication, link generation, redirects, and geolocation, must be placed after invoking the Forwarded Headers Middleware.
Forwarded Headers Middleware should run before other middleware. This ordering ensures that the middleware relying on forwarded headers information can consume the header values for processing. To run Forwarded Headers Middleware after diagnostics and error handling middleware, see Forwarded Headers Middleware order.
Invoke the UseForwardedHeaders method at the top of Startup.Configure before calling other middleware. Configure the middleware to forward the X-Forwarded-For and X-Forwarded-Proto headers:
If no ForwardedHeadersOptions are specified to the middleware, the default headers to forward are None .
Proxies running on loopback addresses ( 127.0.0.0/8, [::1] ), including the standard localhost address (127.0.0.1), are trusted by default. If other trusted proxies or networks within the organization handle requests between the Internet and the web server, add them to the list of KnownProxies or KnownNetworks with ForwardedHeadersOptions. The following example adds a trusted proxy server at IP address 10.0.0.100 to the Forwarded Headers Middleware KnownProxies in Startup.ConfigureServices :
Install Apache
Update CentOS packages to their latest stable versions:
Install the Apache web server on CentOS with a single yum command:
Sample output after running the command:
In this example, the output reflects httpd.86_64 since the CentOS 7 version is 64 bit. To verify where Apache is installed, run whereis httpd from a command prompt.
Configure Apache
Configuration files for Apache are located within the /etc/httpd/conf.d/ directory. Any file with the .conf extension is processed in alphabetical order in addition to the module configuration files in /etc/httpd/conf.modules.d/ , which contains any configuration files necessary to load modules.
Create a configuration file, named helloapp.conf, for the app:
The VirtualHost block can appear multiple times, in one or more files on a server. In the preceding configuration file, Apache accepts public traffic on port 80. The domain www.example.com is being served, and the *.example.com alias resolves to the same website. For more information, see Name-based virtual host support. Requests are proxied at the root to port 5000 of the server at 127.0.0.1. For bi-directional communication, ProxyPass and ProxyPassReverse are required. To change Kestrel’s IP/port, see Kestrel: Endpoint configuration.
The VirtualHost block can appear multiple times, in one or more files on a server. In the preceding configuration file, Apache accepts public traffic on port 80. The domain www.example.com is being served, and the *.example.com alias resolves to the same website. For more information, see Name-based virtual host support. Requests are proxied at the root to port 5000 of the server at 127.0.0.1. For bi-directional communication, ProxyPass and ProxyPassReverse are required. To change Kestrel’s IP/port, see Kestrel: Endpoint configuration.
Failure to specify a proper ServerName directive in the VirtualHost block exposes your app to security vulnerabilities. Subdomain wildcard binding (for example, *.example.com ) doesn’t pose this security risk if you control the entire parent domain (as opposed to *.com , which is vulnerable). For more information, see rfc7230 section-5.4.
Logging can be configured per VirtualHost using ErrorLog and CustomLog directives. ErrorLog is the location where the server logs errors, and CustomLog sets the filename and format of log file. In this case, this is where request information is logged. There’s one line for each request.
Save the file and test the configuration. If everything passes, the response should be Syntax [OK] .
Monitor the app
Apache is now set up to forward requests made to http://localhost:80 to the ASP.NET Core app running on Kestrel at http://127.0.0.1:5000 . However, Apache isn’t set up to manage the Kestrel process. Use systemd and create a service file to start and monitor the underlying web app. systemd is an init system that provides many powerful features for starting, stopping, and managing processes.
Create the service file
Create the service definition file:
An example service file for the app:
In the preceding example, the user that manages the service is specified by the User option. The user ( apache ) must exist and have proper ownership of the app’s files.
Use TimeoutStopSec to configure the duration of time to wait for the app to shut down after it receives the initial interrupt signal. If the app doesn’t shut down in this period, SIGKILL is issued to terminate the app. Provide the value as unitless seconds (for example, 150 ), a time span value (for example, 2min 30s ), or infinity to disable the timeout. TimeoutStopSec defaults to the value of DefaultTimeoutStopSec in the manager configuration file (systemd-system.conf, system.conf.d, systemd-user.conf, user.conf.d). The default timeout for most distributions is 90 seconds.
Some values (for example, SQL connection strings) must be escaped for the configuration providers to read the environment variables. Use the following command to generate a properly escaped value for use in the configuration file:
Colon ( : ) separators aren’t supported in environment variable names. Use a double underscore ( __ ) in place of a colon. The Environment Variables configuration provider converts double-underscores into colons when environment variables are read into configuration. In the following example, the connection string key ConnectionStrings:DefaultConnection is set into the service definition file as ConnectionStrings__DefaultConnection :
Colon ( : ) separators aren’t supported in environment variable names. Use a double underscore ( __ ) in place of a colon. The Environment Variables configuration provider converts double-underscores into colons when environment variables are read into configuration. In the following example, the connection string key ConnectionStrings:DefaultConnection is set into the service definition file as ConnectionStrings__DefaultConnection :
Save the file and enable the service:
Start the service and verify that it’s running:
With the reverse proxy configured and Kestrel managed through systemd, the web app is fully configured and can be accessed from a browser on the local machine at http://localhost . Inspecting the response headers, the Server header indicates that the ASP.NET Core app is served by Kestrel:
View logs
Since the web app using Kestrel is managed using systemd, events and processes are logged to a centralized journal. However, this journal includes entries for all of the services and processes managed by systemd. To view the kestrel-helloapp.service -specific items, use the following command:
For time filtering, specify time options with the command. For example, use —since today to filter for the current day or —until 1 hour ago to see the previous hour’s entries. For more information, see the man page for journalctl.
Data protection
The ASP.NET Core Data Protection stack is used by several ASP.NET Core middlewares, including authentication middleware (for example, cookie middleware) and cross-site request forgery (CSRF) protections. Even if Data Protection APIs aren’t called by user code, data protection should be configured to create a persistent cryptographic key store. If data protection isn’t configured, the keys are held in memory and discarded when the app restarts.
If the key ring is stored in memory when the app restarts:
- All cookie-based authentication tokens are invalidated.
- Users are required to sign in again on their next request.
- Any data protected with the key ring can no longer be decrypted. This may include CSRF tokens and ASP.NET Core MVC TempData cookies.
To configure data protection to persist and encrypt the key ring, see:
Secure the app
Configure firewall
Firewalld is a dynamic daemon to manage the firewall with support for network zones. Ports and packet filtering can still be managed by iptables. Firewalld should be installed by default. yum can be used to install the package or verify it’s installed.
Use firewalld to open only the ports needed for the app. In this case, ports 80 and 443 are used. The following commands permanently set ports 80 and 443 to open:
Reload the firewall settings. Check the available services and ports in the default zone. Options are available by inspecting firewall-cmd -h .
HTTPS configuration
Configure the app for secure (HTTPS) local connections
The dotnet run command uses the app’s Properties/launchSettings.json file, which configures the app to listen on the URLs provided by the applicationUrl property (for example, https://localhost:5001;http://localhost:5000 ).
Configure the app to use a certificate in development for the dotnet run command or development environment (F5 or Ctrl+F5 in Visual Studio Code) using one of the following approaches:
Configure the reverse proxy for secure (HTTPS) client connections
The security configuration in this section is a general configuration to be used as a starting point for further customization. We’re unable to provide support for third-party tooling, servers, and operating systems. Use the configuration in this section at your own risk. For more information, access the following resources:
To configure Apache for HTTPS, the mod_ssl module is used. When the httpd module was installed, the mod_ssl module was also installed. If it wasn’t installed, use yum to add it to the configuration.
To enforce HTTPS, install the mod_rewrite module to enable URL rewriting:
Modify the helloapp.conf file to enable secure communication on port 443.
The following example doesn’t configure the server to redirect insecure requests. We recommend using HTTPS Redirection Middleware. For more information, see Enforce HTTPS in ASP.NET Core.
For development environments where the server configuration handles secure redirection instead of HTTPS Redirection Middleware, we recommend using temporary redirects (302) rather than permanent redirects (301). Link caching can cause unstable behavior in development environments.
Adding a Strict-Transport-Security (HSTS) header ensures all subsequent requests made by the client are over HTTPS. For guidance on setting the Strict-Transport-Security header, see Enforce HTTPS in ASP.NET Core.
This example is using a locally-generated certificate. SSLCertificateFile should be the primary certificate file for the domain name. SSLCertificateKeyFile should be the key file generated when CSR is created. SSLCertificateChainFile should be the intermediate certificate file (if any) that was supplied by the certificate authority.
Apache HTTP Server version 2.4.43 or newer is required in order to operate a TLS 1.3 web server with OpenSSL 1.1.1.
The preceding example disables Online Certificate Status Protocol (OCSP) Stapling. For more information and guidance on enabling OCSP, see OCSP Stapling (Apache documentation).
Save the file and test the configuration:
Additional Apache suggestions
Restart apps with shared framework updates
After upgrading the shared framework on the server, restart the ASP.NET Core apps hosted by the server.
Additional headers
To secure against malicious attacks, there are a few headers that should either be modified or added. Ensure that the mod_headers module is installed:
Secure Apache from clickjacking attacks
Clickjacking, also known as a UI redress attack, is a malicious attack where a website visitor is tricked into clicking a link or button on a different page than they’re currently visiting. Use X-FRAME-OPTIONS to secure the site.
To mitigate clickjacking attacks:
Edit the httpd.conf file:
Add the line Header append X-FRAME-OPTIONS «SAMEORIGIN» .
MIME-type sniffing
The X-Content-Type-Options header prevents Internet Explorer from MIME-sniffing (determining a file’s Content-Type from the file’s content). If the server sets the Content-Type header to text/html with the nosniff option set, Internet Explorer renders the content as text/html regardless of the file’s content.
Edit the httpd.conf file:
Add the line Header set X-Content-Type-Options «nosniff» . Save the file. Restart Apache.
Load Balancing
This example shows how to setup and configure Apache on CentOS 7 and Kestrel on the same instance machine. To not have a single point of failure; using mod_proxy_balancer and modifying the VirtualHost would allow for managing multiple instances of the web apps behind the Apache proxy server.
In the configuration file shown below, an additional instance of the helloapp is set up to run on port 5001. The Proxy section is set with a balancer configuration with two members to load balance byrequests.
Rate Limits
Using mod_ratelimit, which is included in the httpd module, the bandwidth of clients can be limited:
The example file limits bandwidth as 600 KB/sec under the root location:
Long request header fields
Proxy server default settings typically limit request header fields to 8,190 bytes. An app may require fields longer than the default (for example, apps that use Azure Active Directory). If longer fields are required, the proxy server’s LimitRequestFieldSize directive requires adjustment. The value to apply depends on the scenario. For more information, see your server’s documentation.
Don’t increase the default value of LimitRequestFieldSize unless necessary. Increasing the value increases the risk of buffer overrun (overflow) and Denial of Service (DoS) attacks by malicious users.
Источник


