- How to assign permanent letters to drives on Windows 10
- How to assign a drive letter using Disk Management
- How to assign a drive letter using Command Prompt
- How to assign a drive letter using PowerShell
- More Windows 10 resources
- The Dell XPS 15 is our choice for best 15-inch laptop
- Halo: MCC’s live service elements make it better, not worse
- Microsoft’s Surface Duo is not ‘failing up’
- These external monitors go perfectly with the Lenovo ThinkPad X1 Carbon
- How to Assign and Remove Drive Letter with Diskpart in Windows 10, 8, 7?
- Assign drive letter with CMD
- Easier to assign drive letter with AOMEI Partition Assistant
- How to assign drive letter with GUI interface?
- Windows Tip: Assign Permanent Letters to Removable Drives
- Assign a Specific Drive Letter in Windows
- 31 Comments
How to assign permanent letters to drives on Windows 10

On Windows 10, when connecting a removable storage device or an internal hard drive, the system detects and assigns a drive letter automatically to make it usable. However, when reconnecting an external drive (such as a USB flash drive or SD or microSD cards), the system can end up assigning a different letter, which can be annoying.
If you want to see the same drive letter on a particular device, you can manually assign a permanent letter to any drive connected to your computer, and on Windows 10, you can do this in at least three different ways, using Disk Management, Command Prompt, or PowerShell.
Using this approach will prevent Windows 10 from assigning a new letter or trying to set a letter already in use, which can cause conflicts. Also, it helps to select a drive letter that makes more sense to you.
In this Windows 10 guide, we walk you through several methods to manually assign a permanent letter to a drive, as long as you’re connecting the drive to the same device and the letter isn’t already in use.
How to assign a drive letter using Disk Management
To manage drive letters with the Disk Management tool, use these steps:
- Open Start.
- Search for Create and format hard disk partitions and click the top result to open the Disk Management experience.
Right-click the drive and select the Change Drive Letter and Paths option.

Click the Change button.
Use the drop-down menu to assign a new drive letter.
Quick tip: To avoid the system trying to assign the same letter to another drive, it’s a good idea to start adding letters in backward order. For instance, instead of using D, E or F, it better to start with Z, Y or X when assigning a new letter.
Once you complete these steps, the drive will permanently retain the assigned letter, even after reconnecting it. However, if you connect the drive to another device, it may receive a different letter.
How to assign a drive letter using Command Prompt
While the easiest way to assign a new drive letter is to use Disk Management, you can also use DiskPart in Command Prompt to perform the same task.
To assign a drive letter using Command Prompt, use these steps:
- Open Start.
- Search for Command Prompt, right-click the result, and then select the Run as administrator option.
Type the following command to start DiskPart and press Enter:
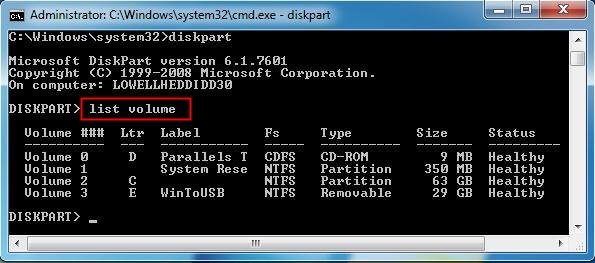
Type the following command to list all the available volumes and press Enter:
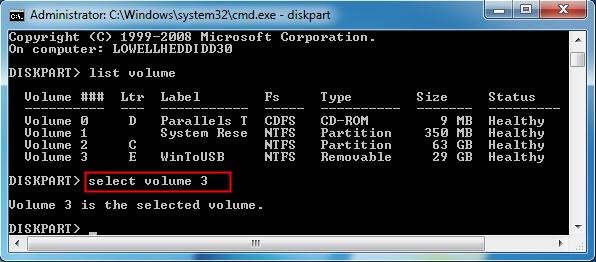
Type the following command to select the volume (drive) to assign a new letter and press Enter:
select volume 3
In the command, make sure to change «3» to the number that represents the drive on your device.
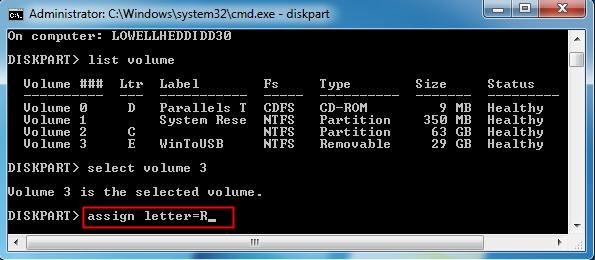
Type the following command to assign a new drive letter, and press Enter:

The command assigns the letter «Z» to the drive assuming it’s available. However, you need to make sure to change the letter for the one that you want to use.
After completing these steps, similar to Disk Management, every time you reconnect the storage to the same device, Windows 10 should assign the same letter automatically.
How to assign a drive letter using PowerShell
Alternatively, you can also use PowerShell to change a drive letter on Windows 10 using these steps:
- Open Start.
- Search for PowerShell, right-click the result, and then select the Run as administrator option.
Type the following command to list the available drives and press Enter:
Type the following command to assign a permanent letter to the drive and press Enter:
Get-Partition -DiskNumber 1 | Set-Partition -NewDriveLetter Z

In the command, make sure to change «1» to the number that represents the drive that you want to modify, and change «Z» for the new letter that you want to use.
Once you complete the steps, the drive will be accessible through File Explorer using the letter that you assigned, and Windows 10 won’t try to change it.
Updated March 7, 2019: We revised this guide to make sure it’s current with the latest version of Windows 10.
More Windows 10 resources
For more helpful articles, coverage, and answers to common questions about Windows 10, visit the following resources:
![]()
The Dell XPS 15 is our choice for best 15-inch laptop
For a lot of people, a 15-inch laptop is a perfect size that offers enough screen for multitasking, and in a lot of cases, some extra performance from powerful hardware. We’ve rounded up the best of the best at this size.
![]()
Halo: MCC’s live service elements make it better, not worse
Halo: The Master Chief Collection is more popular than ever, but some fans don’t agree with the live service approach 343 Industries has taken with it. Here’s why those elements are, at the end of the day, great for the game and for Halo overall.
![]()
Microsoft’s Surface Duo is not ‘failing up’
Microsoft announced this week that it was expanding Surface Duo availability to nine new commercial markets. While Surface Duo is undoubtedly a work in progress, this is not a sign of a disaster. It’s also doesn’t mean that Surface Duo is selling a ton either. Instead, the reason for the expansion is a lot more straightforward.
![]()
These external monitors go perfectly with the Lenovo ThinkPad X1 Carbon
The Lenovo ThinkPad X1 Carbon is an excellent laptop, but what if you want to project the display onto a larger screen? You’ll need an external monitor for that. Here are our favorite options.
How to Assign and Remove Drive Letter with Diskpart in Windows 10, 8, 7?
This post will demonstrate 2 tools for assigning a drive letter in Windows 10,8,7. You can change drive letter with Windows Diskpart or a users-friendly software — AOMEI Partition Assistant.

By Cherry  / Last Updated March 31, 2021
Windows OS users know that they have two amazing tools for managing the disks and partitions—Disk Management and Diskpart. The Disk Management tool in Windows gives you an easy-to-use graphical interface that can manage disk only with mouse-clicking. While Diskpart is a tool that you can manage your disk or partition on the command prompt quickly. To assign letter to drive, you can use both Disk Management and Diskpart. If you want to change the drive letter quickly, the Diskpart utility makes it easy.
Assign drive letter with CMD
To assign, change, or remove a drive letter, you can use the Windows interface of Disk Management, or use the command line on the prompt of Diskpart. Diskpart is a built-in tool that you can use to manage your hard drive, like format disk partition, create partition, delete partition, etc. well, how to assign drive letter with Diskpart?
Step 1. To use a command line, you need to open the command line first. Click Start, type “cmd” at the search box, and right-click the program, select “Run as Administrator”, or press “WIN+R”, type “cmd” and press Enter. Then, type “diskpart” to start.
Step 2. Type list volume and press Enter. Here you should know the number of the simple volume whose drive letter you want to assign, change, or remove.
Step 3. Select volume n and press Enter. Here you can select the volume whose drive letter you want to assign, change, or remove.
Step 4. Then, if you want to assign or change the drive letter, type “assign letter=R”.
If you want to remove the drive letter, type “remove letter=R”.
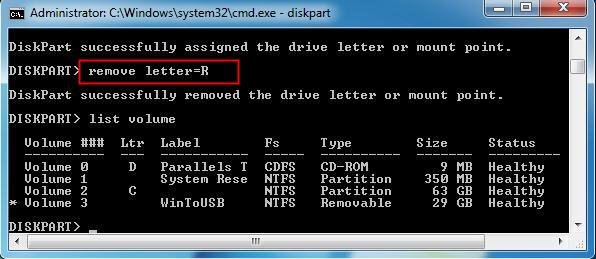
Therefore, you have already assigned, changed, or removed a drive letter. And you can type list volume to see the details.
Actually, you may assign a drive letter when you create a new one. For that, you need to create partition first. After creating a partition, type “assign letter=?” to that partition. Or, if there is some volume hidden, it will not have the drive letter, to unhide it, you need to assign a drive letter for it. Thus, Diskpart may have a little bit complex. Fortunately, there is another easier and simpler way, which could save a lot of steps.
Easier to assign drive letter with AOMEI Partition Assistant
AOMEI Partition Assistant Standard is a great powerful partition manager whereВ you assign drive letter with an easy-to-use graphical interface. Since AOMEI Partition Assistant 5.8 Edition released, it added the partassist.exe utility, which you can use to manage disk and partition with command line. To assign drive letter with partassit.exe, here are the steps you can follow.
Step 1. Install AOMEI Partition Assistant to your computer. Open the command prompt by clicking Start, typing “cmd”, and right-clicking the program, then selecting “Run as Administrator”, or pressing “WIN+R”, typing “cmd” and press Enter. Then, type “cd C: \Program Files \AOMEI Partition Assistant Standard Edition 5.8”, press Enter. To assign a drive letter, you can use the parameters “ partassist.exe /hd:0 /setletter:0 /letter:F”. Here, we take an example for assigning a drive letter to a hidden volume.
Step 2. Type: partassist.exe /list. Press Enter. It will list all disks on your computer.
Step 3. Type: partassist.exe /list:1, then press Enter, it will show you all the volumes on disk 1.
Step 4. Type: partassist.exe /hd:1 /fmt:H /fs:fat32 /label:xbox
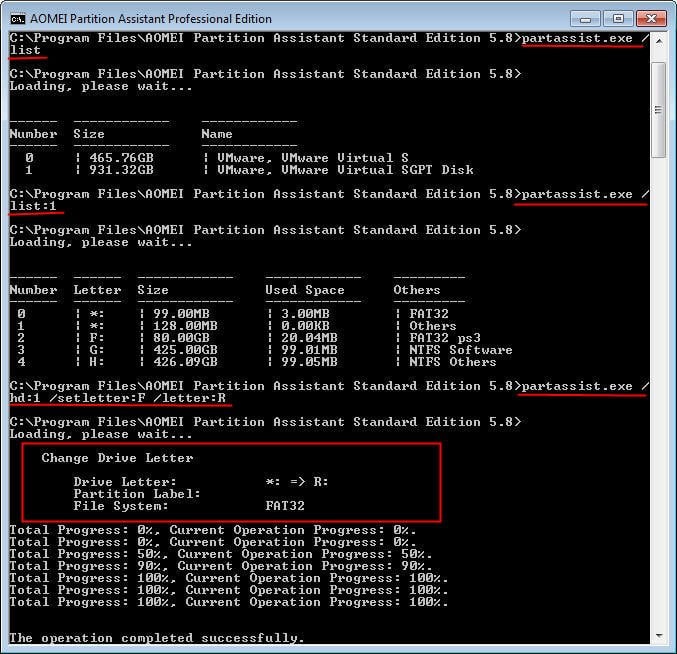
Press Enter, and wait till the progress reaches 100%. Actually, you can also use this syntax to change drive letter for other volumes. But if you want to remove a drive letter, you can use the following parameters:
Remove a drive letter, type: partassist.exe /hd:0 /setletter:0 /letter:*
How to assign drive letter with GUI interface?
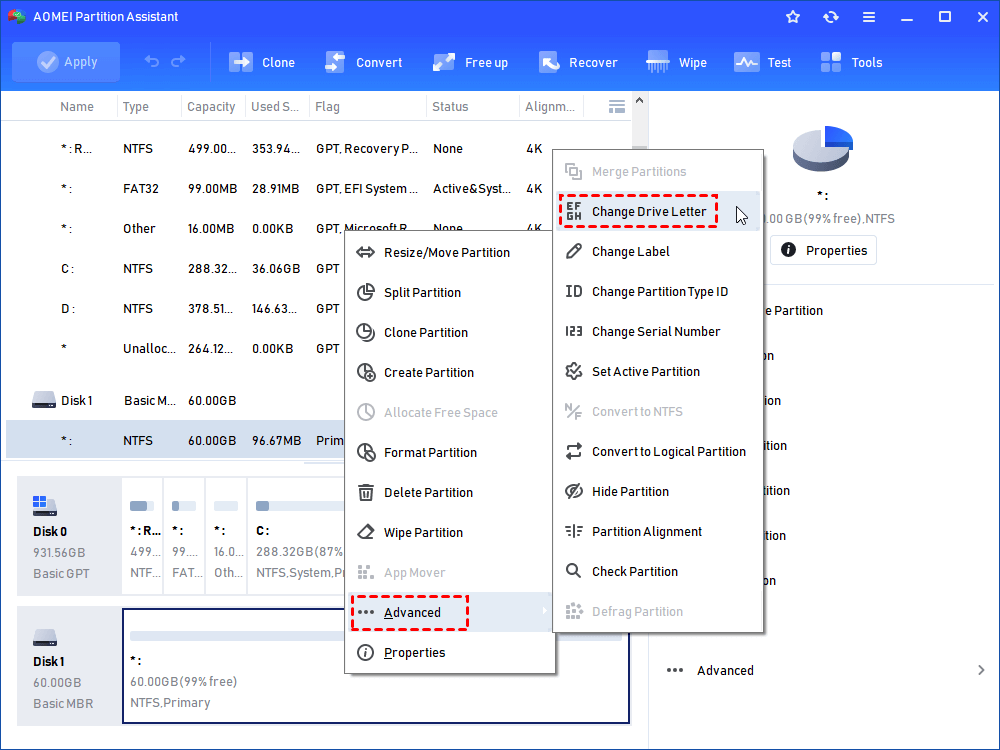
AOMEI Partition Assistant provides you another way to assign drive letter much easier. that is using GUI. people can assign drive letter or remove drive letter without Diskpart command nor Partition Assistant command line.
>Launch AOMEI Partition Assistant, it will show you all storage devices in the main interface. you can see the removable drive doesn’t have a drive letter. If you want to assign a drive letter for the drive, here you need to right click it, select Advanced-> Change Drive Letter.
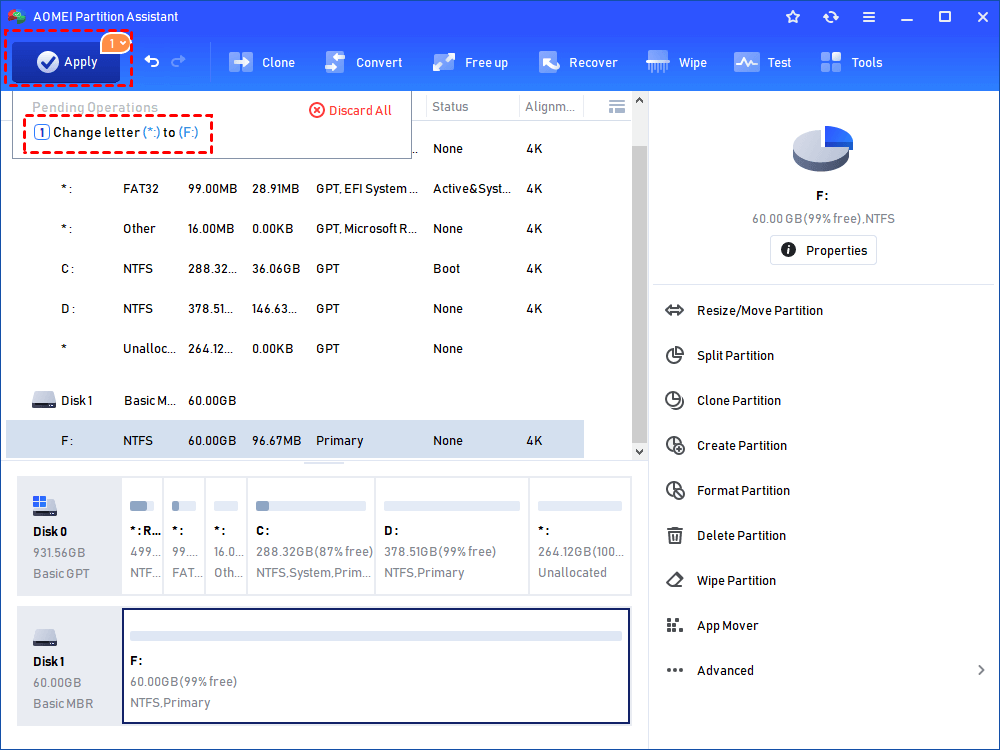
>Then, select a drive letter for the drive.

>Click Apply to submit the task.
AOMEI Partition Assistant supports almost all Windows operating systems, like Windows 10, 8, 7. It has many editions for different OSes. The AOMEI Partition Assistant Server edition is for Windows Server 2003/2008(R)/2012(R); the Standard and Professional edition is for Windows PC OS, like Windows XP/Vista/7/8/8.1/10. Both Diskpart and AOMEI Partition Assistant can manage disk with command line, but AOMEI is more flexible and easier, and simpler.
Note:В Although the system drive letter can be changed, do not do it because that would make the system unable to boot.
Windows Tip: Assign Permanent Letters to Removable Drives


Windows will assign drive letters to external flash drives, SD cards, and other removable storage devices dynamically as you plug them in. If you use a lot of different external storage devices throughout the day, having different letters assigned each time can become annoying and make things feel unorganized. Here’s how to assign permanent letters to each device to make things easier.
Windows progresses through the alphabet (sans A and B) to assign drive letters to devices as you plug them in. So if you plug in a USB flash drive to get data from it, it might be F: but the next time you plug it in, it might be E: or G: depending on the order you plug them in.
The neat thing is you can assign a permanent letter to a USB drive directly with Windows 7, 8.1, and Windows 10. It’s an easy process, and there’s no need to install any third-party utility.
Assign a Specific Drive Letter in Windows
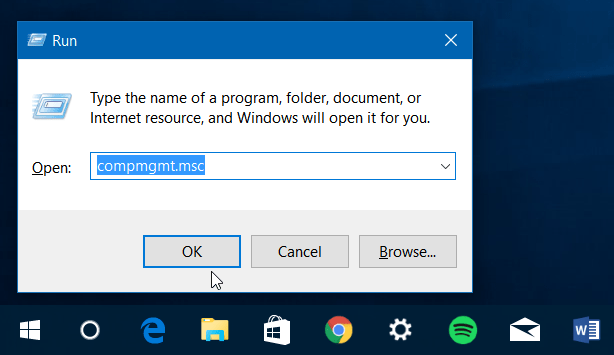
1. To set this up, plug in the drive that you want to assign a permanent letter. Then open the Run dialog (Windows Key+R) and type: compmgmt.msc and hit Enter or click OK.
Or, right-click the Start button to bring up the hidden quick access menu in Windows 10 or 8.1 and select Computer Management.

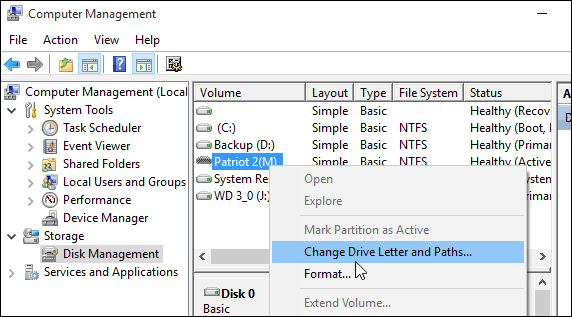
2. Once that’s open, choose Disk Management in the left pane under Storage. It will take a few seconds while Windows looks for the drives currently connected to your PC and displays them in the right pane.
3. Right-click the drive you want to assign a permanent letter to and then choose Change Drive Letter and Paths from the menu.
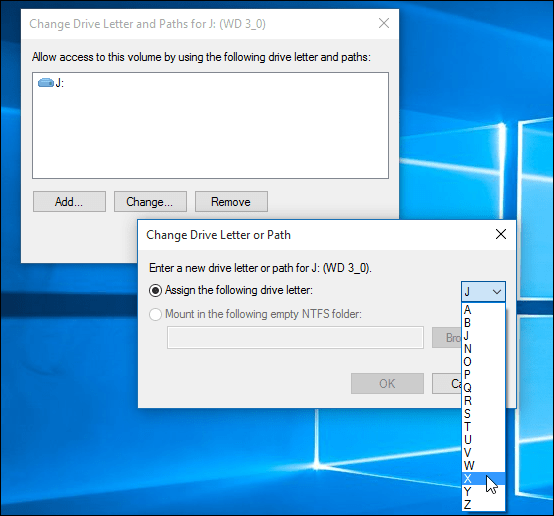
4. A dialog box will open up and here you just need to click the Change button. Then make sure that Assign the following drive letter is selected and choose the letter you want to give it. Click OK and close out of Computer Management.
Now, each time you plug that drive into your PC, it will register with the drive letter you gave it.
When assigning your drive letter, make sure to choose a letter toward the end of the alphabet list. For example, X, Y, or Z — otherwise Windows has the tendency to eventually assign a different letter. Also, keep in mind that it will only be the assigned letter on the computer you changed it on. If you take your external drive to a different PC, Windows will give it a different dynamic letter.
31 Comments
This IS NOT permanent. Windows will still change them randomly. Again I repeat THIS IS NOT PERMANENT
this tutorial is rubbish. i have done this many times, windows still changes the drive letter. this is not permament at all.
Same experience as the other two users. I had changed my drive letter for a USB drive through disk management and it was working great for quite some time when suddenly today the drive letter was changed.
What I did notice is I had my e-reader connected before I turned on the USB drive (which had the letter assigned). Suddenly my e-reader has the assigned letter from the USB drive.
So… NOT PERMANENT AT ALL unless you turn on your drive with the “permanent letter” first.
Thanx, this helped me a lot.
Nope. Windows 10 changes it if I plug in a different usb drive first.
This doesn’t work at all. You can change the drive letter from there, but if you unplug your unit and plug another one, windows will assign the previous letter to the new unit nonetheless. This is so annoying.
I usually have to use the Disk Management utility to correct the mess that Windows makes with drive letters. The most annoying thing is that Windows even changes the drive letters of those external disks that haven’t been unplugged.
Plugged to my laptop I always have an external diskdrive that always should be E:
But if I have a SD card inserted in the SD drive and boot up the computer then the SD card is assigned E: and the always plugged (never unplugged) diskdrive is re-assigned as G: which is annoying since I have an application that looks for its overlays and databases on drive E:
Is there a way to say Windows that a used drive letter (like E:) is not available for dynamic drive letter assignment?
Try assigning a letter well away from ABCDEF, like Z. This way windows won’t automatically reassign your letter when more drives are connected.
Exactly what I do Will. Great tip.
This is a great point, Will. I’ll upgrade the article to include your tip. Thanks!
It worked for a while. Then letters were changed after some days… again! 🙁
What Will says is true. If you assign the last letters of the alphabet to your external drives Windows will ALWAYS REMEMBER AND NEVER OVERWRITE THEM. Just don’t assign two of your external drives the same drive letter and this will work 100% of the time for you.
Peace!
It is too late to assign a drive letter near the end of the alphabet. I have done a lot of work that uses drive letter E: I would have to redo all of this to change it to Z:
Surely, Microsoft would have a tool to assign drives permanently.
John, change your other drives to z,y,x, etc. then when the PC boots or you insert another drive/flash, it will be at the end and not take your E: drives spot.
With all the cracks in Windows I don’t see why there isn’t another “standard” OS that’s just as easy (or easier) and plug-n-play, that actually uses “memory” to remember stuff like drive letters.
Or window size and placement. Or “Yes I’m sure” and “Yes I did click on ‘yes i’m sure’” and “No, I’m not a Robot…you are” and not to ask me to not ever show something again, every time…etc.
There is a shareware application which addresses this, though it’s intended for computer engineers and system administrators, not regular users. You can configure it to map drive letters according to DeviceIDs and other really permanent data. It runs as a service, to it autostarts with Windows. However, there’s no graphical interface. Everything has to be coded on an INI file, which is highly technical.
The software is called USBDLM is it’s free for private and educational uses. It’s available at Softpedia and other software archives.
The first 2 replies here are annoying. This works 100% unless you have gone and relettered multiple devices to the same letter. In that event only 1 (one) of the devices will acquire the desired letter and always the first. When the second device is plugged in Windows sees that the desired letter is use and uses the next available letter. You cannot give 2 devices the same letter, ever. Get over it.
Sheesh. I despise idiots.
If you’re using flash drives, think about reassigning them to A or B; these letters are still available and never used because no one has a floppy drive anymore. This way they can never get in the way of a letter you desire for an external drive.
For the idiot who programmed access to a database on an external drive, something that should never be done precisely because of drive letter changes, you either need to make sure the external drive is always assigned that letter or mount the drive into an empty NTFS folder to eliminate drive letter access. The only other thing you can do is manually assign a letter to the SD drive so it doesn’t take your precious E.
Computers should be more like cars and require an operator’s license, there’d be so many less morons trying to use a computer.
Some people at this forum really need a sex life, learning some manners, or probably both.
Hey Annoyed, your communication skills are annoying. Your tack is repugnant unless that is who you are as you go through life. Also, having a mobile drive that is being plugged into different employee’s computers does not make it practical to assign it under the user’s NTFS folder – especially if ACL’s are used for data security. One never sounds professional when they’re yelling/insulting.
This is why they invented File Servers, and NAS.
Anyone you allow on your network can access, permissions always the same.
Mobile hard drives are subject to Shaking, Shocking, Possibly dropping, and possibly locking.
Tact*
and once upon a time it was understood that highly technical people have put most of their education and self-education into making their computer work instead of making people feel good about the way that we talk.
Annoyed set his name to Annoyed for good reason. It’s blatantly obvious to anyone willing to peruse that 6 out of the first 7 commentators DID NOT READ THE ARTICLE, in which the author specifically explains that drives like E:\ and F:\ will get rewritten as part of windows norm so you should “Permanently” set on letters far away from those so they don’t get reset::
”
When assigning your drive letter, make sure to choose a letter toward the end of the alphabet list. For example, X, Y, or Z — otherwise Windows has the tendency to eventually assign a different letter. Also, keep in mind that it will only be the assigned letter on the computer you changed it on. If you take your external drive to a different PC, Windows will give it a different dynamic letter.
” – The article you should have just read.
Being annoyed about people using computers badly is valid. Some of us work really hard to be professional and do things by best-practice so that solutions work long-term and no one has to guess at the state.
Then you read an article like this where most of the comments did not even bother to read the main text before complaining, and everyone else is doing backwoods duck-tape solutions.
ALSO WTF happened to the internet where now we’re all supposed to sound professional?
Thanks so much for the clear instructions.
This seems to work for me. I’ve assigned permanent letters a while ago and so far they’re not changing. I did assign only one of the four drives a letter towards the end of the alphabet, but the others are from A to E. Also, I gave each of the drives unique names.
I have three computers and three USB HDs. On each computer I have assigned these drives (for historical reasons) the letters G:, M: and O: respectively. D: is a partition on the internal HD and E: is the optical disc burner, so if I plug in any other USB device it usually comes up as F:. I find that these drive assignments stick . . . most of the time! Very occasionally one of the USB HDs comes up as F:. There appears to be no rhyme nor reason; but, hey!, it’s Windows, isn’t it, so that’s no real surprise. I just have to go into Disk Management to change it back and it usually behaves itself well for the next few weeks or months. Nothing, really, to get hot under the collar about.
Change drive letter is grayed out on my system. I am an administrator on the PC
You can use the command line program diskpart to change the driver letter:
1. open command prompt
2. type “diskpart” (in these instructions do not type the quotation marks), press Enter
3. type “list volumes” , press Enter
4. identify the volume number associated with the drive whose letter you wish to change – assume this is volume “N”
5. type “select volume N” (replacing N with appropriate volume number) then press Enter
6. type “assign letter=L” (replacing L with the appropriate new drive letter) then press Enter
7. type “exit” then press Enter to close diskpart and return to command prompt.
This works fine for me, even if changing Drive Letter is greyed out by our IT
You never said what to do if its when you try to change it its grayed out. I cant give it a letter. What do I do?
Jay, when a drive letter is grayed out, it has already been assigned to another drive. Find out which drive has the letter you want to use and then change it’s letter to Z. This will free up the old drive letter and it will no longer be grayed out.
This annoying problem could easily be avoided if the whole concept of drive letters was abandoned. Each drive should have a distinctive drive name (or number) assigned by the user. Drives should then optionally be listed alphabetically or numerically by Windows. I don’t know who started this drive A:\, B:\, C:\, etc. concept but in today’s computing world, it’s obsolete and unnecessary. As it stands now, you can choose to not assign a drive letter during formatting but if you do that, they will not list when you click “This Computer”. It makes you wonder what they are smoking.
Would really like to know how to assign a drive letter PER DEVICE, please
example. (this) thumb is always K
(this thumb drive) is always L.
not the drive slot itself, but device.
For years I’ve been using A: for my built-in SD Card reader, and E: through K: for specific external hard drives and specific thumb drives. I went through computer management to set all that up and it worked for years. For reasons that I cannot work out, my SD Card reader is automatically assigned E: whenever I put in any SD card, including the exact same SD card and/or reboot my computer. Even when I change the drive letter on the SD Card reader back to A: and reboot my computer, the drive letter is once again reset to E: by the computer even when there are no other drives of any kind attached to the computer before or after attempting to assign the SD Card reader to A:. I’ve since tried updating all the drivers, a couple of which have updated, and the problem persists. While I have upgraded one of my external drives recently, I cannot see how that would cause the problem especially since it is not the first time that I’ve replaced an external drive and assigned the new drive to the drive letter of the drive it replaced. I am not running any new software, so as far as I can tell it isn’t a software conflict. My system is set up such that the drive letters I have been assigning need to remain what I assigned them. (I’ve already assigned my DVD-ROM drive to Z:, and even that isn’t working properly now.) Once up a time using Computer Management might have “permanently” reassigned the drive letters, since 1/25/2020 that is apparently no longer the case. I need to find another solution that works.
Being old school and having started out on DOS computers with 5.25″ floppy drives, the lettering of the drives is not a problem to me in and of itself, and it makes no particular difference to me if the lettering of drives is ultimately done away with, but until that time we must work with the tools we have. So any help would be appreciated in resolving this.


