- Changing Default File Associations in Windows 10 via GPO
- How to Set or Change Default Apps on Windows 10?
- Exporting File Associations on Windows 10 to the XML file
- Importing Default App Associations on Windows 10
- Set Default File Associations with Group Policy
- Changing File Association on Windows 10 via Registry
- How to Reset File Associations in Windows 10?
- File Types and File Associations
- Additional Resources
- Set or Change File Associations & Extensions in Windows 10
- Change file associations in Windows 10
- 1] Using Settings
- 2] Using File Properties
- 3] Via File Explorer
- 4] Using Control Panel
- 5] Using freeware Types
- File association fix Windows 10
- How to Change File Associations in Windows
- Here’s how to change what program opens a file in Windows
- What to Know
- How to Change File Associations in Windows 10
- How to Change File Associations in Windows 8, 7, or Vista
- How to Change File Associations in Windows XP
- More About Changing File Associations
Changing Default File Associations in Windows 10 via GPO
In this article, we will look on how to manage default file association on Windows 10 and Windows Server 2019/2016/2012R2. As an example, I’ll show you how to set a default browser app to open HTML files, import these settings into an XML file, and deploy file association settings to other computers manually or using Group Policy (GPO).
The main difference between Windows 10 and previous Windows versions is that now you can’t manage file association settings through the Registry or the “Open With” feature of the Group Policy Preferences. But there was a new opportunity to export the current file association settings from the “reference” computer to the XML file and apply this file on other computers. You can also export configured file associations to a Windows image that is deployed to clients on your network (manually, via WDS or SCCM).
How to Set or Change Default Apps on Windows 10?
Suppose you want to use the Firefox browser to open .HTML files on all domain computers (you want to associate this file extension with the app).
To do this, you need a reference computer with Windows 10 (in this example, the current build 1909 is used) and the installed Firefox browser. To manually create a mapping between a file extension and a program, open the Settings -> Default Apps and click the “Choose default apps by file type” button.
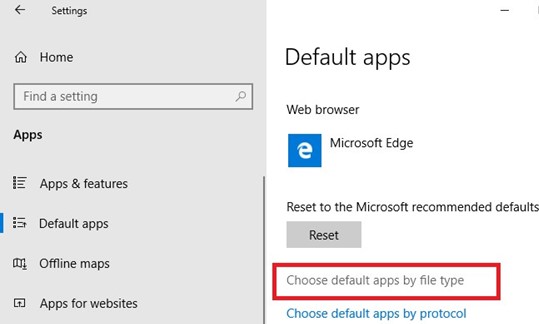
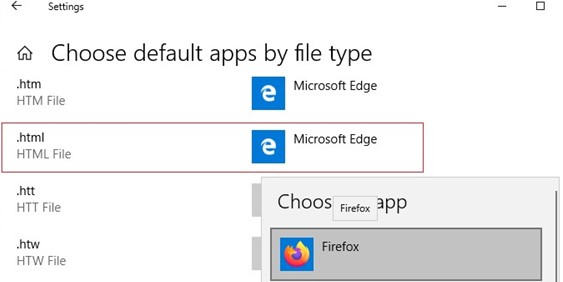
Find the .HTML file in the list of file extensions and use the “Choose a default” button to change the default program to open html files from Microsoft Edge to Firefox.
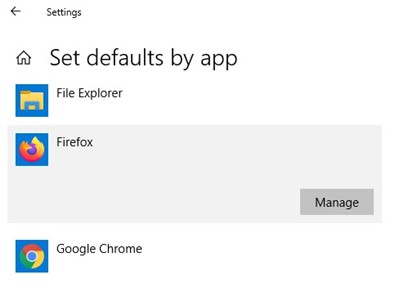
You can automatically assign a specific app with the file extension for which it is registered. To do this, select Set default by apps in the Default Apps section, find your program in the list and click the Manage button.
The next screen contains a list of file types supported by the application. Select the file extensions that you want to open with Firefox.
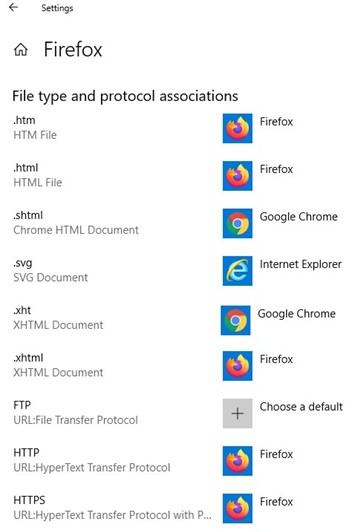
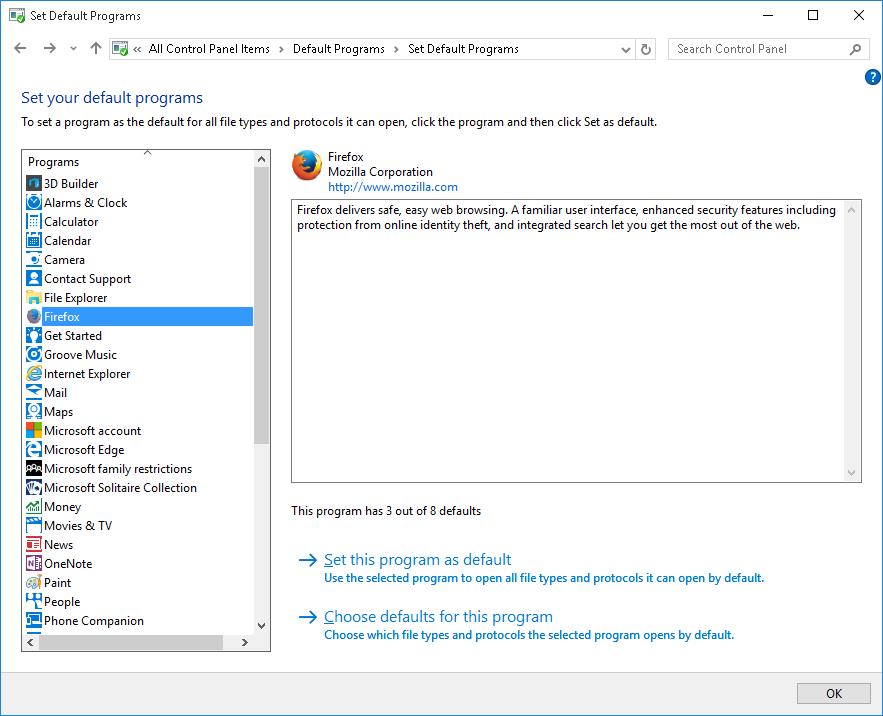
If you need to select specific file extensions, click Choose defaults for this program and check the desired file extensions.

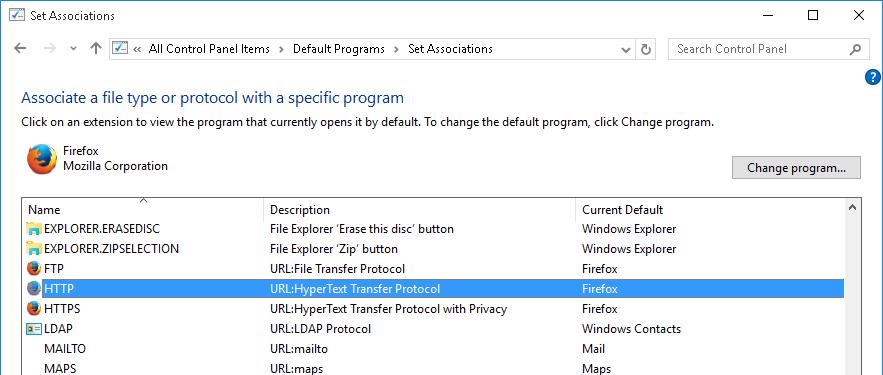
You can check the current associations for the files with the .html extension in the Programs -> Default Programs -> Set Association section of the Control Panel.
Exporting File Associations on Windows 10 to the XML file
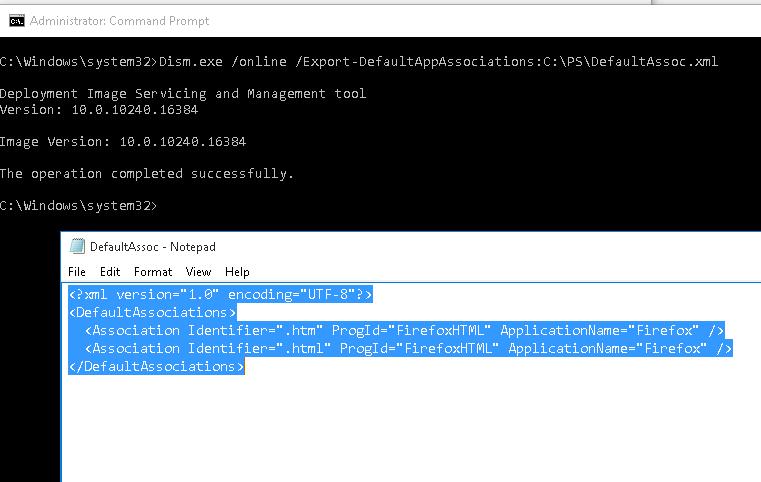
You can export the current configuration of file associations to the XML file using DISM:
Dism.exe /online /Export-DefaultAppAssociations:C:\PS\DefaultAssoc.xml
The command will save all the program associations you have configured on your user profile to the XML file. You can open the DefaultAssoc.xml file in any text editor, and see the full list of file associations exported. If you need to use only a part of associations from this list (in order not to override the existing user settings), you can manually edit the XML file. Leave only the lines with the file extensions you need. For example, we’ll leave the following lines for HTM and HTML extensions:
Importing Default App Associations on Windows 10
The resulting XML file can be imported into a Windows 10 on other computers using DISM tool:
Dism.exe /Online /Import-DefaultAppAssociations:C:\PS\DefaultAssoc.xml
If you manually edited the XML file and imported it through DISM, in some Windows 10 builds you may encounter multiple errors “App default reset notification” at first logon. Microsoft does not recommend to manually edit this XML file.
You can also import these settings to the offline Windows image in the WIM file. First, you have to mount the image:
Dism /Mount-Image /ImageFile:C:\mnt\images\install.wim /MountDir:C:\mnt\offline
And then import the XML file:
Dism.exe /Image:C:\mnt\offline /Import-DefaultAppAssociations:\\Server1\Share\DefaultAssoc.xml
Dism.exe /Image:C:\mnt\offline /Get-DefaultAppAssociations
Set Default File Associations with Group Policy
Windows 10/8.1 introduced a new Group Policy (GPO) option that allows you to apply an xml file with file association settings to all current users on a computer.
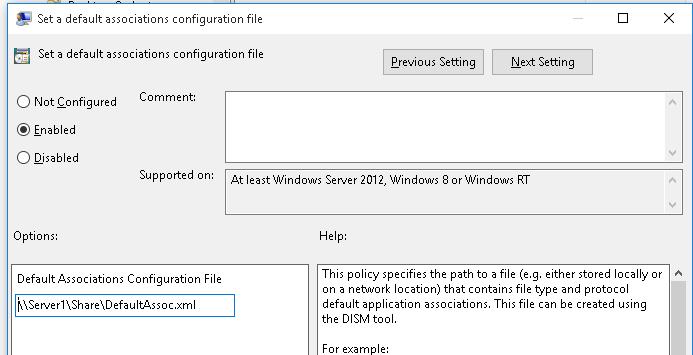
This policy named Set a default associations configuration file is located under Computer Configuration -> Administrative Templates -> Windows Components ->File Explorer.
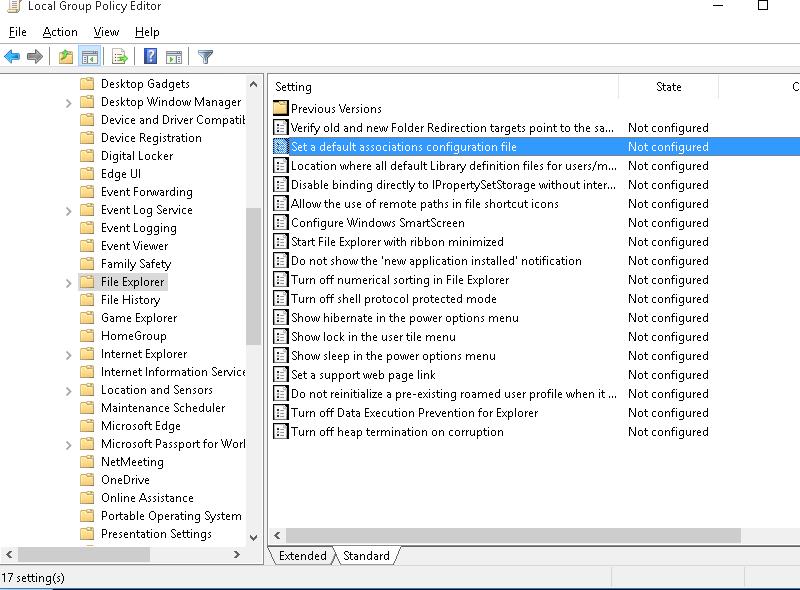
Enable the policy and specify the UNC path to your XML file. It can be located on a shared network folder, SYSVOL directory on the domain controller or pre-copied to the computers using GPP or SCCM.
The new file association settings will be applied to all users of the computer after the next login.
Since Windows 10 tracks changes in the file association settings, the first time you try to open an HTML file, a window may appear confirming that Firefox is used as the default program to open this file type (the request appears only once). Such a request will always appear after installing a new application, that is registered to open an existing file type or protocol. You can hide these notifications by enabling the policy “Do not show the ‘new application installed’ notification” in the same GPO section.
Changing File Association on Windows 10 via Registry
As we said above, in Windows 10 the way to set file association options has changed. In the previous section, we showed you how to configure the association for the .html file type with a Firefox browser through an XML file and Group Policy. Now let’s see how it looks in the Windows 10 registry.
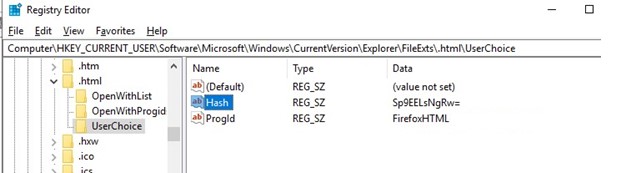
Run the Registry Editor (regedit.exe) and go to the registry key HKEY_CURRENT_USER\Software\Microsoft\Windows\CurrentVersion\ Explorer\FileExts\.html\UserChoice. This registry key contains the association settings for the html file extension. Please note the following registry parameters:
- ProgId – this is the identifier of the registered app for opening this file type. This app is specified in the XML file. If a long identifier is specified instead of the application name, then the file association with the modern UWP (Metro-style) application is configured.
- Hash – a hash value that is automatically generated to validate matching the type of files with the program. The presence of this hash ensures that the user or administrator (through the GPO) has configured this file mapping. This security mechanism is needed to protect users from malicious programs that can replace file associations without user’s approval.
If you try to manually change the ProgId registry value and associate another program, the Hash value will cease to be valid. In this case, Windows 10 will automatically reset the file association settings to the default state. In this case, the user will see a notification:

Accordingly, in Windows 10/Windows Server 2016 you won’t be able to configure file mapping through the registry, as it worked in Windows 7/Windows Server 2008R2.
How to Reset File Associations in Windows 10?
Using the following command, you can reset the settings of file associations imported earlier:
Dism.exe /Online /Remove-DefaultAppAssociations
After running this command, all new users will be logged with the default file association (the reset has no effect on the existing user profiles).
In order to reset the file associations manually configured by the user to the default ones, you need to click on the Reset button in the Settings -> Apps -> Default Applications.

In this case, all file associations will return to the state of clean Windows 10 installation.
File Types and File Associations
This section on file types and file associations is organized as follows:
Additional Resources
- Set Program Access and Computer Defaults (SPAD) is a Windows Control Panel which allows users with administrative privilege to set a machine default and hide or show an application. Media, Mail, Browser, Messenger and Java applications are examples of applications registered in SPAD. Set Your Default Programs (SYDP) is a Windows Control Panel, that works with limited privileges, and permits users to set a user default. Any application can register in SYDP. For information about SPAD and SYDP application registration, see Guidelines for File Associations and Default Programs, and Set Program Access and Computer Defaults (SPAD).
- For related conceptual background, see Overview of Verbs and File Associations.
- To create a Shell data store, see Implementing the Basic Folder Object Interfaces.
For related reference documentation, see the following topics:
- To execute a verb on a Shell item, see the InvokeVerb method.
- To retrieve a collection of verbs that can be executed on a Shell item, see the Verbs method.
- For performing an operation on a specified file, see either the ShellExecute or ShellExecuteEx functions.
- For a list of default perceived types, see the PERCEIVED enumeration.
- To retrieves a file’s perceived type based on its extension, see the AssocGetPerceivedType function.
Set or Change File Associations & Extensions in Windows 10
Each file in your Windows operating system has an extension in its filename, eg . .txt, .doc, etc. These extensions are used to identify the program, with which, windows can open this file. You can set or change these file associations in your Windows 10 OS.
Change file associations in Windows 10
1] Using Settings

In later versions of Windows 10, you will have to do the following to change File Associations & Extensions:
- Open Windows 10 Settings
- Select Apps
- Click Default apps
- Scroll down and click on the blue Choose default apps by file type link.
- Make your changes here.
You can even choose default apps by file type or protocol and set defaults by the app.
2] Using File Properties
You can also right-click the file whose association you want to change > Properties > General tab > Type Of File > Change > Choose a program from the list or recommended or other programs or else click Browse to select one.
3] Via File Explorer
Select the file in Explorer, right-click on it, select Open with, and choose the program or select Choose another app as required.
4] Using Control Panel
To set File Associations in Windows 10/8/7 using Control Panel:
- Open Control Panel
- Click Control Panel Home
- Select Default Programs
- Click Set Associations
- Select a file type in the list and click Change Program.
You will be displayed a list of Programs along with a Description and the Current Default. You can click on the Change program to set or change the current default programs.
5] Using freeware Types
If you wish, you can also set, reset, change File Associations & extensions easily with this freeware.
Types is a free and lightweight configuration utility for Windows that allows you to edit program associations, icons, context menus and other properties of various file types displayed in Windows Explorer.
It is a worthwhile replacement for the inbuilt Windows file type utility.
File association fix Windows 10
If you wish to fix file associations easily, you may want to check out our freeware File Association Fixer. Go here if you are unable to change the Default Program Extension. This post will help you fix broken EXE file associations.
You can also configure, export, import App File Associations in Windows using Settings and DISM Tool. This post will show you how to reset all File Associations to default in Windows 10.
How to Change File Associations in Windows
Here’s how to change what program opens a file in Windows
:max_bytes(150000):strip_icc()/tim-fisher-5820c8345f9b581c0b5a63cf.jpg)
:max_bytes(150000):strip_icc()/ryanperiansquare-de5f69cde760457facb17deac949263e-180a645bf10845498a859fbbcda36d46.jpg)
What to Know
- Under Win10 settings, click Apps > Default Apps > Choose default apps by file type, then choose the program you want to associate.
- The whole process takes less than five minutes.
- Setting a program’s default file association does not restrict other programs that support the file type from working.
This article explains the easy steps below to change a file type’s program association in Windows. Instructions apply to Windows 10, 8, 7, Vista, and XP.
How to Change File Associations in Windows 10
Windows can only open one program for a particular file extension automatically, so if you like to work with your PNG files in Photoshop Elements, for example, and not Paint, changing the default file association for PNG files is required.
Windows 10 uses Settings instead of Control Panel to make changes to file type associations.
Right-click the Start button (or hit the WIN+X hotkey) and choose Settings.
:max_bytes(150000):strip_icc()/001_how-to-change-file-associations-in-windows-2624477-5bf49f7dc9e77c0027195571.jpg)
Select Apps from the list.
:max_bytes(150000):strip_icc()/002_how-to-change-file-associations-in-windows-2624477-5bf49f9846e0fb0026918367.jpg)
Choose Default apps on the left.
:max_bytes(150000):strip_icc()/003_how-to-change-file-associations-in-windows-2624477-5bf49fac46e0fb002dc6d992.jpg)
Scroll down a little and select Choose default apps by file type.
:max_bytes(150000):strip_icc()/004_how-to-change-file-associations-in-windows-2624477-5bf49fc546e0fb00518197c7.jpg)
Locate the file extension for which you want to change the default program.
If you’re not sure what extension the file is using, open File Explorer to find the file and use the View > File name extensions option to show file extensions.
In the Choose default apps by file type window, select the program to the right of the file extension. If there isn’t one listed, select Choose a default instead.
In the Choose an app pop-up window, pick a new program to associate with that file extension. If there isn’t one listed that you want to use, try Look for an app in the Store.
:max_bytes(150000):strip_icc()/005_how-to-change-file-associations-in-windows-2624477-5bf4a062c9e77c002d166d15.jpg)
Windows 10 will now open the program you chose each time you open a file with that extension from File Explorer.
When you’re done, you can close any windows you opened to make these changes.
How to Change File Associations in Windows 8, 7, or Vista
Open Control Panel. In Windows 8, the Power User Menu (WIN+X) is the quickest way. Use the Start menu in Windows 7 or Windows Vista.
:max_bytes(150000):strip_icc()/001_how-to-change-file-associations-in-windows-2624477-5c8985acc9e77c00010c2307.jpg)
Select Programs.
:max_bytes(150000):strip_icc()/002_how-to-change-file-associations-in-windows-2624477-5c89867b46e0fb00017b3204.jpg)
You’ll only see this link if you’re on the Category or Control Panel Home view of Control Panel. Otherwise, choose Default Programs instead, followed by Associate a file type or protocol with a program link. Skip to Step 4.
Choose Default Programs.
:max_bytes(150000):strip_icc()/003_how-to-change-file-associations-in-windows-2624477-5c8986924cedfd000190b297.jpg)
Select Associate a file type or protocol with a program on the following page.
:max_bytes(150000):strip_icc()/004_how-to-change-file-associations-in-windows-2624477-5c8986af46e0fb0001a0bf7b.jpg)
Once the Set Associations tool loads, which should only take a second or two, scroll down the list until you see the file extension that you want to change the default program for.
If you’re not sure what extension the file in question has, right-click it (or tap-and-hold) the file, go to Properties, and look for the file extension in the «Type of file» line of the General tab.
Select the file extension to highlight it.
Choose the Change program button, located just above the scroll bar.
:max_bytes(150000):strip_icc()/005_how-to-change-file-associations-in-windows-2624477-5c8986d746e0fb00015f907f.jpg)
What you see next, and the next step to take, depend on what version of Windows you’re using. See What Version of Windows Do I Have? if you’re not sure which set of instructions to follow.
Windows 8: From the «How do you want to open this type of file [file extension]?» window you see now, look through the list and select the program you’d like to open when you double-click or double-tap these types of files. Try More options for the complete list.
:max_bytes(150000):strip_icc()/006_how-to-change-file-associations-in-windows-2624477-5c8986f646e0fb00017b3205.jpg)
Windows 7 & Vista: From the «Open with» window that popped up, look through the programs listed and choose the one you’d like to open for this extension. The Recommended Programs are probably the most applicable, but there may be Other Programs listed, too. Use Browse to manually locate a program.
:max_bytes(150000):strip_icc()/007_how-to-change-file-associations-in-windows-2624477-5c89871646e0fb00010f11cd.jpg)
Select OK if you see it, and Windows will refresh the list of file associations to show the new default program assigned to this file type. You can close the Set Associations window if you’re done making changes.
From this point forward, when you double-click or double-tap on any file with this particular file extension, the program you chose to associate with it in Step 8 will automatically launch and load the particular file.
How to Change File Associations in Windows XP
If you still have Windows XP, the instructions are different newer operating systems.
Go to Start > Control Panel to open Control Panel.
:max_bytes(150000):strip_icc()/008_how-to-change-file-associations-in-windows-2624477-5c898730c9e77c0001a67767.jpg)
Choose Appearance and Themes.
:max_bytes(150000):strip_icc()/009_how-to-change-file-associations-in-windows-2624477-5c898748c9e77c000142304a.jpg)
You’ll only see that link if you’re using the Category View of Control Panel. If you’re instead using the Classic View, choose Folder Options instead and then skip to Step 4.
Select Folder Options near the bottom of the window.
:max_bytes(150000):strip_icc()/010_how-to-change-file-associations-in-windows-2624477-5c89876546e0fb0001136785.jpg)
Open the File Types tab.
Under Registered file types, scroll down until you find the file extension that you want to change the default program association for.
Choose the extension to highlight it.
Select Change in the lower section.
:max_bytes(150000):strip_icc()/011_how-to-change-file-associations-in-windows-2624477-5c89878746e0fb0001336609.jpg)
From the Open With screen that you’re now looking at, choose the program you’d like to open the file type with by default.
:max_bytes(150000):strip_icc()/xp-open-file-with-5c8940c3c9e77c00010c22e1.png)
If you don’t see that screen, choose Select the program from a list, and then OK.
The most common programs that support this particular file type will be listed under the Recommended Programs or Programs list, but there may be other programs that support the file as well, in which case you can manually select one with the Browse button.
Select OK and then Close back on the Folder Options window. You can also close any Control Panel or Appearance and Themes windows that might still be open.
Going forward, any time you open a file with the extension you chose back on Step 6, the program you chose in Step 8 will be opened automatically and the file will be loaded within that program.
More About Changing File Associations
Changing a program’s file association doesn’t mean that another supporting program can’t open the file, it just means that it won’t be the program that opens when you double-tap or double-click on those types of files.
To use another program with the file, you’ll just need to start that other program manually first, and then browse your computer for the particular file to open it. For example, you can open Microsoft Word and use its File > Open menu to open a DOC file that is normally associated with OpenOffice Writer, but doing so doesn’t actually change the file association for DOC files as explained above.
Also, changing the file association doesn’t change the file type. To change the file type is to change the structure of the data so that it can be considered to exist in a different format. Changing the file’s type/format is usually done with a file conversion tool.


