- fromigorek
- понедельник, 3 марта 2014 г.
- CUDA install on Astra-linux
- Электрический блогнот
- мои заметки на полях
- Linux как установить CUDA
- Предисловие
- Шаг 1 — проверяем nvidia драйвер
- Шаг 2 — качаем CUDA Toolkit
- Шаг 3 — устанавливаем CUDA Toolkit
- Шаг 4 — Тест
- Шаг 5 — устанавливаем cuDNN
- Выводы
- Installation of CUDA Toolkit on Linux
- 0. Pay attention to system requirements
- 1. Manage kernel version
- 2. Check out GCC
- 3. Download the toolkit
- 4. Extract installer’s content
- 5. Uninstall existing Nvidia drivers
- 6. Remove X server config
- 7. Disable Nouveau drivers
- 8. Reboot
- 9. Switch to text mode
- 10. Disable display manager
- 11. Install display driver and toolkit
- 12. Update environment variables
- 13. Verify display driver version
- 14. Verify CUDA compiler driver
- 15. Give CUDA proper version of GCC
- 16. Test compilation
- 17. Reboot
- 18. Get your hands dirty
- Astra linux cuda toolkit
- About
fromigorek
понедельник, 3 марта 2014 г.
CUDA install on Astra-linux
# Установлена Astra-linux-orel-1.9 по дефолту
# Качаю драйвера NVIDIA и CUDA
mkdir -p /root/src/cuda
cd /root/src/cuda
wget http://us.download.nvidia.com/XFree86/Linux-x86_64/331.49/NVIDIA-Linux-x86_64-331.49.run
wget http://developer.download.nvidia.com/compute/cuda/5_5/rel/installers/cuda_5.5.22_linux_64.run
# Для установки проприетарного драйвера NVIDIA, необходимо предварительно выгрузить модуль NOUVEAU
# Данный модуль подгружается еще на этапе загрузки initrd (так сделано в Astra-linux)
# Поэтому пришлось препарировать initrd, чтобы избавиться от NOUVEAU
mkdir /root/src/initrd
cd /root/src/initrd
cp -a /boot/initrd.img-3.2.0-27-generic .
mv initrd.img-3.2.0-27-generic initrd.img.gz
gunzip initrd.img.gz
cpio -i
mv initrd.img ../
rm ./lib/modules/3.2.0-27-generic/kernel/drivers/gpu/drm/nouveau/nouveau.ko
find . | cpio -o -H newc | gzip -9 > ../initrd.img-3.2.0-27-generic
mv /boot/initrd.img-3.2.0-27-generic /boot/initrd.img-3.2.0-27-generic.save
cp -a ../initrd.img-3.2.0-27-generic /boot
# Блэклист для NOUVEAU модуля
touch /etc/modprobe.d/nvidia-installer-disable-nouveau.conf
echo «blacklist nouveau» > /etc/modprobe.d/nvidia-installer-disable-nouveau.conf
echo «options nouveau modeset=0» >> /etc/modprobe.d/nvidia-installer-disable-nouveau.conf
# Необходимые пакеты для установки драйвера NVIDIA (пакеты ставились с DVD)
apt-get update
apt-get install linux-headers-`uname -r` binutils pkg-config build-essential xserver-xorg-dev
reboot
# После перезагрузки проверяю отсутствие модуля NOUVEAU
lsmod |grep nouveau
Источник
Электрический блогнот
мои заметки на полях
Linux как установить CUDA

Установить CUDA (Compute Unified Device Architecture) библиотеки в Linux очень легко и в тоже время сложно. Казалось бы, что тут сложного, сделай какой-нибудь apt-get install cuda или yum install cuda и система на автомате все сама установит. Действительно, во многих случаях этого достаточно, но, как говорится, есть нюансы.

Так вот, чтобы использовать всю мощь вашей графической карты необходимо выполнение следующих условий:
- Наличие карты Nvidia (будем считать, что она уже есть);
- Установленные в системе драйвера от Nvidia (будем исходить из того, что тоже установлены);
- CUDA Toolkit, те самые библиотеки и программы, которые чаще всего для простоты называют CUDA (без Toolkit)
Вот пунктом номер 3 мы и будем заниматься в этой статье.
Все последующие шаги будут приведены для Ubuntu 18.04 (самая популярная система), но они так же подойдут и для других дистрибутивов Linux.
Предисловие
Устанавливать CUDA будем от обычного пользователя, в домашнюю папку. Я не сторонник установки в /usr/local таких вещей, которые часто приходится обновлять. Лучше поставить куда-нибудь в безопасное место, чтобы не запороть работающую систему. Например, /home/username/cuda подойдет отлично. Надоест эксперементировать с CUDA, просто удалите эту папку и все. И не надо заботиться, что какие-то зависимости нарушились в системе.
Шаг 1 — проверяем nvidia драйвер
Исходим из того, что Nvidia карточка у ва есть и nvidia драйвер установлен в систему и запущен.
Проверяем:
lsmod | grep -i nvidia
вывод должен быть похожим на следующий:
Далее определяем версию nvidia драйвера с помощью команды modinfo:
Есть еще один способ определить версию драйвера. Для этого воспользуемся утилитой nvidia-smi:
Nvidia-smi так же выдала версию 435.21.
Если nvidia-smi не будет в вашей системе, то пользуйтесь способом с modinfo.
Шаг 2 — качаем CUDA Toolkit
Между весрией Nvidia драйвера и версией CUDA Toolkit существует связь. Для определенной версии Nvidia драйвера нужно скачивать и устанавливать строго соответствующий пакет CUDA Toolkit, иначе ничего не получится. Опять же есть два способа определить версию CUDA Toolkit.
Первый способ:
идем на страницу cuda toolkit release notes и в таблице «Table 1. CUDA Toolkit and Compatible Driver Versions» ищем нужное соотвествие между версией драйвера и версией CUDA Toolkit:

Например, на моем ноуте установлен nvidia драйвер версии 435.21, значит мне подойдут все версии CUDA Toolkit кроме 10.2. Иными словами 10.1 включительно и ниже.
Если у вас драйвер версии 390, то CUDA Toolkit надо скачивать версии 9.1 и ниже.
Второй способ:
можно снова воспользоваться утилитой nvidia-smi:
здесь четко написано, для вашего драйвера нужна CUDA 10.1.
После того, как определились с версией CUDA Toolkit идем и скачиваем его со страницы:
https://developer.nvidia.com/cuda-toolkit-archive

Здесь выбираем:
Linux -> x86_64 -> Ubuntu -> 18.04 -> runfile (local)
После скачивания в директории для загрузок появится файл:
cuda_10.1.105_418.39_linux.run
Шаг 3 — устанавливаем CUDA Toolkit
Инсталлер скачан. Сделаем его исполняемым:
И сразу же запускаем:
Запускается долго (наверняка происходит самораспаковка).
После соглашения с EULA появляется экран: 
Как видите здесь размечен драйвер, мы его устанавливать не будем, он уже в системе и запущен.
Далее наводи курсор на «CUDA Toolkit 10.1» и жмем букву «A», тем самым переходя к расширенным настройкам: 
Здесь делаем неактивными все позиции, как на скриншоте и переходим в «Change Toolkit Installation Path» и вводим имя директории для установки: 
в прцессе установки нужно будет еще ввести «Root install path» вводим туже саму директорию: 
Когда установка завершится нужно будет дать системе знать куда установлена CUDA, для этого в файл
/.bashrc прописываем следующие строки:
На этом установка закончена.
Шаг 4 — Тест
Тестируем связку CUDA и драйвера Nvidia. Для этого воспользуемся примеры из устанвки CUDA.
Возьмем тест с частицами.

Как видно из рисунка, тест запустился и судя по выводу nvidia-smi на 24% нагружает видеокарту. Буковки C+G перед ./particles говорят о том, что задействованы и вычислительные (С) и графические (G) ресурсы видеокарты.
Шаг 5 — устанавливаем cuDNN
Если вы планируете использовать CUDA в машинном обучении, то просто необходимо устанвить библиотеку cuDNN. Этабиблиотека позволяет максимально эффективно использовать мощности графического ускорителя при работе с нейронными сетями. Ставится cuDNN элементрано:
1) регистрируетесь;
2) скачиваете нужную версию (для каждой CUDA своя cuDNN);
3) распаковываете архив в папку куда установлена CUDA.
Выводы
В данной статье приведено описание способа установки CUDA библиотек в Linux в случае, когда графический драйвер уже установлен, а у пользователя нет прав администратора.
Источник
Installation of CUDA Toolkit on Linux

A short guideline for installation of CUDA Toolkit 9.1 on Ubuntu 17.10

This article aims to be a guideline for installation of CUDA Toolkit on Linux. Target environment of this guideline is CUDA 9.1 and Ubuntu 17.10, however it can be applicable to other systems. Actually, it’s not a rocket science, but there are certain points which require extra attention and those points are completely distributive-independent.
0. Pay attention to system requirements
Official installation guide for Linux defines system requirements which you must conform to make things work. This might be obvious that everyone should get familiar with system requirements before installing anything on a target system. However it is easy to lull your vigilance if you are working basically with software in the modern world of constant changes and updates.
So, pay special attention to supported versions of kernel and gcc. If your existing installation differs from the recommended one, you must be able to decide whether you are OK to upgrade/downgrade your kernel and whether it’s possible for you to install required version of gcc.
1. Manage kernel version
CUDA is a device architecture which is implemented inside GPU. It allows to create a heterogeneous computing architecture, where CPU acts as a supervisor and GPU takes role of a workhorse. Thus, CPU and GPU need to talk to each other and such communication is done via driver. As Linux implements microkernel architecture where drivers are treated as plugins, they must be compatible with the kernel which they are going to be plugged into.
Unfortunatelly, Nvidia’s drivers are source-closed and you cannot compile them for your kernel version. Hence, you are left to use what you are given. If driver is not compatible with your kernel, you have to change the kernel.
As official documentation states, supported version of kernel for Ubuntu 17 is 4.9. Well, Ubuntu 17.10 is shipped with kernel 4.13 and downgrading it to version 4.9 may look too aggressive.
So, will it work with kernel 4.13? Actually, yes and no, it depends. Installation has failed for my version 4.13.0–32 and it has failed for version 4.13.26. Why? Well, there are bugs inside the kernel. For example, some functions may be used without includes of their headers and this results into compilation errors. While such issues are easy to fix, there are other errors which can drive you crazy.
Luckily, kernel 4.13.16 is suitable for CUDA 9.1 and no errors were observed.
I recommend to use UKUU to manage kernels on Ubuntu. You can stay without it, however personally I have found it to be very useful, as it allows you to do all job with few command-line instructions. Feel free to follow this article to get familiar with UKUU. In short installation looks like:
Don’t forget to reboot your system after switching to another kernel:
After that make sure the kernel headers and development packages for the currently running kernel are installed:
2. Check out GCC
CUDA needs gcc 6 for Ubuntu 17. The latter one comes with gcc 7. Required version can coexist with default one:
3. Download the toolkit
Download process is straightforward:
- Go to download page.
- Select Linux OS.
- Select x86_64 architecture.
- Select Ubuntu distribution.
- Select version 17 .
- Select runfile (local) installer type.
It’s important to select runfile for installer type, as this installer will contain display driver of version which is guaranteed to be compatible with toolkit.
4. Extract installer’s content
Downloaded installer contains display driver, toolkit and samples. We are going to install them manually, so extract them:
5. Uninstall existing Nvidia drivers
If your system already has display driver installed, delete it:
6. Remove X server config
If you have configuration of X server, delete or backup it:
7. Disable Nouveau drivers
- Create a file /etc/modprobe.d/blacklist-nouveau.conf with the following 2 lines:
2. Regenerate the kernel initramfs :
8. Reboot
9. Switch to text mode
Press Ctrl + Alt + F1 to enter text mode and login as usual user.
10. Disable display manager
Disable display manager, so nothing will interact with graphics device:
After this point you will not be able to read this text from target machine, so make sure you can read it from another device.
11. Install display driver and toolkit
Now it’s time to install all we need:
12. Update environment variables
Edit rc file of your shell to update environment variables (e.g.,
and refresh environment for current session:
13. Verify display driver version
Check display driver is installed properly:
14. Verify CUDA compiler driver
Check CUDA compiler driver is installed properly:
15. Give CUDA proper version of GCC
We have installed gcc 6 and g++ 6 at step #2. Now it’s time to make CUDA able to use it:
16. Test compilation
Now it’s time to check if installation was successful. We can do this by compiling and running one of samples.
Go to the sample directory:
Compile sample (as root , because samples are located inside system dir):
Check it can run:
17. Reboot
Reboot just to be sure everything is good:
18. Get your hands dirty
At this point CUDA Toolkit is installed and it’s time to get hands dirty.
Источник
Astra linux cuda toolkit
CUDA Install Guide
This is a must-read guide if you want to setup a new Deep Learning PC. This guide includes the installation of the following:
Debian installation method is recommended for all CUDA toolkit, cuDNN and TensorRT installation.
For PyTorch, CUDA 11.0 and CUDA 10.2 are recommended.
For TensorFlow, up to CUDA 10.2 are supported.
TensorRT is still not supported for Ubuntu 20.04. So, Ubuntu 18.04 is recommended
Install NVIDIA Driver
Windows Update automatically install and update NVIDIA Driver.
Check latest and recommended drivers:
Install recommended driver automatically:
Or, Install specific driver version using:
Verify the Installation
After reboot, verify using:
Install CUDA Toolkit
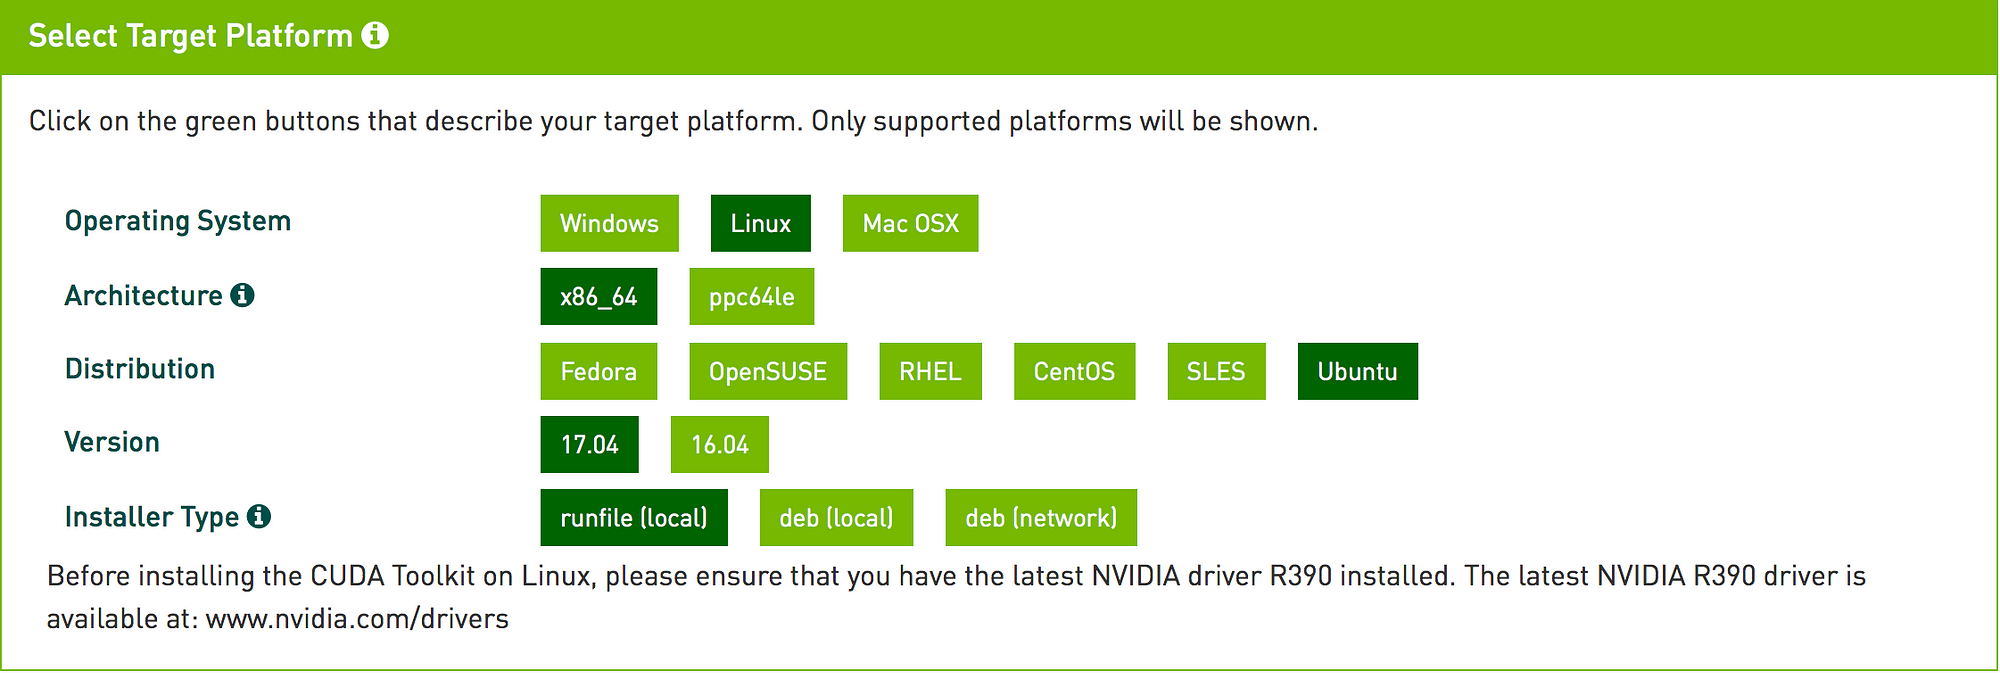
- Go to https://developer.nvidia.com/cuda-toolkit-archive and choose your desire CUDA toolkit version that is compatible with the framework you want to use.
- Select your OS.
- Select your system architecture.
- Select your OS version.
- Select Installer Type and Follow the steps provided. (.exe on Windows and .run or .deb on Linux)
Windows exe CUDA Toolkit installation method automatically adds CUDA Toolkit specific Environment variables. You can skip the following section.
Before CUDA Toolkit can be used on a Linux system, you need to add CUDA Toolkit path to PATH variable.
Open a terminal and run the following command.
or add this line to .bashrc file.
In addition, when using the runfile installation method, you also need to add LD_LIBRARY_PATH variable.
For 64-bit system,
For 32-bit system,
Note: The above paths change when using a custom install path with the runfile installation method.
Verify the Installation
Check the CUDA Toolkit version with:
The NVIDIA CUDA Deep Neural Network library (cuDNN) is a GPU-accelerated lirbary of primitives for deep neural networks. cuDNN provides highly tuned implementations for standard routines such as forward and backward convolution, pooling, normalization and activation layers.
- Go to https://developer.nvidia.com/cudnn and click «Download cuDNN».
- You need to sing in to proceed.
- Then, check «I Agree to the Terms. «.
- Click on your desire cuDNN version compatible with your installed CUDA version. (If you don’t find desire cuDNN version, click on «Archived cuDNN Releases» and find your version. If you don’t know which version to install, latest cuDNN version is recommended).
Choose «cuDNN Library for Windows (x86)» and download. (That is the only one available for Windows).
Extract the downloaded zip file to a directory of your choice.
Copy the following files into the CUDA Toolkit directory.
a. Copy \cuda\bin\cudnn*.dll to C:\Program Files\NVIDIA GPU Computing Toolkit\CUDA\vx.x\bin .
b. Copy \cuda\include\cudnn*.h to C:\Program Files\NVIDIA GPU Computing Toolkit\CUDA\vx.x\include .
c. Copy \cuda\lib\x64\cudnn*.lib to C:\Program Files\NVIDIA GPU Computing Toolkit\CUDA\vx.x\lib\x64 .
Download the 2 files named as:
- cuDNN Runtime Library for .
- cuDNN Developer Library for .
for your installed OS version.
Then, install the downloaded files with the following command:
TensorRT is meant for high-performance inference on NVIDIA GPUs. TensorRT takes a trained network, which consists of a network definition and a set of trained parameters, and produces a highly optimized runtime engine that performs inference for that network.
- Go to https://developer.nvidia.com/tensorrt and click «Download Now».
- You need to sing in to proceed.
- Click on your desire TensorRT version. (If you don’t know which version to install, latest TensorRT version is recommended).
- Then, check «I Agree to the Terms. «.
- Click on your desire TensorRT sub-version. (If you don’t know which version to install, latest version is recommended).
- Download «TensorRT 7.x.x for Windows10 and CUDA xx.x ZIP package» that matches CUDA version.
- Unzip the downloaded archive.
- Copy the DLL files from /lib to your CUDA installation directory C:\Program Files\NVIDIA GPU Computing Toolkit\CUDA\vx.x\bin
Then install the uff , graphsurgeon and onnx_graphsurgeon wheel packages.
Download «TensorRT 7.x.x for Ubuntu xx.04 and CUDA xx.x DEB local repo package» that matches your OS version, CUDA version and CPU architecture.
Then install with:
If you plan to use TensorRT with TensorFlow, install this also:
Verify the Installation
You should see packages related with TensorRT.
Download and install the new version as if you didn’t install before. You don’t need to uninstall your previous version.
PyCUDA is used within Python wrappers to access NVIDIA’s CUDA APIs.
Install PyCUDA with:
If you want to upgrade PyCUDA for newest CUDA version or if you change the CUDA version, you need to uninstall and reinstall PyCUDA.
For that purpose, do the following:
- Uninstall the existing PyCUDA.
- Upgrade CUDA.
- Install PyCUDA again.
About
Installation guide for NVIDIA driver, CUDA, cuDNN and TensorRT
Источник


