- Установка WireGuard в Ubuntu
- Установка WireGuard на Ubuntu
- Шаг 1. Установка репозитория
- Шаг 2. Установка WireGuard
- Шаг 3. Настройка системы
- Шаг 4. Генерация ключей сервера
- Шаг 5. Генерация ключей клиента
- Шаг 6. Конфигурационный файл сервера
- Шаг 7. Конфигурационный файл клиента
- Шаг 8. Запуск сервера
- Шаг 9. Настройка брандмауэера
- Шаг 10. Подключение клиента
- Шаг 11. Проверка
- Выводы
- Astra linux wireguard client
- Astra linux wireguard client
- Side by Side Video
- Command-line Interface
- Key Generation
- NAT and Firewall Traversal Persistence
- Demo Server
- Debug Info
Установка WireGuard в Ubuntu
WireGuard — это новый, современный VPN сервис с открытым исходным кодом, который позиционирует себя как замену OpenVPN и использует современную криптографию. Он реализован в виде модуля ядра Linux. Изначально он поддерживал только Linux, но потом были разработаны приложения для Windows, MacOS и Android.
В сегодняшней статье мы поговорим о том как установить WireGurad Ubuntu 20.04, а также как настроить подключение между настроенным VPN сервером и клиентом.
Установка WireGuard на Ubuntu
Шаг 1. Установка репозитория
В этой статье будет приведен пример установки программы на Ubuntu 20.04, вы можете получить WireGuard из официальных репозиториев, но в более старых дистрибутивах или для получения самой свежей версии следует использовать PPA. Для добавления PPA в систему выполните:
sudo add-apt-repository ppa:wireguard/wireguard
После этого список пакетов будет автоматически обновлен.
Шаг 2. Установка WireGuard
В установке нет ничего сложного, выполните такие команды:
sudo apt install wireguard

Эти два шага надо выполнить как на сервере, так и на клиентском компьютере, дальше работаем только на сервере.
Шаг 3. Настройка системы
Для того, чтобы пакеты перенаправлялись туда, куда надо, нужно разрешить перенаправление сетевых пакетов на уровне ядра. Для этого откройте файл /etc/sysctl.conf и добавьте в конец такие строки:
sudo vi /etc/sysctl.conf
net.ipv4.ip_forward = 1
net.ipv6.conf.default.forwarding = 1
net.ipv6.conf.all.forwarding = 1
net.ipv4.conf.all.rp_filter = 1
net.ipv4.conf.default.proxy_arp = 0
net.ipv4.conf.default.send_redirects = 1
net.ipv4.conf.all.send_redirects = 0
Затем необходимо выполнить команду sysctl -p чтобы система перечитала конфигурацию:
Шаг 4. Генерация ключей сервера
Для сервера надо создать приватный и публичный ключ. Эти ключи, потом надо будет записать в конфигурационный файл сервера и клиента, сами файлы ключей вам не нужны, поэтому можете создавать их где хотите, например, в домашней папке:
wg genkey | sudo tee server_private.key | wg pubkey | sudo tee server_public.key

Ключи созданы, можете утилита tee запишет их в файл, а также выведет на экран, что очень удобно.
Шаг 5. Генерация ключей клиента
Аналогичным образом создаём ключи для клиента. Команда та же:
wg genkey | sudo tee client_private.key | wg pubkey | sudo tee client_public.key

Шаг 6. Конфигурационный файл сервера
Наш конфигурационный файл сервера будет находится по пути /etc/wireguard/wg0.conf и будет выглядеть следующим образом:
sudo vi /etc/wireguard/wg0.conf
[Interface]
Address = 10.66.66.1/24,fd42:42:42::1/64
ListenPort = 63665
PrivateKey = OFCMMpdPYUTndTkTuCDCZDg6uYrzGcjcL6Tg4aAp5kU=
PostUp = iptables -A FORWARD -i wg0 -j ACCEPT; iptables -t nat -A POSTROUTING -o enp0s8 -j MASQUERADE; ip6tables -A FORWARD -i wg0 -j ACCEPT; ip6tables -t nat -A POSTROUTING -o enp0s8 -j MASQUERADE
PostDown = iptables -D FORWARD -i wg0 -j ACCEPT; iptables -t nat -D POSTROUTING -o enp0s8 -j MASQUERADE; ip6tables -D FORWARD -i wg0 -j ACCEPT; ip6tables -t nat -D POSTROUTING -o enp0s8 -j MASQUERADE
[Peer]
PublicKey = 2g8MWhxN1QGLAfGwEnxHG38/krdcPbgjo87zSKurP1g=
AllowedIPs = 10.66.66.2/32,fd42:42:42::2/128

Файл разделен на две секции:
- Interface — настройка сервера;
- Peer — настройка клиентов, которые могут подключаться к серверу, секций Peer может быть несколько.
В данном случае мы настраиваем сервер WireGuard для работы с IPv4 и IPv6 одновременно, вот, что значат основные параметры:
- Address — адрес сервера в сети VPN;
- ListenPort — порт, на котором будет ожидать подключения WireGuard;
- PrivateKey — приватный ключ сервера, сгенерированный ранее;
- PostUp — команда, которая выполняется после запуска сервера. В данном случае включается поддержка MASQUERADE для интерфейса enp0s8, а также разрешается прием пакетов на интерфейсе wg0. Сетевые интерфейсы вам придется заменить на свои.
- PostDown — выполняется после завершения работы WireGuard, в данном случае удаляет все правила, добавленные в PostUp.
Секции Peer содержат настройки клиентов, которые могут подключится к серверу:
- PublicKey — публичный ключ клиента, сгенерированный ранее;
- AllowedIPs — IP адрес, который может взять клиент. Обратите внимание, маска для IPv4 должна быть 32.
Теперь можно переходить к созданию конфигурационного файла непосредственно для клиента.
Шаг 7. Конфигурационный файл клиента
Конфигурационный файл клиента будет выглядеть примерно так:
[Interface]
PrivateKey = GMJXo+phyNS/kodizn353D2MN8bPNOSqJEhQ83caKkY=
Address = 10.66.66.2/24,fd42:42:42::2/64
DNS = 8.8.8.8,8.8.4.4
[Peer]
PublicKey = xxIV2fvMp7J2H1GxVuQcfVi2TJ0lQ/2K8UXSKC/byhM=
Endpoint = 192.168.56.101:63665
AllowedIPs = 0.0.0.0/0. /0

Обратите внимание, что все ключи мы генерируем на сервере, а затем уже скидываем конфигурационный файл клиента на компьютер, который надо подключить к сети. Рассмотрим подробнее что за что отвечает:
- PrivateKey — приватный ключ клиента, сгенерированный ранее;
- Address — IP адрес интерфейса wg0 клиента;
- DNS — серверы DNS, которые будут использоваться для разрешения доменных имён;
- PublicKey — публичный ключ сервера, к которому надо подключится.
- Endpoint — здесь надо указать IP адрес сервера, на котором установлен WireGuard и порт;
- AllowedIPs — IP адреса, трафик с которых будет перенаправляться в сеть VPN, в данном примере выбраны все адреса.
После того, как вы внесли все изменения, скопируйте файл на компьютер клиента под именем /etc/wireguard/wg0.conf.
Шаг 8. Запуск сервера
Для запуска сервера используйте такую команду:
sudo wg-quick up wg0

Аналогично можно использовать systemd:
sudo systemctl start wg-quick@wg0
С помощью systemd можно настроить автозагрузку интерфейса:
sudo systemctl enable wg-quick@wg0
Шаг 9. Настройка брандмауэера
В этой инструкции мы использовали порт 63665 для WireGuard. Программа использует UDP, нужно разрешить подключение к этому порту. Для этого выполните:
sudo ufw allow 63665/udp
Или убедитесь, что ufw отключён и порты никто не блокирует:
sudo ufw status

Настройка WireGuard Ubuntu завершена.
Шаг 10. Подключение клиента
Пришло время переходить к клиенту. Я предполагаю, что WireGuard уже установлен, а конфигурационный файл клиента находится по пути /etc/wireguard/wg0.conf. Подключение выполняется аналогично запуску сервера:
sudo wg-quick up wg0

После этого вы можете посмотреть статистику по подключению с помощью команды:

Шаг 11. Проверка
Чтобы убедиться что всё работает можно выполнить ping для сервера WireGuard. Он должен быть доступен:

Если пакеты идут, значит всё хорошо. Если же нет, надо внимательно проверять инструкцию и смотреть что сделано не так. У WireGuard здесь есть проблемы. У программы нет подробных логов, где можно было бы посмотреть какая ошибка произошла, а причин проблем может быть очень много. Чаще всего — это несоответствующие ключи, закрытый порт или неверный адрес сервера. Доступность порта на сервере можно проверить с помощью утилиты nc. Надо запускать на клиентской машине:
nc -z -v -u 192.168.56.101 63665
Также можно убедится, что пакеты WireGuard доходят к серверу, для этого используйте tcpdump на сервере:
tcpdump -n -i enp0s8 port 63665

Вместо enp0s0 вам надо прописать имя своего сетевого интерфейса.
Выводы
В этой статье мы рассмотрели как выполняется установка WireGuard на Ubuntu 20.04. В процессе установки ничего сложного нет, но мне удалось развернуть программу только в Ubuntu. Если у вас не получается установить WireGuard самому, вы можете попробовать скрипт автоматической установки. Скрипт скачает и установит все необходимые зависимости, а также настроит систему и создаст конфигурационные файлы для клиентов. Несмотря на все преимущества WireGuard я пока не намерен на него переходить из-за сложности отладки ошибок. А что думаете вы о программе? Напишите в комментариях!
Источник
Astra linux wireguard client
![]()
This project is a bash script that aims to setup a WireGuard VPN on a Linux server, as easily as possible!
WireGuard is a point-to-point VPN that can be used in different ways. Here, we mean a VPN as in: the client will forward all its traffic trough an encrypted tunnel to the server. The server will apply NAT to the client’s traffic so it will appear as if the client is browsing the web with the server’s IP.
The script supports both IPv4 and IPv6. Please check the issues for ongoing development, bugs and planned features!
WireGuard does not fit your environment? Check out openvpn-install.
Download and execute the script. Answer the questions asked by the script and it will take care of the rest.
It will install WireGuard (kernel module and tools) on the server, configure it, create a systemd service and a client configuration file.
Run the script again to add or remove clients!
I recommend these cheap cloud providers for your VPN server:
- Vultr: Worldwide locations, IPv6 support, starting at $3.50/month
- Hetzner: Germany and Finland, IPv6, 20 TB of traffic, starting at €3/month
- Digital Ocean: Worldwide locations, IPv6 support, starting at $5/month
- PulseHeberg: France, unlimited bandwidth, starting at €3/month
Источник
Astra linux wireguard client
You’ll first want to make sure you have a decent grasp of the conceptual overview, and then install WireGuard. After that, read onwards here.
Side by Side Video
Before explaining the actual comands in detail, it may be extremely instructive to first watch them being used by two peers being configured side by side:
Or individually, a single configuration looks like:

Command-line Interface
A new interface can be added via ip-link(8) , which should automatically handle module loading:
(Non-Linux users will instead write wireguard-go wg0 .)
An IP address and peer can be assigned with ifconfig(8) or ip-address(8)
Or, if there are only two peers total, something like this might be more desirable:
The interface can be configured with keys and peer endpoints with the included wg(8) utility:
Finally, the interface can then be activated with ifconfig(8) or ip-link(8) :
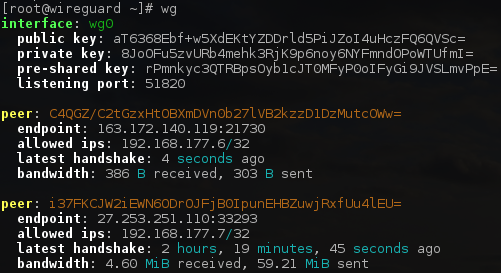
There are also the wg show and wg showconf commands, for viewing the current configuration. Calling wg with no arguments defaults to calling wg show on all WireGuard interfaces.
Much of the routine bring-up and tear-down dance of wg(8) and ip(8) can be automated by the included wg-quick(8) tool:

Key Generation
WireGuard requires base64-encoded public and private keys. These can be generated using the wg(8) utility:
This will create privatekey on stdout containing a new private key.
You can then derive your public key from your private key:
This will read privatekey from stdin and write the corresponding public key to publickey on stdout.
Of course, you can do this all at once:
NAT and Firewall Traversal Persistence
By default, WireGuard tries to be as silent as possible when not being used; it is not a chatty protocol. For the most part, it only transmits data when a peer wishes to send packets. When it’s not being asked to send packets, it stops sending packets until it is asked again. In the majority of configurations, this works well. However, when a peer is behind NAT or a firewall, it might wish to be able to receive incoming packets even when it is not sending any packets. Because NAT and stateful firewalls keep track of «connections», if a peer behind NAT or a firewall wishes to receive incoming packets, he must keep the NAT/firewall mapping valid, by periodically sending keepalive packets. This is called persistent keepalives. When this option is enabled, a keepalive packet is sent to the server endpoint once every interval seconds. A sensible interval that works with a wide variety of firewalls is 25 seconds. Setting it to 0 turns the feature off, which is the default, since most users will not need this, and it makes WireGuard slightly more chatty. This feature may be specified by adding the PersistentKeepalive = field to a peer in the configuration file, or setting persistent-keepalive at the command line. If you don’t need this feature, don’t enable it. But if you’re behind NAT or a firewall and you want to receive incoming connections long after network traffic has gone silent, this option will keep the «connection» open in the eyes of NAT.
Demo Server
After installing WireGuard, if you’d like to try sending some packets through WireGuard, you may use, for testing purposes only, the script in contrib/ncat-client-server/client.sh .
This will automatically setup interface wg0 , through a very insecure transport that is only suitable for demonstration purposes. You can then try loading the hidden website or sending pings:
If you’d like to redirect your internet traffic, you can run it like this:
By connecting to this server, you acknowledge that you will not use it for any abusive or illegal purposes and that your traffic may be monitored.
Debug Info
If you’re using the Linux kernel module and your kernel supports dynamic debugging, you can get useful runtime output by enabling dynamic debug for the module:
If you’re using a userspace implementation, set the environment variable export LOG_LEVEL=verbose .
© Copyright 2015-2021 Jason A. Donenfeld. All Rights Reserved. «WireGuard» and the «WireGuard» logo are registered trademarks of Jason A. Donenfeld.
This project is from ZX2C4 and from Edge Security, a firm devoted to information security research expertise.
Источник


