- Обновляем BIOS на Eee PC
- Почему не всё так просто
- Что делать?
- Действуем!
- Ubuntu Documentation
- Introduction
- Considerations before updating the BIOS
- Finding the right BIOS file
- Reviewing installation instructions
- BIOS update changes previously set configurations
- UEFI (Unified Extensible Firmware Interface)
- Apple
- Website bug
- Boot into BIOS (F10) to upgrade BIOS
- Lenovo
- Samsung
- Toshiba
- Vendor independent updating methods
- Обновление UEFI/BIOS в Linux
- FAT32 ESP
- Подготовка
Обновляем BIOS на Eee PC
Сегодня я расскажу вам, как обновить BIOS на нетбуке ASUS Eee PC 900. Вполне вероятно, что описанные здесь действия подойдут для перепрошивки других нетбуков этого семейства.
Проще всего под Linux это делать так: форматируем флешку в FAT32/FAT16, записываем туда файл под именем 900.ROM, перезагружаемся, нажимаем Alt+F2. И тут начинаются неожиданности…
Почему не всё так просто
Перепрошивка BIOS на нетбуке оказалась делом нетривиальным. В наличии были только флешки на 2 и 4 Гб, попытка отформатировать их и прошить нетбук с их помощью закончились неудачей. Были испробованы всевозможные варианты: разные флешки, FAT16 и FAT32, форматирование раздела и самой флешки. Единственным, подающим признаки жизни, вариантом оказался вариант с форматированием самой флешки в FAT16, но и тут было не всё так хорошо. Прошивающая программа находила файл, начинала считывать, но потом висла. В других случаях она просто висла на сообщении «Reading file 900.ROM» даже без попытки считать его с флешки.
Что делать?
Тут я вспомнил, что ASUS рекомендует использовать для пошивки маленькие флешки, и, видимо, не просто так. Поэтому я решил обмануть систему, «создав» флешку на 10мб. Там прошивка будет гарантированно располагаться где-то в начале диска и загрузчик по идее сможет её считать. Так и получилось.
Действуем!
- Качаем новую прошивку отсюда.
- Распаковываем, переименовываем файл в 900.ROM (для других моделей Asus EEE Pc xyz имя файла будет xyz.ROM)
- Создаём образ нашей будущей флешки
dd if=/dev/zero of=mytestfile.out bs=1 count=0 seek=10M - Форматируем его в FAT16
mkdosfs -F 16 mytestfile.out - Монтируем
mount -o loop mytestfile.out /mnt/ - Копируем туда файл 900.ROM
- Размонтируем
umount /mnt - Записываем образ на флешку
dd if=mytestfile.out of=/dev/sdc
После этого всё стандартно: выключаем нетбук, вставляем флешку, включаем нетбук, жмём Alt+F2, через несколько минут радуемся обновленной BIOS. После обновления прошивающая программа попросит выключить питание нетбука. При следующем включении вам скорее всего предложат сбросить настройки BIOS, в этом нет ничего страшного. Также, в BIOS могут оказаться отключенными какие-то устройства (у меня был отключен Wi-Fi и ещё что-то), включаем их, если они нужны.
Образ заливался на флешку в 2гб, но мне кажется, что этот способ будет работать с любыми флешками.
Источник
Ubuntu Documentation
Introduction
Considerations before updating the BIOS
Finding the right BIOS file
- When looking up which BIOS file to download from a vendor’s website, it is best to consult the sticker on the computer itself, and not rely on the result of a terminal command (i.e. dmidecode). This is due to how the results of terminal commands can either be too vague, or provide incorrect results for the computer due to the vendor not coding or properly documenting the information.
Reviewing installation instructions
- To ensure the best results, one should review all documentation from the vendor. This may be a separate README from their website.
BIOS update changes previously set configurations
- Some BIOS updates will add new settings within the BIOS, as well as adjust previously existing settings to something different than what was set previously. One would want to take note of the settings prior to updating, in case the desired settings do become changed, or the new feature would have an undesirable impact.
UEFI (Unified Extensible Firmware Interface)
If the system has an UEFI (Unified Extensible Firmware Interface) based BIOS, one would want to backup the EFI partition first. To do so, copy the /boot/efi/EFI/ folder to a safe location. If the BIOS update either adjusts or removes it, one may restore it to its intended location, for example, via live environment.
For either the Acer Aspire One AOA110 Netbook or Acer Aspire One AOA150 Netbook please see here.
Apple
One may reinstall OS X for a firmware update following Apple’s instructions here.
- When looking up the model on the ASUS website, one may need to find the model name as noted in the BIOS screen, which can differ from the sticker, or the result of a terminal command.
For the model R554LA, the BIOS version found on the ASUS website is different, depending on if one goes to the Driver & Tools section, versus if one goes to the BIOS & FIRMWARE section.
ASUS provides within their BIOS a utility called Easy Flash. Please search the Asus website for instructions.
When searching for the latest BIOS update, please make sure one checks the OS for both Windows and Linux to get the latest fixes. For example, the latest BIOS available for Windows was a later version in comparison to Linux for the Eee PC 1005HA Seashell.
If you are using UEFI and your F12 boot options include «Flash BIOS upgrade», one may download the BIOS upgrade .exe from Dell’s website, and put it to your /boot/EFI/ folder. Reboot and select «Flash BIOS upgrade» option. In the dialog select the .exe file you have just downloaded and continue with the process.
For more on Dell specific procedures, please see here.
Website bug
Please be advised HP was previously blocking review of their software updates (BIOS, firmware, drivers, etc.) from non-Windows operating systems for many PC models. This was last identified for HP Pavilion Elite d5200t ATX CTO Desktop PC but has since been partially fixed. What happened previously was the Software & Drivers tab at the top was missing. If one uses any browser in Windows, the tab did show up. To work around this problem, one may change the URL from:
to: Now the tab shows up, but doesn’t bring you to the drivers page for that model. Instead, one has to go lower in the page and click the button «Software and Drivers» and then click the button «Go».
Boot into BIOS (F10) to upgrade BIOS
- One may update the BIOS during startup via the F10 menu. Please keep in mind that the USB drive must be formatted with FAT32 (NTFS won’t work).
Lenovo
- Lenovo makes available up to three different methods with which to update the BIOS. They are presented in the order one should utilize them:
A self-contained bootable ISO environment. There are instances where one may not update via the Windows .exe, and only update to a certain level via the ThinkVantage System Update. Hence, it is recommended to try this first.
Windows only executable file.
ThinkVantage System Update. In certain circumstances, the Windows only executable file may not work. However, the ThinkVantage System Update has a different update implementation, that may work when the Windows only executable file does not.
- MSI offers an update via a command from within the UEFI/BIOS to select and load a specific file from a USB drive.
- Boot into the BIOS setup (by pressing DEL-key while MSI splash screen is shown).
- Take note of the exact model (e.g. GE70 2oe).
- Take note of the currently installed BIOS version (e.g. E1757IMS.517).
- Take note of any changed configuration (as these will all be reset to defaults).
Search MSI’s website for the exact model (if you can’t find it, try to create an account and register your device via its serial number from inside the battery compartment).
Download and extract update file (
8 MB) to a USB stick following this guide.
Samsung
Unfortunately, for many models, Samsung does not provide via their website the option to see the latest BIOS version, the release notes for a given BIOS version, or allow one to download a dedicated, OS vendor independent BIOS upgrade method. Instead, they provide a Windows only software update program called Samsung PC Update or SW Update, that is used to both check if a BIOS update is available, and if so, then download and install via this program.
Toshiba
Toshiba has made available a BIOS .exe for certain models (ex. Toshiba Satellite L305D-S5934) that when executed, generates an ISO to burn to disc, and in turn allows one to boot to the disc to update the BIOS. This .exe was successfully run in Ubuntu via WINE to generate this ISO, the ISO burned in Ubuntu, and the BIOS updated successfully.
Vendor independent updating methods
Windows 10
One may temporarily install Windows 10 to update the BIOS from here.
Windows Evaluation
One may utilize an evaluation copy of Windows from here to update when one may only use Windows.
Windows System Repair Disc
In Windows 7, create a System Repair disc. Put the BIOS file on a spare USB drive (formatted as FAT32), boot to to the System Repair disc, navigate to the USB via command line and execute the file.
USB Recovery Drive
In Windows 8.1, create a USB recovery drive. Put the BIOS file on the USB drive.
Boot into Windows
- One may do this via swapping in dedicated drive, or dual boot.
In a Windows Enterprise environment, use Windows To Go.
FreeDOS
Boot to FreeDOS and execute the .exe file. If one is using UEFI, one may want to use Legacy mode, versus UEFI.
While Using WINE worked once for one person, for one piece of hardware, at one point in time of Ubuntu and WINE development, it would be considered a last resort. It would be conservative to believe that using WINE to update the BIOS holds a potentially higher risk in comparison to using Windows to damage your motherboard beyond troubleshooting, necessitating a warranty event or purchase of a new motherboard.
Question: What tools in linux are available to indicate my BIOS would want to be upgraded?
Answer: One may utilize fwts, as well as review your dmesg logs for errors.
Question: Is updating the BIOS of a host possible with a virtualized guest environment?
Answer: No.
Question: Are BIOS updates risky?
Answer: No. OEMs typically advise when performing a BIOS update, do not interrupt the power supply.
Question: My logs advised to update my BIOS should I?
Answer: Yes.
Question: The BIOS release notes doesn’t specifically cover my problem. Should I update anyways?
Answer: Yes. Not all BIOS fixes are documented in the change log, tested to your specific problem under the same operating system, or tested under your operating system at all.
Question: If the problem isn’t reproducible in Windows, but is reproducible in linux, could this be a BIOS issue?
Answer: Yes.
Question: If the release notes don’t say anything about linux or Ubuntu, should I update the BIOS?
Answer: Yes. Your vendor may only test and have release note commentary about a different operating system, so it wouldn’t advise on if your problem is resolved.
Question: If I didn’t change anything in the BIOS, and my problem started happening after restarting from an update, is it possible an outdated BIOS issue?
Answer: Yes. Updates to Ubuntu can cause buggy BIOS problems to manifest that the prior version did not. The solution is to update a buggy and outdated BIOS, not rely on unintentional WORKAROUNDs.
Question: Whose responsibility is it to keep my BIOS updated?
Answer: The responsibility to keep the BIOS updated lies solely with owner of the hardware. However, as a courtesy to the Ubuntu Community, update methods that may not have been offered by your BIOS vendor are available in this article.
Question: If I don’t update my computer’s buggy and outdated BIOS, are there negative consequences?
Answer: Yes. First, one could be vulnerable to publicly documented BIOS security vulnerabilities. For example, Row Hammer, Lenovo Service Engine BIOS vulnerability, SMM Incursion Attack, etc. Second, not keeping the BIOS updated is not respecting the time of triagers or developers. If one isn’t willing to put the effort in to keep this updated, one shouldn’t expect others to be motivated to help.
Question: If a BIOS update came out after my problem started to occur, should I update?
Answer: Yes.
Question: Someone has the same computer manufacturer and model as me, but I can reproduce the problem, and they can’t. Should I update the BIOS?
Answer: Yes. Folks with the same manufacturer and model can have different hardware under the hood, and/or different revisions of the same hardware. Updating the BIOS helps better root cause the issue, or may solve it altogether.
Источник
Обновление UEFI/BIOS в Linux
Не секрет, что производители материнских плат и ноутбуков не всегда дают возможность пользователям Linux обновить UEFI/BIOS прошивку так же ненавязчиво, как это делают пользователи Windows. Тем не менее для HP EliteBook 840G1, которым я пользуюсь, сделать это немногим сложнее.

Для этого дела понадобятся следующие артефакты:
- FAT32 EFI System Partition (ESP)
- WINE
- Переменный электрический ток
FAT32 ESP
Ноутбуки линейки HP EliteBook содержат 3 режима загрузки. Узнать какой из режимов выбран можно в настройках UEFI/BIOS → System Configuration → Boot Mode . Данный раздел следует читать, если только выбран последний, бескомпромиссный режим UEFI , в остальных случаях можно проскочить.
- Legacy
- UEFI Hybrid with compatibility support module (CSM)
- UEFI Native without CSM
Если вы внимательно читали топик про Linux kernel EFI Boot Stub, то вы наверняка знаете, что и как нужно сделать, для того, чтобы создать дисковый раздел. Можно использовать gdisk , parted или KDE Disk Partition для создания ESP раздела. Вот так выглядит уже готовый раздел.

Рекомендуется ESP раздел монтировать в /boot/efi , а не просто в /boot , для того чтобы можно было хранить образы ядра Linux и файлы загрузчика ОС на штатных линуксовых ФС, вместо того, чтобы все держать в FAT32 EFI System Partition.
Мы уже знаем, что UEFI/BIOS будет искать \EFI\BOOT\bootx64.efi , для чего абсолютный путь к файлу должен быть /boot/efi/EFI/Boot/Bootx64.efi , иначе все пропало и UEFI/BIOS не найдет загрузчик ОС! Обновлению системной прошивки это не помешает, но для чего же тогда нужна прошивка, если нельзя загрузить операционную систему? Очень немаловажно, что по-умолчанию GRUB-2 не копирует необходимый файл и поэтому bootx64.efi надо скопировать вручную.
Подготовка
Берем свежую прошивку с сайта HP, выбираем Linux в выпадающем списке ОС, затем BIOS, скачиваем… и обнаруживаем исполняемый файл для Windows — sp64081.exe . Нет, глаза нас не подвели.
Опытные пользователи бывают готовы к подобным сюрпризам, для чего держат Windows VM либо пользуются не-эмулятором WINE или и то и другое вместе, бо случаи бывают разные. Для распаковки файла возможностей WINE вполне достаточно. Запускаем:
Программа завершает работу с бестактной ошибкой, напоминая лишний раз о том, что нам подсунули не то, что мы ожидали.
Однако, это не должно никого волновать, так как файлы распакованы верно а сверх этого ничего и не требовалось.
Из этого списка нам понадобятся только 3 файла: L71_0137.bin , HpBiosUpdate.efi и HpBiosUpdate.s12 и теперь внимание: скопировать файлы нужно точно в указанные места.
Чтобы попасть в меню настройки UEFI/BIOS надо после включения нажать клавишу Esc или F10 а далее File → Update System BIOS .
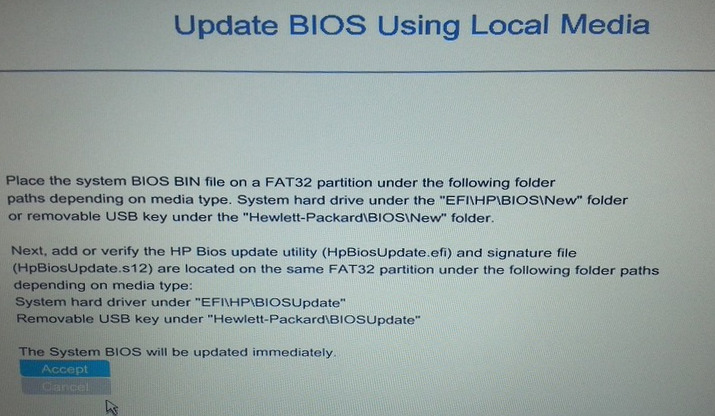
После выбора Accept , процесс обновления стартует без прочих реверансов. Видимо зная цену своим аккумуляторам, производители обновляют прошивку только при включенном электрическом питании компьютера. 2-3 минуты, и процесс благополучно завершен.
UPDATE: По итогам здравых идей в комментариях необходимы некоторые дополнения.
- Можно скопировать те же самые 3 файла на USB флешку, в прописанных путях и используя её обновить прошивку. Разметка файловой системы должна быть FAT32 ESP.
- Можно обновиться из File → Update System BIOS напрямую по интернету, если подключен сетевой кабель. Обновление не будет работать через WiFi соединение.
- Вместо WINE для распаковки архива достаточно использовать 7z e sp64081.exe .
Источник


