AR5B95
Как установить Mac OS на Acer Aspire V3-571g

Установить хакинтош на ноутбук acer aspire v3 571g? Да легко. Одна бессонная ночь и у нас неплохой такой Macbook Air.
А теперь подробности. Решил я как-то установить на свой ноутбук acer Mac OS Mojave, немножечко загуглил, и нашёл много полезной информации, а самое главное то, что мой ноутбук оказывается практически всем своим железом поддерживает данную яблочную операционную систему. Единственный недостаток который мне сулила эта установка был в том, что Mac OS не поддерживает гибридную технологию Optimus, тоесть о дискретной графике стоит забыть и работать исключительно на Intel HD 4000. Но так как я не геймер и ноут использую исключительно как медиацентр и рабочую печатную машинку, то данный факт меня ни сколько не испугал, наоборот, порадовало то, что отключенная Nvidia не будет греть ноутбук.
Процесс установки Mac OS хакинтош на Aspire v3 571g (завод WiFi)
- Записываем образ Mac OS на флешку. Запись образа на флешку описана мной в этой статье.
Если у вас ноутбук с абсолютно такими же параметрами как у меня, (перечислю параметры наиболее важные для завода):
Intel i5-3210M с интегрированным видео HD4000, WiFi Atheros AR5B95(чип AR9285), то можете смело брать мою папку Clover. В ней уже лежат абсолютно все нужные кексты, за исключением кекста на вайфай, Эпл почему то решили его выпилить в новой системе и поэтому прочитав далее статью вы узнаете как его несложно завести. В приложенной папке лежит уже на нужном месте файл SSDT-1.aml, который при загрузке системы подсказывает железу, что дискретное видео нужно отключить и работать на интегрированном.
Из всего, что не работает в этой модели ноутбука в Хаке это только bluetooth. Хоть чип AR9285 и хороший для хакинтоша, но к сожалению именно в этой карточке он не заводим. Если же у вас карта на этом же чипе, но AR5B195, то у вас даже синезуб будет работать как родной.
- Добавляем на EFI раздел вашей загрузочной флешки мою папку Clover из архива выше.
- Устанавливаем Mac OS Mojave в штатном режиме.
- Загружаемся вновь с флешки, радуемся что всё установлено и прекрасно работает. Но остался последний шаг, завод WiFi.
- Находим в архиве с Clover файл AirPortAtheros40.kext. Открываем Finder, нажимаем Cmd+Shift+G, в появившемся поле вставляем этот путь: /Система/Библиотеки/Extensions/IO80211Family.kext/Contents/PlugIns . Переходим по нему и копируем туда AirPortAtheros40.kext, затем запускаем Kext Utility.app, которую я тожу приложил в архив, она пересоберёт кеш, после чего перезагрузитесь и вайфай должен работать.
Можете запустить запакованный в архив DPCIManager.app и у вас должно быть что-то похожее на мои скрины:
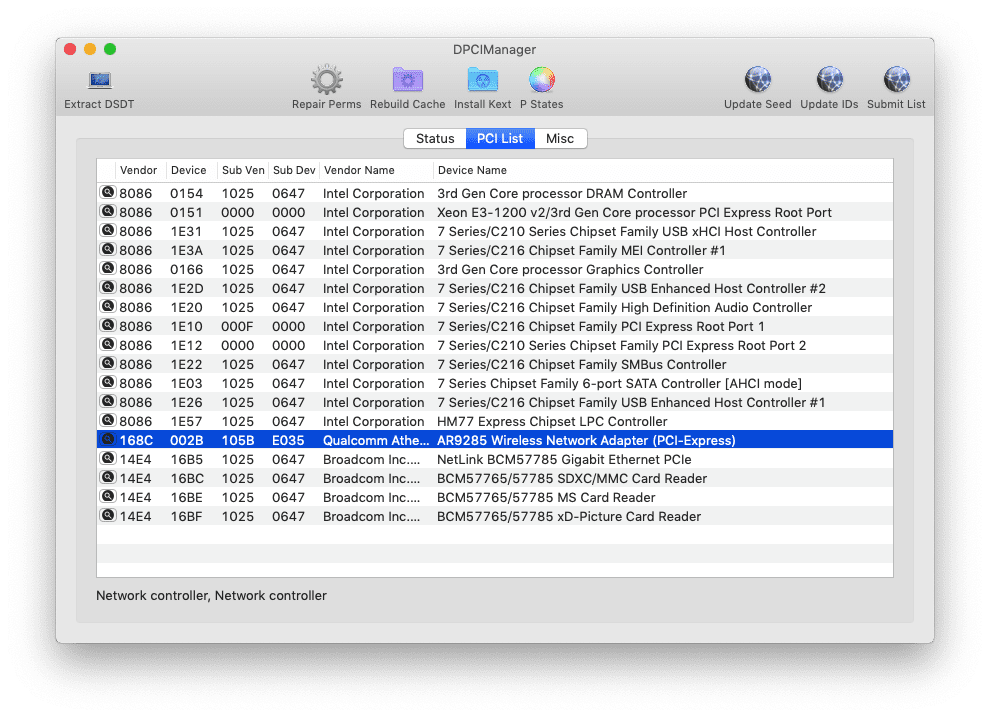

Таблица совместимости карт wifi в Хакинтош
Если вы набрели на эту статью в поисках решения проблемы WiFi, то оставлю здесь таблицу совместимости ноутбучных mini pci expres карт, пусть пригодится.
Источник
Atheros ar9285 mac os
Краткая поэтапная инструкция по установке 10.12 Sierra.
Установка принципиально не отличается от установки El Capitan.
Обязательно добавляйте в загрузочные аргументы(бутарги, Boot Arguments) -v debug=0x100 для отлова паники.
Если этого сделано не было, вопросы и просьбы о помощи типа:» у меня идет установка, а потом перечеркнутый круг что мне делать?» или «идет установка, а потом перезагрузка, помогите», будут игнорироваться. Помогайте себе сами.
Конфиг (config.plist) Clover в большинстве случаев годится от El Capitan.
2. Копируем FakeSMC.kext и др. в /EFI/EFI/CLOVER/kexts/10.12(создать папку 10.12) или в /EFI/EFI/CLOVER/kexts/Other
Install.APP в программы
Очень рекомендуется, при первой установке, никаких других кекстов в папки 10.12 и Other не копировать.
FakeSMC.kext копируем чистый, без датчиков.
Можно добавить кекст на сеть, хотя из-за него тоже можно словить панику, к тому же это можно сделать после установки.
2.1. Установка поверх или на другой диск — запустить Install.APP
2.2. Для новой установки изготовить флэшку команндой от Apple:
sudo /Applications/Install\ 10.12\ Developer\ Preview.app/Contents/Resources/createinstallmedia —volume /Volumes/ИМЯФЛЕШКИ —applicationpath /Applications/Install\ 10.12\ Developer\ Preview.app
3. Видео
3.1. Nvidia:
а) Либо пользуемся официальным драйвером, если поддерживает видеокарта.
б) Либо добавляем в бутаргументы nv_disable=1, ставим в VESA режиме, первый запуск так же с ключем и установка вебдрайверов, в аргументы nvda_drv=1 и перезагрузка в штатном режиме.
3.2. AMD77xx — легась verge паникует. Пропишите изменения прямо в плист AMDRadeonX4000.kext
ati-personality.pl
4. Звук
4.1. В большинстве случаев достаточно VoodooHDA.kext
5. Настройки
Установка прог со сторонних источников —
sudo spctl —master-disable
6. Клавиатура PS2 (непроверенно)
Нет решений:
Прекращена поддержка процессоров не имеющих инструкции SSE4.
Проверить наличие инструкций ( в другой макоси) в терминале вот так: sysctl -a machdep.cpu.features
===========================================================================
Многие проблемы с установкой и первичной настройкой такие же как в осях 10.8—10.11
Установка по методу ГЫКа с правками xite666 (видео):
Источник
Rebranding the Atheros 928x cards — The guide

philip_petev
WARNING . Do not try to change the Vendor/Product IDs! You may change them even to any other manufactuter IDs, but after that, there’s no turning back, because on the next boot, the Atheros EEPROM Tool won’t recognize the card as Atheros and you won’t be able to restore the previous EEPROM state . Use it only to rebrand one Atheros 928x card to another Atheros 928x card !
WARNING. For advanced users only! Do not try this unless you know what you’re dealing with! The following operation is dangerous and may destroy your WiFi card ! I’ve warned you . I don’t take any responsibility, if you have bricked your card . Read the whole guide carefully, before doing anything !
EDIT: A RECOVERY GUIDE IS AVAILABLE, CHECK HERE .
This guide is mainly for all 4x30s owner, but can be used by anyone with whitelist in BIOS.
You’ll need the following:
— Windows XP or later (Windows 7 recommended) — obviously, the tools, used in this guide, works only on Windows XP or later, so you’ll need another computer, running Windows XP or later **or** you can use your ProBook with installed Windows XP or later and the modified FanReset.dylib file by RehabMan (required for cards, not present in the whitelist, like AR9280).
— this Atheros EEPROM tool. It’s modified to extract the first 512 bytes of the WiFi card’s EEPROM.
— An Atheros 928x based card, running with the stock Atheros driver.
— A hex editor (I’ve used this one, because it’s free and doesn’t require installation, but you can use any hex editor).
VERY IMPORTANT: all Windows 7 and later users should disable temporarily the Windows 7’s driver signature enforcement. Select Windows 7 in your Chameleon menu and then press quickly F8, then select Disable Driver Signature Enforcement in the menu . After selecting it, Windows 7 will continue its boot process. This is not a one-time operation, on the next boot the driver signature enforcement will be enabled again. This step is a must, because without doing it, the drivers, bundled with the Atheros EEPROM tool, will not be loaded and you may damage your card .
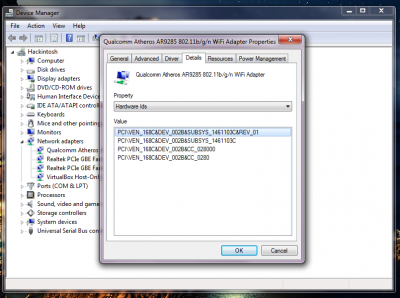
1. So, let’s begin! The first thing is to check your current card’s IDs. In this manual I’ve used an Atheros 9280 based card:
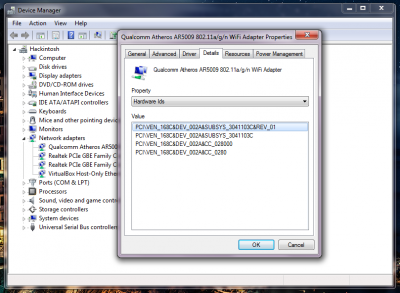
The first line is quite enough for us:
PCI\VEN_168C&DEV_002A&SUBSYS_3041103C&REV_01
That means 168c:002a 103c:3041
These should be changed to 168C:002b 103c:1461 for ProBook 4x30s (the IDs of the HP Atheros 9285 card).
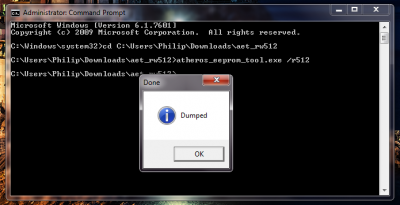
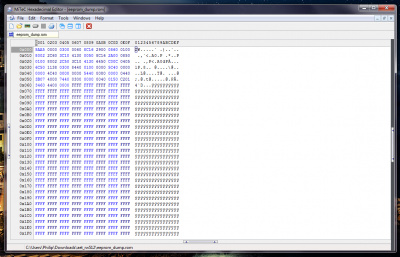
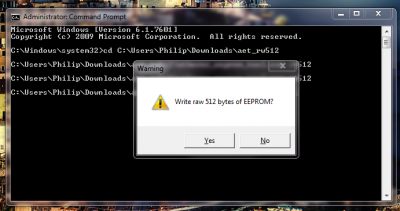
2. Now we should extract a 512 bytes dump from the card’s EEPROM. Download and extract the Atheros EEPROM tool in some folder. Open Command prompt as an administrator (right click on Command Prompt and Run As Administrator), go to the folder, where the tool is located (cd C:\somewhere\aet_rw512) and run the following command:

When you press OK, a new file will be created in the tool’s folder, called eeprom_dump.rom:
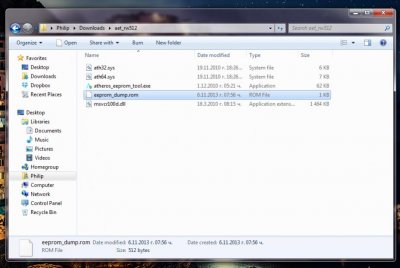
It’s recommended a copy of this dump to be made, if you want to restore the EEPROM to its previous state later.
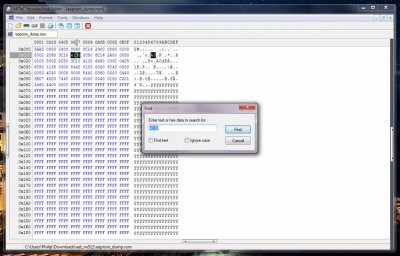
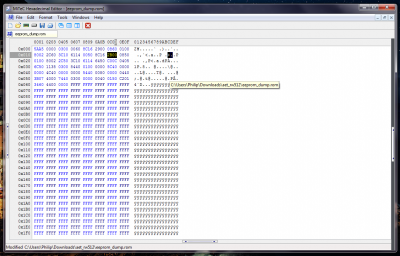
3. Now the dump should be edited properly. Open it in the hex editor:
NOTE: All IDs in this dump are flip-byted . Keep that in mind, when you search for them .
First, to change the SubVendor/SubProduct IDs. In this case, they are 103c:3041. That means we are looking for hex values 3c10 4130. In my case I won’t change the SubVendor ID, because it’s already set to HP (103c), but the owner of cards from another assemblers like Dell Wireless 1515 will have to change it as well. First, the SubProduct ID (unmark the two checkboxes):
And when you find it, change it to 6114 (the flip-byted value of 1461):
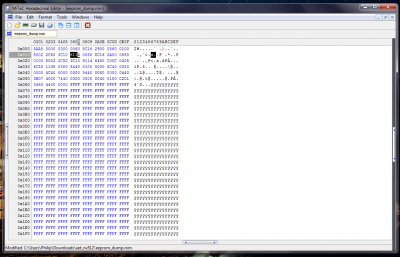
NOTE 2: you’ll probably find the Subvendor/Subproduct IDs in more than one place in this dump, you should change them in all places (in this card they were on two places). If you are not sure if any hex value you may find in the dump is a Product/SubProduct ID or not, look at the previous two values and if they are the flip-byted Vendor/SubVendor IDs, you are on the right path.
Same goes for the SubVendor ID (only if needed).
Now it’s time for the main Vendor/Product IDs. Actually, we need to change only the Product ID, because the Vendor ID is already set to Atheros (168c). You could use the Replace function as well:
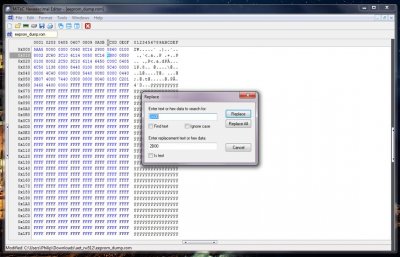
and change the Product ID from 2a00 (Atheros 9280) to 2b00 (Atheros 9285):
All needed edits have been made. Now, save the file.
4. It’s time to upload the modified dump on the card. In Command prompt, run the following command:

5. Reboot your computer. The card will be recognized again, the driver will be installed and now you should see the following:
The funny part is in OS X:
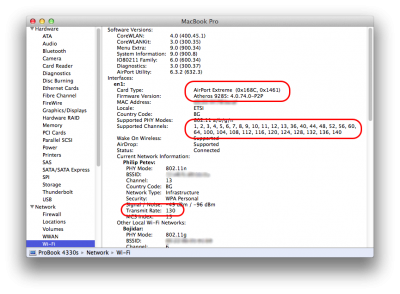
As you can see, the card appears like Atheros 9285, but acts just like Atheros 9280: same channels, same speed. I’m using it for already a week and haven’t seen any problems so far. Of course, in order to work, the current Atheros 9285 DSDT patches / kext injectors should be used, because this trick only avoids the whitelist in BIOS, but for OS X it’s still unsupported Atheros 9285 card.
NOTE 3: During the extraction/writing process you may see this:
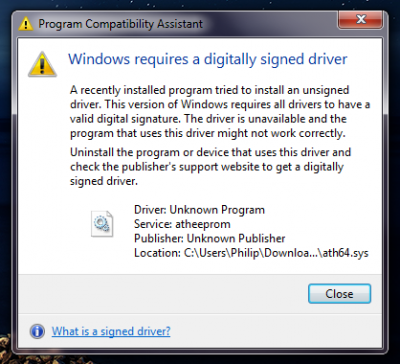
This is only a warning message, it shows that an unsigned driver has been loaded and you may ignore it.
The problem would be if you see this:
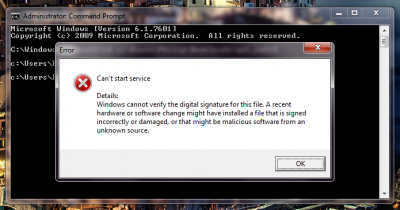
That means you haven’t disabled the driver signature enforcement. Don’t try anything, close all programs, reboot your computer and disable it (the first note in this guide, marked as VERY IMPORTANT) Continuing the procedure in this case (especially if you’re trying to write the dump) may brick your card .
This guide can be used for rebranding of all Atheros based card, supported by this EEPROM tool (as far as I know, the whole AR92xx series).
Credits:
eugene — for the modified Athero EEPROM tool.
edukees — for the initial Atheros 9285 rebranding guide.

eduk33s
Thank you for include me in the credits i was banned right after the post of the «guide»
Your card obviosly seems to be working great in Mac, but what is happening in windows?, the driver detect it like an ar9285 does work ok?, a modification of the driver can be done for that, but my doubt is about another IDs that can be work in our 4530s. I found this in the win driver:
HP laptop
PCI\VEN_168C&DEV_001C&SUBSYS_303F103C —> «Qualcomm Atheros AR5007 802.11b/g WiFi Adapter»
PCI\VEN_168C&DEV_001C&SUBSYS_3040103C —> «Qualcomm Atheros AR5007 802.11b/g WiFi Adapter»
PCI\VEN_168C&DEV_001C&SUBSYS_137A103C —> «Qualcomm Atheros AR5007 802.11b/g WiFi Adapter»
PCI\VEN_168C&DEV_001C&SUBSYS_137B103C —> «Qualcomm Atheros AR5007 802.11b/g WiFi Adapter»
PCI\VEN_168C&DEV_001C&SUBSYS_1385103C —> «Qualcomm Atheros AR5006 802.11a/b/g WiFi Adapter»
PCI\VEN_168C&DEV_001C&SUBSYS_1386103C —> «Qualcomm Atheros AR5006 802.11a/b/g WiFi Adapter»
PCI\VEN_168C&DEV_002A&SUBSYS_1381103C —> «Qualcomm Atheros AR5009 802.11a/g/n WiFi Adapter»
PCI\VEN_168C&DEV_002A&SUBSYS_1382103C —> «Qualcomm Atheros AR5009 802.11a/g/n WiFi Adapter»
PCI\VEN_168C&DEV_002A&SUBSYS_3041103C —> «Qualcomm Atheros AR5009 802.11a/g/n WiFi Adapter» (Philip’s original card (don’t work)
PCI\VEN_168C&DEV_002A&SUBSYS_3042103C —> «Qualcomm Atheros AR5009 802.11a/g/n WiFi Adapter»
PCI\VEN_168C&DEV_002B&SUBSYS_303F103C —> «Qualcomm Atheros AR9285 802.11b/g/n WiFi Adapter»
PCI\VEN_168C&DEV_002B&SUBSYS_3040103C —> «Qualcomm Atheros AR9285 802.11b/g/n WiFi Adapter»
PCI\VEN_168C&DEV_002B&SUBSYS_1461103C —> «Qualcomm Atheros AR9285 802.11b/g/n WiFi Adapter» (Combo Probook) (working)
PCI\VEN_168C&DEV_002E&SUBSYS_1462103C —> «Qualcomm Atheros AR9287 802.11b/g/n WiFi Adapter»
PCI\VEN_168C&DEV_002E&SUBSYS_1626103C —> «Qualcomm Atheros AR9287 802.11b/g/n WiFi Adapter»
PCI\VEN_168C&DEV_0030&SUBSYS_1628103C —> «Qualcomm Atheros AR9382 802.11a/g/n WiFi Adapter»
PCI\VEN_168C&DEV_0030&SUBSYS_1627103C —> «Qualcomm Atheros AR9380 802.11a/g/n WiFi Adapter»
PCI\VEN_168C&DEV_0032&SUBSYS_1785103C —> «Qualcomm Atheros AR9485 802.11b/g/n WiFi Adapter»
PCI\VEN_168C&DEV_0032&SUBSYS_179F103C —> «Qualcomm Atheros AR9485 802.11b/g/n WiFi Adapter»
PCI\VEN_168C&DEV_0032&SUBSYS_1838103C —> «Qualcomm Atheros AR9485 802.11b/g/n WiFi Adapter»
PCI\VEN_168C&DEV_0032&SUBSYS_191A103C —> «Qualcomm Atheros AR9485 802.11b/g/n WiFi Adapter»
PCI\VEN_168C&DEV_0034&SUBSYS_1864103C —> «Qualcomm Atheros AR9462 802.11a/b/g/n WiFi Adapter»
PCI\VEN_168C&DEV_0036&SUBSYS_18E3103C —> «Qualcomm Atheros QCA9565 802.11b/g/n WiFi Adapter»
PCI\VEN_168C&DEV_0036&SUBSYS_217F103C —> «Qualcomm Atheros QCA9565 802.11b/g/n WiFi Adapter»
BTW: I rebrand with this method an Acer ar9285, and a Sony (AIO) AR5B195. No problem at all.
philip_petev
eduk33s
Great!
This is a really good alternative for those who don’t want Bluetooth (HP Combo Ar5b195), and better yet, use a diferent and «advanced» card.
A note that can be important: this modified aet requires the msvcr100d.dll, and i have dificulties to make it work with WIN 8  .
.
I will try this two Ids for the ar9285 and report if work/don’t work with the 4530s
Источник


