- How to record the screen on your Mac
- Use the Screenshot toolbar
- Record the entire screen
- Record a selected portion of the screen
- Trim, share, and save
- Change the settings
- How to Capture and Record Audio on Your Mac
- Need Some Help?
- 1. Professional Voiceover Services — 500 words — Deep and clear, British accent
- 2. Audio Editing: Cleanup, Fixing & Editing
- 3. Original Score for Movie or Game
- External Audio
- QuickTime Player
- Step 1: Start a New Recording
- Step 2: Select Input Source and Quality
- Step 3: Record
- GarageBand
- Step 1: Set Up a New Project
- Step 2: Recording to a Track
- Internal Audio
- Soundflower
- Step 1: Download and Install Soundflower
- Step 2: Set Soundflower as Your Output Device
- Step 3: Play Some Audio
- Step 4: Start a New Audio Recording in QuickTime Player
- Skype Calls
- Step 1: Configure Skype
- Step 2: Download and Enable LineIn
- Step 3: Record with QuickTime Player
- Step 4: Make the Call
- An Easier Way: Piezo
- Step 1: Download and Install Piezo
- Step 2: Prepare to Record
- Step 3: Check Your Skype Settings
- Step 4: Recording
- Conclusion
How to record the screen on your Mac
You can make a video recording of the entire screen or just a selected portion of it.
Use the Screenshot toolbar

To view the Screenshot toolbar, press these three keys together: Shift, Command, and 5. You will see onscreen controls for recording the entire screen, recording a selected portion of the screen, or capturing a still image of your screen:
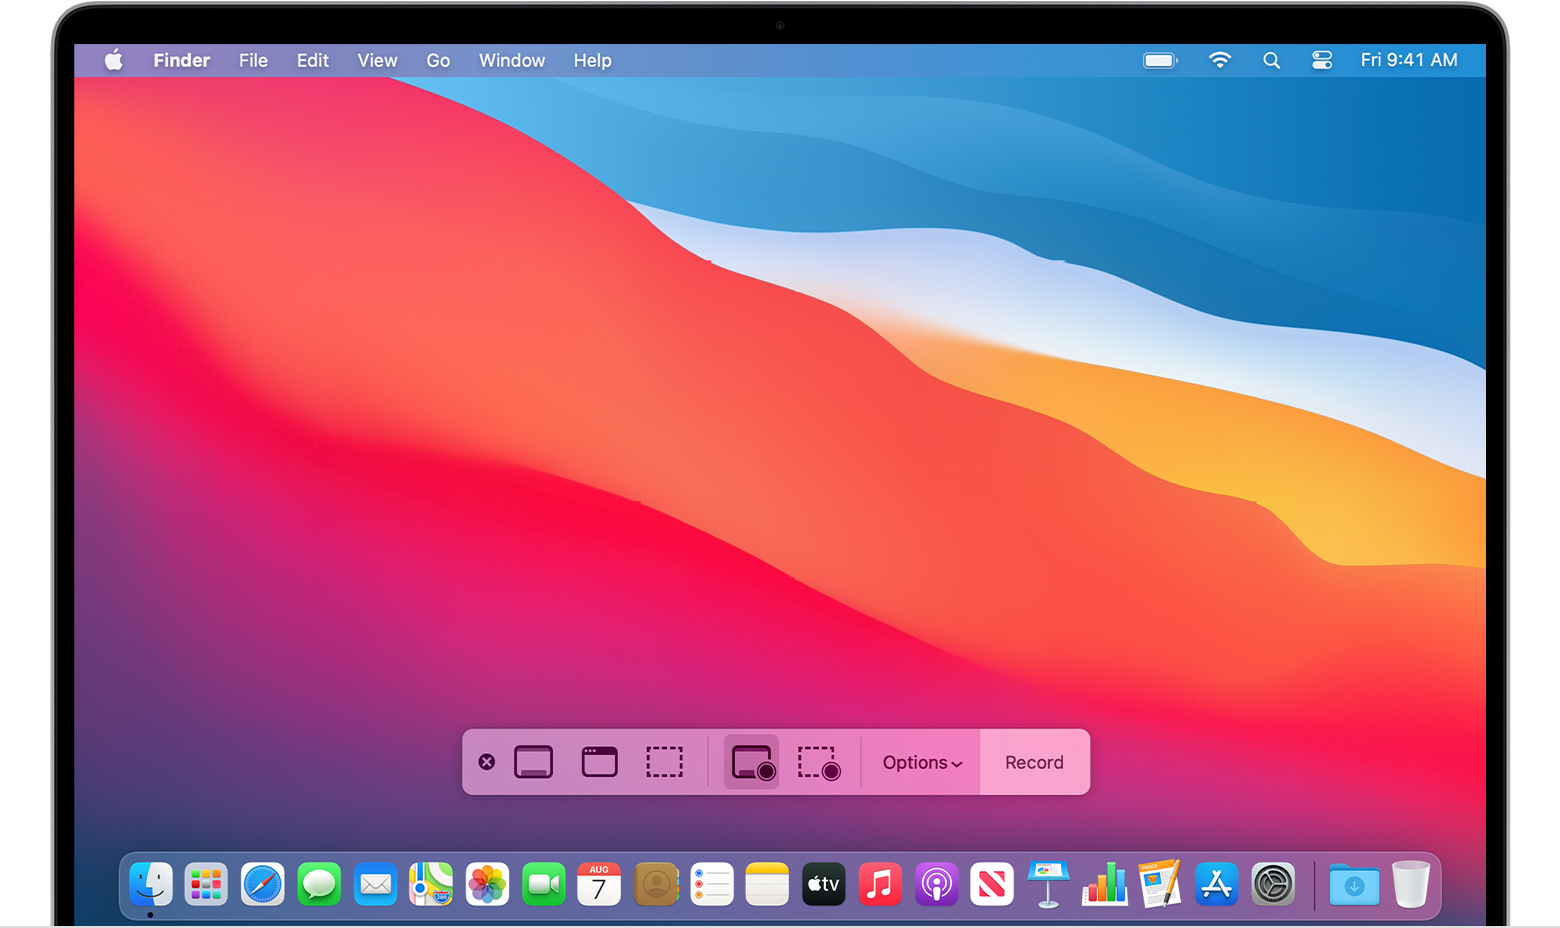
Record the entire screen
- Click in the onscreen controls. Your pointer changes to a camera .
- Click any screen to start recording that screen, or click Record in the onscreen controls.
- To stop recording, click in the menu bar. Or press Command-Control-Esc (Escape).
- Use the thumbnail to trim, share, save, or take other actions.
Record a selected portion of the screen
- Click in the onscreen controls.
- Drag to select an area of the screen to record. To move the entire selection, drag from within the selection.
- To start recording, click Record in the onscreen controls.
- To stop recording, click in the menu bar. Or press Command-Control-Esc (Escape).
- Use the thumbnail to trim, share, save, or take other actions.
Trim, share, and save
After you stop recording, a thumbnail of the video appears briefly in the lower-right corner of your screen.
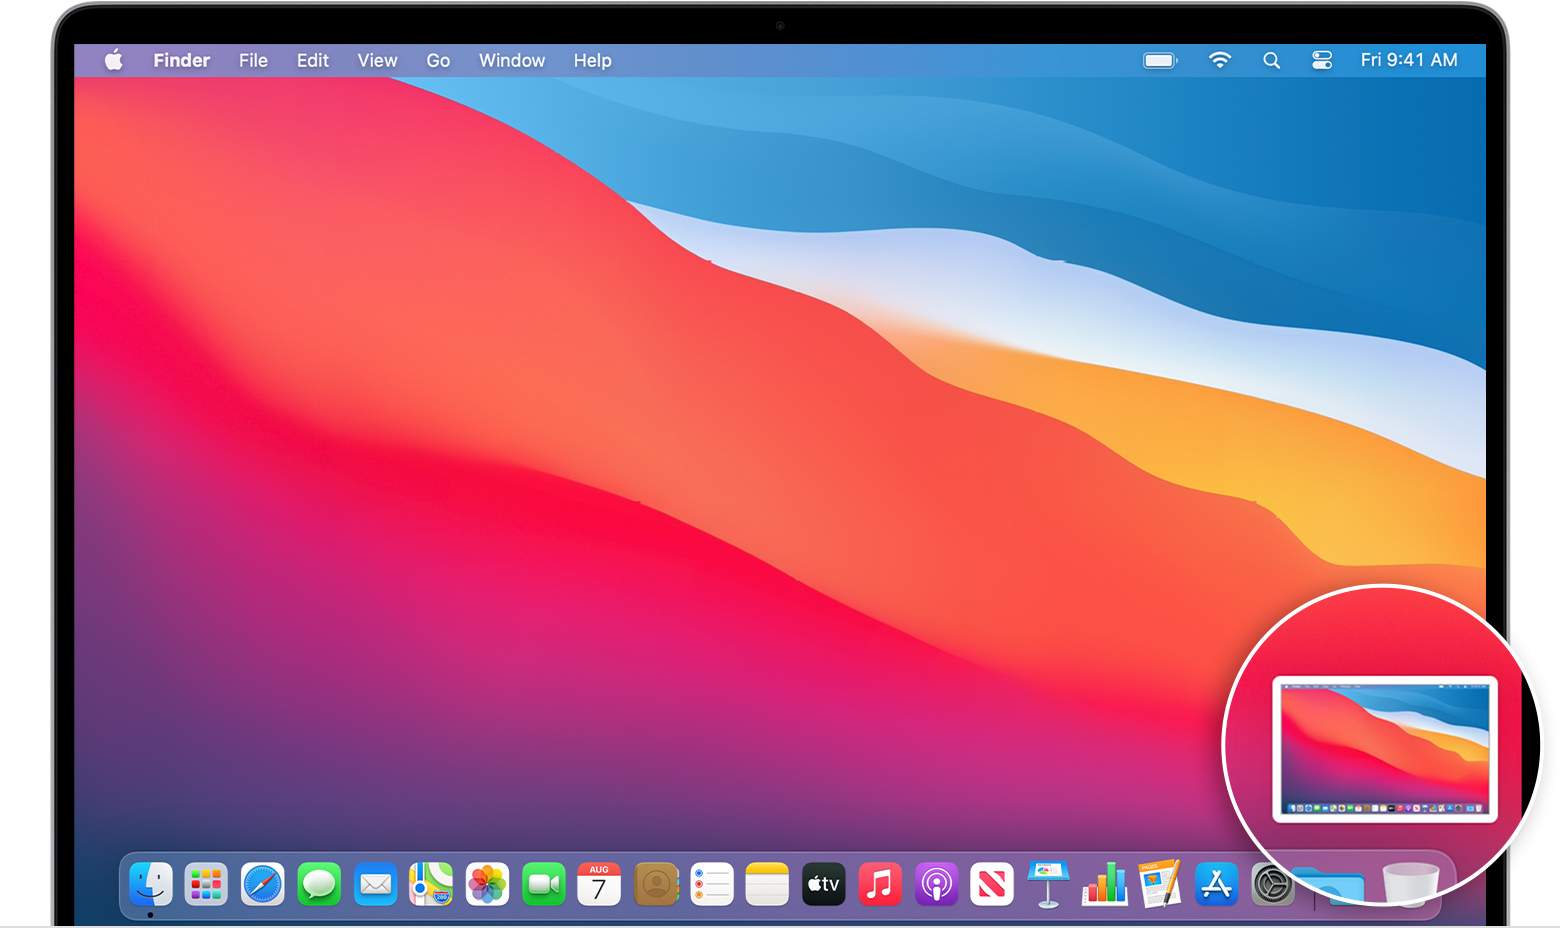
- Take no action or swipe the thumbnail to the right and the recording is automatically saved.
- Click the thumbnail to open the recording. You can then click to trim the recording, or click to share it.
- Drag the thumbnail to move the recording to another location, such as to a document, an email, a Finder window, or the Trash.
- Control-click the thumbnail for more options. For example, you can change the save location, open the recording in an app, or delete the recording without saving it.
Change the settings
Click Options in the onscreen controls to change these settings:
- Save to: Choose where your recordings are automatically saved, such as Desktop, Documents, or Clipboard.
- Timer: Choose when to begin recording: immediately, 5 seconds, or 10 seconds after you click to record.
- Microphone: To record your voice or other audio along with your recording, choose a microphone.
- Show Floating Thumbnail: Choose whether to show the thumbnail.
- Remember Last Selection: Choose whether to default to the selections you made the last time you used this tool.
- Show Mouse Clicks: Choose whether to show a black circle around your pointer when you click in the recording.
Источник
How to Capture and Record Audio on Your Mac
Whether you’re wanting to become the next Bob Dylan or start your own podcast, the Mac has some of the best software around to help you make this a reality. But no matter how good your musical or conversational aspirations are, they’ll be for nought if we can’t effectively capture our music or record our conversations. In this tutorial, I’ll look at the different ways you can capture and record audio to include in your future projects.
Need Some Help?
This tutorial will teach you the basics of recording audio, but there’s a lot more that’s involved in creating a professional audio project. If you need some extra help, there are plenty of audio experts on Envato Studio ready to step in. Here are just a few examples:
1. Professional Voiceover Services — 500 words — Deep and clear, British accent


Get your script recorded by a former BBC News presenter with his own broadcast-quality studio in the UK. His special Envato rate of $75 for up to 500 words includes all rights in all media, apart from UK TV and radio broadcasting. You will receive a 24 bit studio wav file and an mp3 copy.
2. Audio Editing: Cleanup, Fixing & Editing


Have a piece of audio that is too noisy? Muffled? Unclear dialogue? Maybe just needs to trimmed or resequenced? This Grammy-winning producer with 20+ years experience in the music industry will fix it for you.
3. Original Score for Movie or Game
Get up to 15 minutes of music composed especially for your movie (short/animated/feature/documentary), game, or YouTube show.
You will receive a *.zip package where you will find both mp3’s (44.1khz/320kbps) and wav’s (48khz/24bit) of all music themes and variations as separate files.


There are plenty more providers in the audio section on Envato Studio, so have a browse. Then, when you’re ready, read on to find out about the options for recording audio on a Mac.
External Audio
If you’re wanting to capture audio such as vocals, musical instruments or even just dictating notes, you’ll need a way of getting that external audio in to the Mac. Whilst your Mac will likely have a built-in microphone (with the exception of the Mac mini and Mac Pro) which can be used, the quality is mediocre at best.
For the best results, it’s recommended to use a dedicated audio device such as a USB microphone that best suits your needs. Many of them are fully Mac compatible and require no drivers to install, they simply appear as a usable audio input device in System Preferences.
Tip: Always check with the manufacturer before purchasing and audio interface. Mac OS X supports the ASIO (Audio Stream Input/Output) standard which the majority of USB devices are developed for. Occasionally, some devices use proprietary drivers so double-check before spending any money.
A popular USB microphone that’s a good all-rounder for recording both vocals and musical instruments is the Blue Microphones Snowball USB Mic. These types of microphones offer a high quality of sound and can be used to record conversations, vocals and musical instruments.


The Blue Microphones Snowball USB mic is a popular microphone for budding musicians and podcasters.
If you have an electric guitar, you’ll need to make sure you have a line in connection on your Mac. Currently, the only Mac models that have a dedicated line in port are the Mac mini and Mac Pro. If you don’t have a dedicated line in, USB devices such as the Peavey XPort provide a suitable input and are designed specifically for electric guitars.


The Peavey XPort is a USB device designed specifically for electric guitars.
Now that I’ve covered some of the basics of getting audio in to your Mac, let me look at the software options.
The Mac includes two easy methods of recording external audio without the need for any additional software, QuickTime Player and GarageBand.
QuickTime Player
Ever since QuickTime Player X was released, it has provided some very simple ways of recording audio from external audio devices. Let’s test this by recording some audio from our built-in microphone.
Step 1: Start a New Recording
Open QuickTime Player and, using the menu, select File > New Audio Recording. A rather inconspicuous window will appear with very few control options.


QuickTime Player‘s record functions are quite sparse, but that’s not necessarily a bad thing.
Step 2: Select Input Source and Quality
Select the triangle icon on the right-side to bring up the list of currently enabled audio input sources. If it’s not already selected, pick the built-in microphone.


You can select which input device you wish to use easily by using the input selection menu.
Tip: You can have multiple audio devices plugged in at the same time and your Mac will only use the one you select.
You can also select the quality you want to record in. Unless you’re going to be recording for hours or have very little space left, you can use the option Maximum.
Step 3: Record
Hit record and speak into the microphone. Once you’ve finished recording, press stop. You can save your recording by using the File > Export menu.


Rather confusingly, QuickTime offers to save audio as a movie format.
Keeping the Format option as Movie will retain the quality of the recorded audio. If you change this to Audio only, a compressed MPEG-4 version is created that is still of a high quality.
Here’s a test recording I did with my MacBook Air’s built-in microphone.
Here’s another one I did with my Samson Meteor USB microphone.
It’s only when you compare the built-in microphone to a dedicated USB version that you notice how much of a difference it sounds in comparison.
GarageBand
GarageBand is one of Apple’s most popular apps and has been included free with Mac purchases for quite a number of years. We can use GarageBand to record external audio from different sources in the same way we have used QuickTime Player to do so.


GarageBand is a great app for those wanting to learn how to make music on the Mac.
The benefit of recording with GarageBand is that you can record your audio directly in to a project that you’re working on.
Step 1: Set Up a New Project
Launch GarageBand and select a new project that best suits your need. For the purpose of this tutorial, I’ll be selecting Vocals.


Selecting the correct project will load the required presets for the work you’re doing.
Once your project window opens, you’ll need to specify the microphone you want to use. On the lower-right of the project is the option to change the Input Source, so this is where we’d expect to find our list of microphones, similar to QuickTime Player.


Changing the microphone to use is a little more involved than changing the setting in the project.
Unfortunately, that’s not the case and selecting this will only give you the option to change between recording in stereo or recording on each channel as mono. Instead, we change the microphone we want to use through GarageBand‘s preferences, accessible via the GarageBand > Preferences menu.


Changing the microphone in GarageBand‘s preferences will alter the project accordingly.
Once you change your required microphone, GarageBand will promote you that it needs to change its drivers which will take a few moments. Once it’s done, you can now record using your chosen mic.
Some microphones feature their own headphone jack so you can monitor the audio being recorded. If you’re wanting to use this, change the output device in GarageBand as well.
Step 2: Recording to a Track
Select the track you wish to record to (in this case, either Male or Female) and then press the record button.
Once you’ve recorded, you’ll see a coloured segment appear that will include a waveform of the captured audio.


GarageBand provides a waveform view and you can make a number of edits, including cutting out sections, if necessary.
Now you’ve recorded in to GarageBand, you can edit the effects, trim the audio and work on your new masterpiece!
Internal Audio
Recording audio that your Mac is playing back, such as an internet stream, is a little different as it’s not audio we can just simply input into the Mac like a microphone. Our Mac has no option to record what is being sent to the speakers, but with some additional software, we can do exactly that.
Soundflower
Soundflower is a freely developed audio routing app for Mac OS X. Once installed, it provides a way of routing audio that your Mac is playing as though it was an external source. Lets record some audio from a YouTube clip using Soundflower and QuickTime Player.
Step 1: Download and Install Soundflower
Download Soundflower and install the software. Your Mac will need to be restarted so make sure you have saved any documents you might have open.
Step 2: Set Soundflower as Your Output Device
After your Mac has restarted, open System Preferences and select Sound. Set Soundflower (2ch) as your output device.


Once installed, Soundflower acts as a virtual audio device.
What this does is take the audio that was destined for your speakers and route it through Soundflower as a virtual input device, allowing another application to record it as though it was coming from an audio input device like a microphone.
Keep System Preferences open as you’ll be going back to it in a few moments.
Step 3: Play Some Audio
Open up a YouTube clip and start playing it. You’ll notice that your Mac no longer has any audio coming from it. This is because it’s now going through Soundflower, not our default output.
Using another feature of Soundflower, we can listen to the audio being played by using an app called Soundflowerbed that is installed in your Applications folder.


Soundflowerbed provides access to the audio being passed through Soundflower, allowing us to listen to it whilst it works.
Launch the app and select your desired output option. You’ll now be able to listen in on what is being piped through Soundflower.
Step 4: Start a New Audio Recording in QuickTime Player
Just like we did at the beginning of this tutorial, start a new audio recording in QuickTime Player. Select the input option as Soundflower (2ch).
Record a few seconds of audio and then hit stop, as well as stopping any currently playing audio. Play back the recording in QuickTime and you’ll notice it has recorded your system audio.
Skype Calls
Whilst the above works for recording any audio our Mac might be outputting, if we were to use the above method on its own to record a Skype call, we’d only hear the other caller and not ourselves.
To include our side of the conversation, we can use an app called LineIn. It’s a free app by Rogue Amoeba that works that takes your audio input, such as microphone, and routes it to the audio output of your choice. Using this in conjunction with Soundflower, we can record an entire Skype call between both parties.
Step 1: Configure Skype
As Soundflower appears just like any standard audio device, we can configure it directly within Skype.
Launch Skype and then, using the menu, select Skype > Preferences. Make sure to set your desired microphone as the input and the output to Soundflower (2ch).


Skype’s audio settings can be configured independently of the Mac’s primary settings.
Tip: Always check your Skype audio settings before making a call, especially when you’re planning to record.
Step 2: Download and Enable LineIn
Download LineIn and copy the app to your Applications folder. Once copied, launch the app.
Now that the app is running, simply select your preferred microphone and as the input and output it to the same Soundflower (2ch) that we’ve set up our Mac’s audio to go to. This will ensure that when we record, we get both the output from Soundflower as well as the input from our microphone.


LineIn provides a means to also record our side of the conversation, avoiding long periods of dead air where we’d otherwise be speaking!
Make sure to select the option Pass Thru so that our microphone audio is captured at all times.
Step 3: Record with QuickTime Player
As we did earlier in the tutorial, start a new audio recording with QuickTime Player and make sure to specify Soundflower (2ch) as the input option. Once you’re ready, start recording.
Step 4: Make the Call
Call the Skype Test Call service which will play a message and then ask you to say something to test everything is working. If it is, you’ll hear your message back.
To avoid any feedback, it’s recommended to use a set of headphones so that your microphone doesn’t pick up any of the call.
Once you’ve completed the call, hang up and then stop the QuickTime Player recording. Play it back and you should now hear the Skype test call with your part in it.
An Easier Way: Piezo
Throughout all of the above, we’ve explored some very interesting ways of recording audio, both from external devices as well as being able to capture internal audio. If you’re regularly recording audio, either external or internal, and are willing to part with $15, I recommend the fantastic app Piezo, also by Rogue Amoeba.


Piezo provides an all-in-one solution to recording audio from any source, external or internal.
Piezo combines almost all of the features we’ve looked at in this tutorial into one simple app. Whether you want to record a USB microphone or the audio from a specific app, Piezo is able to do this for you. It’s especially handy for Skype as you simply keep your audio settings as you would expect them to be
Step 1: Download and Install Piezo
There is a free trial of Piezo that can be downloaded, which is limited to the first 15 minutes of recorded audio.
Download the trial and install it by placing it in your Applications folder.
Step 2: Prepare to Record
Launch Piezo and using the Source menu, select Skype as the audio you wish to record. Skype will then launch automatically.


Piezo can capture audio from individual apps without having to install any additional software.
Tip: Tip: If you’ve currently got Skype open, Piezo will need to quit and relaunch the app. Make sure to have Piezo open first if you want to record a call.
Next to the timer, click the text and you can specify a title and comment for the recording, as well as the quality. I’ve specified 64k spoken word for now to keep the file size down.
Step 3: Check Your Skype Settings
Using the menu, select Skype > Preferences and specify the microphone and output settings you want to use.


It’s always a good idea to check the Skype settings before getting ready to make a Skype call when you’re using external audio devices.
Step 4: Recording
Hit the record button in Piezo and then place your Skype call. You’ll notice that Piezo has two meters in the app, the left corresponds to audio input from a microphone whereas the right indicates the audio being output from the system or app you’re in. This is really useful when determining why some audio might not be working.
Piezo has a nice touch when it comes to recording as it will only begin once there’s actually some audio, so if you press record but take a few moments to actually set up a Skype call, it won’t do anything until it detects audio.
When you’ve finished recording, simply press the record button again to stop and your completed recording will be in your Music folder.
Conclusion
The Mac includes some great free tools for audio capture when using external audio devices and these can be enhanced further when combined with software such as Soundflower, allowing for the recording of system audio.
Whilst a setup involving Soundflower and LineIn provides most of the functionality you’d need to record a Skype call for the purpose of a podcast, I find investing in Piezo will save you a lot of headache and everything is neatly wrapped in a single app. If you’re planning to record Skype calls on a regular basis then Piezo is a worthwhile investment.
It’s also worth checking the audio apps available on Envato Market to see what’s available. Audio Broadcast HTML5 Recorder and Player, for example, combines various HTML5 technologies to allow you to record your voice in the browser (only through JavaScript, without Flash or Java) and send the recording to a web server.

 Audio Broadcast HTML5 Recorder and Player on Envato Market
Источник


