- Record audio notes in OneNote for Windows 10
- Start a recording
- Stop a recording
- Play back a recording
- Delete a recording
- Realtek High Definition Audio Driver для Windows 10
- Что такое и зачем нужны драйвера?
- Как установить набор драйверов?
- Realtek High Definition Audio Driver: функционал
- Вероятные проблемы
- Скачать бесплатно
- Record audio notes in OneNote for Windows 10
- Start a recording
- Stop a recording
- Play back a recording
- Delete a recording
- Record audio notes in OneNote for Windows 10
- Start a recording
- Stop a recording
- Play back a recording
- Delete a recording
- Fix sound problems in Windows 10
Record audio notes in OneNote for Windows 10
When you’re at a lecture, Q&A session, or an interview, and you know you won’t be able to type notes fast enough, you can use OneNote to record audio notes.
Note: Before you get started, make sure your Windows 10 computer or device has a microphone that’s properly set up in Windows Settings.
Start a recording
To begin an audio recording in your notes, do the following:
Click a location on the current page where you want to start the audio recording.
On the Insert tab, click Audio.
OneNote begins recording immediately. To verify that a recording is in progress, note the increasing time counter on the Recording tab that appears.
Stop a recording
To end an audio recording, do the following:
On the Recording tab, click Stop.
OneNote ends the recording. If you want to continue recording at a later time, click Record.
Play back a recording
To listen to an audio recording in your notes, do the following:
Double-click any Audio Recording icon on any page in your notebook.
Tip: While playing back audio in OneNote for Windows 10, you can use the additional controls on the Audio tab that appears — including Pause, Back 5 Minutes, Back 15 Seconds, Forward 15 Seconds, and Forward 5 minutes.
Delete a recording
If you no longer need a particular audio recording, do the following:
On any page, right-click the Audio Recording icon of the recording you want to delete.
On your keyboard, press the Delete key.
Caution: When you delete an audio recording from your notes, it is erased immediately and cannot be recovered.
Realtek High Definition Audio Driver для Windows 10

Наверняка каждый продвинутый пользователь ПК слышал о фирме Realtek. Эта легендарная компания занимается изготовлением звуковой аппаратуры для компьютеров. Большая часть продукции, выходящая под брендом Realtek – это интегрированные (встроенные) звуковые чипы. Аппаратура данной компании славится своим высоким качеством.
Аудиокарты Реалтек хорошо воспроизводят звук и при этом стоят не очень дорого. Тем не менее, для корректного функционирования аппаратуры необходим так называемый драйвер. Что это такое и зачем он нужен? Ответ узнаете, прочитав данную статью.
Что такое и зачем нужны драйвера?
Драйвер – это специализированная программа, которая нужна для взаимодействия между операционной системой и аппаратными комплектующими. С помощью данной утилиты компьютер понимает, как работать с тем или иным устройством. Стоит подметить, что для каждой модели оборудования нужен свой драйвер.
Так вот, для того чтобы звуковая карта исправно работала и воспроизводила звук, необходимо установить драйвер. Конечно, можно самостоятельно искать утилиту, которая подходит под ваш звуковой codec. Но куда легче скачать набор драйверов. К примеру, Realtek High Definition Audio Driver. Это полноценный пакет драйверов для звукового оборудования, который подходит для операционной системы Windows XP, Windows 7 (в том числе и Максимальная), Windows 8, Windows 10 и прочие ОП от Microsoft. Таким образом обозреваемая утилита может решить множество системных ошибок.
Например, программа способна справится с проблемой «Выходное устройство не установлено». Также прога может помочь, когда на компьютере нет звука.
Работать с паком драйвером очень просто. Необходимо загрузить утилиту на компьютер (сделать это можно у нас на сайте) и установить. В процессе инсталляции программа самостоятельно определит, какие дрова нужны вашему оборудованию. Но как установить Realtek HD Audio Driver на ПК? Ответ на этот вопрос даст следующий раздел статьи.
Как установить набор драйверов?
Процесс инсталляции прост как дверь. Первое что надо сделать, так это запустить скачанный файл. После этого необходимо руководствоваться следующей инструкцией:
- Запуск загруженного исполняющего файла приведет к активации распаковщика. Программа извлекает файлы, которые понадобятся в процессе установки. Все что нужно сделать – так это немного подождать.
- По окончанию распаковки компьютер запустит инсталлятор. В нем необходимо нажать на кнопку «Далее».
- Начнется процесс установки. Это не займет много времени. Как правило, пакет драйверов для звуковой аппаратуры инсталлируется в течение 5-10 минут.
- После завершения установки программа порекомендует нам перезагрузить компьютер. Лучше последовать этому совету. Перезагрузка нужна для того, чтобы система обнаружила новые файлы. Отмечаем соответствующий пункт, после чего жмем на кнопку «Готово».


Realtek High Definition Audio Driver: функционал
Чтобы зайти в диспетчер программы Realtek High Definition Audio Driver необходимо нажать на кнопку «Пуск» и в поиске ввести «Панель управления». Перейдите по открывшейся вкладке. Затем нажмите по «Оборудование и звук». Произойдет переход в новое окно. Там в самом низу расположен пункт Диспетчер Realtek HD. Нажав на него, вы откроете панель управления программой.

Программные возможности менеджера Realtek High Definition Audio Driver довольно-таки разнообразны. И это неудивительно. Ведь в арсенале у данной утилиты множество различных настроек. В первую очередь хочется подметить функцию объемного звучания. Многие знают, что практически все современные ПК способны поддерживать звук формата 5 в 1. Тем не менее большинство разработчиков ПО пренебрегают данной возможностью.
Но только не ребята из Realtek. Обозреваемая утилита способна воспроизводить звук в формате 5 в 1. Подобная возможность наверняка обрадует как компьютерных музыкантов, так и обычных меломанов. Мало того, благодаря дополнительным плагинам можно добиться объемного звучания 7 в 1. Однако это далеко не единственная заслуга данной проги.
Производить различные манипуляции со звуком можно с помощью специализированного диспетчера. Как выглядит Audio Manager в данной программе вы можете увидеть на изображении, которое расположено выше. С помощью данного меню можно осуществлять различные манипуляции с компьютерной периферией. К примеру, Sound Manager позволяет включать или отключать микрофон. Данная программа способна осуществлять роль стандартного системного микшера для регулировки громкости. То есть с ее помощью можно регулировать звук на наушниках, громкость динамиков, колонок и пр.

Realtek High Definition Audio Driver с лихвой удовлетворяет все потребности среднестатистического ПК юзера. К примеру, драйвер пак обеспечивает отличное звучание во время просмотра видеозаписей. Чего уж там говорить о музыке. Слушать любимые песни с установленным Realtek High Definition Audio Driver – сплошное удовольствие. Однако данная программа рассчитана не только на обычных юзеров. Ее возможности наверняка могут заинтересовать профессиональных компьютерных музыкантов, которые работают со звуком.
Что же данный драйвер пак может им предложить? Контроллер поддерживает большинство популярных технологий в сфере записи и проигрывании звука. Например, режим Full Duplex. Это особая функция, которая позволяет записывать и воспроизводить звук одновременно. Такой режим наверняка пригодится для работы с аудиоредакторами и прочим музыкальным софтом. Кроме этого, благодаря мультимедиа аудиоконтроллеру Sound Effect Manager компьютерный музыкант может использовать различные звуковые эффекты, эквалайзер, синтезатор, осуществлять усиление звука и пр. Данная утилита значительно облегчает работу и делает аудио продукт более качественным. В программе реализована поддержка различных звуковых форматов, что также является преимуществом.
Вероятные проблемы
Самая распространенная проблема, с которой сталкиваются пользователи данной программы, заключается в том, что утилита попросту не запускается на ПК. То есть процесс инсталляции драйверов на звук успешно завершился, но иконка с прогой так и не появилась в «Панели управления». Аналогичная проблема возникает и при обновлении операционной системы. Как же бороться с тем, что программа корректно не устанавливается?
На самом деле все очень просто. Необходимо переустановить пакет звуковых драйверов. Тем не менее есть несколько нюансов. Во-первых, обратите внимание на версию утилиты. Скачивайте лишь самый новый драйвер пак. Сделать это можно у нас на сайте. На данной странице представлена последняя версия Реалтек аудио драйвера (на момент написания статьи это 2.81). На нашем интернет-сайте вы можете скачать бесплатно данную утилиту на русском на свой компьютер или же ноутбук через торрент. Во-вторых, обратите внимание на разрядность программы. Есть две версии Realtek High Definition Audio Driver – для 32 bit и для 64 bit машин. Выбирайте тот вариант, который походит под ваш PC.
Перед тем как устанавливать прогу нужно узнать разрядность вашего компьютера. Как это сделать? Все довольно-таки просто. Необходимо просто руководствоваться данной инструкцией:
- Активируйте системную программу под названием «Выполнить». Делается это с помощью горячей комбинации Win + R.
- Появится небольшое окно с полем ввода. Необходимо вбить туда команду cmd и нажать на кнопку Enter.
- Вышеописанные манипуляции приведут к запуску командной строки. В нее необходимо ввести systeminfo и вновь нажать на клавишу Enter. Начнется сбор данных, что может занять определенное количество времени.
- После того как система закончит обработку данных, она выведет всю информацию о машине в консольное меню. Там вам надо отыскать пункт System Type. В нем и указана разрядность вашей машины.
Примечание. Если в поле указан параметр х86, то это значит, что у вас 32-х разрядная система.
Определив разрядность операционной системы, вы легко сможете подобрать нужную версию программы.
- Разработчик: Realtek
- Операционная система: Windows 10
- Язык программы: Русский
- Лицензия: Бесплатно
Скачать бесплатно
Realtek High Definition Audio Driver – отличный набор драйверов, который обеспечивает взаимодействие между компьютером и звуковой картой. Данная утилита выделяется на фоне конкурентов. Ведь обозреваемая программа обеспечивает качественное и объемное звучание даже при использовании, откровенно говоря, слабенькой аппаратуры.
Также радует огромный функционал данного программного пакета. Realtek High Definition Audio Driver – это довольно универсальный софт, который способен удовлетворить потребности не только обычных ПК юзеров, но и компьютерных музыкантов.
Record audio notes in OneNote for Windows 10
When you’re at a lecture, Q&A session, or an interview, and you know you won’t be able to type notes fast enough, you can use OneNote to record audio notes.
Note: Before you get started, make sure your Windows 10 computer or device has a microphone that’s properly set up in Windows Settings.
Start a recording
To begin an audio recording in your notes, do the following:
Click a location on the current page where you want to start the audio recording.
On the Insert tab, click Audio.
OneNote begins recording immediately. To verify that a recording is in progress, note the increasing time counter on the Recording tab that appears.
Stop a recording
To end an audio recording, do the following:
On the Recording tab, click Stop.
OneNote ends the recording. If you want to continue recording at a later time, click Record.
Play back a recording
To listen to an audio recording in your notes, do the following:
Double-click any Audio Recording icon on any page in your notebook.
Tip: While playing back audio in OneNote for Windows 10, you can use the additional controls on the Audio tab that appears — including Pause, Back 5 Minutes, Back 15 Seconds, Forward 15 Seconds, and Forward 5 minutes.
Delete a recording
If you no longer need a particular audio recording, do the following:
On any page, right-click the Audio Recording icon of the recording you want to delete.
On your keyboard, press the Delete key.
Caution: When you delete an audio recording from your notes, it is erased immediately and cannot be recovered.
Fix sound problems in Windows 10
If you’re having audio problems, the following suggestions might help. The tips are listed in order, so start with the first one, see if that helps, and then continue to the next one if it doesn’t.
If multiple audio output devices are available, check that you have the appropriate one selected. Here’s how:
Select the Speakers icon on the taskbar.
Next, select the arrow to open a list of audio devices connected to your computer.
Check that your audio is playing to the audio device you prefer, such as a speaker or headphones.
If this doesn’t help, continue to the next tip.
The audio troubleshooter might be able to fix audio problems automatically.
To run the troubleshooter
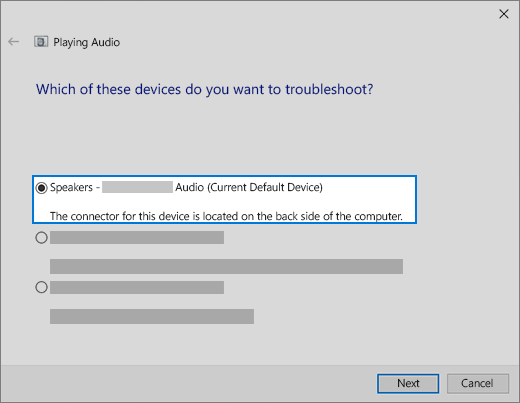
In the search box on the taskbar, type audio troubleshooter, select Fix and find problems with playing sound from the results, then select Next.
Select the device you want to troubleshoot and then continue through the troubleshooter.
You can also launch the troubleshooter from audio Settings. Select Start > Settings > System > Sound > Troubleshoot.
If running the troubleshooter doesn’t help, continue to the next tip.
To check for updates
Select Start > Settings > Update & Security > Windows Update > Check for updates.
Do one of the following:
If the status says «You’re up to date, go to the next tip.
If the status says «Updates are available,» select Install now.
Select the updates you want to install, then select Install.
Restart your PC and see if your sound is working properly.
If that didn’t solve your problem, continue to the next tip.
Try these steps
Check your speaker and headphone connections for loose cords or cables. Make sure all cords and cables are plugged in.
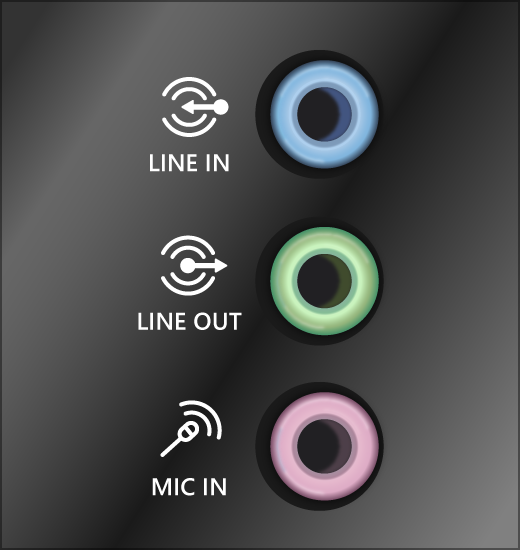
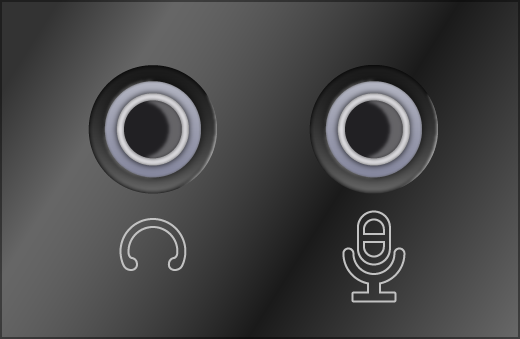
If you have multiple 5mm jacks to plug into, especially on a surround sound system, make sure all cords and cables are plugged into the correct jack.
If it’s not clear which jack goes with which cord, consult your hardware manufacturer, or try the most obvious outputs one at a time and see if they work.
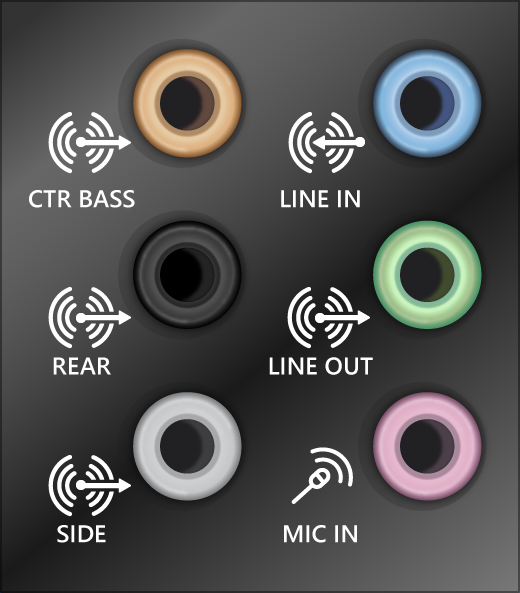
Note: Some systems use a green jack for output and pink for mic input and others will be labeled «headphone» or «microphone.»
Make sure the power is turned on and check the volume level.
Make sure the mute setting is not turned on, and try turning up all the volume controls.
Remember some speakers and apps have their own volume controls. Be sure to check them all.
Try connecting your speaker and headphones to a different USB port.
It’s possible that your speakers won’t work when your headphones are plugged in. Unplug your headphones and see if that helps.
If your cables and volume are OK, see the next sections for additional troubleshooting.
Check to make sure your audio devices aren’t muted and haven’t been disabled.
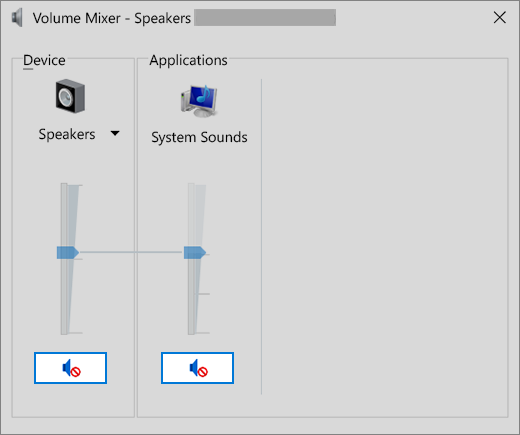
Right-click the Speakers icon on the taskbar, and then select Open Volume mixer.
You’ll see a set of volume controls for your devices. Make sure none of them are muted. If any of them are muted, you’ll see a red circle with a line through it next to the volume control. In that case, select the volume control to unmute.
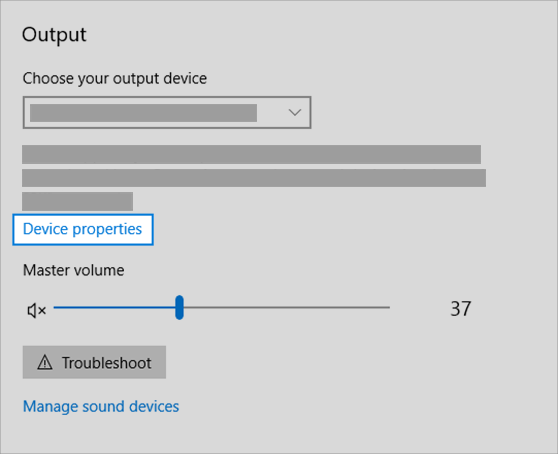
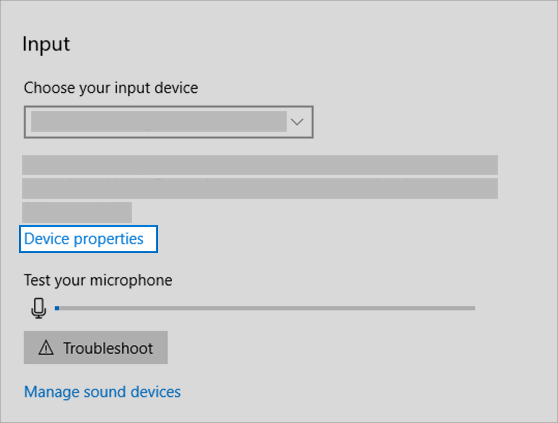
Check your device properties to make sure that your devices have not been disabled by mistake. Select Start > Settings > System > Sound .
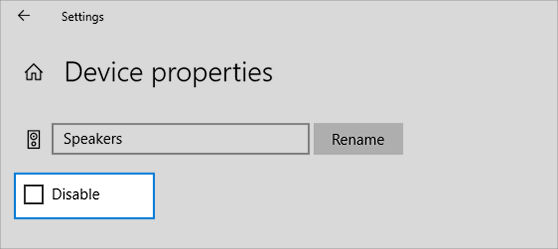
Select your audio device, and then select Device properties. Be sure to select Device properties for both the output and input devices.
Make sure the Disable check box is cleared for the output and input devices.
If that didn’t solve your problem, continue to the next tip.
Hardware problems can be caused by outdated or malfunctioning drivers. Make sure your audio driver is up to date and update it if needed. If that doesn’t work, try uninstalling the audio driver (it will reinstall automatically). If that doesn’t work, try using the generic audio driver that comes with Windows. If you’re having audio issues after installing updates, try rolling back your audio driver.
To update your audio driver automatically
In the search box on the taskbar, type device manager, then select it from the results.
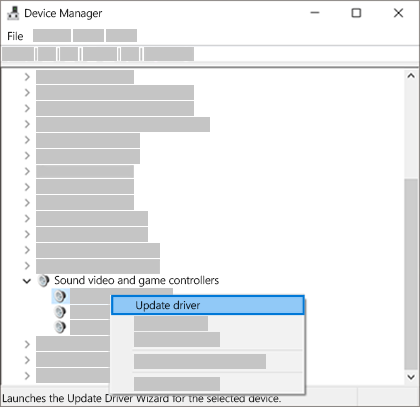
Select the arrow next to Sound, video and game controllers to expand it.
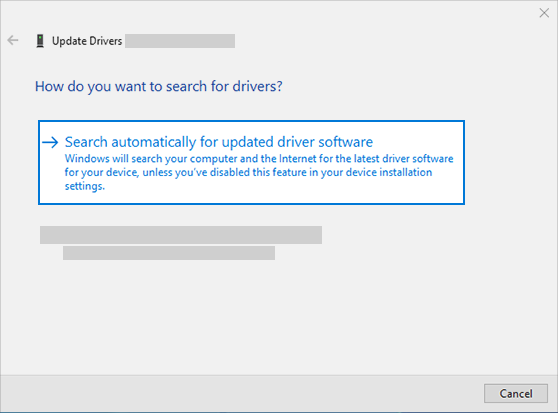
Right-click the listing for your sound card or audio device, such as headphones or speakers, select Update driver, then select Search automatically for updated driver software. Follow the instructions to complete the update.
If Windows doesn’t find a new driver, look for one on the device manufacturer’s website and follow those instructions. If that doesn’t work, try uninstalling your audio driver.
To uninstall your audio driver
In the search box on the taskbar, type device manager, then select it from the results.
Select the arrow next to Sound, video and game controllers to expand it.
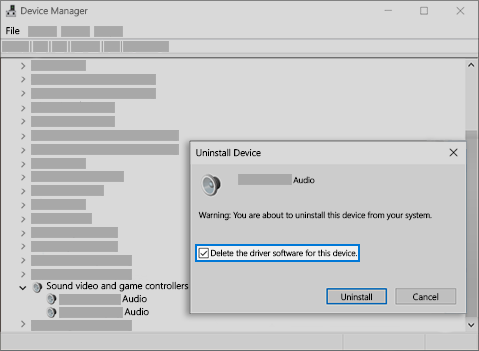
Right-click the listing for your sound card or audio device, select Uninstall device, select the Delete the driver software for this device check box, and then select Uninstall.
Restart your PC.
Note: Be sure to save documents and any other current work before you restart.
This restart will automatically prompt your PC to reinstall your audio driver.
To restart, select Start > Power > Restart .
If those options didn’t work, try using the generic audio driver that comes with Windows.
To use the generic audio driver that comes with Windows
In the search box on the taskbar, type device manager, then select it from the results.
Select the arrow next to Sound, video and game controllers to expand it.
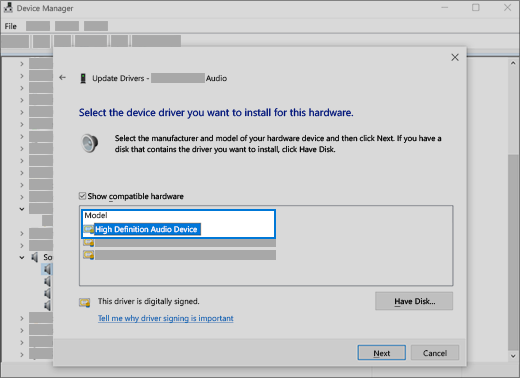
Right-click the listing for your sound card or audio device, then select Update driver > Browse my computer for driver software > Let me pick from a list of device drivers on my computer.
Select the audio device whose driver you want to update, select Next, and then follow the instructions to install it.
If these steps didn’t solve your audio issue, visit your device manufacturer’s website and install the most recent audio/sound drivers for your device. Following is an example of a driver download page for a sound device manufacturer.
If you have audio issues after installing updates
If your audio was working before you ran Windows Update and now isn’t working, try rolling back your audio driver.
To roll back your audio driver
In the search box on the taskbar, type device manager, then select it from the results.
Select the arrow next to Sound, video and game controllers to expand it.
Right-click the listing for your sound card or audio device, then select Properties.
Select the Driver tab, then select Roll Back Driver.
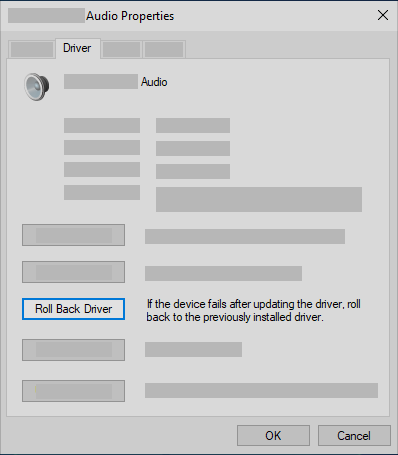
Read and follow the instructions and then select Yes if you want to roll back your audio driver.
If rolling back your audio driver didn’t work or wasn’t an option, you can try to restore your PC from a system restore point.
Restore your PC from a system restore point
When Microsoft installs updates on your system, we create a system restore point in case problems arise. Try restoring from that point and see if that fixes your sound problems. For more info, see «Restore from a system restore point» in Recovery options in Windows 10.
If you’re connecting to an audio device—such as headphones or speakers—using USB or HDMI, you might need to set that device as the default audio device. If you’re using an external monitor that doesn’t have built-in speakers, make sure that the monitor isn’t already selected as your default output device. if it is, you won’t have any audio. You can check that when you set your default output audio device. Here’s how:
In the search box on the taskbar, type control panel, then select it from the results.
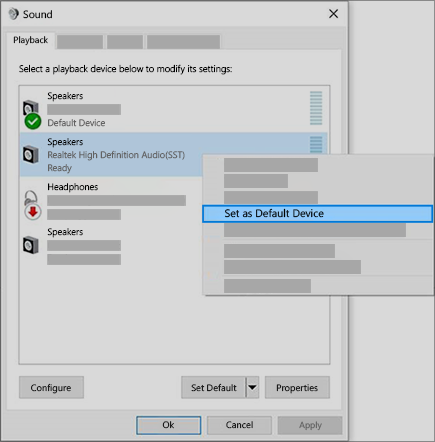
Select Hardware and Sound from the Control Panel, and then select Sound.
On the Playback tab, right-click the listing for your audio device, select Set as Default Device, and then select OK.
If setting your audio device as the default device doesn’t help, continue to the next tip for additional troubleshooting.
Sometimes having audio enhancements on can result in audio issues. Disabling them may resolve your issue.
In the search box on the taskbar, type control panel, then select it from the results.
Select Hardware and Sound from the Control Panel, and then select Sound.
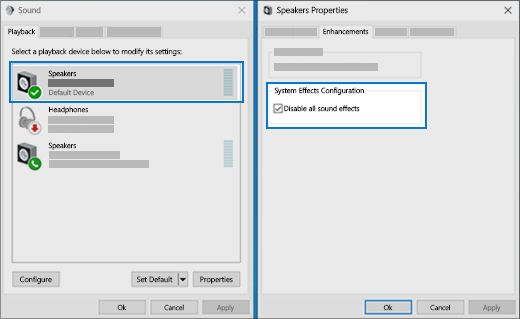
On the Playback tab, right-click the Default Device, and then select Properties.
On the Enhancements tab, select either the Disable all enhancements or the Disable all sound effects check box (depending on which option you see), select OK, and try to play your audio device.
If that doesn’t work, on the Playback tab, select another default device (if you have one), select either the Disable all enhancements or the Disable all sound effects check box (depending on which option you see), select OK, and try to play audio again. Do this for each default device.
If turning off audio enhancements doesn’t help, see the next sections for additional troubleshooting.
In the search box on the taskbar, type services, then select it from the results.
Select each of the following services, right-click, and then select Restart:
Windows Audio Endpoint Builder
Remote Procedure Call (RPC)
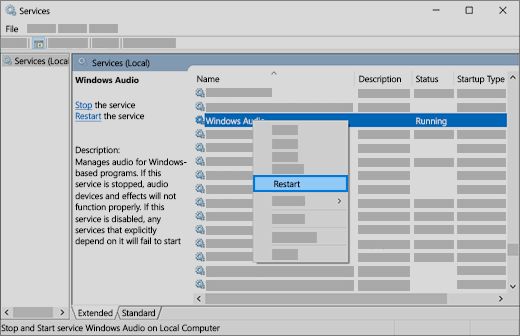
If restarting these services doesn’t resolve your issue, see the next sections for more troubleshooting.
In the search box on the taskbar, type control panel, and then select it from the results.
Select Hardware and Sound from the Control Panel, and then select Sound.
On the Playback tab, right-click (or press and hold) Default Device, and then select Properties.
On the Advanced tab, under Default Format, change the setting, select OK,and then test your audio device. If that doesn’t work, try changing the setting again.
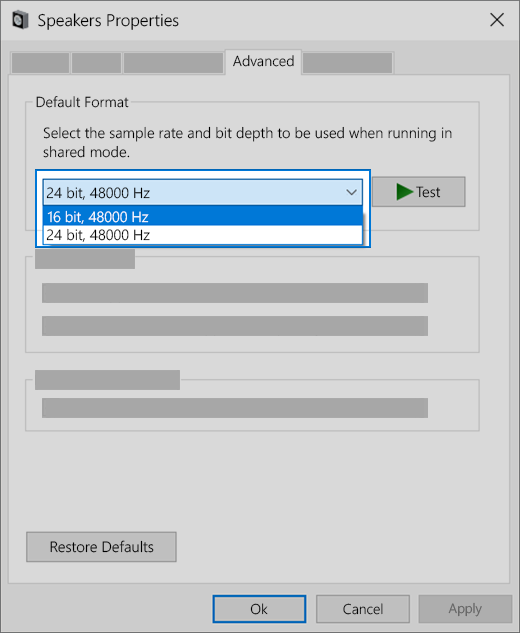
If trying different audio formats doesn’t help, see the next sections for additional troubleshooting.
Many updates require you to restart your device.
To check and see if you have installed updates pending and need to restart
Save your work and close all open applications.
Select Start > Power . If you have installed updates pending, you’ll see options to Update and restart and Update and shut down.
Select one of those restart options to apply the updates
If restarting doesn’t help, see the next section for additional troubleshooting.
Some audio problems might be caused by an issue with the audio system’s IDT High Definition Audio CODEC. This can be fixed with a manual driver update which allows you to choose the sound driver you want to use.
Note: Not all systems will have an IDT High Definition Audio CODEC.
To check and see if you have one, and to manually update the driver
In the search box on the taskbar, type device manager, then select it from the results.
Select the arrow next to Sound, video and game controllers to expand it.
Look for IDT High Definition Audio CODEC. If it’s listed, right-click it and select Update driver, then select Browse my computer for driver software > Let me pick from a list of device drivers on my computer.
You’ll see a list of pre-installed drivers. Select High Definition Audio Device, and then select Next.
1. Select Start > Settings > Privacy , and then select Microphone from the left menu.
Under Allow access to the microphone on this device, select Change. Make sure the toggle is turned On.
If you’re having this issue with a specific app, scroll down to Choose which Microsoft Store apps can access your microphone and make sure that the toggle next to that app is turned On as well.


