Auto dark mode windows
Windows 10 Auto Dark Mode
Automatically switches between the dark and light theme of Windows 10 at scheduled times.
 Android, GNOME Shell, iOS and MacOS already offer the possibility of changing the system design based on the time of day. So why not Windows too?
Auto Dark Mode helps you to be more productive. When it is light outside, we enable you to have a bright and clearly readable OS. After the sun starts to set, your operating system switches to a matching theme to take care of your eyes. This app saves you from the annoying way to switch the design manually in the Windows settings.
By enabling the automatic theme switcher in the app, a task in the Task Scheduler of Windows is created. This task will launch the app and set your theme. No background task, no interruption of a CMD-window, no footprint and no reliability issues. You can find many settings in the easy-to-understand user interface.

- Easy to use and clean user-interface.
- Theme switch based on custom times or the suntimes of your location + time offset.
- Desktop wallpaper switch.
- Windows .Theme-File switch, to also change Accent Color and Mouse Cursor.
- Office theme switch
- You can choose if only Apps should change their theme, or both apps and system.
- Support for accent color on the Taskbar and other system elements.
- Ability to automatically enable the grayscale color filter of Windows 10.
- Easy theme switch with a Jump-List, accessible from the Startmenu or Taskbar.
- Lightweight with 100% clean uninstall. No admin-rights needed.
Download and installing
Windows SmartScreen-Filter, your webbrowser or some antivirus software may warn you from downloading or starting this app. This is due to the missing signature license, which unfortunately I cannot afford. But from the numerous github stars you can see that many people use the program without problems.
Click here to see a VirusTotal test of AutoDarkMode_Setup.exe
Installing is pretty easy as you only need to run the setup file provided as .exe. If you want to deploy Auto Dark Mode on multiple machines, you can use the argument /verysilent to skip the installer window.
Download Auto Dark Mode from WinGet.
Download Auto Dark Mode from Chocolatey (unofficial entry).
Download Auto Dark Mode from Scoop (unofficial entry).
You still have open questions? Check out our wiki!
For developers: adding new modules
In case you want to contribute and add a new module, here’s how:
Understanding how a module works
AutoDarkMode uses a modular timer based system. Each module is registered or deregistered to a specific timer when it is enabled or disabled. The first step therefore usually consists of creating an Enabled property or config class for your module in Config/AdmConfig.cs . Only read operations are allowed to this config file. If you need write access, you will need to add a new configuration class and file and save it separately. In order to then create a module let’s take a look at what a module class looks like:
A module needs to have a constructor that calls its base constructor with exactly one string parameter (name) and one bool parameter (should the module be fired when it was enabled in the config file).
Each module has access to the configuration builder in case it needs to retrieve values from the global configuration. You can call it by invoking the ConfigBuilder singleton instance.
A module must inherit from the AutoDarkModeModule base class. The base class ensures that modules are comparable and implements the IAutoDarkModeModule interface. This ensures that all modules can be controlled by only using the interface. You will then need to override
- Fire() , which is called by the timer and
- TimerAffinity , which is the unique name of a timer this module should run on.
There are preconfigured timer names in Timers/TimerName.cs that tick at different intervals. An example on how to add new timers will come at a later point in time.
Adding a module to the module warden
Each module is automatically controlled by the module warden, which is a module itself that runs by default. It manages enabling and disabling modules on any timer based on the current configuration file state. You can add your modules to the software by changing the Fire() method in Modules/ModuleWardenModule.cs
It looks similar to this one:
To add a module, call AutoManageModule with type signature AutoManageModule#(String, Type, Bool, Bool) and takes the following parameters:
- Name: Derived from the className so you can use typeof(MyModule).Name
- Type: The module’s class used for object instantiation, this is always typeof(MyModule)
- FireOnRegistration: The module event should be triggered as soon as it is registered to a timer, boolean true/false
- Enabled: A boolean value that indicates whether the module should be running currently. Point it to your Enabled Property that you created in the configuration file or use an existing one if it fits your needs
Our final call then looks like this:
AutoManageModule(typeof(MyModule).Name, typeof(MyModule), true, config.MyModuleProperty.Enabled);
And that’s it. Your module will now be managed automatically. Next steps would be providing a user interface element that controls your module.
About
Automatically switches between the dark and light theme of Windows 10
Авто-переключение тёмной темы в Windows 10 или краткий обзор Auto Dark Mode
Привет, наверняка каждый задумывался о том, почему в Windows 10 есть светлая и темная тема, но не реализовано переключение тёмной темы. Ведь даже в macOS Mojave (10.14), iOS 13 и Android (не во всех, но многих) реализована данная возможность. И, гуляя по GitHub, наткнулся на интересную программу: Auto Dark Mode . Именно об этой программе пойдёт речь в этой статье.
Описание
Auto Dark Mode — это программа, которая позволяет довести переключение светлой\темной темы до автоматизма. Она написана на C# и, лично я, рекомендую использовать её на Windows 10, начиная с версии 1909 (19H2) и выше. Программа обновляется регулярно, при появлении проблем. Автор данной программы поддерживает её актуальность вплоть до новой 2004 (20H1) версии. Теперь давайте сравним плюсы и минусы:
Плюсы
- Регулярно обновляется
- Локализация на русском языке (неполная, но достаточно)
- Полностью настраиваемая
- Просто и удобно в использовании
- Смена темы по времени рассвета/заката (по геолокации, вычисленной через IP-адрес устройства)
- Смена картинки рабочего стола
- Открытый исходный код
Минусы
- Лаги при самой смене темы
- Несовместимость с ранними версиями Windows 10
- Автозапуск
- Иногда не сразу меняется тема (особенно при загрузке системы)
В любом случае, несмотря на то, что у этой программы есть минусы, я доволен тем, что есть люди, которые умеют делать полезные программы. И я буду ей пользоваться до тех пор, пока эту функцию не реализуют из коробки
Скачать бесплатно Auto Dark Mode 2.3.1

Auto Dark Mode – небольшая программа для Windows 10, которая автоматически меняет цвет темы оформления в заданное время. Имеет 2 режима: ручной, в котором вы сами устанавливаете время, и автоматический, при котором тема меняется в зависимости от времени суток. Для каждой темы можно настроить обои, цвет в приложениях и другие параметры.
В Auto Dark Mode есть 2 основных режима:
1. Пользовательский. Вы сами устанавливаете время, когда должна включаться светлая и темная тема. Например, можно поставить так – в 7.00 включается светлая тема, а в 20.00 она переключается на темную.
2. Автоматический («От рассвета до заката»). В этом режиме программа определяет ваше местоположение и сама устанавливает время смены темы в зависимости от времени суток.
Также в Auto Dark Mode есть дополнительные параметры. Например, можно отключить смену темы оформления в приложения или в системе. Также можно настроить рабочий стол для каждой темы отдельно – выбрать фон, обои и т. д. В параметрах можно изменить формат времени на 12-часовой.
Особенности программы
• Автоматически меняет тему оформления в заданное время.
• Настройка рабочего стола для каждой темы по отдельности.
• Интерфейс на русском языке.
• Поддерживает Windows 10.
Программу Auto Dark Mode можно скачать совершенно бесплатно.
Скачать Auto Dark Mode 3.0
Auto Dark Mode – небольшая утилита, немного расширяющая возможности настройки цветовых схем в операционной системе Windows 10. Установив данное приложение, пользователь сможет планировать включение темного режима. Такое переключение может быть не только просто интересным, но также позволит адаптировать экран для зрительного восприятие, что в конечном итоге может положительно сказаться на здоровье глаз.
Программа с самого начала установки предлагает продолжить инсталляцию на родном языке и далее приветствует пользователя приятным лаконичным окном в стиле Windows10. Несколько вкладок в списке меню предлагают установить для ручного режима время включения и выключения темного стиля. Еще один варианта активации режима, предполагает включение «от рассвета до заката», это удобно и при этом не нужно тратить время на настройку. Также для авто режима, достаточно просто установить галочку в чекбоксе и Auto Dark Mode сделает все сам, без участия пользователя.
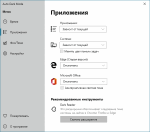
Отдельный раздел позволяет работать с поведением цветовых схем в приложениях. Для максимальной адаптации некоторых популярных браузеров (Chrome, Firefox и Edge) есть отдельные расширения, которые предлагается установить не покидая интерфейса программы.
Далее, вкладка Фонов и тем, позволит провести тонкие настройки при выборе режима Windows темы. Здесь можно настроить фон, курсор мыши и основной цвет. Другими словами, любой желающий может создавать свои собственные темы.
Ну и на конец, небольшой список настроек в соответствующем пункте, позволит:
• Задействовать режим часов в 12 часовом формате.
• Искать обновления в фоновом режиме.
• Изменение после Connected Standby.
• Использовать задачу входа вместо записи в автозапуске.
• Поддержка нескольких пользователей.
• Использовать цветовой фильтр в серых оттенках.
• Установить задержку переключения цвета панели задач.
Auto dark mode windows
Windows 10 Auto Dark Mode
Automatically switches between the dark and light theme of Windows 10 at scheduled times.
Android, GNOME Shell, iOS and MacOS already offer the possibility of changing the system design based on the time of day. So why not Windows too?
Auto Dark Mode helps you to be more productive. When it is light outside, we enable you to have a bright and clearly readable OS. After the sun starts to set, your operating system switches to a matching theme to take care of your eyes. This app saves you from the annoying way to switch the design manually in the Windows settings.
By enabling the automatic theme switcher in the app, a task in the Task Scheduler of Windows is created. This task will launch the app and set your theme. No background task, no interruption of a CMD-window, no footprint and no reliability issues. You can find many settings in the easy-to-understand user interface.
- Easy to use and clean user-interface.
- Theme switch based on custom times or the suntimes of your location + time offset.
- Desktop wallpaper switch.
- Windows .Theme-File switch, to also change Accent Color and Mouse Cursor.
- Office theme switch
- You can choose if only Apps should change their theme, or both apps and system.
- Support for accent color on the Taskbar and other system elements.
- Ability to automatically enable the grayscale color filter of Windows 10.
- Easy theme switch with a Jump-List, accessible from the Startmenu or Taskbar.
- Lightweight with 100% clean uninstall. No admin-rights needed.
Download and installing
Windows SmartScreen-Filter, your webbrowser or some antivirus software may warn you from downloading or starting this app. This is due to the missing signature license, which unfortunately I cannot afford. But from the numerous github stars you can see that many people use the program without problems.
Click here to see a VirusTotal test of AutoDarkMode_Setup.exe
Installing is pretty easy as you only need to run the setup file provided as .exe. If you want to deploy Auto Dark Mode on multiple machines, you can use the argument /verysilent to skip the installer window.
Download Auto Dark Mode from WinGet.
Download Auto Dark Mode from Chocolatey (unofficial entry).
Download Auto Dark Mode from Scoop (unofficial entry).
You still have open questions? Check out our wiki!
For developers: adding new modules
In case you want to contribute and add a new module, here’s how:
Understanding how a module works
AutoDarkMode uses a modular timer based system. Each module is registered or deregistered to a specific timer when it is enabled or disabled. The first step therefore usually consists of creating an Enabled property or config class for your module in Config/AdmConfig.cs . Only read operations are allowed to this config file. If you need write access, you will need to add a new configuration class and file and save it separately. In order to then create a module let’s take a look at what a module class looks like:
A module needs to have a constructor that calls its base constructor with exactly one string parameter (name) and one bool parameter (should the module be fired when it was enabled in the config file).
Each module has access to the configuration builder in case it needs to retrieve values from the global configuration. You can call it by invoking the ConfigBuilder singleton instance.
A module must inherit from the AutoDarkModeModule base class. The base class ensures that modules are comparable and implements the IAutoDarkModeModule interface. This ensures that all modules can be controlled by only using the interface. You will then need to override
- Fire() , which is called by the timer and
- TimerAffinity , which is the unique name of a timer this module should run on.
There are preconfigured timer names in Timers/TimerName.cs that tick at different intervals. An example on how to add new timers will come at a later point in time.
Adding a module to the module warden
Each module is automatically controlled by the module warden, which is a module itself that runs by default. It manages enabling and disabling modules on any timer based on the current configuration file state. You can add your modules to the software by changing the Fire() method in Modules/ModuleWardenModule.cs
It looks similar to this one:
To add a module, call AutoManageModule with type signature AutoManageModule#(String, Type, Bool, Bool) and takes the following parameters:
- Name: Derived from the className so you can use typeof(MyModule).Name
- Type: The module’s class used for object instantiation, this is always typeof(MyModule)
- FireOnRegistration: The module event should be triggered as soon as it is registered to a timer, boolean true/false
- Enabled: A boolean value that indicates whether the module should be running currently. Point it to your Enabled Property that you created in the configuration file or use an existing one if it fits your needs
Our final call then looks like this:
AutoManageModule(typeof(MyModule).Name, typeof(MyModule), true, config.MyModuleProperty.Enabled);
And that’s it. Your module will now be managed automatically. Next steps would be providing a user interface element that controls your module.


