- Linux Mouse and Keyboard Automation Software Tools
- Linux Auto Mouse Click Software
- Type of Mouse Click which can be Auto Clicked using this Linux Automation Tool
- Автоматизируем щелчки мышкой в Linux: xdotool
- Automate mouse clicks anywhere on Windows, Mac and Linux
- Book multiple Passport appointments (Example)
- Auto Mouse Click
- How to Auto Mouse Click
- Step 1 : Download Auto Mouse Click
- Step 2 : Configure HotKey to get Mouse Cursor Position
- Step 3 : Automate Mouse Clicks
- Schedule Automatic Mouse Clicks
- Auto Mouse Click in Action
- Register Auto Mouse Click
- Contact Us
Linux Mouse and Keyboard Automation Software Tools
This Website provides Keyboard and Mouse Automation Tools for Linux. There are so many variants of Linux and the Automation Tools offered here will be tested on every possible Linux distribution. Initial Testing of all the Automation Tools offered here are done on Linux Mint, Ubuntu, Kubuntu, Fedora, etc. which are one of the best Linux Distros. When using any of the Linux Mouse Automation Tool presented on this website, you would not need to go to Terminal and struggle with complex commands. Linux Automation Tools offered here are at par with available Windows Automation Tools and are extremely user friendly.

You can also find similar tools for OS Automation for Windows 8, Windows 7, XP, Vista and other 32 bit and 64 bit versions of Microsoft Operating System at as Auto Clicker and also on Apple Macintosh using Mac OS X Auto Clicker for Mac 10.5 onward versions.
Linux Auto Mouse Click Software
The Linux Auto Mouse Click Software presented here is a Linux Mouse Automation Tool. Just have a close look at the given below screenshot of the software and you will notice that there is everything you would need to automate your Linux tasks using Mouse Clicks. There are some commands in the Menu of this Linux Automation Software to save Screen Area of this Linux Automation Tool. Download Video Tutorial displaying how to use the Linux Auto Mouse Click Software to Automate Mouse Clicking and Keyboard Typing.

Whether you are using your Linux on Single or Multiple Monitor Computer, every Pixel on your Monitor is defined by X and Y Co-Ordinates. On a Basic Single Monitor Linux Computer, value of X Co-Ordinates start at Left Hand Side and go on increasing to the right. Similarly values of Y-Co-Ordinates starts at top and go onto increasing towards the bottom of the screen. Total Number of Pixels together define the Screen Resolution.
This Linux Mouse Automation Software displays X and Y Co-Ordinates of the Mouse Cursor at the top right corner. In order to understand the X and Y Co-Ordinates, just move the Mouse Cursor around the screen and notice the X and Y Co-Ordinate Values change in the software.
In order to click at some location on the screen automatically with this Linux Automation Software, you would need to specify the X and Y Co-Ordinates of that particular location. Separate Edit Boxes have been provided on the software’s main screen to capture X and Y Co-Ordinates. In order to fill in the X and Y Co-Ordinates, you can use a System wide Keyboard Shortcut. The System Wide Keyboard Shortcut is a Key Combination (Configurable from Settings of the Software) which works even when this Linux Automation Tool does not have Focus. Just Move the Mouse Cursor to the desired location and press the System Wide Keyboard Shortcut Key to automatically enter the screen location in the edit boxes provided. Configure other parameters and then press the Add Click Button to store the Mouse Click in the List of Mouse Click to Automate.
Have a look at the Software Screenshot again and notice the Status Bar of the Software. Yes Another Configurable Keyboard Shortcut allows you to add the Mouse Click automatically to the script using a single keyboard key press.
The System Wide Keyboard Shortcuts can be configured using Settings of the Software. In order to launch the Settings screen, navigate to the Edit Menu and select the Menu Item labeled Settings or press F7 to invoke the settings screen.
To Auto Click at Current Mouse Cursor Location and Not a pre-determined location identified by X and Y Co-Ordinates, add a Click at X = 999 and Y = -999. Once you add a Mouse Click at X = 999 and Y = -999 and run the script, the script will determine the mouse cursor position and will then click at that particular location. Yes this Linux Automation Tool cannot click at X = 999 and Y = -999 and any type of click added with these co-ordinates get converted to current mouse cursor location.
Type of Mouse Click which can be Auto Clicked using this Linux Automation Tool
Given below types of mouse clicks can be automated using this Linux Auto Clicker Software. The Screenshot of the software also displays various types of mouse click that can be sent to active gui application.
- Single Left Mouse Click or just Click.
- Double Left Mouse Click or simply Double Click.
- Ctrl (Key on Keyboard) + Left Mouse Click.
- Shift + Left Mouse Click.
- Middle Mouse Click.
- Right Mouse Click.
Источник
Автоматизируем щелчки мышкой в Linux: xdotool
Эта очень короткая заметка на примере активации ключей в Steam описывает процесс автоматизации операций, выполняемых при помощи мыши и клавиатуры.
Допустим, вы купили несколько наборов игр Humble Bundle. Теперь у вас есть, например, 5 ключей для активации в Steam. А может быть 15 или даже 25. Вы очень не хотите активировать их вручную, потому что это слишком муторно: в клиенте Steam нужно каждый раз наводить курсор на меню «Games», щёлкать, потом наводить курсор на пункт меню «Activate a Product on Steam…», опять щёлкать, потом нажимать Enter, потом ещё раз Enter, и только затем наконец-то вводить ключ (а потом нужно подождать, ещё раз нажать Enter, затем Escape). А потом повторять то же самое для каждого последующего ключа. Как писал Леонид Каганов, стоило ли вообще ради такого «прогресса» спускаться с пальмы и брать в руки каменный топор?
В общем, вы решили этот процесс автоматизировать — тем более, что задача-то, на самом деле, очень простая. Для её решения нам потребуются консольные утилиты xdotool и xclip — убедитесь, что они установлены у вас в системе.
Для начала вы собираете ключи с веб-страницы, чтобы затем записать их в текстовый файл, по одному на строку. Естественно, не вручную. Например, со страницы Humble Budle их можно собрать, выполнив через JS-консоль что-нибудь в таком духе:
Получается текстовый файл с примерно таким содержимым:
При сохранении текстового файла убедитесь, что в конце есть перенос строки (некоторые текстовые редакторы не добавляют его автоматически). Иначе при выполнении скрипта последний ключ не будет активирован.
Далее вам нужно открыть Steam и определить координаты тех точек, куда нужно будет автоматически перемещать курсор. Таких точек две: во-первых, точка для первого щелчка (меню «Games»), во-вторых, точка для второго щелчка (пункт меню «Activate a Product on Steam…»). Тут по настроению — можете получить координаты с помощью команды getmouselocation, а можете их подобрать.
В первом случае можно либо запустить xdotool через watch (для автоматического перевыполнения команды через определённый интервал времени), либо добавить sleep.
То есть либо запускаете watch xdotool getmouselocation и наводите курсор на нужное место экрана, посматривая при этом в консоль и запоминая значения нужных точек, либо запускаете xdotool sleep 5 getmouselocation и получаете координаты той точки, где курсор оказывается через 5 секунд после запуска команды (соответственно, смотреть в консоль или запоминать координаты не нужно — достаточно будет просто успеть поместить курсор в нужное место, и уже потом переключиться к консоли).
Во втором случае вы пишете, допустим, xdotool mousemove 52 38 , выполняете, смотрите, где оказался курсор, а потом меняете числа, пока не найдёте подходящие. Этот вариант более весёлый, поэтому, думаю, многие предпочтут сделать именно так.
Теперь, когда у нас есть нужные координаты, давайте действовать итеративно: прежде всего попробуем автоматически пройти до момента ввода ключа.
Для этого будем использовать команды mousemove, click, sleep и key. Список команд, кстати, можно посмотреть в документации по xdotool.
xdotool mousemove 210 105 click 1 mousemove 210 160 sleep 0.1 click 1 sleep 0.1 key Return sleep 0.1 key Return
Если в точке, куда в первую очередь перемещается курсор, не Steam, а какое-то другое окно (например, если Steam скрыт за окном терминала), то нужно добавить команды windowactivate/windowfocus, чтобы сначала отобразилось окно Steam, и уже затем выполнялись следующие команды.
steam_window=48234551 ; xdotool windowactivate $steam_window windowfocus $steam_window sleep 0.5 mousemove 210 105 click 1 mousemove 210 160 sleep 0.1 click 1 sleep 0.1 key Return sleep 0.1 key Return
Чтобы получить идентификатор активного окна, вы можете использовать команду getactivewindow (если окно Steam будет активно через секунду после выполнения команды xdotool sleep 1 getactivewindow, то в консоли отобразится его идентификатор). Кроме того, для команды getmouselocation (см. выше) также указывается идентификатор окна, над которым находится курсор.
Теперь давайте попробуем написать небольшой скрипт, который читает файл с ключами и поочерёдно их активирует.
Скрипт можно назвать, например, activate_steam_keys.sh.
Разрешаем для файла выполнение и запускаем скрипт. При этом передаём скрипту аргумент — имя файла с ключами.
chmod +x activate_steam_keys.sh
./activate_steam_keys.sh steam_keys.txt
А дальше просто смотрим на экран и наслаждаемся процессом. Всё-таки хорошая идея была взять тот каменный топор.
Источник
Automate mouse clicks anywhere on Windows, Mac and Linux
Have you ever faced a situation wherein you needed to click on multiple buttons at the same time? Maybe you wanted to click on a button exactly at a specific time and don’t want to miss it (for example, booking an appointment during rush hour). In these situations, we often need a tool that could automate mouse click actions without human intervention.

Auto Mouse Click is a mouse click automation software for PCs and Macs which allows you to pre-configure the position, timing and type of mouse clicks and perform them in sequence. It is a handy utility for skipping the tedious effort of sitting in front of the computer screen and clicking the same buttons repeatedly, or if even if you want to click multiple buttons in quick succession.
Auto Mouse Click is available for Windows, Mac and Linux systems. Description and how-to guides for using the tools have been provided in the respective links.
If you want to use mouse automation on dual monitors or on a single high resolution screen, you may also try another software called Auto Mouse Clicker, which is similar to Auto Mouse Click, built for bigger screens.
All the automation utilities mentioned above are available on free-to-try basis.
Auto Mouse Click may be helpful in the following scenarios:
- Click on multiple elements (buttons, links, etc.) at the same time
- Click on a particular button repeatedly for specific number of times
- Schedule mouse click at specific position at specific time
- Perform specific mouse action (left click, right click, etc.) at specific time
Book multiple Passport appointments (Example)
It’s often difficult to get passport appointments from the Passport website during rush hours; especially if you are trying to get multiple appointments (for you and your family members) on the same day. Limited number of appointment slots open up for a limited amount of time, and a lot of candidates compete for these slots. Even if you do manage to get an appointment for yourself, getting a second appointment on the same day is infeasible.
With Auto Mouse Click, submitting multiple passport applications becomes really easy.
- Download and install Auto Mouse Click for Windows, Mac or Linux.
- Create the respective user accounts for your family members on the Passport website.
- Log in to each of the accounts in separate browser windows.
- Fill up the application forms for the different candidate in each of the browser windows, logged in with different user credentials. This is because, only one session may be allowed per user as a security measure.
- Complete all the steps for all the members prior to the final Submit button.
- Now, arrange the browser windows on the screen in such a way that neither of them overlap.
- Scroll to the position where the Submit button is visible in each of the browser windows.
- Launch the Auto Mouse Click utility and Pick the mouse click positions of all the Submit buttons on screen.
- Setup Auto Click to double-click on the Submit buttons, and schedule it to run at an appropriate time.
Now sit back and relax as all your appointments are booked successfully.
Note: The steps may slightly differ based on the particular situation, but the application of the utility should be fairly similar.
The above use case is just an example of the application of Auto Mouse Click. The potential of what this tool can help you achieve, is only bounded by your own imagination. Let us know about your opinion on this handy utility in the comments below.
Disclaimer: This article is meant for educational purposes alone, and is not intended to promote any kind of illegal activities. 7labs may not be held responsible for the misuse of any information provided in this article.
Источник
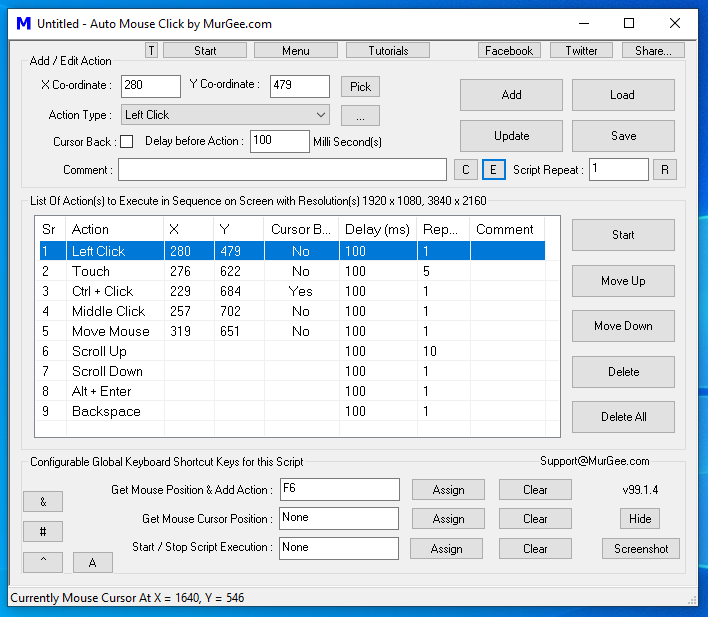
Auto Mouse Click
Automate Mouse clicks with Auto Mouse Click Utility. Define Click Type, X Co-ordinates, Y-Co-ordinate and specify whether to return mouse cursor back to original location and automate mouse clicks. Download and try Auto Mouse Click for free. The Auto Mouse Click Utility allows to group Mouse Clicks (let’s call the group as Mouse Click Script) and Save them in a File for later use. The Mouse Click Script can be loaded to run at a later time.
You can also watch a Video for Automating Mouse Clicks at the bottom of this page. The Small video displays all the steps outlined below.
You can Unlock Trial of Auto Mouse Click Software Utility by paying USD 9.87 on 1 Windows Computer for usage of upto 3 Months from the Date of Payment of Activation Fees, once the Free Software Trial Ends.
How to Auto Mouse Click
Given below steps outline how to automatically initiate mouse clicks. The procedure to auto mouse click has been divided into 3 Steps.
You can also save mouse clicks in a file and then run the mouse clicks automatically by double clicking on the Mouse Clicks (.mamc) file or schedule mouse clicks to run at a specified time using task scheduler.
Step 1 : Download Auto Mouse Click
Download and launch Auto Mouse Click Software Utility. During installation of Auto Mouse Click Software utility, you can opt the create a Desktop Shortcut or you can launch the software utility from the Programs Menu.
Step 2 : Configure HotKey to get Mouse Cursor Position
Given below steps outline, how you can get mouse cursor position automatically by pressing a configurable Hot Key. In case you do know the X and Y co-ordinates, you can also fill them in the Main Window of Auto Mouse Click Software Utility.
- Look at the bottom of the Software Utility, where it reads Other Settings, here notice the Hot Key to get Mouse Position.
- Press any Key here to get the Mouse Cursor Position, Let’s say F6 and click on the button labelled Assign.
- Now test the new hot key to get the mouse cursor position. Just move mouse cursor anywhere on the screen and press the hotkey.
- Whenever you press the HotKey configured above, the current mouse cursor location will be prefillded in X Co-Ordinate and Y-Co-ordinate edit boxes at the top of the Mouse Click Utility.
- Now you have a HotKey with which you can automatically read Mouse Cursor Position (X Co-ordinates and Y Co-ordinates).
Step 3 : Automate Mouse Clicks
Given below steps outline, how you can automate mouse clicks with the software utility presented here. The Rest of the steps require you to specify where to click mouse, define mouse click type, delay, whether to return mouse cursor to it’s original location, etc.
Once you are done specifying the mouse clicks, you can start automating mouse clicks by pressing the button labelled Start and you can stop the mouse click automation by pressing the button labelled Stop. The edit box labelled Repeat Count allows you to specify, how many times the complete mouse click script should be run.
Let’s start by specifying the Mouse Clicks to automate. You can also Save the Mouse Clicks in a file to run them at a later time. The Repeat Count value specifies how many times all the mouse clicks should be run, Repeat Count of 0 says keep on running mouse clicks infinite time, any other value will specify how many time the mouse clicks should be run.
- Once you do have desired X and Y Co-ordinates on Computer Screen, you now can automate mouse click (left button single click, right button single click, and double clicks).
- Select the Click Type (Left Click, Right Click, etc) from the Combo near label Click Type .
- In case you do want Mouse Cursor to return back to original location after clicking on the specified X and Y Co-ordinates, please do check the checkbox labelled Cursor back .
- In case you do leave the Check Box Cursor Back unchecked, then during automation of mouse clicks, the mouse cursor will be moved to the specified X and Y Co-ordinates, the mouse click will be initiated and the mouse cursor will be left at the click location.
- The edit box labelled Delay before Click allows you to specify delay in Seconds for a given Mouse Click.
- Once you are done specifying the Mouse Click, Click on the button labelled Add.
- After following steps above, now you can test your newly added Mouse Click by pressing the Start Button. Please use the Stop button to stop automating the mouse click or close the Software Utility to stop automating Mouse Clicks.
- By following steps outlined above, you can add more Mouse Clicks and you can also save Mouse Clicks in a file for later use.
- Editing already added Mouse Click can be done by clicking on the List of Mouse Clicks, Specifying new values and clicking on the button labelled Update.
Schedule Automatic Mouse Clicks
In Order to run Auto Mouse Clicks at a specified date / time, you would need 2 things. The First one is save the Mouse Clicks in a File by pressing Save Clicks and the second thing you would need is a Scheduler. You can also double click on the Mouse Clicks file (.amk) to run the Mouse Clicks automatically.
Auto Mouse Click in Action
Watch Auto Mouse Click utility in action here in this video. The video presents how to automate mouse clicks easily. Specify X and Y co-ordinates, define the mouse click type (whether to simulate left button click, right button click or to simulate single or double mouse clicks) and specify the delay in seconds. Add as many mouse clicks as you want to be automated and click on start button to start automating mouse clicks. Download and Auto Mouse Click and try it yourself whether it can be of use to you or read our small guide to auto mouse click before downloading the software utility.
Double click on the video to view how to auto click mouse to repeat tasks in full screen mode.
Register Auto Mouse Click
At the end of trial period of the Auto Mouse Click Software utility, a pop up window will appear asking you whether you wish to register the software utility ?. Click on Yes and follow on screen prompts.
Contact Us
Do you see any feature missing in the Auto Mouse Click Utility? Drop us an email at support@MurGee.com and we will try our best to implement the feature.
Another Mouse Cursor Automation Software Program named Auto Clicker offers easy to use and hot key controllable mouse clicker. Visit MurGee Home for More Auto Mouse, and more Software Downloads.
Источник


